To solve the lack of space, we use various tricks. In particular, multifunctional furniture serves this purpose. In this article we will look at how to make a transforming table with your own hands . The task, frankly, is not the easiest, but we managed to find some interesting options.
You might be interested in picnic tables; this is probably the easiest thing to do yourself. Also presented are several transformable coffee tables, a dining table, a computer table, a transformable bed table and even a stepladder. In general, if you want to save space, you can always come up with something.
What is needed for assembly
In order to assemble a coffee-dining table, you need to prepare everything for this work. Initially, obtain all the necessary parts and tools. This will help you not to be distracted during the assembly process, but to completely immerse yourself in the work and do everything quickly and efficiently.
Assembling the table is a simple procedure.
For such work you will need:
- a Phillips screwdriver or a screwdriver with all the necessary attachments;
- furniture hammer (other models may be too powerful and large and break the part due to awkward movement);
- a set of necessary fasteners (as a rule, they come as a complete set along with the purchased parts for assembling a transformer coffee table.
Use professional tools to assemble furniture.
The modern furniture market offers many different models, but most manufacturers offer disassembled tables that are assembled according to a standard design.
Frame
First you should start working on the body of the product. After which subsequent parts can be safely attached to the base. The details of the legs of the future table are prepared and all the elements are connected one by one.
Table legs can be made of metal.
The output should be four corner legs. The leg itself consists of two elements, which are attached to each other using screws provided for this purpose. They can also be called eccentrics.
Prepare all the parts to assemble the table.
The elements of the body side frames are connected using exactly the same principle. After completing this stage, a person receives four legs and a square or rectangular base body (it all depends on the model of the purchased table).
The table top is easily attached to the table legs.
Once these elements are ready, they need to be connected to each other. The legs are screwed to the body according to the instructions and at the end we get a part of the table to which the transformer mechanism can already be attached. It will perform the conversion functions.
The mechanism of the transforming table may be different.
Note! If you look closely at the details of the legs and drawers, you can see that in addition to the holes for connecting each element of the leg and drawer with each other, there are other “holes”. They are entrusted with another function: installation of the lift, as well as the tie of the entire structure, ensuring maximum tightness of the connection and possible loosening in the future as the product is used in its different variations. After the assembly of these elements is completed, you need to make sure that the special holes match each other.
The tabletop can be of any shape.
Then you can proceed to the plastic thrust bearings; they must be pressed to the bottom of the legs. Special shock absorbers are installed on the upper part of these elements. They will perform the function of softening the impact of the tabletop during its transformation.
Mechanism
The next step will be the assembly and installation of the lifting mechanism.
The table can be laid out depending on the number of guests.
To put it into working condition, you need to:
- connect the spring with one side to a special hole inside the lifting mechanism;
- there is a groove on the opposite side, the spring is attached to it with the other side using a special pin;
- screwing the lifting mechanism to the drawers (initially you need to connect it with long elements, and then with short ones).
The folding mechanism will have to be purchased separately.
Additional Information! The legs, which are assigned the function of holding the inset tabletop, are located above those intended for the underframe.
Tabletop and underframes
After all the above work has been completed, you can safely proceed to the next stage - mounting and fastening the tabletop and underframe. This stage goes as follows. Using specially designated screws and using a screwdriver or screwdriver, the lower flap of the tabletop-book, as well as the underframe, is secured.
The tabletop is most often wooden.
These parts are screwed to special holder platforms. Then you should start installing shock absorbers on the outside of the underframe. With their help, when folding a full-fledged product into a magazine version, the tabletop will not receive serious impacts, which will contribute to:
- eliminating strong pops during transformations;
- preventing scratches, cracks, chips and other damage to the tabletop surface.
Table legs can be designer.
Then you need to fold the legs of the lift into a special box. It does this simply, just move from outside to inside, after which the legs will be in the right place. This will not affect the aesthetic appearance of the product in any way, because the lower part of the tabletop successfully masks everything.
Carefully assemble the table.
Then the second part is installed on top. When doing such work, it is necessary to ensure that the end holes that are intended for hidden hinges. The center-to-center distance between them should be approximately 14 millimeters. You need to insert the hinges into these holes and secure them as carefully as possible with screws.
Dining option or unfolded table.
Materials and tools
For one small portable wooden table you will need:
- Approximately 1-1/2 inch wood board for table top. You can also use a thicker board or sheet of plywood. It all depends on the expected load on the table for which it is intended. It can be any wood: pine, cedar, oak, etc., the main thing is that it must lie long enough to dry. You can also use plastic as a tabletop.
- A thin piece of plywood for the rim of the table top or any other material that matches the type and method of processing with the table top.
- 20*45 block for making table legs. You can also use a metal tube or corner as legs.
- Wooden parts for support rails according to the selected table dimensions.
- Electric drill and drill set.
- Screwdrivers, wrenches (including socket wrenches).
- Saw (manual or electric).
- Brass hinges (long, garage type).
- A set of screws, nails and other fasteners that may be needed. In this case, be sure to take into account the conditions in which the table will be used: for outdoor use, galvanized metal products should be used.
- For finishing: sandpaper, paint or varnish, stain, brushes.
- Preparation of the drawing.
First, you need to “sketch” a drawing of the proposed table in order to decide in advance on its design and correctly calculate the dimensions. This table will have few details:
- tabletop (one, two or three parts);
- frame with stiffening ribs;
- legs.
It will be easier to keep to scale and change dimensions if necessary if you make such drawings on graph paper. You can download a copy of the sketch of the table model you like from the Internet. But since, despite all the efforts made by the authors of DIY sites, there is a possibility of errors in the dimensions of the drawing, it is worth making sure they are correct by checking the calculated values.
Return to contents
DIY transforming table
Dear visitors to the site “Visiting Samodelkin,” from the material presented by the author, you will learn how you can independently make a transforming table for a gazebo from a 30x80 mm board.
Author: Nikolai Shaduro, built a gazebo at his summer cottage and decided to place garden furniture in it, but it should be compact and not take up much space inside the gazebo. I started searching for drawings on the Internet, as usual, it’s very rare to find something useful, there are a lot of sites, but there’s little use. In general, from everything that I found useful on the Internet, I had to think out a lot and customize it, and make up my own. The author's table turned out great, which he decided to generously share with us.
I used different types of boards for the table: birch, pine, aspen, but it is best to take hard types of wood, such as birch, because the table and two benches are designed for 6 people, that is, the structure must withstand high loads.
The advantage of this table is that it compactly folds into a bench with a backrest and back into a table with two benches; it takes up little space when folded.
So, let's look at what exactly is needed to make a transforming table?
Materials
1. board 30x80 mm of different species (it is better to take birch boards) 2. metal corners 3. wood screws 4. wood glue or liquid nails 5. varnish 6. stain 7. M12 bolts 8. nut 9. washer 10. nails
Tools
1. hacksaw 2. screwdriver 3. drill 4. hammer 5. ruler 6. pencil 7. tape measure 8. protractor 9. angle 10. brush
Step-by-step instructions for creating a transforming table with your own hands.
As mentioned above, the author first built a gazebo on his summer cottage and decided to acquire garden furniture.
After a long search on the Internet for a suitable drawing, I got to work, first of all I drew templates for the legs directly on the floor, you can also use a sheet of plywood.
Next, he saws the boards according to size; the author used different types of wood: aspen, pine, birch, but it is best to use hard wood.
Please pay attention! There will be two benches, namely internal and external. First of all, the master makes an external bench; he showed us all the detailed dimensions directly in the photographs, which, mind you, is very convenient. The height of the legs is 440 mm, the width of the legs at the bottom is 400 mm - this is very good for the stability of the bench. Attention important point!
The length of the internal crossbar is 150 mm, we remind you once again
that the crossbar is located inside.
The length of the outer bench is 1380 mm; before direct assembly, all workpieces should be thoroughly sanded and be sure to chamfer so that the surface is smooth, even, as they say, “Without a hitch.”
The bench turns out to be simple, and the master makes the fastening using wood screws, wood glue and, for greater reliability, adds metal corners, since the structure must be extremely strong.
So, let's move on) Now you need to assemble
the Inner Bench
. Please note! The height of the legs on both benches should be strictly the same, but the crossbar that fastens the legs is moved outside and its length is accordingly increased to 400 mm, the length of the top bar is 350 mm where at a distance of 40 mm from the edge a hole is drilled for an M12 bolt and drilled out to recess the bolt head into cavity of the board so that nothing protrudes. The author indicated all the necessary dimensions directly in the photographs.
The length of the bench is 1440 mm, but in each individual case the dimensions may vary, because everyone makes it for themselves, but as a standard we use the dimensions presented by the master.
Holes are drilled in the top bar.
After both benches are ready, you need to try them on and one should fit into the other with a small gap (see photo)
That is, two benches when folded should create one whole.
This is exactly what should happen in the end.
We've sorted out the benches a little, now let's move on to considering the author's further actions, namely the manufacture of brackets from timber. The angle of connection of the two bars should be about 100-1050 (see photo) where beam “A” is responsible for the width of the tabletop, and beam “B” is the height from the top of the bench to the tabletop.
The author indicated all the necessary dimensions in the photographs.
A hole is drilled in timber “B” for an M12 bolt and drilled out to recess the head into the cavity of the wood.
After that, the resulting brackets should be connected to the inner bench; we place a washer at the connection point so that there is no mating.
The head of the bolt is recessed into the drilled hole.
The same is true on the opposite side.
In general, 2 brackets are fixed in this way, which are responsible for the height and width of the tabletop.
Then you should align both brackets evenly.
And now the fun begins)) you need to connect the tabletop with the outer bench, this is done using a straight strip, its dimensions are indicated in the photo.
These strips need to be made in 2 pieces, the author struggled for a long time to get the exact size during the fitting process, so in each individual case there may be errors. To begin with, the master drove nails along the edges of the planks and made a mark with them, that is, he drove a nail so that it stuck out a little on the other side and made a mark, and then drilled a hole for an M12 bolt
Everything must first be carefully adjusted, and then drilled calmly, as they say, “Measure twice, cut once.”
It is imperative to make a limiter on this bar so that your tabletop does not move apart; for example, the author’s one looks like this.
That is, when unfolded, it will fix the tabletop in a level position and will not allow further movement.
As you can see, everything is quite simple, a piece of board is cut at a certain angle and attached to the plank using 2 self-tapping screws.
For complete symmetry, everything is done the same on the second bar.
This is what actually results from the author’s work. This transforming table is compactly placed in the corner of the gazebo when folded.
Actually, what happens is that the tabletop turns into a backrest, and two benches are connected into a single whole by inserting into each other.
And if you need to set the table and arrange a “Feast on the Mountain,” simply pull the bench and the table unfolds.
Voila)) and everything is ready.
The undeniable advantage of a transforming table is, of course, its compactness.
The author advises using hardwood, for example birch, to make the table. This design is designed for 6 people when unfolded, so everything should be extremely reliable. The joints are additionally reinforced with metal corners.
Of course, making such a wonderful table is quite difficult, but you are presented with all the necessary dimensions and description, which the author did not have and he collected information all over the Internet. So let's take it and do it) Go for it, friends!
This concludes the article. Thank you all very much for your attention! Come visit often and don't miss out on new items in the world of homemade products!
Source
Become the author of the site, publish your own articles, descriptions of homemade products and pay for the text. Read more here.
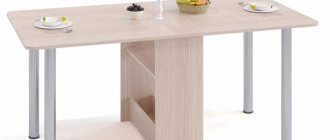
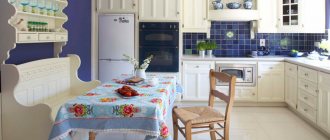
Round shape saves space in cramped kitchens
What could be more pleasant than drinking tea at a round table covered with a beautiful tablecloth with the whole family. This ritual charges you with positive emotions for the whole day.
A round extendable table looks most advantageous in the kitchen, where the whole family can dine at it, and if necessary, you can host a large dinner. To do this, simply unfold it with a slight movement of the hand, and all the guests will fit.
A transformable dining table can also stand in the living room and serve as a work area or a place to prepare for lessons. In any case, if necessary, it can be assembled quickly and conveniently.
Transformer tables for the kitchen are visually no different from others. The only thing is that they have additional parts that move apart or recline. Sliding parts, as a rule, are hidden inside the table, and those that recline are visible, but they do not spoil the picture. For example, the main part of a round table can be rectangular in shape and stand under the window, and its wings are lowered down. This saves a lot of space.
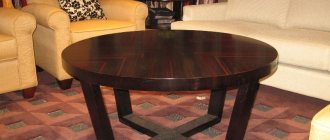
Often, after adding a folding part, a round extendable table takes on an oval shape and takes on an impressive size. Then it is best to place it in the living room to accommodate all the guests.
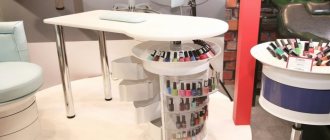
Round tables can be small in size, and then their main purpose is to stand in the living room so that cups of coffee can be placed on it, magazines, photographs of household members and other memorable items can be laid out.
It doesn’t necessarily have to have impressive dimensions - a compact transformable table can also stand in the living room. Magazine, lunch or work - it can perform different functions. It is important that it fits into the environment and saves space.
Materials
I bought all the necessary materials at a construction supermarket. I had some in stock. The list of all materials turned out like this:
- edged pine board 4100 x 400 x 25 mm;
- screws 20 mm – 40 pcs.;
- screws 50 mm, 70 mm – 10 pcs.;
- metal corners 40 x 40 mm – 4 pcs.;
- stain 0.5 l.;
- furniture varnish PF 170 – 0.5 l.;
- wood glue “Stolyar” - 125 g;
- wooden dowels 30 mm - 24 pcs.;
- round self-adhesives – 8 pcs.;
- piano hinge 400 mm – 4 pcs.
Preparatory work
Before you start making the table, you need to create its layout. This can be done using special programs if you want to make a table of an original model. If the table has a fairly simple design, which, apart from 4 legs and a tabletop, does not include anything, then you can sketch out a schematic drawing of the table on paper. This is necessary to determine the features of the table model and its parameters.
Related article: How to properly lay tiles in the bathroom?
As a rule, the instructions for the mechanism contain recommendations regarding the size of the future table. Guided by them, you can do without drawing up a layout or design drawing. When all the parameters of the table are known, you need to cut the material. That is, prepare patterns for future individual table parts.
You can choose the material for making the table taking into account your own taste preferences. The transforming table can be made of chipboard, fiberboard and other things. You need to pay attention to the thickness of the material so that it can withstand the weight of the entire structure, mechanism and objects located on the table. As a rule, a thickness of 22 mm is sufficient.
Assembly diagram of the transforming table.
When the material has been selected and purchased, you can proceed to sawing it. A hacksaw or jigsaw is suitable for this. You can make your task easier and order cutting of parts in a carpentry workshop, but doing this work yourself should not be too difficult even for novice craftsmen.
When the parts are ready, you need to check whether they correspond to the required dimensions and fit together. A total of 14 parts must be prepared:
- 4 for the frame;
- 8 for legs;
- 2 for table top;
- 1 small board to support the tabletop when unfolded.
Extensible table materials
The range of transformable tables and the materials used for their manufacture is quite extensive.
- The most budget ones are made of plastic . Main advantages: low price, high mobility, ease of maintenance.
- The most popular ones are made from chipboard or MDF . Main advantages: attractive appearance, affordable cost, high degree of reliability;
- Glass models . Lightness, presentability, strength;
- Natural wood. The noble appearance of an oak tabletop means status, unconditional strength and a fairly high price.
The presence of holes on poorly processed edges can lead to swelling of the tabletop after some time.
Glass (glass transformers)
Glass countertops, initially viewed with caution, are gaining more and more popularity. Tempered, especially strong glass can withstand significant loads and heavy weight. Has anti-shock properties.
It’s still not worth testing glass for strength by inflicting blows of superhuman force. Even wood cannot withstand such loads. You will need the table intact.
The shape of the countertops can be different: oval, round, square, rectangular. It may change during transformation. The support parts are made of metal or wood. Such designs greatly decorate the kitchen, giving it an airy feel. They can be decorated with a film of a pleasant shade.
The main advantages include ease of maintenance, environmental friendliness, visual appeal, and reliability.
Watch the video instructions on how to make a transformable table with your own hands
If you manage to break the table, you don’t have to worry about wounds or cuts. Thanks to the technology used, the tabletop in this case is crushed into non-sharp tiny elements.
Wooden set
Wooden tables are the most durable, environmentally friendly and durable option. They look decent and appropriate in any interior - not only in the kitchen, but also in the living room. The main thing you should pay attention to is the reliability of the mechanism and the quality of the wood. You can pair them with folding chairs with a wooden back. Find out how to choose kitchen tables and chairs for a small kitchen here.
Metal for the kitchen
Such models, often combined with wooden elements, are purchased mainly for use in the country house, park, or gazebo. Their versatility allows them to be used not only for their intended purpose, but also for cooking grilled foods over an open flame. A very good option for picnics, guaranteeing not only comfort, but a spectacular spectacle in the dark. Compact when folded. Find out how to transform an ordinary table by decorating it with ceramic tiles in this material.
Plastic
Lightweight, easy-to-care products made from decorative plastic also have their fans. The elements of the retractable mechanism are usually made of metal, which guarantees the reliability of the structure. Basically, such models of tables and plastic chairs are used in country houses.
Cost of materials
- edged pine board 0.04 m 3 x 4200 rub. = 170 rub.;
- screws 2 cm – 40 pcs. in stock;
- screws 50 mm, 70 mm – 10 pcs. in stock;
- metal corners 4 x 4 cm – 4 pcs. x 2.5 rub. = 10 rub.;
- stain 0.5 l. = 100 rub.;
- furniture varnish PF 170 – 0.5 l. = 50 rub.;
- wood glue “Stolyar” - 125 g = 70 rubles;
- wooden dowels 30 mm - 24 pcs. in stock;
- round self-adhesives – 8 pcs. in stock;
- piano hinge – 400 mm – 4 pcs. = 4 x 44 rub. = 176 rub.
Total: 576 rub.
Final finishing and decoration
To give the finished product originality and make it unique, final finishing is needed. There are many ways to decorate. When choosing, it is important to consider the overall style of the interior. Homemade transformable tables should fit harmoniously into the space. What finishing options can be used:
- Artificial aging of a product. This is a fashionable design technique that suits different styles. The surface, previously painted with gold or silver paint, is varnished, and then sandpaper is passed over it.
- Varnish coating. You can buy a special varnish in the store, which when dried gives a cracking effect. The product with it looks like expensive antique furniture. You can add confiture or sparkles to it, then the table will be even more beautiful.
- Marine theme. If after rest there are various pebbles and shells left, they can be used for decoration. They are perfect for decorating a table top, legs or just the sides of a product. You can glue them in any order or create a composition.
- Stencils. They will help you draw any drawings or patterns on the surface. Ready-made store-bought ones or home-made ones will do.
- Mosaic. You can make a beautiful composition from fragments of multi-colored glass and mirrors by gluing them to the surface. Such a table will be unusual and original.
How to make a kitchen table with your own hands from wood or wood boards
After reading the information on how to make a transformer table with your own hands, it becomes clear that this is a simple process. If you take the task responsibly, prepare and complete all the necessary steps, then within a few hours you can get a wonderful multifunctional piece of furniture, and use the saved money to invite guests to try it out.
Artificial aging
Varnish coating
Marine theme
Stencils
Mosaic
Original and simple coffee tables
With unlimited imagination, you can make very beautiful and original tables. For example, from wooden boxes! By connecting four drawers in a circle with ordinary nails, installing them on a sheet of plywood with wheels and painting them, you can radically transform the interior.
For such a coffee table, 4 pieces of 45 cm each and 26 pieces of 15 cm each were required. An excellent solution for a high-tech interior.
A simple way to make a beautiful wooden coffee table is explained in detail in the video:
A transformable coffee table is an excellent solution for small apartments that have little space for a variety of pieces of furniture. This table folds and unfolds depending on the needs of the owners. When folded it is a small coffee table, and when unfolded it is a table for guests. This design makes the table multifunctional and practical.
Drawing of a transforming table.
Even a person who has never made furniture before can make a transforming table with their own hands. All you need is desire and patience.