When modern apartments are renovated, two rooms are often combined to expand the space. Among other questions, a dilemma arises about how to decorate the ceiling in the kitchen-living room in order to emphasize the features of the room and not overdo it. It all depends on the goal, budget and interior design.
The ceiling covering in the kitchen-living room should look attractive, be practical and durable
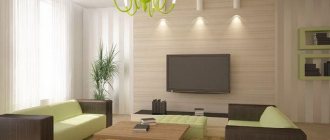
Ceiling design options in the kitchen-living room (photo selection)
If the owners decide to combine two different spaces, then they need to decide whether they will be one whole or should complement each other. This is fundamentally important, since with this decision we begin to think through the concept - one or two stylistics.
The design of the ceiling carries an important emotional load in the interior of the kitchen-living room
In the context of the design of the entire room, the design of the ceiling is also thought out, and the following factors should be taken into account:
- Dimensions. If the room is low and has a small area, then you should not choose a two-level option for finishing the upper surface; it hides excess space. It is not recommended to choose too dark tones. And in very spacious rooms you can use stucco to emphasize and create a somewhat pretentious atmosphere.
For a small room, suspended structures are contraindicated, but a ceiling with an illuminated niche will create the illusion of a high ceiling - Lighting. The kitchen area needs more light and preferably with LED lamps. The living area usually requires more comfort and dim lighting; solutions of variability are usually adopted.
- Invoices. Various materials on the ceiling in the kitchen-living room in interior design often look impressive and speak of an individual approach to design.
Polystyrene panels are a budget-friendly and very effective way to create a variety of textures on the ceiling surface
The style of one part of the room cannot be radically different; they must be consistent, even if the contrast method is used.
DIY plasterboard ceiling in the kitchen
Regardless of the characteristics of the room, only moisture-resistant green plasterboard sheets and galvanized UD and CD metal profiles are used to assemble a plasterboard suspended ceiling.
No wooden sheathing or conventional gypsum boards. All elements of the ceiling structure must be moisture resistant, since the kitchen has always been and remains the largest producer of water vapor and condensation.
Marking the future suspended structure
- It is necessary to begin work by applying marking lines for installing a load-bearing metal profile on the walls and ceiling surface. It is best to rent a dual-beam laser level for these purposes.
- We fix the device on the wall, turn it on and adjust it, use a ruler or tape measure to measure the distance from the horizontal laser beam to the ceiling.
- At the lowest point of the ceiling surface, the distance from the laser beam to the ceiling should be at least 4 cm, so we adjust and lower the marking line issued by the laser to keep it at least 5-6 cm. After the final adjustment along the laser line, you need to pull the painting cord or duplicate the horizontal markings with a simple pencil.
For your information! In any kitchen or other living space, the ceilings always lie crookedly, with a slope and a height difference on the walls of up to 5-6 cm.
- After applying horizontal markings on the walls, it is necessary to draw the ceiling lines for installing the supporting profile of the CD suspension, in increments of 60-70 cm.
Installing a profile on the kitchen ceiling
- The first step is to install and secure the UD profile guides on the kitchen walls according to the horizontal markings. To do this, we drill holes in the wall and profile in increments of 30 cm, hammer in the plugs and tighten the mounting screws.
- To install the galvanized CD profile, we mark the installation points of the U-shaped strip on opposite walls of the kitchen. Each section of the CD profile is inserted inside and placed on the shelf of the UD frame. Before installing the crabs, the CD strips remain “hanging” in the air, supported only by the UD slats sewn to the kitchen walls.
- This design will clearly not withstand the weight of drywall, especially if the kitchen ceiling is two-level, with numerous inserts and cut-ins. Therefore, the next stage of assembling a structure made of sheet plasterboard will be the installation of “crabs”.
- Each “crab” is a short perforated strip, which is pulled behind the supporting profile and sewn to the kitchen ceiling. Next, the edges of the tape are bent and the CD profile is folded.
- Before attaching the edges of the ribbons under the profile, a marking cord is pulled between the opposite walls of the kitchen, along which the height of installation and fastening of the CD profile is adjusted.
Strengthening the suspension system and installing drywall
Two-level ceilings in the kitchen with additional boxes and decorative elements always require reinforcement of the suspension system in the places where the additional load is attached.
Despite its apparent lightness, drywall, which consists of 98% gypsum, has significant weight, so in the place where the boxes are installed, it is always necessary to attach additional spacers and mountings that increase the rigidity of the supporting frame.
Be sure to install jumpers and spacers in places where lamps or ventilation elements are installed.
- If the kitchen ceiling design includes additional suspended podiums or built-in niches, each element will need to cut out its own frame from a galvanized profile, which will subsequently be sheathed with pieces of plasterboard.
- To fasten curved figures, the hanging profile is retrofitted with a mounting rail with split edges. Every 4-5 cm, a cut is made in the horizontal flange of the profile, which allows you to bend the supporting profile exactly along the curved contour of the plasterboard sheet.
- The joint lines of plasterboard sheets are also reinforced. To prevent the seams between the kitchen ceiling cladding parts from cracking, both edges of the mating sheets must be attached to the backing CD profile.
- The main part of the drywall is attached to the kitchen ceiling using self-tapping screws. In places where there is a transition from the upper level to the lower level, the material can be glued with acrylic glue, for example, “Moment” or “Liquid Nails”.
Finishing operations for assembling the ceiling in the kitchen
- After laying the drywall, in order to relieve tension in the ceiling cladding, first of all, cut the seams at the transition points. After this, all joints are cleaned, primed and sealed with gypsum putty.
- Next, the lower level of the ceiling is assembled in a similar way, all transition points to the upper level are glued with mesh and sealed with putty. At the end of the work, the hanging decor is primed and painted with acrylic enamel.
Modern ceiling design
Often, architects deliberately create a layout with a combined kitchen to increase demand. This is a fashionable trend; many owners appreciate the advantages of this option. But figuring out how to make a ceiling is a task that people with innate good taste and professional designers can do. After all, more than one question is posed here:
- make the ceilings in the living room combined with the kitchen competently by modern standards;
- choose a single style or two;
- whether to divide the surface by structure, color.
One of the goals of modern ceiling design is to create comfort. If the owner feels good in such an atmosphere, the eye does not “stumble” on anything, this is one of the indicators of a successful project.
When choosing a design, it is not at all necessary to strictly follow one style direction. It’s better to take a couple of your favorites and select from them what you like
Necessary Requirements
The ceiling in the kitchen is made of a variety of materials. However, one should sensibly evaluate the financial capabilities, the requirements for the operation of a particular material, and the frequency of cooking. Culinary processing is accompanied by strong changes in temperature and humidity, the appearance of steam, evaporation of fat, soot, and the action of color pigments. In addition, it should be taken into account that these factors will affect not only the area of the work area, but also the decoration of the living room.
Materials for ceiling decoration must meet the following mandatory requirements:
- resistance to moisture - both water and evaporation. Otherwise, repairs, and the entire combined kitchen-dining room will have to be carried out much more often;
- resistance to pollution. Even with a powerful hood, it is impossible to completely protect the walls and ceiling from splashes of grease, water, food particles, and the like. Accordingly, finishing materials should be low-porous and not prone to absorption;
- ease of cleaning – the dirt-repellent effect alone will not ensure cleanliness. Finishing materials should easily tolerate cleaning with warm and hot water, household chemicals, and, if necessary, using abrasive materials;
- One of the very useful properties of kitchen materials is the ability not to absorb odors . When combining the kitchen and living room, the recommendation turns into a mandatory requirement;
- repairability - the ceiling above the kitchen area will in any case require repairs earlier than the ceiling in the living room. Accordingly, it should be designed in such a way that, if necessary, repairs can be carried out only in certain areas.
Quite a few materials meet these requirements. In practice, the choice takes into account only the most important factors, as well as the financial capabilities of the home owner.
Options for finishing ceilings in the kitchen-living room
With ceilings in the living room combined with the kitchen (see photo), it is important not to make a mistake, otherwise the miscalculation will be double the size. Careful selection of materials is important so that the finishing emphasizes the advantages and decorates the room.
Textured wallpaper will hide minor defects in the ceiling covering
Tensioners
Stretch ceilings are a popular option with many variations of colors, shapes and structures. It is installed either as a single canvas over the entire space, or they try to combine it with drywall or other variations. Sometimes two different tension panels are used, harmoniously combined, but selected for a specific zone in space.
The stretch fabric can be matte or glossy, plain or patterned
From plasterboard
Beautiful lines are often created from this material and spot lighting is used to enhance the effect. This applies to the two-level option, but one layer is also used, especially if the surface of the original ceiling turned out to be problematic. Only in the case of very low walls should you carefully select such a finish.
You can make anything from plasterboard, in accordance with the design ideas of the owners of the kitchen-living room
Combination of plasterboard with suspended ceiling
This combination is especially popular among owners who want to make their kitchen-living room special and memorable. This ceiling option looks impressive when it creates the illusion of a floating element in the middle of the ceiling. You can use canvas with or without gloss, any pattern or structure.
Stylish combination of white plasterboard structures with mirror inserts made of stretched fabric
From other materials
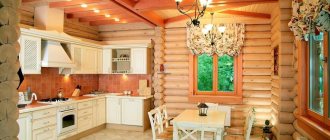
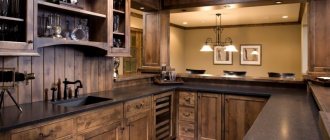
Lovers of a loft or farm theme will like wooden coverings. It can be a ceiling design in the kitchen-living room as a decor on a putty surface or completely made of boards. Also, sometimes this surface is covered with wallpaper in the same color as the walls or another color.
Natural wood or its imitation is perfect for decorating the ceiling of a kitchen-living room in a modern style
Painting as an option for finishing the ceiling
One of the budget options is painting; it looks good if the surface itself is perfectly flat. Then you can choose an interesting shade and come up with a painting. Sometimes the ceiling is painted snow-white, and around the place where the chandelier should be, an image is drawn with thin gold lines and other techniques.
Painted ceilings are easy to clean from dust, but stains can only be removed by repainting.
Living room plus kitchen: pros and cons
Quite often, such a solution is considered possible and successful when the kitchen and living room area is small. In practice, such aspirations are justified only in the case when the kitchen is rather nominal in nature and is reduced to a sink, microwave, refrigerator and coffee maker. In other cases, kitchen equipment and furniture immediately occupy most of the space, turning the room into a very modest dining room-kitchen.
If there is sufficient space, then combining the living room and kitchen into a studio is quite justified. The advantages of this solution can be considered:
- a large space with several windows creates a feeling of spaciousness, even in cases where the interior is decorated in classical styles and involves a large amount of furniture;
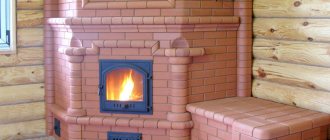
- the kitchen serves as a hearth or fireplace, which fully corresponds to the original classic purpose of the living room;
- the large area of the combined space, on the one hand, allows for more interesting design solutions, and on the other hand, allows you to effectively maintain the unity of style;
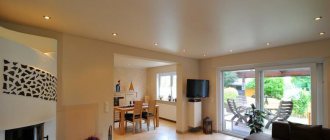
- integration allows you to solve the lighting problem much more effectively, without increasing the cost of the project. The ceiling in the living room and kitchen serves as the base for any kind of lamps and lighting;
- Very convenient for the housewife is the ability to quickly transfer dishes and remove dishes from the dining table. At the same time, people who dine retain the feeling of dining in the living room, in a beautiful hall, and not next to the stove.
The disadvantages of the solution are quite significant:
- Cooking is accompanied by evaporation of fat, water, the appearance of soot, solid hot particles, many odors, an increase in temperature and humidity. All this is unacceptable in the living room, and therefore the kitchen combined with the living room must be equipped with powerful ventilation and exhaust hood, and preferably an air purification system;
- cooking is accompanied by sounds. This problem is not being solved. The maximum that can be done is to use the most silent technology possible;
- Cleaning the kitchen should be done much more often: a dirty work table looks more than unsightly in the living room.
Types of ceilings for the kitchen-living room
To combine, but leave the individuality of each zone, you can make everything out of plasterboard, but there will be one level on one side and two on the other.
- Single-level. A single-level ceiling allows you to avoid unnecessary issues with problematic original ceilings. It is easy to install, quite durable and looks neat. Plus, it is not difficult to fix if damage occurs.
A single-color ceiling on one level leaves the kitchen-living room space as it really is - Multi-level. They give you the opportunity to “play” with lines, color and lighting. But there is one disadvantage, noticeable only in some cases, they reduce the height of the walls. But in most cases, such installation is a way to make your room stylish, thoughtful and comfortable.
By placing surfaces at different levels, you can achieve the effect of expanding the space and increasing the height of the ceiling
Plasterboard ceiling with lighting in the kitchen
To a large extent, the expressiveness of a kitchen interior depends on the correct placement of lamps, their type and the number of lighting points. Traditionally, three types of lighting are used for plasterboard suspended ceilings.
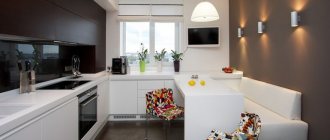
The most common lighting option is the distribution of spotlights on the lower tier pendants. This type of lamp creates uniform background lighting throughout the kitchen.
A more modern version of the backlight is based on two and three-color LED strips.
Tapes laid in the upper tier of a plasterboard suspended ceiling provide soft diffused light; if necessary, you can change the color and saturation of the lighting, thereby enhancing the color background of the kitchen interior.
The third type of backlight is used for local lighting. This could be the front door to the kitchen, the dining table, or an additional cutting table near the countertop.
How to zone a space using ceilings in the kitchen-living room: interesting ideas (selection of photos)
A suspended ceiling is often used for precisely this purpose; it can play a role in zoning. Considering that many owners prefer a two-level ceiling, this can be done with the help of lighting, creating the effect of a floating element in the middle.
With the help of spectacular lighting of the ceiling structure, you can highlight the dining area of the kitchen-living room
Also, zoning using the ceiling is performed:
- using different textures;
- creating different levels - two or more;
- They use more than one material, etc.
The bright red color of the plasterboard structure acts both as an accent and as a space divider
Combining 2 or more finishes can have a positive effect on the overall interior, but it is important not to overdo it with colors.
Ceiling with a pattern
If you decide to choose a stretch ceiling with a pattern for your kitchen, please look at the photo at the beginning. It really makes an impression!
What designs are suitable for the kitchen space? The most popular images are the sky with clouds, fruits and berries, and plant motifs. There are a variety of colors to suit your taste. Since this room is intended for preparing food, and often eating it, let's remember the effect of color on appetite.
What colors increase your appetite? Orange, yellow, red. Images of fruits or berries, coffee, chocolate will fit perfectly. Blue, violet, blue reduce appetite, so if your goal is not to overeat, a photo of blueberries may be suitable for you.
When choosing a two-level stretch ceiling for a kitchen with a pattern, pay attention so that the image does not disharmonize with other interior elements or enter into a color conflict. There is no need to overload the kitchen with accents; harmony and beauty are our motto!
Pros and cons of suspended ceilings
The advantages of suspended ceilings quantitatively outweigh the disadvantages; they include the following:
- Long term.
- They are safe and environmentally friendly.
- Saves from dampness.
- They have average prices.
- It is easy to care for.
- Big choice.
- They hide engineering structures if they run along the ceiling.
The main advantage of a stretch ceiling is its resistance to leaks and humidity fluctuations
At the same time, there are disadvantages to this option:
- Although it can be quickly installed, it is difficult to do on your own.
- The seams, especially if not done by a professional, may be too noticeable.
- The smell lasts for several days, then becomes less noticeable and disappears completely.
The tension fabric is quite easy to damage with a sharp object.
If there are allergy sufferers in the house, you will also have to carefully study the composition of the material used for suspended ceilings.
Examples of ceiling shapes
The most commonly used ceiling forms.
In wave form
It is considered a fairly fashionable design solution that smoothes out the geometry of the room, noticeably refreshes the decor and gives it a brighter and more elegant appearance.
Rectangular
Thanks to clean lines, clear shapes and strict proportions, you can create a truly stylish and fashionable design, create the necessary accents in the interior that attract attention, and also achieve very interesting spatial effects.
The photo shows a kitchen with a two-level ceiling in the shape of a rectangle located above the bar counter.
Semicircle
The semicircle located above the table is a design basis that allows you to add unusual motifs to the space and at the same time unite and zone the room.
The photo shows the kitchen and a semicircular two-level ceiling structure above the dining area.
Angular
It brings slight irregularity, freedom, movement into the room and completely changes its symmetrical scheme, thereby making its design more complex and unusual.
The photo shows a classic kitchen and a corner two-level ceiling structure placed above the kitchen unit.
Color for decorating the ceiling in the kitchen-living room
The most common colors for ceilings are shades of white, followed by pastel options. Combinations with dark and black colors are considered a special style. But many owners decide to make bright decisions as an accent or addition to the interior.
A white ceiling is always relevant for small rooms
It should be remembered that each shade has its own effect on the psyche and mood of a person. Creating a specific and special atmosphere is the task of the designers. Choosing a boring palette can cause depression, and intrusive colors in large quantities can irritate and affect feelings of anxiety.
Sky blue panels combined with white beams create a pleasant nautical ambience
Too many dark solutions without proper lighting often become a bad option. And illiterately selected light shades carry a feeling of dullness and emptiness. Therefore, it is important to take into account the overall appearance of the room when determining the color of the ceiling.
Two-level ceiling design
The most popular ceiling design options.
With photo printing
A variety of original fantasy designs decorating the flat surface of the two-level ceiling bring new colors and unusual bright accents to the room.
With beam
Such a detail, original in texture and color, as decorative beams, is not only distinguished by its uniqueness and primitiveness, but also allows you to decorate the interior with any style solution.
With ledge
With the help of a protrusion located in a suitable place, for example, above a bar counter, kitchen unit or hood, you can create original visual effects in the space, add unusualness and expressiveness to the environment, and also turn planning imperfections into a unique interior feature.
Figured
A variety of two-stage radial and curvilinear shapes or geometric shapes, delighting with their aesthetic appearance, will add a dynamic effect to the room and create the illusion of some kind of movement.
Two-color
A two-tier design with a combination of different colors, for example, white-red, white-brown, white-gray or other shades, is a fairly effective way to zone the space, radically change the interior appearance and make it much more expressive and modern.
Ceiling lighting design in the kitchen-living room (photo selection)
The combination of two rooms leads to the desire to divide them into thematic spaces. This can also be done with ceiling lighting. For example, installing spot lighting elements around the perimeter will definitely fulfill its function. Shades of emanating light in one and the other part of the room can also help.
A pendant lamp above the table or in the center of the room provides general lighting for the kitchen-living room
Spotlights are used to illuminate functional areas in accordance with a pre-designed scheme
So, the ceiling in the kitchen-living room is an important part of the interior, capable of transforming the space or ruining it if lines, materials, and colors are used incorrectly. Before you settle on a specific choice, you should take into account all the nuances so as not to pay twice later.
Backlight methods
All lighting elements must be carefully thought out, since after the installation process it will be extremely difficult to remove or add anything. The play of light can not only add brightness to certain areas, but also set a certain atmosphere for the entire room.
The most optimal would be a combination of all types of lighting, divided into different switches. The backlight can be:
- point;
- central;
- contour.
In addition, elongated pendant lamps and small light bulbs can be used as decoration here.
Using pendant lights
Photos of ceilings in kitchens and living rooms
Kitchen combined with living room and tension structures in it
When choosing a suspended ceiling for such a room, first determine the following:
- room style;
- ceiling shape;
- design complexity;
- type of canvas (texture).
Complex ceiling structure
Advice. If the kitchen area is much smaller than the living room, use dark colors. However, you cannot make such a decision if it is larger than the living room. In such a situation, even well-chosen lighting will not be able to correct the failure.
After this, you can start creating the design. Buy only high-quality canvas. The ceiling itself can be glossy, satin or matte. With any choice, it is important to use light sources wisely. Modern and classic styles use decor using photos on the ceiling. The main thing to do is to achieve uniformity of the image. As an option, you can decorate the ceiling with frescoes and paintings.
An example of using a fresco on a ceiling canvas
A competent choice of the shape of the tensile structure hides flaws in the floor slab, power cables, ventilation shaft openings, poorly executed niches, bevels, and cracks in the slab.
A great idea is to decorate the ceiling with lighting located behind the canvas. If you use photo printing on film, you can create a real starry sky in your kitchen.
Starry sky design