Bathhouse projects
Number of projects 681
- 1 bathroom
Log bathhouse project BO-026
- To favorites
- 35² Total area
- 5 x 8m Building area
from 472,500 rub.
Construction time individually
- 1 room
- 1 bathroom
Project of a garden house-sauna “Comfi”
- To favorites
- 18.9² Total area
- 4 x 6m Building area
from RUR 255,149
Construction time individually
Log bathhouse project BO-004
- To favorites
- 20² Total area
- 5 x 4m Building area
from 270,000 rub.
Construction time individually
- 1 bathroom
Barrel sauna project Super-lux 2
- To favorites
- 12² Total area
- 6 x 2m Building area
from 168,000 rub.
Construction time individually
- 2 rooms
- 2 bathrooms
Bathhouse project BKm-4
- To favorites
- 65² Total area
- 6 x 8m Construction area
from 877,500 rub.
Construction time individually
- 2 rooms
- 2 bathrooms
Bani Alpha Project
- To favorites
- 78² Total area
- 8 x 7m Construction area
from 1,053,000 rub.
Construction time individually
Bathhouse project “Russian Steam”
- To favorites
- 36² Total area
- 6 x 6m Construction area
from RUB 420,968
Construction time individually
- 1 room
- 2 bathrooms
Bath project Travushka-ant
- To favorites
- 54.7² Total area
- 8 x 9m Construction area
from RUR 738,450
Construction time individually
- 2 rooms
Bathhouse Yakovlevskaya project
- To favorites
- 77² Total area
- 6 x 8m Construction area
from 700,000 rub.
Construction time individually
Mini bathhouse project No. 3
- To favorites
- 8.2² Total area
- 2 x 4m Building area
from 313,000 rub.
Construction time individually
- 1 room
Colibri Bath Project
- To favorites
- 17² Total area
- 5 x 4m Building area
from RUB 308,658
Construction time individually
- 1 room
- 1 bathroom
Bathhouse project at Kuzmich
- To favorites
- 106² Total area
- 11 x 11m Construction area
from 1,431,000 rub.
Construction time individually
- 2 rooms
- 1 bathroom
Project Baths made of timber AR-038
- To favorites
- 43² Total area
- 7 x 9m Construction area
from 580,500 rub.
Construction time individually
- 1 room
- 1 bathroom
Baths Mont Blanc project
- To favorites
- 53.3² Total area
- 10 x 5m Construction area
from 848,700 rub.
Construction time individually
Implemented project
- 1 room
- 2 bathrooms
Bathhouse project Wonderful moment
- To favorites
- 43² Total area
- 6 x 8m Construction area
from 810,000 rub.
Construction time individually
- 4 rooms
- 2 bathrooms
Project Baths Aquatoria
- To favorites
- 144² Total area
- 13 x 10m Construction area
from 3,250,000 rub.
Construction time individually
- 3 rooms
- 2 bathrooms
Bath Novara Project
- To favorites
- 128.85² Total area
- 8 x 11m Construction area
from RUR 1,739,475
Construction time individually
- 1 room
Sanduny Baths Project
- To favorites
- 17² Total area
- 4 x 6m Building area
from 320,000 rub.
Construction time individually
- 2 rooms
- 2 bathrooms
Bath Antoine project
- To favorites
- 115² Total area
- 11 x 7m Construction area
from 1,552,500 rub.
Construction time individually
- 1 room
- 1 bathroom
Bani Motiv Project
- To favorites
- 38.56² Total area
from 520,560 rub.
Construction time individually
View all projects
The bathhouse is considered an original Russian invention, with its roots going deep into the past. The Russian bathhouse was used to cleanse the body and soul, turning ordinary washing into a ceremony with its own traditions and rules. The bathhouse was an integral building of every Russian courtyard. Therefore, building a bathhouse in a dacha is part of tradition, and now when arranging a personal plot, the question more often arises of what kind of bathhouse to build rather than whether to build it at all.
The main attributes of a Russian bath are a stove and a stove bench Source mazorhomes.com
Russian bath: features of its action
The human body temperature does not exceed 40° because he sweats, due to which he releases excess heat into the surrounding air with the release of excess fluid. This is the basis of the operating principle of any type of bath. The differences are only in the ratio of temperature and humidity.
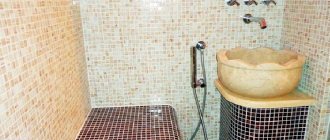
Hammam decorated with mosaics
In a Turkish bath (hammam), the humidity reaches 100%, and the temperature of the air, stone floor and benches does not exceed 40°. In a sauna (Finnish bath) this ratio is completely opposite. At 120° the humidity is only 40%.
A sauna can also be installed in an apartment
But the optimal combination of temperature and humidity for health (and there will be no negative consequences from such a procedure) can only be maintained in a Russian bathhouse, but only if it is properly designed and built.
A bathhouse cannot be called a cheap pleasure. If you order its construction on a turnkey basis, the amount may turn out to be unaffordable. With average prices for materials and specialist work, you will have to pay from 7 to 22 thousand dollars. You can build the simplest bathhouse yourself, saving significant money.
Construction of a Russian steam bath
Russian baths, as close as possible to traditional ones, are coming back into fashion. They have their own characteristics:
- the foundation is a boulder stone that does not require a plinth;
- the walls are logs, wild, debarked and dried, selectively chopped logs that have not undergone any other processing;
- assembly without metal parts such as nails or corners;
- caulking with natural materials such as tow and moss;
- insulation with natural materials, for example, peat or moss;
- waterproofing - natural resin;
- roof - shingles, turf or shingles;
- the stove must be made of stone;
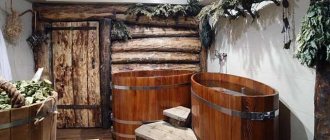
- font - barrel, pool (you can always run outside and plunge into a river, lake or rub yourself in the snow).
Traditional Russian steam bath built on boulders
All this creates a lot of unnecessary difficulties; the bathhouse itself is generally flammable and short-lived. But there is every opportunity to independently build a bathhouse with the same qualities, but much more practical and modern. It is recommended to make a sauna house not only with a steam room, but also with a washing room, where there is a font, a tub for dousing or a shower, and a dressing room.
A Russian traditional steam bath can consist of several rooms
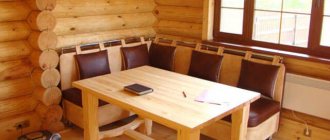
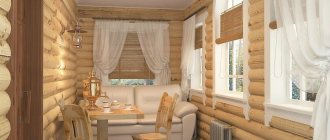
Waiting room
They undress in it, store towels, sheets, brooms and brooms, relax between visits to the steam room, and drink tea. This room serves as a barrier to cold air. There is a window there (for security reasons and for beauty).
A well-equipped dressing room can lift your spirits
Steam room
A heater with a water tank is installed in it, and beds or shelves for lying on are built. The oven provides uniform, strong heating and exposure to superheated steam without convective air mixing. The steam room may have a small window for ventilation, which will help avoid waterlogging (one or two ventilation holes can be made for the same purpose).
A steam room with beds can be equipped with one window
Washing
Heat enters this room from the back wall of the furnace. After visiting the steam room, you need to cool down in the font or shower, which removes waste and toxins from the body. At the same time, sweating does not stop, and due to high humidity it also intensifies. The washing machine's operating principle is similar to that of a hammam.
The washing area with a font and rinsing tubs is heated by the rear wall of the stove
Choosing a place to build a bathhouse
When choosing a place for a bathhouse, you must consider the following parameters:
- Mandatory - the placement of the bathhouse must comply with the approved norms and rules: SNiP 30-02-97, SNiP 2.08.01-89, SP 11-106-97. According to which it is necessary to take into account the distances from the bathhouse to other buildings, both on your own site and on neighboring ones.
- Optional – historical signs based on orientation relative to the cardinal directions. So the entrance to the bathhouse was made from the south side, and the windows from the southwest, so that in winter there would be less snow at the entrance, since the snowdrifts on the south side are always lower, and the light of the sun's rays at sunset pleased the eye for a long time during bath procedures.
For practical reasons, it is best to build a bathhouse on an elevated area to facilitate drainage of used water.
Operation and visiting rules
Before you go to the steam room, you need to prepare. It is better to refrain from drinking alcoholic beverages, which can have a bad effect on the heart. You need to remove outer clothing, contact lenses and jewelry. For normal sweating, take a shower and wipe dry with a towel before the procedure .
Before entering the room, you need to put a felt cap on your head, which will protect against overheating. Mandatory shoes are flip-flops, which will also help you avoid slipping on a wet floor. Doctors advise not to wear even a swimsuit or swimming trunks , as they absorb sweat. As a result, the fluid secreted by the body quickly evaporates and ceases to protect the body from burns. Therefore, underwear should only be worn in public saunas, where entry without clothing is prohibited.
A beginner who decides to try his hand for the first time is allowed to steam for no more than 10 minutes. It is believed that it is better to sit on a shelf in a reclining position. This way the body warms up more evenly. You need to place a terry towel under yourself. Upon completion of the procedure, you should cool slightly and then pour lukewarm water over yourself.
We recommend: Do-it-yourself chimney in a bathhouse - a step-by-step guide on how to do it correctly?
In the future, you can spend up to 20 minutes in the steam room, but it is important to monitor your well-being. If discomfort occurs, you must leave the sauna immediately. Those who practice regularly sweat faster. If a person does not tolerate heat well, you need to place a broom soaked in warm water on his back . Adults can visit the sauna no more than once every three days. Women who are pregnant or menstruating are prohibited from performing such procedures . People with heart disease, hypertension, or asthma should not go to the steam room.
It is recommended to put enough fuel into the furnace firebox so that after the procedures you can dry the premises.
When the sauna visit ends, all walls are wiped dry. Doors and stove dampers are left open for 2 hours to ventilate. In this case, the water tank is closed with a lid. For regular use, it is recommended to clean with detergents every two weeks . To protect against fungal damage, the wood is coated with protective compounds. If there is an unpleasant odor in the room, it can be eliminated by placing a hot water tank in one of the corners. A few drops of essential oil are added to it. As the water begins to evaporate, it will be absorbed into the wood and the heavy smell will go away.
4
Electrical equipment, ventilation, sewerage - we prepare in advance
It is better to build a regular stove in a separate bathhouse. It is rarely used in a built-in sauna; an electric stove is usually installed. When choosing an electric heater, we take into account the area of the steam room to determine the power of the device. We install a separate machine on the panel, lay the cable in a corrugation, and connect the stove. We are laying out the cables for lighting and installing the switch outside.
Connecting the electric stove yourself in the sauna is not difficult
Ventilation serves not only for air exchange, but also allows you to warm up the room faster. We punch ventilation holes in the wall; you will need two of them - inlet and outlet. We make the entrance at the back of the stove so that the cold air warms up instantly and circulates through the steam room. We punch a hole diagonally at the top for exhaust ventilation. We install valves to regulate air flow. All that remains is to install a fire damper, which will close if a fire occurs.
Before installing the floor, we will install a sewer system. If it already exists, we simply connect the pipe to the existing system. If not, we make a local drain: at a distance from the building, we dig a hole up to one and a half meters, and draw a trench to it. We lay pipes from the drain hole in the steam room to the drainage pit. Installation is carried out using special sewer pipes, the tightness is ensured by their design, otherwise we put cement mortar on the joints.
Which bathhouse to choose: design and materials
First of all, you will have to choose a bathhouse depending on the material from which the “box” will be built, the type of structure, and also select the optimal heat source. All these parameters are important and are selected individually depending on the needs of the owner and the characteristics of the area where the bathhouse will be installed.
Baths, differing in type of structure
- Full bath. A separate building, which is a full-fledged bathhouse with a steam room, washing area and relaxation area. The building can be two-story, with other additional rooms, for example, a bedroom or a billiard room.
Full bathhouse in Russian style Source market.sakh.com
- Built-in bathhouse (joint construction of a bathhouse and a house under one roof). An excellent option for saving space in your garden. The rest room can be combined with the living room, and the washroom can be used as a full bathroom. In other words, to arrange a bathhouse inside the house, it is enough to allocate a space for the steam room; all other rooms are already provided for in any house layout.
Two-story house-bath Source parki48.ru
- Bathhouse extension. If the project does not provide for the allocation of premises for a bathhouse inside the dama, you can make a steam room in the extension. If space allows, the extension can accommodate a washing room with a rest room.
One-story house with an attic, a carport and an attached bathhouse Source kedrovydom.ru
- Bathhouse trailer. An inexpensive option for a mobile sauna for a summer residence. Having a small size, the trailer is installed directly on the ground or on a prepared low-power foundation. You can take a steam bath in such a bathhouse with no less comfort. The only drawbacks are the small size and the lack of a rest room - you can’t walk around there with a large group.
Bathhouse from a container trailer Source neftzmz.ru
- Disposable saunas, or sauna tents. They are a temporary structure - a structure protected from the wind by tent fabric. It is assembled immediately before use and disassembled after. This type of bathhouse is more suitable for outdoor recreation, although it can also be used as a summer cottage option.
A sauna-tent installed on the shore of a lake is an excellent option for outdoor recreation. Source kharkovforum.com
Main heat sources
The air temperature in the steam room must be kept within 100 degrees; both wood-burning, gas and electric stoves can cope with this task.
Wood-burning stoves are the most widespread, as a sign of a traditional Russian stove. They build a red brick stove, leading the firebox into the dressing room so that they can add firewood without entering the steam room. Nowadays, in addition to brick stoves, cast iron and steel stoves are used equally, which are containers with a chimney and a heater.
The most economical and modern are gas stoves. The difficulty in using them lies in certified installation and subsequent connection.
The simplest and most compact option are electric ovens. Temperature regulation occurs automatically according to a given program. The absence of a chimney, quick installation, ease of operation - these are the main advantages of such structures.
Electric heater with temperature controller Source dekoriko.ru
See also: Catalog of companies that specialize in the construction of baths.
Types of material for bath construction
The traditional material for baths is wood: logs or profiled timber. Wooden walls retain heat well inside the building, and the resinous aroma has a beneficial effect on well-being. Disadvantages include low fire resistance - wood is treated with special solutions to protect it - and poor sealing of joints, which requires careful caulking of all cracks.
A cheaper material for bathhouse walls is brick or cellular concrete blocks. The advantages of such baths include ease of maintenance, fire resistance, good, but not high enough thermal insulation properties, as a result of which such walls require additional insulation. In addition to additional thermal insulation of the walls, they must be carefully sealed from the inside due to their high moisture absorption capacity.
Brick bathhouse Source karelia-dom.ru
How to build a sauna with your own hands? Stages of building a bathhouse
The construction process includes a number of stages.
We recommend reading:
Metal tiles from the Metal Profile company
Step 1. Select a location
You need to carefully select a building site. It is recommended to avoid slopes and dampness, as in this case it will be necessary to make a reinforced foundation. If there is a body of water nearby, then it is better to take a sauna next to it, in which case, after you warm up in the steam room, you can cool off in the refreshing water.
To build a bathhouse, you need to choose a flat surface; it is recommended to enter the bathhouse from the south, so you can avoid a large accumulation of snow in front of the door.
Step 2. Drafting
You can make a bathhouse plan yourself, find a ready-made version, or order a drawing. Projects for small baths can be taken ready-made, they are quite simple, and if you need to make changes, it will be quite easy to do.
If you are planning a complex building with a large number of rooms and several floors, then it is better to choose a ready-made project or order it from specialists. The advantage of the latter option is that in this case all the features of your site will be taken into account, as well as personal wishes and preferences, and the project will be tailored to you. But drawing development is a paid service.
An incorrectly drawn up drawing will entail additional costs and difficulties during the construction process, so pay special attention to drawing up the project.
The drawing should be as detailed as possible: you need to indicate the dimensions of all rooms, mark the partitions, indicate where the doors, windows, stove, shelves and furniture will be located. At the design stage, you should also consider the water supply system, wiring, etc. The more detailed the project, the better.
Simple projects can contain only the main rooms (relaxation room, steam room and washing room). It is better if the bathhouse has a dressing room; it will protect the room from the cold from the street, and can also be used to store logs.
Baths can be one-, two-story and with an attic. The project can include a balcony, terrace, swimming pool and other amenities. It all depends on your wishes, the size of the plot and the budget.
The most popular is the 6x4 bathhouse project. The building turns out to be quite compact, so it can fit even in small areas, while the dimensions of the bathhouse provide ample opportunities for planning. Designs for 6 by 4 baths vary greatly: they can include a large steam room and washing room, several relaxation rooms, a bathroom, a terrace and even a kitchenette.
4x4 and 6x6 projects are also in high demand. Square buildings, they will also fit in medium areas. Baths of this size will fit all the main rooms and a couple of additional ones.
For small areas, 3x3 and 3x4 bathhouse designs are often chosen. Of course, there are fewer opportunities to change the layout, but it is quite possible to get a compact and easy-to-use building. In such a bathhouse there are only two rooms: a steam room, combined with a washing room, and a relaxation room, which plays the role of a dressing room.
Such a bathhouse, of course, is not suitable for constant use by a large company. But as a country house option for one or two people it will be an excellent alternative.
If, on the contrary, you have a large and spacious area, as well as a good budget, then pay attention to large bathhouse projects: 8x8, 9x9, 10x10, etc.
In such buildings, they are not limited to three rooms and create additional ones: a kitchen, a bedroom, a vestibule, a bathroom, a gym, a billiard room, etc. If you relax in a bathhouse mainly in the summer, then choose a project with a spacious terrace, then you can place a stove on it and cook outdoor barbecue. The spacious bathhouse can easily accommodate a swimming pool. It can be placed in a separate room or on the terrace. This bathhouse is perfect for relaxing with a large group or the whole family.
You can get a more spacious bathhouse in a smaller area if you give preference to a corner bathhouse. Its design allows for the most efficient placement of premises even in a small area. Such baths can be very different in size and shape, so anyone can create an ideal project for themselves. By the way, a corner bathhouse is convenient because with this layout the stove is located in a corner room, so its heating is sufficient for other rooms.
When drawing up a project, almost everyone prefers a bathhouse with a terrace. And this is not surprising! This detail significantly improves the quality of relaxation in summer weather. Of course, it is more pleasant to relax in nature, breathing fresh air and drinking aromatic tea, rather than huddling in a stuffy room.
The project of a bathhouse with a swimming pool will be relevant if there is no body of water nearby, but there is a strong desire to cool off in cool water after warming up in the steam room. Moreover, you should not think that a swimming pool in a bathhouse is a luxury. Nowadays there are ready-made pool bowls made from different materials, so if you only need a small pool to take a dip in, you can make one quite cheaply.
As you can see, the choice of projects is huge. We have listed only a few of them. When determining the size of a future bathhouse, you need to take into account the number of people who will go to the bathhouse, and it is better to immediately provide for a reserve, since you are unlikely to build a bathhouse for one or two years, and over many years the composition of the company may increase. In addition, you need to take into account the budget: obviously, the larger the building, the more expensive its construction will be.
If you are building a wooden bathhouse, we also recommend paying attention to the length of the beam. For example, the maximum length of a profiled beam is 6 m, therefore, it is obvious that it is better to choose a 6x6 m project rather than 7x7 m. There are many nuances and it is better to take them all into account at the design stage, since it is easier to make changes to the drawing, than in already started construction.
Step 3. Laying the foundation
The construction of a building begins with the construction of the foundation. It is important that the foundation can support the weight of the building, so the foundation must be strong and reliable. Its depth depends on the level of freezing of the ground.
There are different types of foundations, but when building a bathhouse, a columnar or strip foundation is most often used.
A strip foundation is more reliable, so it is suitable for the construction of bathhouses that have a large weight: brick, aerated concrete, two-story, etc. If you are going to build a small one-story bathhouse, then you can limit yourself to a columnar foundation, it is easier and cheaper to build it.
A strip foundation can withstand high loads, which is why it is chosen when building two-story baths. But the construction of this base will cost more than a columnar one, since more material will be required. An important advantage of a strip foundation is the ability to create a warm basement or basement.
We recommend reading:
Aromatherapy in the bath
For wooden baths, a shallow type of strip foundation is suitable, for block or brick ones - a recessed one.
If you are going to build a bathhouse on soil with weak bearing capacity, you will have to abandon the strip foundation and choose a different type of foundation.
A column foundation is a simpler and cheaper option that is suitable for any type of soil. Making such a base is quite simple, so it will be a good solution for small buildings. Foundation supports can be made of different materials: brick, concrete, iron, etc.
If you plan to make a columnar foundation, it is recommended to install a grillage - this will give the structure additional strength.
But sometimes it happens that you have to build a bathhouse on an uneven surface, in particular, this happens if you want to build a building next to a river. In this case, you need to make a pile foundation. This base option will also be indispensable when building a bathhouse in permafrost regions. A pile foundation will cost about 40% less than a strip foundation, which is a significant saving on construction. But during its construction, additional costs arise due to the need to use special equipment.
Any of these types of foundations can be made independently, without turning to specialists. In the articles presented on this site, you will find detailed instructions on how to install a foundation yourself.
Before making the foundation, you need to prepare the site, namely make markings. Make sure that the markings are as even as possible - how even the bathhouse will turn out will depend on this.
Step 4. Construction of walls
As already mentioned, to build a bathhouse you can choose different materials: timber, gas block, expanded clay concrete, brick, logs, etc. Whatever material you choose, it is also important to ensure that the walls of the bathhouse are as smooth as possible.
When building a wooden bathhouse, it is better to choose larger logs for the lower crowns than for other rows.
When choosing materials you need to be more careful; it is important to purchase only high-quality ones, otherwise the building will quickly deform. If you come across defective materials, you should stop using them, otherwise the service life of the building will be significantly reduced.
You should buy materials for building a bathhouse with a reserve; there is a high probability that the materials will be defective. In addition, if there are not enough of them, you will have to go and buy new ones, and this will slow down the work process.
You need to decide in advance on the location of windows and doors and when laying the walls, do not forget to leave gaps for them.
Step 5. Install the roof
To install the roof, you need to make a rafter system - a frame made of wooden beams. Afterwards, you should install rafters from beams, sheathe the roof with roofing material and insulate it. To install the roof, you need to use wood species that do not produce a lot of resin, so it is better to choose hardwood.
The roofing material can be any, but metal tiles are considered the most popular.
If you need an economical option
It is not necessary to build a large sauna to enjoy steam treatments - there is always the opportunity to build a sauna cheaply, using an economical option. At the same time, you can save on many things, for example:
- Wall material. A bathhouse made of wood is more preferable, but one made from blocks is economical. If you do not want to deviate from wooden buildings, it is preferable to choose frame construction technology, in which you can use used edged boards or low-grade unedged ones, giving additional flavor to the appearance of the bathhouse.
- Careful planning. At the project creation stage, reduce the size of the rooms to the minimum acceptable. You can refuse the rest room. But the steam room should be carried out taking into account all safety requirements: in a steam room that is too small, it is easy to get burned on the heater or scalded by the steam. The washing room can be combined with a steam room.
- Drainage system. You can refuse to supply water to the bathhouse through a pipeline; it is enough to equip a stove with a tank for heating water and bring water in buckets. You can even give up the bathroom altogether.
However, it is better to discuss all methods of saving with the developer - it will be clearer on site which of them can be used and which will be clearly undesirable.
Economy bathhouse Source drevo72.ru
Creating partitions in the bathhouse
Creating partitions in the bathhouse
When the building is surrounded by perimeter walls, you need to allocate separate rooms, which should also be securely separated from each other.
To install wooden partitions, special wooden blocks are provided in advance. When the partition is laid out between the already laid floor joists, it is mounted anywhere, secured to the crossbars.
Sometimes partitions are mounted in the opposite direction to the floor beams. In this case, a purlin is installed in the intended space, which is a reliable basis for the partition.
The partitions in the bathhouse do not carry any load
There are several types of partitions.
- Single solid from boards.
- Double solid boards.
- Double with a gap, that is, the possibility of free air circulation.
- Double with full filling, that is, without drafts.
- Frame and sheathing.
If the simplest partition design is chosen, they are made from boards 4-5 cm thick and 10-20 cm high. They should be planed first. This action can be performed only on one side. The use of boards with a wider diameter is not recommended, because they tend to deform. To ensure complete blocking of the cracks and the possibility of long-term operation, you need to choose tongue and groove material.
Installation of partitions
The bars are connected with steep tenons of 10-12 cm. The pitch of their arrangement is calculated from the height of the boards; it is optimal to take breaks of less than 1 m. If round tenons are not available, nails without heads are used instead, but you should ensure that their length is within 6- 8 cm
On the walls next to the partition it is necessary to draw vertical lines and mark them with a cord. To check the evenness of the fastenings, it is advisable to use a plumb line. In addition to the walls, they should subsequently be drawn along a line to the ceiling and 4x4 cm boards should be nailed to them. Then grooves are formed, the width corresponding to the structure of the bars.
In front of the place where you plan to insert boards for the partition, you should leave a gap, that is, do not fasten the bars at a distance of 20-30 cm. Only fastening wooden guide structures is allowed on the beam. Natural shrinkage of the structure should be provided for in advance. To maximize its compensation, the partitions are measured a few centimeters shorter than the main walls of the bathhouse.
Wooden interior partitions
The bars are first placed in the grooves, then moved until they are closed. The partition is provided without holes, so fastening should be done as tightly as possible, using spikes or quarters.
Skirting boards are nailed down along the perimeter of the space separated by the partition. Usually small holes are formed separating structural elements. They should not be overlooked. They must be caulked with tow or plaster.
Partitions made of timber
A double partition is made with the connectors left or when they are filled with material that plays the role of thermal insulation. It is advisable to use mineral wool in any configuration, including in the form of slabs.
The thickness of the boards is approximately 2-2.5 cm. With these parameters, the gap between the rows will be about 0.4 cm. A double partition is constructed by alternately assembling the first and second sides. When creating gaps is not planned, insulation should be laid between each row of beams in parallel with the assembly of the walls. The upper edges of the boards are held in place by inserting them into the grooves. The bottom edges are nailed to the boards with long nails.
To save on the construction of partitions, they should be constructed using a frame-sheathing method. To assemble the frame, you can choose between tenons, notches or nails. The main material is boards. The support for the frame is a beam. An alternative fastening is carried out on crossbars when inserting structural elements into the grooves.
Frame partition
The upper edge of the structure should not reach the ceiling by 1-2 cm. The remaining gap should be filled with tow mixed with a gypsum solution. You can also use boards that completely cover the joint without leaving any gaps. To insert the door frame into the partition, additional boards should be placed nearby to close the frame leaf.
Video - Partitions in the bathhouse
Order the construction of a bathhouse or buy a ready-made structure
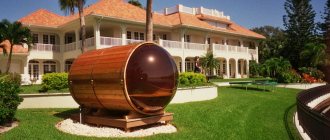
How to build a sauna for a summer residence? If the issue of the need for a bathhouse on the site has already been resolved, all that remains is to choose whether to order construction from scratch or buy a ready-made bathhouse. When ordering construction, you can choose a standard project or make an individual one for the customer. Ready-made compact baths for summer cottages “arrive” to the customer already assembled. You can see it from the inside immediately before purchasing; the cylindrical baths are especially interesting.
Features of ready-made baths:
- The bathhouse is mounted on a wooden frame;
- Inside and outside, the frame of the bathhouse is covered with clapboard, it is possible to use profiled timber, then the cost of the finished bathhouse will be higher;
- The heat source is an electric heater;
- The bathhouse is divided into 3 rooms, transforming into each other: dressing room, washing room, steam room;
- The water tank is mounted on the roof, and there is a drain pan under the floor. The wastewater is discharged through a special pipe.
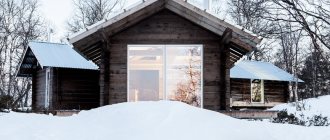
Finished cylindrical bathhouse Source pinterest.com
Construction of a frame sauna
Start building your sauna. Start by laying out the foundation.
Construction of a frame sauna
Foundation
The optimal base option for a frame sauna is a strip foundation, buried 80-100 cm. Determine the appropriate depth for laying the strip individually, taking into account the characteristics of the soil at the construction site.
Foundation
The recommended width of the concrete strip is 250-300 mm. The above-ground part of the base must have a height of at least 200 mm.
Section of strip foundation
Mark the site in accordance with the recommended parameters and the building plan. Use pins and string to mark.
Dig trenches according to the markings. Fill the bottom of the depressions with a sand-gravel mixture, lay the reinforcing mesh, install the formwork and pour concrete.
Foundation formwork
Let the concrete dry completely. It takes about 4-5 weeks to gain strength. Cover the dried concrete with a double layer of roofing material.
Place small ventilation holes in the base base. This can be done even before pouring concrete by laying pipes of the required section in the required places. It is not recommended to make holes in hardened concrete, because... this may lead to a decrease in structural strength.
Strip foundation for sauna
Timber frame
Lay out the first crown of timber. Use material with a cross section of 15x15 cm or 20x20 cm.
Lower crown and fastening features
Frame
It is better that the lower beam does not contact the foundation. To prevent such contact, place strong wooden slats on the foundation approximately every 300 mm. Slats 15 mm thick will be sufficient. The resulting voids are filled with thermal insulation material, or even better, with polyurethane foam.
Frame
Fasten the bottom trim beam in a convenient way. The main thing is that the connection is as reliable as possible. It is better to refrain from using metal fasteners. A connection using grooves is optimal.
Timber frame
Lay out the required number of rows of timber in accordance with the planned height of the building. Connect the rows using wooden dowels. Place a jute seal between the rows.
Frame covering
Cover the erected frame with strong boards and roofing felt. Leave the sauna like this for six months. During this time, the wood will shrink, and you can continue arranging the sauna.
After completing the shrinkage processes, cut out openings for double-glazed windows and doors in the walls and install the mentioned elements.
If construction is carried out using high-quality timber that has undergone full chamber drying, it is not necessary to take such a long break.
Shed roof
Shed roof
Start arranging the roof structure. For a private sauna, a pitched roof is well suited - it is a simple and budget option.
If the distance between the opposite walls of the building does not exceed 450 cm, the rafters can be installed without the use of additional supports. If the distance exceeds the mentioned value, the Mauerlat must be installed.
Shed roof options
The Mauerlat is a support beam fixed along the upper edge of the walls of the building. In wooden buildings, the functions of the mauerlat can be taken over by the last laid crown of timber.
To install the rafters, grooves of the appropriate size are created in the Mauerlat. Traditionally, rafters are fixed in meter increments.
The rafter legs should extend outward by approximately 50 cm. This will prevent moisture from getting from the roof onto the walls of the building.
The roof slope must have a certain slope (determined individually, in accordance with the characteristics of the selected finishing material). To create a slope, the front wall of the building must be raised to the appropriate height.
We recommend: Do-it-yourself change house - step-by-step construction instructions
Next, the roof arrangement is carried out in a standard way: the sheathing is installed, insulating layers are installed (moisture protection, insulation, vapor barrier) and the finishing finishing material is attached.
All wooden elements of the building must be treated with an antiseptic. It is also recommended to treat with a fire retardant. Impregnations can be used both before the installation of elements and after their arrangement - decide for yourself.
Shed roof
Video description
Several interesting projects on video:
Economy options
Small summerhouses save space on your garden plot, combining all the characteristics of a traditional bathhouse. They are perfect as temporary buildings when there is no money to build a large bathhouse, but you want to take a steam bath right now.
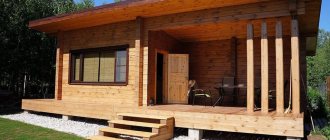
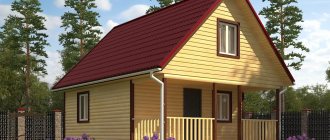
Economy bathhouse lined with imitation timber Source bane.guru
Frame bath Source line-home.ru
Bathhouse 2x3 m covered with siding Source plotnic.ucoz.ru