Buy or make?
Nowadays, any toy inventory is sold in the store, but very often the parental budget is limited due to shocking prices. For this reason, you have to make simple interior elements yourself, inviting the child to participate, and simultaneously turning the activity into a playful activity.
Since a sleeping place is perhaps the most important attribute of a toy apartment or house, a bed or sofa made from home household accessories becomes a priority.
Let us consider in more detail the solution to the condition so that the homemade product is pleasing to the eye and actively used by the child
Model selection
Before we get down to business, we need to agree on what we want to see as a result. A doll bed can be made in different versions, but the main condition is its environmental friendliness, safety, and play appeal.
The second condition is that it must be reliable, easy to use and necessarily bright in design. During construction, it is possible to use any variety:- single and double models;
- rocking cradle;
- two-tier;
- canopy bed;
- hanging hammock.
You can choose from a variety of types: with a headboard, supporting backrests, panels, on legs or with a rectangular stand.
In addition, it is worth considering the possibility of manufacturing parts of a bedroom set. For example, if it is a Barbie bed, a trellis, or at least a bedside table. If this is a baby doll, then you will need a changing table. The wardrobe will require at least a couple of drawers under the bed.
Before starting work, you should also correlate the dimensions of the bed with the parameters of the toy, so as not to be disappointed at the end when the bed for the baby doll suddenly turns out to be small.
What qualities should bedding sets for a doll have?
Since everything related to children and their interaction must meet certain requirements, linens for a doll’s bed are no exception.
- Safety: Since your child will be in direct contact with the products, they should be hypoallergenic and pleasant to the touch. Since children's skin is quite delicate, it quickly reacts to all sorts of irritants. Choose fabrics for making bedding for dolls from natural materials. It can be cotton, linen, silk and so on.
- Aesthetics: beautiful things should be before your child’s eyes. When choosing decent options for bedding sets for a doll's house, you must choose the color and texture of the material to match the interior created in the doll's bedroom. This way you can instill in your child a sense of style and taste.
- Durability: You should be prepared for the fact that your child will endlessly straighten and make the bed, placing dolls there. In a word, the material for bedding should be “resilient” and durable so that your child does not tear it on the first day.
- Environmentally friendly - bedding for dolls should be made from environmentally friendly materials, without the use of chemical additives and dyes.
- Practicality - the fabric for bedding for dolls must be practical so that the child can wash it, dry it, change sets of linen, etc.
Are we mastering thoroughly or not?
Reliable and durable materials will ensure long-lasting service for the craft, especially if the child is very small. As you know, they are characterized by a love of research, that is, analysis into small details of everything that arouses interest.
If the child is older, but still has a baby or is planning to expand the family, then a well-made toy will faithfully serve more than one younger generation.
On the other hand, children's instability should be taken into account. Today the baby constantly plays the role of mother, putting her child to bed, and tomorrow the craft is mercilessly pushed away. The girl selflessly rolls her passion in a stroller or rocks her in her arms.
Therefore, it makes sense to make the desired object from the simplest available material, without spending a lot of time, effort and nerves, so that if necessary, you can easily part with it.
Note!
How to make a Dove of Peace craft from paper with your own hands, step-by-step instructions with photo examples
- Do-it-yourself owl - how to sew an owl, an owlet, an owl silhouette from fabric. Simple ways to create crafts
Autumn crafts for the autumn holiday from leaves, fesalis, plasticine, vegetables - come up with a creative name, create masterpieces
Cardboard version
Having completed the drawing of the crib for the doll, we proceed to the next step of action. If the choice is on paper, cardboard or other types of pulp industry, then we will need the following tools:
- scissors;
- stapler, staples;
- a simple pencil;
- markers;
- glue;
- scotch;
- matter, yarn;
- paints;
- brushes
Cardboard is very common in everyday life and therefore the most preferable; it is also safe and easy to use. Classes with him are available even to children, but always under supervision. A cardboard bed is made as follows.
We transfer the parts of the bed to be made to the specified dimensions from a paper sheet onto cardboard and create templates using these sketches. We perform this action twice for the headboards; for the base, it is desirable to have at least three repeating parts.
We glue all the stock blanks together, having previously secured four longitudinal wires between them with tape for greater strength. We extend its ends beyond the perimeter by about 10 cm. We place the glued canvas under the press.
After all the glued parts have completely dried, we string both backs on opposite sides onto the ends of the wire placed in the base. We twist the ends of the wire together and carefully press them, even pressing them into the body of the backrests.
Note!
- What craft materials to use for creativity: non-traditional, foamed, soft or natural pieces made by yourself
- New Year's crafts from pine cones: what you can make from pine cones with your own hands, a guide with step-by-step master classes
What figurines from balls you can make with your own hands: 105 photos of crafts from small, round and long balls
Then we glue the duplicates of the blanks made earlier, thus hiding the visible elements of the twisted wires. We cover the bed assembled in this way with bright material, for example, colored sheets or pieces of fabric, and that’s it - the crib for dolls is ready.
Wooden bed: learning from experienced craftsmen
You can also make a wooden bed yourself. Any doll will be comfortable in such a crib. But here you will need carpentry experience. As in previous versions, measurements are based on the doll's height.
Materials:
- crib base;
- 4 legs (round or rectangular);
- rounded headboard;
- side skirts;
- sandpaper;
- glue;
- textile;
- braid, lace.
Instructions:
- We sand all parts well with sandpaper.
- We glue the base with the rest of the parts, coating them well with glue.
- Let the frame dry.
- To give the crib a more aesthetic appearance, you can coat it with varnish.
- Let's get down to bed linen. We cut out a mattress, a bedspread, pillows, a sheet and a blanket.
- We complement the linen with lace and braid.
Papier-mâché method
To realize a conceived idea, craftsmen can use papier-mâché. There are three technologies for creating objects from paper, but we will not dwell on each of them, but consider the first method. It will be enough to learn how to make a bed out of paper.
On a model twisted from wire, we glue small pieces of paper soaked in glue in layers. If PVA glue is not available, silicate glue is used; you can use old-fashioned starch paste.
To increase the strength of the product, it is reinforced by adding fabric pieces. It is allowed to use gauze or thin nylon mesh. The classic gluing technique requires applying about a hundred layers of paper, but when creating furniture for a dollhouse, ignore this condition.
Important: the recommended method is good for children because it perfectly develops the motor skills of the child’s fingers.
Bedding and bedding for dolls.
Bedding: mattress, two pillows, blanket.
- Share
Mattress (inside there are several hand-stitched layers of padding polyester).
- Share
- Share
I'm telling you how to make a quilt (not my idea). In the photo there is a future blanket for a bunk bed that is in a dollhouse in a children's nursery. So, I sewed a blanket cover, turned it inside out, steamed it with an iron and drew a grid (4 squares by 4, each equal to 5 cm by 5.5 cm + 1 cm).
- Share
- Share
- Share
- Share
- Share
The pillows also contain ecofiber.
- Share
Bed sheets. Wraparound pillowcases (the photo shows how to put them on).
- Share
- Share
- Share
In this photo the blanket is draped over the pillows.
I thought for a long time about how wide this blanket should be: the bed is a double, which means we need to take into account the width of the bed + the height of the blanket for two dolls, and I really didn’t want it to hang too much from the bed, and there was also a blanket on top.
- Share
- Share
I knitted a simple blanket.
- Share
I sewed almost the same accessories and bedding for the bed of our schoolgirl doll.
- Share
- Share
I made linen for a bunk bed.
- Share
- Share
- Share
- Share
- Share
- Share
- Share
- Share
- Share
- Share
- Share
- Share
This is how the cradle bed turned out.
- Share
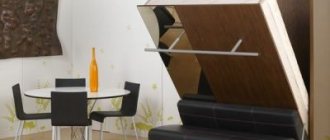
Second life of a cardboard box
This option is perfect for those parents who do not have the opportunity to devote a lot of time to creating a sleeping place, but circumstances require an urgent solution. We take an available box, preferably a shoe box or packaging from the doll itself.
Having discussed the appearance with the child, we begin making a sleeping alcove. The removed cover can be used instead of bed legs as a rectangular base. It is enough just to glue it under the bottom of the box and give the glue time to dry.
Then we cut the rectangle of the box itself at the corners from top to bottom by two-thirds. One side of the box, which will become the head of the bed, can be left unchanged in height. We will reduce the side walls by cutting off one third of the side.
The rear wall is reduced by half the height or similar to the sides, that is, according to the planned project. The next stage of work is pasting with colored paper or painting the entire surface of the product. Alternatively, you can cover it with beautiful flaps or self-adhesive film.
As a feather bed and pillows, pieces of foam rubber adjusted to size, inserted into the mattress pad and pillowcases, respectively, look good. You will have to sew them yourself by hand or on a sewing machine. If you don’t have the time or desire to sew, just cover it with fabric, securing it with thread at the bottom.
Advice: do not use pins and needles to secure it so that the girl does not accidentally get hurt during the game.
That's basically it, a crib made from a box for dolls with your own hands. Now it can be used in children's games.
Manufacturing process
Creating beds for dolls is an interesting process that opens up wide scope for the implementation of original creative ideas. There are many step-by-step instructions on online resources to help you do the job correctly. The choice of a suitable model and design must be made together with the child. Novice craftsmen will be able to make their own structures from cardboard, shoe boxes, ice cream sticks, and plywood.
From cardboard
A simple but elegant sleeping place for a Barbie doll can be made from ordinary corrugated cardboard. In addition to the main material, you will need: album sheets, wire, tape, pieces of fabric, scissors, glue. The entire process is carried out in accordance with the instructions:
- The desired bed model is schematically depicted on a piece of paper. Design parameters depend on the size of the doll.
- Based on the finished template, the necessary elements are cut out of cardboard and their side edges are glued together.
- Two pieces of wire 50 cm long are laid on top of the cardboard parts, fixed with tape, and the surface is filled with glue. The workpiece is placed under a press until completely dry.
- The elements of the body and headboard are pierced with an awl, and wire is threaded into the resulting holes. The fastening points are coated with glue.
- The pieces of wire are tied on the reverse side and the long ends are cut off.
Advantages of a children's ottoman, the best bed with sides, nuances of choice
At the final stage, the bed for dolls made of cardboard is covered with viscose napkins, paper or fabric. The sleeping place will become even more attractive with decor in the form of floral appliqués. Miniature bedding will add realism to the product: mattress, pillows, blanket.
From a shoe box
The basis for this project will be an ordinary shoe box. Tools you will need: scissors, glue, stationery knife, ruler, pencil. The work includes several stages:
- Half of the box is applied to the end, this will be one of the legs of the future bed.
- Legs are drawn on both sides of the box lid, the optimal height of which is 3–4.5 cm. Excess cardboard is cut off. If desired, you can make additional support.
- One or both side parts of the box are cut off after preliminary marking.
- The legs are glued to the crib body.
The surface of colorful boxes does not require special decoration. However, if necessary, you can complement the design of doll furniture with ribbons, fabric or paper.
From ice cream sticks
To make a cute little crib, you need to prepare 18 wooden popsicle sticks and 1 skewer. To connect the parts you will need glue. Additional tools you need are a ruler, a pencil, cotton swabs, and a knife. The process is carried out according to the instructions:
- One of the sticks is cut strictly in the middle. Two sides of the bed are glued together from half and five whole products.
- The skewer is cut in the center, each half should match the length of the side. The elements are glued to the body.
- For the frame, 2 sticks are glued together and then dried.
- The remaining sticks are placed on the bottom.
This original doll bed looks very cute. The product is complemented by bed linen, which can be pieces of textiles. The model can be decorated using gouache or wood varnish.
Characteristic features of a classic children's bed, decor options
Two-tier plywood
A crib made from this strong material is strong, durable, and safe. For work you will need: bamboo sticks, glue, screws, a piece of plywood, decorative elements. The process is carried out in accordance with the master class:
- Bamboo sticks are cut into 12 pieces. 4 of them should be the longest, since they are used to support the structure. The remaining 8 are divided into 4 segments.
- The sticks that serve as support posts are wrapped with braid.
- Self-tapping screws are screwed into the places where the tiers are fixed, and glue is used for reinforcement.
- The bottom of the plywood bed is secured with self-tapping screws. After complete drying, the base elements are covered with fabric.
All supporting parts are made in accordance with the selected scheme. The result is a reliable bunk bed for dolls. An excellent addition to the model will be bright bed linen that you can sew yourself.
Two tiers - cool
If you need to prepare two sleeping places, but for various reasons there is not enough space for furniture or this is a design idea, a bunk version of the bed is not difficult to make. An additional box will be required.
But the lid should not be used as a stand for the case, but should be cut into four parts and used as posts. We glue them to the backs of the lower bed, and then at the desired height we fix the second one with glue and press it with clothespins for strength while it dries.
Product decor
When the homemade bed is ready, the question arises of decorating it. You can decorate a homemade product not only by painting the surface, pasting it with colored paper or colorful rags. Cellulose is very easy to cut, and this means the use of carved decorations on the backs and sides.
The doll's bed can be decorated by gluing appliqués, lace, beads, beads, braid or ribbons. In such situations, fantasy is like a boundless sea; the brighter the object, the more attractive it is for children, especially girls, the more willingly they play with it.However, we should not forget about the curiosity of children. The toddler can tear off beads, beads and other small parts and swallow them.
The unwritten rule: “the smaller the child, the larger the toy,” has not yet been canceled.
Basic sewing rules
After choosing old things that will become the basis, you need to make patterns and get down to business. To do this you need to know the basic rules:
- be sure to overcast the edges of cut fabrics;
- sew products only inside out;
- choose thin threads No. 40;
- make patterns according to the height of the baby doll, bed.
To the dimensions of the pattern you need to add 3 cm for seams.
We present a size chart of the most popular types of dolls.
| View | Standard toy size (height cm) | Length of sheets, duvet cover cm |
| Barbie | 27-29 | 30 |
| Big doll | 45-50 | 52-53 |
| Average | 33-40 | 42-43 |
| Small | 25-30 | 30-33 |
| Baby Bon | 43-45 | 47 |
Using this table, draw the pattern, adding another 3 cm to it for the crotch seam.
Now let's take a closer look at the different textile details.
Beautiful embroidered handmade bed linen for dolls
How to sew a pillowcase
Select the desired size of fabric, cut out two parts from the fabric, sew around the perimeter, leaving about a 10 cm gap
Fill the future pillow with ball filler
This is one of the most difficult parts. The catch, first of all, is the small proportions. The doll pillowcase will turn out to be quite small, so you need to work carefully.
We sew up the connector with hidden stitches and get a small pad
We will sew a standard pillowcase with a turn up. Measure out the square (rectangle) of the required parameters and make the appropriate marks.
Centering the design, cut out the fabric for the pillowcase, take a ruffle or braid, step back 1-2 mm from the edging of the ornament and adjust it inward
Apply the future scent on top about 30% of the width of the pad, bend the edge
The pillow should be 3 cm larger on all sides than the space occupied by the baby doll's head.
Turn it over and, focusing on the contour, grind the part, retreating 1-2 mm
We also sew the wrong side of the pillowcase along the perimeter, focusing on the outline of the ornament, and first bend the bottom edge
Next, put marks similar to the first dimensions. The third segment should be equal to 1/3 of the full measurements.
We overcast the internal seams, turn them inside out, sew on beautiful buttons and make loops for them
Now cut out the resulting segment, sew a gap to the main part (which was 1/3 of the pillow). Then fold the resulting rectangle (or square) in half and sew on both sides. The pillowcase is ready.
sheet
We make a sheet, add 5 cm to the size of the mattress on each side, bend the edges
With this subject things are easiest. The sheet should be 2-3 cm larger than the doll's bed (depending on the height of the bed).
All you have to do is measure the dimensions of the bed, cut a rectangle of the appropriate size, and hem it around the perimeter.
If desired, you can add ruffles and fringe.
Do I need a duvet cover?
Selecting fabrics for making a patchwork quilt
The question of a duvet cover often arises here. Is it needed? The answer depends on the blanket you have. If it is tight, a cover will come in handy. If it is thin, this part of the textile is superfluous.
We cut out the central part of the blanket - some beautiful block, embroidery, an interesting fragment
We edge strips around the perimeter of the picture
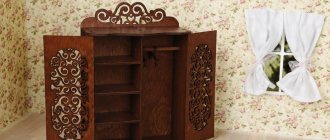
Furniture for dolls made of cardboard
It is prepared quite simply and does not require special skills. In the absence of strong external influence, it is quite durable and at the same time light, which is very convenient during the game.
Rearranging furniture or moving it to another room does not create any problems and is done by children independently without the participation of adults.
Playing with dolls for most girls is not just a game process, but a subconscious preparation for future adult life. Naturally, playing with dolls is a very serious activity.
Even virtual reality can hardly compete with the realistic world of children's fantasies. Therefore, a crib for a doll, made by parents together with their daughter or son, will not only become a memorable event in their life, bringing a lot of joy during the game, but will also contribute to the development of creative imagination.
Materials for making doll furniture
There are many models of toy furniture, in particular beds for dolls. They differ in decor, size and, of course, material.
- Foamed polyethylene allows you to make cribs of the most intricate designs.
- Cardboard is the most economical and easy-to-use material. Just take one nuance into account: in order for the furniture to be strong enough, cardboard should be applied in several layers.
- Plywood is a practical option for a doll's crib. The only drawback is that the parts need to be cut efficiently and accurately. But this material allows you to make removable models that you can carry with you and not deprive your favorite doll of comfort.
- Wood is the strongest and most durable material. Not only daughters, but also granddaughters can play with such a crib.
DIY doll bed: photo ideas for original crafts
Please repost
0