Features of working with plywood
Most often, plywood is used to make a dollhouse. As you probably know, it can come in different brands. It is better to make a dollhouse with your own hands from sanded furniture plywood. You can use them from coniferous trees, but preferably from birch. It’s better not to take a construction one, even though it costs twice as much.
In general, working with plywood is not difficult. If you have a jigsaw and sanders, cutting and preparing the parts will take a couple of hours. The only difficulty that may arise when making a two-story plywood doll house is the installation of the second floor ceiling. T-fastening plywood is not the easiest task.
We need to figure out how to secure the floors
The glue is not very reliable, and trying to install screw-type fasteners into the end with a thickness of 6 mm is difficult - the material can split, even with pre-drilled holes (the thinnest self-tapping screw is 1.8 mm). There are several options:
- do it on nails (not very reliable, unless you coat it with additional glue);
- install corners at the bottom (not very nice);
- install a glazing bead around the perimeter, which will both support the floor and “work” as a ceiling plinth (the best option).
After cutting out the parts, all joints must be sanded well. First, use medium-grain wood sandpaper and gradually move on to fine sandpaper. Once the edge is smooth, you can begin assembly.
Instructions for creating a children's house with your own hands
So, the most common option, perhaps, is to make houses from wood. Let's look at the instructions that will help us recreate it with our own hands, creating a safe and interesting play space for the child.
We decided to make a house of a traditional type and small size, having the following parameters: 160 by 160 by 140 centimeters. The height of the ridge of this structure will be only 90 centimeters. So let's get started.
Drawing No. 1
Drawing No. 2
Drawing No. 3
Drawing No. 4
Step No. 1 – collect the necessary materials
A wooden house for a child is a small analogue of a serious structure, so its construction should be approached in the same way as you would approach the arrangement of a real-size house. To assemble such a real small house, you need to first stock up on some materials. Namely:
- foundation blocks, 4 pieces;
- timber for laying the floor, 11 pieces;
- floor boards, 4 pieces;
- timber for roofing, 5 pieces;
- edged boards.
- lining for finishing;
- figured platbands;
- furniture panel;
- ondulin for the roof;
- paint of the desired shade;
- mounting angles;
- beam holders, 6 pieces;
- screws;
- nails.
You also need to prepare a traditional set of construction tools, and you can get to work.
To create a house, stock up on lumber
Prices for construction boards
Construction boards
Step No. 2 – install the foundation and assemble the floor
Before starting major work on the foundation, it is necessary to fold the frame, connecting the beams together. It will be the standard for the rest of the work associated with creating a house for a child.
First, we connect the boards, turning them into the frame of the future foundation of our house
The base must be aligned diagonally and reinforced with metal corners.
Next, we find a flat place on the site, place a frame on it, and mark points on the corners of this frame. At these points, recesses are dug, inside of which we will later place blocks for the foundation.
Blocks for the foundation will then be placed at the corners of the frame.
So, we place our blocks in the dug holes. Each of the recesses must first be filled with sand approximately the size of the bayonet of one shovel.
The laid blocks and the frame placed on them will need to be isolated from each other, covered with a layer of waterproofing.
Connecting the frame and foundation
The finished frame is sewn up with cut boards, which we previously prepared to create the flooring, and we get a fully assembled lower segment of this house.
Prices for popular models of jigsaws
Jigsaw
We have a stable floor for the future house
Please note: it is best to impregnate the frame with special materials on its lower side in order to ensure:
- protection from moisture and rotting;
- protection from insects.
Such security, in turn, will maximize the service life of the structure being created.
Step No. 3 - create a frame
Now we need to build the frame of the future house. First, on the surface of the newly created floor, you need to create markings for attaching the timber.
Consistently attach beams to the floor surface of the house, creating a frame for children's housing
By analogy with the image presented in this step, you will need to sequentially fill the timber, measuring its individual parts. Do this carefully, as the rafters will then be placed on top of the frame.
Step No. 4 - install the rafters
We make markings, only this time for the rafters. We attach ready-made, pre-assembled rafters, in the amount of three pieces, onto a securely fastened frame.
We fix the rafters on the previously assembled frame
Step No. 5 - sheathing
Now we have to cover the house. Using lining, it is necessary to fill the empty space in the finished wall frame.
The frame is covered with clapboard, and the roof is covered with carved boards
The roof of the roof is sheathed with carved boards, and the outside is lined with ondulin, laid on both sides of the canopy. It is very convenient to cut ondulin with a grinder.
Ondulin is an ideal coating for the roof of a children's house
Prices for various types of ondulin
Ondulin
Step No. 6 – decor
As you remember, we stocked up on carved frames. Now is the time to decorate with them:
- doorway;
- window openings.
We decorate the corner parts of the outer side of the building with curly overlays.
Overlays and curly trim will help give the house an elegant look.
Step No. 7 – arranging the interior
So that the children have something to play in the house, install homemade tables and benches inside, having previously treated them against parasites and carefully sanded them so that they do not accidentally get a splinter. In principle, you can install a purchased set of children's furniture inside.
The house must be filled with some kind of furniture for the convenience of children
Dollhouse project
The first thing to start building a dollhouse is creating a project. You need to decide on the height and number of floors, the width of the room, the type of roof, and whether or not there will be a basement floor. Choose the number of floors as desired. This is arbitrary, but all other parameters must be calculated.
The size of the dollhouse depends on the size of the doll inhabitants. To make playing comfortable, the height of the ceilings in the rooms must be at least twice the height of the doll. For example, with a doll height of 22 cm, ceilings of 40-45 cm will provide enough space for them to move freely, but if the ceilings are even higher, it will be even more convenient to play. But you also need to take into account the child’s growth. The height of the topmost ceiling should be slightly below eye level. In this case, it will be convenient to play, and the dollhouse will be “growth-able” - its height will be enough for a couple of years.
The depth of doll rooms also depends on the height of the dolls, but also on the availability of free space. On average, the depth is 30-45 cm. This is enough to accommodate the entire furnishings. But it could be deeper.
This is roughly what you need to do before you start working.
The width of the dollhouse depends on the number of rooms in it. Here you decide depending on the available free space. In shape, the frame of a doll's house usually looks like a rectangle, but whether it is extended in length or in height - this is determined by each person. If the structure turns out to be rather large, you can attach furniture wheels to the bottom. This is very convenient - the toy turns out to be mobile.
You can draw the project itself in any design program, but if you don’t own them, it’s easier to do it on paper. Why do you need a dollhouse project? To calculate the amount of materials required for its manufacture, and without the dimensions and number of walls, you will definitely be mistaken.
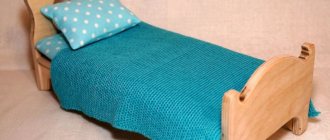
Housing options for dolls
In order to begin manufacturing, you must first resolve the issue of the dimensions and material of the future structure. Then draw up a house project, make drawings for sawing or cutting, think through and select finishing materials, consider options for fastening and installing the entire structure. It is important that it is stable and can withstand small “shocks”.
The size will depend on the height of the dolls that will “live” there, as well as on the capabilities of the room. After all, an apartment for half a room will take up too much space, limiting the owner.
At the same time, a very small structure will be more difficult to manufacture and finish, because working with small parts is not easy.
For ease of use, the ceiling height is set at twice the height of the doll, then it will be easy to move it around the rooms and install it inside. Higher ceilings are welcome, they will make the game even more interesting.
The depth of the rooms is determined based on the height of the dolls and the need for free space for items inside the house. On average it is 30-45 centimeters, but it can be more. The width is calculated based on the number of rooms for dolls and the volume of the room.
The shape of the house usually resembles a rectangle, elongated in height or width, it all depends on the imagination of the manufacturer. For large structures, you can use furniture wheels, which are screwed from the bottom and make it easy to move the doll housing to any place.
You can create a project on paper or, using modern technologies, in a computer program, which itself will calculate the amount of materials needed for the building.
An example of a standard doll house design:
The size largely depends on the material, since not every raw material is able to maintain its shape and withstand the load. Let's try to look at houses made of different materials.
Plywood or laminate
Plywood is a very good choice for making a dollhouse. It holds its shape well, is strong enough, and is easily fastened with glue or self-tapping screws. It is convenient to work with it using standard tools; only after completing the work it is advisable to clean it with sandpaper to make it smoother.
Plywood is easy to decorate with paper or fabric, and it is durable. Laminate has similar properties, which is also often used to create a doll’s apartment.
An example of a dollhouse diagram:
To create you will need:
- laminate or plywood, with a thickness of at least 7 mm;
- PVA glue, it can be replaced with carpentry glue;
- jigsaw;
- remnants of wallpaper that will be used to decorate walls, pieces of furniture, and for the floor you can use self-adhesive film;
- pencil for making notes;
- tape measure or centimeter.
The manufacturing process consists of the following stages:
- Cutting out the wall of a plywood structure according to the dimensions in the drawing.
- Selecting places where windows and doors will be located, cutting them out.
- Assembling the structure using wood glue or small nails.
- Construction of the roof, its design. The roof of the house can be covered with corrugated cardboard and painted, thus simulating tiles.
- Attaching the structure to the base is a piece of plywood that is slightly larger in size. This is necessary to give the structure greater stability and the possibility of additional decoration. For example, on a wide surface in front of the house you can organize a veranda or flower beds.
- Decorating the inside and outside of walls and floors. Sometimes it is more convenient to cover the interior walls before assembling the house, then the joints will not be visible, but in this case it is important not to make large overlaps, violating the proportions of the structure.
- Furniture arrangement.
- Interior decoration with small details: curtains, rugs, tablecloths, etc.
An example of step-by-step construction of a house in the photo (instructions for dad):
Project
Marking the future house
Drilling
Drilling
Finishing with a file
putty
Grinding
Finished walls
Painting
Painted parts
Marking for fasteners
Assembly
Assembly
Finished design
Interior
Balcony
Room
Drywall mockups
Drywall is also a popular material because of its durability and low cost, because often after repairs it remains in the form of small pieces that have nowhere to be attached. A Barbie house is an ideal option for this. However, it is more difficult to fasten, glue is not suitable here, it will be necessary to align the cut points to reduce the consumption of the product.
Self-tapping screws screwed into metal corners will be more effective. But you will need to take them in small sizes or then saw off the ends protruding from the outside.
The scheme for working with drywall is similar to that of plywood; the same tools are required for it. Therefore, you can use the diagram above.
Styrofoam
This material is also from the budget category, remaining after the purchase of household appliances or other goods. Its only drawback is its fragility, so you should work with polystyrene foam carefully.
To work you will need:
- polystyrene foam, preferably in large sheets;
- toothpicks, bamboo sticks (left over from sushi sets);
- glue gun;
- several wooden rulers;
- corrugated cardboard;
- wallpaper remnants;
- foam sponge;
- remains of ceiling plinths;
- accessories for creating an interior.
Let us present the manufacturing process in stages:
- Project development, drawing up.
- Cutting the foam according to the drawing, it is better to do this with a hot knife, then the foam will crumble less.
- Cutting out future windows and doorways.
- Assembly. To do this, you will need toothpicks, which you need to break in half, fasten the pieces of foam with them, apply glue between them and press them tightly.
- The ceiling and floor are also glued using a glue gun, only to strengthen the structure they need to be strengthened. For this, bamboo sticks are used, which are glued to the foam in the form of transverse beams.
- An interfloor staircase is built separately; it is made of wooden rulers or the same foam, and the railings are made of toothpicks or bamboo sticks. After which the finished one is glued into the structure.
- Making a roof, the material for which can be foam or corrugated cardboard.
- Exterior finishing includes painting the entire building with acrylic paint, which is convenient to apply with a foam sponge using light tangential movements. A balcony can be made outside, which is assembled in the same way as a staircase.
- Finishing from the inside uses pieces of wallpaper and colored paper; window sills and other interior details can be cut from the ceiling plinth. Curtains, carpets, and small decorations will add coziness to the design.
- Furniture arrangement, check-in.
Bookshelf or rack
It is not at all necessary to purchase materials to make a home for dolls; sometimes it is enough to use interior items that are no longer in use. So, an old bookshelf or cabinet may well become a home for Monster High or a little princess.
In this case, the amount of work required is minimal: you will only need to seal the back wall of the house and arrange the internal contents. Details such as the roof and chimney for a structure standing against a wall can generally be drawn on or depicted with duct tape.
Old cabinet or chest of drawers
Old bedside tables, chests of drawers, and wooden cabinets gathering dust in the attic or basement can also be put to good use. They are much better suited for larger dolls and require minimal processing.
Internal shelves and drawers can be removed, thus creating larger rooms. Or, conversely, add partitions between high ceilings to match the height of the dolls used. And of course, finishing that will give the product a finished look.
Cardboard
The popularity of cardboard is understandable; it is inexpensive, easy to assemble, and always available. True, this design is short-lived, since the cardboard breaks and tears. Therefore, it is better to use corrugated cardboard, which is used for packaging.
The house can be assembled quickly and easily from scrap materials:
- corrugated cardboard itself;
- finishing elements;
- fabrics and other things.
Tools you will need for work:
- drawings, parts templates;
- knife, brushes, paints, pencils, felt-tip pens;
- glue gun;
- ruler and others.
Photo of the scheme:
Photo of the house:
The assembly process is simple and similar to other designs, but cardboard has some special features: it bends easily, so you need to crumple it carefully. It is better to fasten with glue; the edges are not cut off, but are bent inward and act as a fastening element.
To correctly bend the cardboard at this point, you need to draw something pointed, but not cutting, for example, a pencil. A groove is formed along which the material can easily bend.
It is better to cut out details like windows using a stationery knife along the marked lines.
Boxes
Cardboard boxes are the easiest way to assemble a dollhouse for a girl. To do this, you will need to go to the back exit of the nearest store and pick up boxes that are similar in size. This will make it faster and easier to assemble the house.
Then you need to fasten them together using glue or double-sided tape. Cut out windows and create an environment. Exterior decoration can also be made from boxes, for example, a balcony or terrace.
Fabric
A fabric house is a good option for a small room, since it can be folded up and put away for a while. To make it you will need thick fabric with various patterns and the ability to sew.
The structure is assembled from fabric according to the diagram. Each element is sewn separately, then turned inside out and fastened together into a single house. To seal the walls, you can use cardboard or a plastic mesh, which is placed inside; they will prevent the walls from bending and will make the entire product more durable. However, a house with cardboard cannot be washed.
Video tutorial on creating a house from fabric and cardboard:
Finishing features
Decorating a dollhouse with your own hands raises no less questions than building it. In principle, you can use the same finishing methods as in apartments or houses. For example, in doll rooms, walls can be decorated in the following ways:
- Paint it. Only you need to take special paint, which is approved for use in children's and medical institutions. This can be any type of composition, but the best choice is probably water-based washable paint. It is not too expensive, does not smell when painted, can be wiped off, and can be easily tinted to any color.
- Put up wallpaper. If you have plain wallpaper left over from renovation, this is a good option. But leftovers with a pattern are unlikely to be suitable, since the pattern is usually too large for miniature rooms. For such a case, you can find a sample of wallpaper on the Internet and print it on a color printer. Using the same technology, by the way, you can make “linoleum” or “parquet” - print it, stick it, cover it with at least a layer of PVA. For complete authenticity, use varnish or epoxy resin.
It's easier to glue the wallpaper before starting assembly.
If you have chosen the option to “hang wallpaper”, it is easier to do this before the assembly stage. Even if there are several floors, the blanks are drawn out and wallpaper is glued. This is much easier than trying to cover the corners later.
The exterior decoration is not much different. Painting is most often used. This is the best option in terms of practicality and labor costs. If you want, you can make something similar to decorative plaster. It can be imitated using gray toilet paper. You just need to choose thicker. It is torn into pieces, glued with PVA diluted with water (1 to 1), laid out on the walls, forming the desired relief. After drying, you can paint using acrylic paints. This is a decoupage technique and can be used with colored or regular napkins.
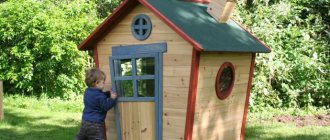
Plywood growth house
This design can be used both outdoors and in the apartment. The house is easy to assemble, literally within 5 minutes it can also be easily disassembled into convenient fragments that can be stored in the pantry.
On a hot day, such a house on the site will provide comfortable conditions for playing outdoors.
Play structure for home
In essence, it is an enlarged copy of a dollhouse. Therefore, its production takes place using the same technology.
Table 2. Step-by-step instructions
| Illustration | Description |
Step 1 | First, a drawing is made with details: determining the dimensions, shapes, number of parts, fixation points. |
Step 2 | Patterns of individual fragments are made on a scale of 1:1 and transferred to sheets of plywood. After this the material is cut out. |
Step 3 | The parts are polished. |
Step 4 | If necessary, parts are painted. |
Step 5 | The house is being assembled. |
Particular attention should be paid to the interior decoration of the house. The design may provide for a bench and a folding table, or a shelf on the wall. Furniture can also be portable plastic or wooden.
When operating the house outdoors, it is necessary that the base be dry, so the structure is placed on a podium or dry grass
Plywood is often used in the furniture industry and for the manufacture of a large number of boxes of various sizes and other very beautiful and functional crafts. What plywood products can you make with your own hands? Read in the special article.
Inside the house, you can lay a soft mat or mattress on the floor, on which the child will feel comfortable.
Window and door decoration
Cutting windows in plywood, OSB, or any other material is not such a problem. First, using a drill and a drill bit, make a hole into which you can pass the saw blade. Next is a matter of technology. The cut hole is sanded until it is smooth, and then it is necessary to make the holes look like windows. For this you need frames and curtains. If desired, you can also make glass from transparent plastic bottles.
A lot depends on the details
Frames with bindings can be made of white cardboard. They are glued on after finishing the “finishing work”. Children love to open/close doors, so it is better to make them from thin plywood. Fasteners can be found - there are piano hinges or small furniture hinges. You can make deadbolts from wire and thin tubes.
From cardboard boxes
For such a house you will need:
- cardboard boxes - according to the number of rooms;
- glue - you can use a stapler or double-sided tape;
- wallpaper, colored paper, magazine clippings, organza, fabrics - for decoration.
- Connect the boxes together. You can make a house with several floors if space allows. Cut out doors and windows in the resulting structure. Decorate each room by covering the walls with wallpaper and the floors with fabric. Hang organza scraps on the windows.
- Decorate the house from the outside. For this purpose, use wallpaper or paper with a “stone” or “wood” pattern.
- Arrange toy furniture. Ready! Barbie can move into her new cozy home.
A Barbie house can be made from several boxes
If this model is too big for your living space, you can make a folding house that is easy to make and very compact. To do this, just connect two cardboard sheets crosswise into grooves. Cut doors in the walls, cover the “rooms” with wallpaper and pictures, and celebrate a housewarming party with your favorite doll and her friends.
Make a compact house out of cardboard by joining two sheets of cardboard crosswise into grooves.
Let there be light!
A house for dolls with lighting is aerobatics. Moreover, there is no need to fence the system with wires, converters, light bulbs and other electrical “stuffing”. There is a very simple and effective solution. Any more or less large lighting store has small LED lamps that run on batteries. Moreover, they are mounted with Velcro. Each lamp is equipped with its own switch and operates on a voltage of several volts. In general, a very good solution.
These are non-volatile LED lamps
If you still want to make real light in a dollhouse, you need a 220/12 V converter or a battery with the appropriate voltage. You will also need light bulbs or an LED strip of the appropriate value, and a bunch of wires. In general, this path is much more difficult and requires much more time, but it is also a possible option.
How to make a roof
If the roof is planned to be ordinary - gable, the layout of the attic space or attic floor must be done so that there is a partition in the center that will support the roof at the junction of the two halves of the roof. This is the easiest way. There are also more complex ones.
The roof on a dollhouse can be made in different ways can be made in different ways
If you need a roof of a complex shape, we cut out several rafters from plywood that will define the shape. We attach them to the walls and cover them with some flexible material. It can be cardboard, fiberboard. The ends of the rafters are coated with glue (preferably carpentry glue), after which the material is laid. If the bend is too steep, additional fasteners may be needed. Usually thin small nails, like shoe nails, are used.