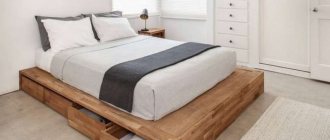
Bedding for a doll's crib: a set for child development
If you have a little princess living in your house, for whom you are ready to create a toy dream house with all the ensuing circumstances, then sooner or later it will come to bed linen for dolls. In pursuit of naturalness and naturalness, you will have to create interiors identical to human ones.
Another situation is also possible - you collect dolls and are seriously interested in creating the proper environment for them, close in its parameters to the truthful one. In both of the above cases, you will be dealing with the need to create bedroom interiors for dolls, an integral part of which is the space and decoration of the bed as the main element of any bedroom.
What seams to sew bed linen with?
Bed linen will undergo a lot of friction, washing, and twisting, so when sewing, you need to choose the strongest seams. The types of seams need to be known to every seamstress who takes on the production of these products.
Let's get acquainted with all types of linen seams, see what the seams used look like.
Pressed seam
The simplest one is the pressed seam. Its width can be 0.5-2 cm. Place two parts facing each other and sew on a machine. Finish both cuts with an overlocker and iron on one side.
The right side of the overlock stitch should be on top.
To get a flat seam, press it with an ironing foot. If he left a mark on the front side, then you need to iron the area under the seam allowance.
In the "iron"
If the fabric is thick, it is better to use an ironed seam. 2 fragments of bedding are sewn together. The sections are processed with an overlocker, then the seam is ironed in both directions.
Covering seam
This type has always been used for sewing underwear, and then bed linen. The closed seam also has another name, since it was used in the manufacture of underwear shirts. This is a linen seam, performed in two lines.
How to do it? You need to put the fragments facing each other. We make a bottom allowance equal to 1 cm, an upper allowance of 0.5 cm, and stitch it on a machine. Then iron the seam allowances towards the larger side. Fold the wide seam allowance under the narrow seam and place a seam 1 mm from the edge. We smooth the seam, then steam it.
Back seam
First, fold it inside out and make a stitch. Then we fold it, hide the stitching and the cut. We lay the line again and iron it in any direction.
Stitch for thin fabrics
The French seam is characterized by the fact that the allowance is sewn inside, which makes the processing very neat.
To get a French seam, the parts are folded inside out, then stitched with a seam width of 0.3-0.5 cm. After stitching, the seam must be smoothed with an iron.
Double
A seam made by laying two lines is called a double seam. How to flash:
- Sew the fragments inside out.
- Turn the parts face inside and stitch.
- Sew the second line.
- Straighten and iron.
Why does a dollhouse need bedding for a crib?
It would seem that dolls can definitely do without bed linen, so why waste time? Look for ready-made kits on sale or do handicrafts... In fact, linen for dolls plays an important role (of course, not for the dolls themselves), and for these reasons:
- If you are concerned about the interior of your dollhouse, then it is almost certain that a bedroom with a bare bed or a bed covered with only one doll blanket will not look nice.
- It is important for your child to recreate some semblance of the human world in games, so when he asks the question of why the dolls sleep without bedding, this will probably puzzle you.
- With the help of bedding for a doll's bed, you can instill in your child the important qualities of a real housewife. If there is linen on the bed, you can ask your daughter to change sets, washing them at the same time. Your child will certainly enjoy this form of play, and you will develop in your child the correct habits for changing and washing clothes. Thus, you will kill several birds with one stone.
How to sew a soft doll ottoman with your own hands from scrap materials: templates, stencils, photos
And now we will make not just an ottoman for a doll, but a real masterpiece!
We take plastic decorative elements and saw off several ends of the same height - the legs of our pouf.
How to sew a soft doll ottoman with your own hands from scrap materials: step 1
Now we take a round base, it could even be a reel of large adhesive tape, but for us it is a perfume cap.
How to sew a soft doll ottoman with your own hands from scrap materials: step 2
We insert the wire - it will fix the doll on the pouf later.
How to sew a soft doll ottoman with your own hands from scrap materials: step 3
On top we put two layers of foam rubber or one layer, but a thick one, we didn’t have one.
How to sew a soft doll ottoman with your own hands from scrap materials: step 4
Now let's move on to the elements. We sand the elements a little to add texture.
How to sew a soft doll ottoman with your own hands from scrap materials: step 5
And cover it with brown paint, optionally with varnish on top of the paint.
How to sew a soft doll ottoman with your own hands from scrap materials: step 6
We cover the base with velvet fabric and make a screed using glue.
How to sew a soft doll ottoman with your own hands from scrap materials: step 7
Now we glue the decorative tape to decorate the pouf and at the same time hide the imperfections of the screed.
How to sew a soft doll ottoman with your own hands from scrap materials: step 8
In the meantime, the elements have dried and can be treated with acrylic gold paint.
How to sew a soft doll ottoman with your own hands from scrap materials: step 9
You can also decorate with gold foil. This is done simply: apply the varnish and carefully press the foil over it, wait 20 minutes and sharply tear it off. Ready!
How to sew a doll's soft ottoman with your own hands from scrap materials: step 10 How to sew a doll's soft ottoman with your own hands from scrap materials: step 11
We glue the legs to the base (since we have a beautiful black base-lid, we do not cover it with decorative fabric, but leave it to shine). And our ottoman for cat dolls!
How to sew a soft doll ottoman with your own hands from scrap materials: done!
Bed set for a doll
The main principle of creating bedding for dolls is their maximum identity with their “human” counterparts. You must understand that the more similar the items for the dollhouse are, the more delight they will cause both you and your child. This is the main highlight and the main difficulty of modeling of this kind. Not everyone has the nerves, strength and patience for such painstaking work.
Manufacturing process
Creating beds for dolls is an interesting process that opens up wide scope for the implementation of original creative ideas. There are many step-by-step instructions on online resources to help you do the job correctly. The choice of a suitable model and design must be made together with the child. Novice craftsmen will be able to make their own structures from cardboard, shoe boxes, ice cream sticks, and plywood.
From cardboard
A simple but elegant sleeping place for a Barbie doll can be made from ordinary corrugated cardboard. In addition to the main material, you will need: album sheets, wire, tape, pieces of fabric, scissors, glue. The entire process is carried out in accordance with the instructions:
- The desired bed model is schematically depicted on a piece of paper. Design parameters depend on the size of the doll.
- Based on the finished template, the necessary elements are cut out of cardboard and their side edges are glued together.
- Two pieces of wire 50 cm long are laid on top of the cardboard parts, fixed with tape, and the surface is filled with glue. The workpiece is placed under a press until completely dry.
- The elements of the body and headboard are pierced with an awl, and wire is threaded into the resulting holes. The fastening points are coated with glue.
- The pieces of wire are tied on the reverse side and the long ends are cut off.
Important parameters of a teenage bed, current models, styles, colors
At the final stage, the bed for dolls made of cardboard is covered with viscose napkins, paper or fabric. The sleeping place will become even more attractive with decor in the form of floral appliqués. Miniature bedding will add realism to the product: mattress, pillows, blanket.
From a shoe box
The basis for this project will be an ordinary shoe box. Tools you will need: scissors, glue, stationery knife, ruler, pencil. The work includes several stages:
- Half of the box is applied to the end, this will be one of the legs of the future bed.
- Legs are drawn on both sides of the box lid, the optimal height of which is 3–4.5 cm. Excess cardboard is cut off. If desired, you can make additional support.
- One or both side parts of the box are cut off after preliminary marking.
- The legs are glued to the crib body.
The surface of colorful boxes does not require special decoration. However, if necessary, you can complement the design of doll furniture with ribbons, fabric or paper.
From ice cream sticks
To make a cute little crib, you need to prepare 18 wooden popsicle sticks and 1 skewer. To connect the parts you will need glue. Additional tools you need are a ruler, a pencil, cotton swabs, and a knife. The process is carried out according to the instructions:
- One of the sticks is cut strictly in the middle. Two sides of the bed are glued together from half and five whole products.
- The skewer is cut in the center, each half should match the length of the side. The elements are glued to the body.
- For the frame, 2 sticks are glued together and then dried.
- The remaining sticks are placed on the bottom.
This original doll bed looks very cute. The product is complemented by bed linen, which can be pieces of textiles. The model can be decorated using gouache or wood varnish.
Criteria for choosing a fall guard for a bed, rules of use
Two-tier plywood
A crib made from this strong material is strong, durable, and safe. For work you will need: bamboo sticks, glue, screws, a piece of plywood, decorative elements. The process is carried out in accordance with the master class:
- Bamboo sticks are cut into 12 pieces. 4 of them should be the longest, since they are used to support the structure. The remaining 8 are divided into 4 segments.
- The sticks that serve as support posts are wrapped with braid.
- Self-tapping screws are screwed into the places where the tiers are fixed, and glue is used for reinforcement.
- The bottom of the plywood bed is secured with self-tapping screws. After complete drying, the base elements are covered with fabric.
All supporting parts are made in accordance with the selected scheme. The result is a reliable bunk bed for dolls. An excellent addition to the model will be bright bed linen that you can sew yourself.
What qualities should bedding sets for a doll have?
Since everything related to children and their interaction must meet certain requirements, linens for a doll’s bed are no exception.
- Safety: Since your child will be in direct contact with the products, they should be hypoallergenic and pleasant to the touch. Since children's skin is quite delicate, it quickly reacts to all sorts of irritants. Choose fabrics for making bedding for dolls from natural materials. It can be cotton, linen, silk and so on.
- Aesthetics: beautiful things should be before your child’s eyes. When choosing decent options for bedding sets for a doll's house, you must choose the color and texture of the material to match the interior created in the doll's bedroom. This way you can instill in your child a sense of style and taste.
- Durability: You should be prepared for the fact that your child will endlessly straighten and make the bed, placing dolls there. In a word, the material for bedding should be “resilient” and durable so that your child does not tear it on the first day.
- Environmentally friendly - bedding for dolls should be made from environmentally friendly materials, without the use of chemical additives and dyes.
- Practicality - the fabric for bedding for dolls must be practical so that the child can wash it, dry it, change sets of linen, etc.
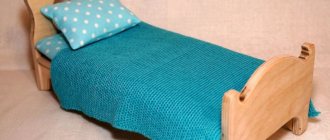
Sweet dreams, Kirochka - a doll bed with your own hands
Hello, dear and beloved Beybikovites!) Hello, guests of our Country) Come to us and see what kind of bed my Kirochka (jointed doll Gotz Clara) will now sleep in.
The theme of the topic is evening and night, but we will come to you with our topic in the morning))))
A good sleep is very important!) And who would argue with that?)) I want our dolls to be able to “relax” and “see” good dreams in cozy cribs, in warm and soft beds)
It just so happened that it was with Kira that we decided to make a bed, that’s why the name of the topic is - with wishes of sweet and good dreams to Kirochka) But of course, other girls (my favorite dolls) managed to pamper themselves in the bed, Kira is not greedy))
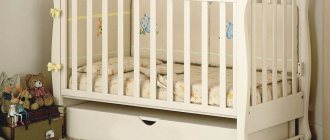
At one time, on occasion, I bought just such an ordinary crib. I was very glad that she at least somehow fits the size of my favorite Gotz dolls))
I should add that the crib served us in topics about Kirochka: it was involved in the decorations, helped us create a village “entourage”))
But in the form in which the bed was bought, it certainly did not satisfy either me or my dolls - a flat pillow in a synthetic rustling “wrapper” and a kind of mattress, or even a bedspread, made of the same synthetics. Is this a bed??? Oh, dolls are people too)) and they DO NOT want to go to such a bed))
We mercilessly remove synthetics!...))) Moreover, this is easy to do - just put it away: perhaps it will be suitable for something else)
How did the work begin? From the mattress!)) If theater begins with a coat rack, then a cozy and comfortable bed begins with a soft mattress))
We sewed a mattress!) Real!) And striped))
It turned out to be a soft mattress) The filling is padding polyester. And of course, we sewed on “things” - pieces of fabric, so that our mattress would look completely realistic) To give the desired shape and so that the synthetic padding would fit better inside, I hand-stitched it with threads
Kirochka liked the mattress) She approved it) She touched it with her hands and agreed with me:
- Really soft))
Our mattress on the other side also has stripes) Only the stripe is narrower.
The mattress must be covered with a sheet) We sewed a sheet, the same as in the village of grandmother Kira - with lace)
- I like it so much) - Kirochka rejoiced) - Now there is a sheet) But one sheet is not enough, you also need pillows. It is so?..
- Of course, you need pillows and a blanket, but how can you sleep without them? “Sweet dreams are impossible without this,” I answered Kirochka, “Let’s start sewing pillows, Kirochka!))
Kira got used to the fact that her grandmother in the village, on her bed, always has not one pillow, but a whole pile!) This means that we will have not one pillow, but, for example, three) In fact, according to your wishes, the number of them on your bed not limited))
Now the pillows are ready!)
It's almost a real bed)
And the bear climbed onto the bed) He loves where it’s warm and soft)
“One, two, three,” Kira busily counted the pillows and continued busily, “That’s enough for now, for the first time.”
“Now there are pillows, too, but what about pillowcases?” asked Kira, “will there be pillowcases?”
“Definitely!)) We’ll sew some beautiful ones,” I reassured Kira)
After sitting at the typewriter, I handed Kira the pillowcases too)
Kirochka reviewed my works and approved)
One pillowcase, for the largest pillow, with such lace...
The second pillowcase, for a medium-sized pillow, we have with other lace...
We “embroidered” the third pillowcase, for the smallest pillow) The pillowcase at the bottom has ribbon ties, and not with the traditional “turn up”, that’s what we wanted)
The main thing for me is that my girls like what I do for them) They are happy, smiling, and I am with them) And how nice it is to sew all this)))
Kira put the pillowcases on the pillows herself)
Kira and Mishka thanked me for my efforts) Nice)
But while gratitude is premature, something else is needed for the bed) At least a blanket is missing)
We sewed a blanket) It’s real - quilted!)), the top is made of red satin, the bottom is made of cotton fabric) Everything is as it should be)
- Wow! A real blanket! — I think Kira was delighted)
Kira and the bear sat on the bed:
- Now we have everything we need to sleep, we can also say good night)
- No, Kirochka, we don’t have everything yet) Something is missing) Think carefully)
Kira, looking at the blanket and pillows, thinking for a minute, suddenly realized what I was talking about)
— There’s not enough duvet cover!)))
— Exactly the duvet cover, Kira, and we will sew it)
After some time, the duvet cover was also sewn)
“I’ll put it on the blanket myself, I know how,” Kira said, smoothing the duvet cover with her hands.
Kira deftly inserted the blanket into the duvet cover and herself tied the ribbons sewn along its bottom.
This is how we sewed the ribbons)
It is much easier to put a blanket into a duvet cover of this “style” - this is firstly, and secondly, this “style” is very consistent with the time of the 50s, from which, according to “legend”, my Kirochka)
To create the authenticity of a bed and bed in a rustic style, Kira and I sewed curtains like these and hung them on the bed at the head and at the feet) Remember rustic beds and their design?)))…
Well, that's all - the bed is assembled))
Of course, Kira was happy and sat on her new bed this way and that)
Kira even lay down on the bed) It seems that she was ready to sleep, despite the fact that it was quite light outside and it was still too early for a night’s sleep)
Kira was falling into a dreamy slumber... What was she thinking about?.. Probably about those good dreams that will come to her when the new moon scatters lantern stars across the night sky...)
“Kirochka, don’t fall asleep, my dear)) We have time to sew something else that you need for sleep,” I asked Kira)
“What?.. What are you saying?...” Kira woke up from her slumber, hearing that she would have something else very necessary for sleep.
- I’m telling you, Kira, that you need to sew a nightgown)) That’s it)) We’ll make it in time))
“Can I lie down, I don’t really want to get up...,” Kira pronounced the words drawlingly, her eyes became completely sleepy...) She hugged the pillow and did not want to leave her soft bed at all)
- Okay, Kira) Just don’t sleep, I’ll call you for a fitting)
I went to sew, and Kira stayed in bed - fighting sleep))
We didn’t need any complications in the nightgown for Kira, I sewed the nightgown in a simple way, quickly))
Fitting soon followed)
“Now I’ll sleep,” Kira said) She had been waiting for this moment for so long - sweet dreams in a soft, cozy bed) I wasn’t going to argue with the “child”)
Captured this “historical” moment))
Kira almost fell asleep...
- Good night, Kirochka)
“Good night,” answered sleepy Kira...
Shh... Quiet)... Let's not disturb Kirochka, let him sleep)... Sweet dreams, Kirochka)...
I say to all of you, our dear guests, in a whisper: Thank you for being with us) Until we meet again)…
Typical doll crib set
As in the case of “human” bedding, a set for dolls should consist of:
The bed must have a mattress, pillows, and blanket. Alternatively, you can cover your doll's bed with a doll's crib blanket.
If you want to sew a set of underwear for dolls yourself, then you can do this by looking at the rules for sewing ordinary products for people. The only point is that you need to reduce the scale, otherwise you can follow all the instructions. The mattress, as a rule, is made of padding polyester, the blanket and pillow are made of ecofiber.
How to make a bed for Barbie dolls?
Barbie is the most popular doll all over the world. And, of course, the crib for such a luxurious beauty must be appropriate.
Materials:
- a piece of foamed polyethylene;
- glue (it’s better to take “Moment”);
- furniture stapler;
- pencil, ruler;
- wide tape;
- knife;
- a piece of sandpaper;
- crepe satin 2 colors (to your taste);
- a small piece of foam rubber;
- decorative elements (lace, braid, sequins, etc.)
Instructions:
- We cut out the base of the crib of a suitable length from polyethylene.
- We cover it with satin and secure the fabric with a furniture stapler.
- We make a rounded back with edging.
- We trim the edging of the back with fabric, gathering it a little in a circle.
- We glue the back parts with glue and tape.
- We cut out the legs of the crib and cover them with fabric.
- We connect the legs, back and base with a stapler.
- We decorate the headboard with braid.
- We make a mattress made of fabric with foam padding according to the size of the bed.
- We cut out a sheet from fabric and decorate it with lace.
- Making pillows and a quilt.
- We decorate bed linen with sequins.
- Making a lace bedspread. The crib for Barbie is ready.
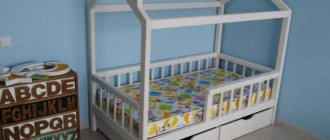
Bedding and bedding for dolls.
Bedding: mattress, two pillows, blanket.
- Share
Mattress (inside there are several hand-stitched layers of padding polyester).
- Share
- Share
I'm telling you how to make a quilt (not my idea). In the photo there is a future blanket for a bunk bed that is in a dollhouse in a children's nursery. So, I sewed a blanket cover, turned it inside out, steamed it with an iron and drew a grid (4 squares by 4, each equal to 5 cm by 5.5 cm + 1 cm).
- Share
- Share
- Share
- Share
- Share
The pillows also contain ecofiber.
- Share
Bed sheets. Wraparound pillowcases (the photo shows how to put them on).
- Share
- Share
- Share
In this photo the blanket is draped over the pillows.
I thought for a long time about how wide this blanket should be: the bed is a double, which means we need to take into account the width of the bed + the height of the blanket for two dolls, and I really didn’t want it to hang too much from the bed, and there was also a blanket on top.
- Share
- Share
I knitted a simple blanket.
- Share
I sewed almost the same accessories and bedding for the bed of our schoolgirl doll.
- Share
- Share
I made linen for a bunk bed.
- Share
- Share
- Share
- Share
- Share
- Share
- Share
- Share
- Share
- Share
- Share
- Share
This is how the cradle bed turned out.
- Share
Cardboard crib for Monster High dolls
For fragile Monster High doll girls, you can make a cardboard crib.
Materials:
- cardboard;
- ruler, pencil;
- PVA glue;
- napkins;
- paints (waterproof);
- textile;
- padding polyester;
- decorative elements (beads, sequins, etc.)
Instructions:
- We measure the height of the doll and set this segment aside on cardboard.
- Make a proportional width and cut out a rectangle.
- To make the structure strong, we cut out 3-4 bases and glue them together.
- We make the legs in the shape of a rectangular block - cut out a long rectangle, mark 5 edges on it.
- We glue the extreme edges and bend the upper edge of the bars.
- Glue the legs to the base.
- Cut out the headboard (if you wish, you can cut out a heart or a flower in it, or you can leave it whole).
- Mix PVA with water and soak napkins in the mixture.
- We apply the napkins to the frame of the crib and let it dry.
- We coat the entire crib with glue, paying special attention to the folds, and leave it to dry again.
- We paint the bed frame with paints.
- We cut the mattress, bed linen and bedspread.
- We decorate the linen with beads and lace.