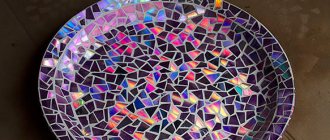
Cutting board as an object of decoupage
The ideal object for applying decoupage images is a wooden cutting board. The smooth surface of wood will allow you to apply the desired image without any problems.
A decorated bread board will decorate any kitchen. Photos of decoupage boards for use as a sample can be easily found on websites dedicated to this hobby.
What kind of food cutting board can it be?
A plywood board is the simplest and most budget option. To manufacture the product, strong and reliable samples of material are selected.
Solid wood boards are practical and durable. Inexpensive ones are made from pine, birch, more hygienic, with a long service life - from oak, acacia, beech.
According to the method of making boards, there are:
- Solid, carved from solid wood or plywood.
- Glued together from separate fragments.
It's easier to cut a whole one. The assembled ones are more practical, less susceptible to deformation, and are assembled according to the mosaic principle.
Appearance and shape depend on imagination and technical capabilities. Cutting boards can be:
- Solid standard.
- Sliding. For installation on a pallet. It is convenient to remove chopped products from them (see photo).
- With waste compartment that slides out like a drawer.
- Angular. Suitable for kitchen complexes with a wide work surface.
- On legs
Material selection
If plywood is chosen as the base, it is worth using class I blade, which has a minimum number of knots and defects. You should not take moisture-resistant material: it is impregnated with synthetic adhesives.
Any type of wood is used for production. Pine, spruce and birch do not last long. General requirements:
- It is necessary that the wood is dry throughout.
- The workpiece should not contain oil stains from technical oil, gasoline and other products: the material tends to absorb odors and some surface substances.
- It is desirable that the board or piece of plywood be solid, without cracks, loose areas, or knots.
The thickness of the workpiece is determined based on the purpose of the board. For slicing vegetables, the thickness can be any; for cutting and beating meat, a thick layer is preferable.
Advantages of decoupage
This technique has a number of special advantages. These include:
- bright visual effect;
- simplicity. Beautiful decoupage of boards is accessible to any diligent person;
- relative cheapness of materials;
- durability of the applied drawings.
What will you need to decoupage a board?
To practice this hobby you will need to purchase the following materials:
- acrylic based art paints. The set must contain white paint. It will create the desired background on the subject;
- glue. You can use the well-known PVA (its disadvantage is yellowness, which may appear over time). You can also purchase special decoupage glue;
- Water-based acrylic varnish intended for coating wooden surfaces. If the board is primarily decorative, then any varnish of this type will do. If it is intended to be actively used for its intended purpose, then preference should be given to parquet or yacht varnishes. They have higher performance properties;
- scissors;
- brushes;
- sandpaper;
- sponges;
- the board itself;
- decoupage napkins with drawings. They can be replaced with any images you like, for example, newspaper and magazine clippings, or printed drawings.
How to make a board from fragments
To make a cutting or decorative board from fragments, you need to add clamps and wood glue to the basic tools. The rest of the process is similar.
Step 1: Preparing the Fragments
Trimmings from different tree species look good together.
The slats are given the same thickness, at least 18 mm. The width can be any. Using a jointing machine, smooth end faces are obtained.
Step 2: Sanding
The faces of the boards are leveled on a planer. You can’t remove too much: a thin product loses its strength.
Step 3: Determine the Width
The blanks are sawn into strips. They can be the same or different widths. The side edges are leveled with a jointer.
Step 4: Assembly
The fragments are laid out on a flat surface in the order in which they will be glued together. For convenience, the blanks are divided into separate groups. Wood glue is applied to the ends of the slats.
The technical composition must be free of toxic impurities.
The groups are fastened with clamps and leveled with slats in the upper and lower planes (see photo).
When the glue has dried, the group blanks are sanded and planed to make them even.
Dividing a large board into narrow fragments makes it possible to process workpieces on machines. Focused on the width of the working areas of planing equipment.
The processed group blanks are leveled in thickness, glued together, lubricating the side ends with glue, and the structure is secured with clamps.
Step 5: Trimming and Final Sanding
When the glue has dried, the board is cut to the required size and the surface is sanded again. The corners can be rounded with a router.
A small groove is cut along the perimeter of the board. The juice generated when cutting food will accumulate there.
Step 6: Oil Treatment
The finished product is treated with oil.
In a similar way, a board is made from fragments of any shape.
Surface preparation
In order for the applied paint to adhere better, it is necessary to sand the surface. Regular sandpaper will do for this.
For greater effect, it is recommended to first go over the entire area with coarse sandpaper. And after that, repeat the operation, but with fine-grained sandpaper.
We recommend reading:
- Volumetric decoupage is the best master class for beginners. Step-by-step instructions and all the features of the decoupage technique (100 photos + video tutorial)
Paper for decoupage - an overview of all types. Instructions on how to choose and use the right material using the decoupage technique (120 photos + video)
- Decorating furniture with your own hands - an overview of the best methods. 100 photos of the best options for modern furniture decor
Options for laying solid boards
How to lay solid boards depends on the type of base. One installation option is used for a concrete floor, and another for a wooden floor. Each method differs in the method of attaching the board and the preliminary steps carried out before installation.
On the concrete floor
Floating installation
It requires a perfectly even base, because the floor is secured only with a tongue-and-groove lock. This installation is used in rooms where high humidity is excluded, because when they swell, the boards will displace each other, the floor will swell, and some elements will not return to place after drying, because they do not have a rigid connection.
It is not advisable to use a floating floor in a room with heavy furniture. When moving furniture, floor boards may be torn out, damaging the lock, and the damaged boards or entire covering will need to be replaced.
The best base for such installation is a liquid floor. Perfect evenness will eliminate the unstable position of the boards, so the coating will lie motionless, without vibration.
To pour a liquid floor, clean the concrete from looseness and dirt, putty it, checking the height differences in level. A difference of more than 2 mm per 3 meters indicates that another screed will be required to fill the liquid floor.
After the putty has dried, vacuum the concrete and pour the liquid floor. The floor polymerization time is 2-5 days, depending on the brand and indicated on the can or bag.
After the floor has settled, mark it, and then proceed with installation. Bring the boards into the room and let them sit for 3-4 days. Depending on the shape of the room, lay out the array from the center or one of the far corners. Having laid one board, place another on it with a shift of half the length.
Insert the boards from the groove side, this will allow you to finish them off using a wooden block and a hammer. Press the laid floor with your knee, place the block against the end side of the inserted board, and gently hit the block with a hammer to put the board in place. As the board sits in place, move the block towards the edges.
Lay the last three rows after you have measured and cut the boards of the last row. First, lay the last row, then insert the boards of the penultimate row by 1-2 mm and raise them by 5-7 cm. Insert the boards of the third row into the floor by 1-2 mm and raise them so that the tongue-and-groove lock of the boards of the second and the third row stuck by 1-2 mm. After this, gently press them down so that the boards fall into place.
If you correctly calculated and cut the boards of the last row, the boards will fit well. If the width of the last row is less than required, there will be a gap between the board and the wall, which you will cover with a plinth or fillet. If the board is wider, then it will not be possible to assemble 1-2 rows. You'll have to take them apart and trim the board of the first row.
Laying solid boards in a floating manner reduces the time and cost of work, and is used for rooms with low traffic. Heavy furniture and a large number of people, as well as high humidity, can damage this coating.
On glue
The preparatory work for laying with glue is the same as for laying a floating floor.
Because for a high-quality adhesive connection, tight pressure is necessary over the entire area of the elements being glued. Therefore, it is advisable to fill the floor with liquid. Laying a solid board on a screed without plywood, not filled with liquid flooring, will not allow the elements to be properly glued.
After preparing the base and applying markings to the floor, it is necessary to prime it. When using dry adhesives diluted with water, to prepare the soil, add twice as much water as is written in the instructions for the adhesive. It is usually located on one side of the bag.
When using ready-made adhesives, add the recommended solvent at the rate of one part solvent per ten parts glue. Then paint the entire surface of the liquid floor with this primer.
The primer polymerization time is indicated on the bag or jar of glue. When the primer is completely dry, bring 4-5 boards into the room and apply glue to the place where they will be installed. After this, apply glue to the back surface of the boards. Do not coat the tongue-and-groove lock with glue, otherwise it will be difficult to disassemble the solid floor for repairs.
Video - laying solid boards on a concrete floor (two-component adhesive Uzin MK 92 S):
Dry the glue for 5-15 minutes (depending on the specific brand - indicated in the instructions for use), then put the board in place. Press it in the middle with your hands for 5-10 seconds, then press it in the same way, moving towards the edges. Then install the adjacent board in the same way. Press it only after the comb has completely entered the groove.
After installing 4-5 boards, tap them with a rubber hammer, this will improve the strength of the adhesive joint. The outer rows are assembled in the same way as when laying a floating floor, the difference is that they are installed with glue.
Laying on a wooden floor
This installation is used to replace wooden floors covered with floorboards, plywood or particle board (chipboard). After removing the covering from the floor, inspect the joists. Repair or replace all areas covered with mold, blackness, or cracks. It is better to do this while renovating the floor than to disassemble it after a year or two.
Having prepared the logs, check their height using a level. A deviation of more than 5 mm per two meters is unacceptable. To eliminate this defect, use inserts made of plywood or fibreboard (fibreboard). They are made 5-10 cm long, the distance between adjacent inserts is 5 cm. The purpose of this work is to create a flat horizontal surface.
Having leveled the surface of the joists, lay plywood on them. The thickness depends on the distance between the lags:
- 40-50 cm – 25 mm;
- 50-60 cm – 30 mm;
- 60-70 cm – 35 mm;
- 70-85 cm – 45 mm (it is possible to use two sheets of 20 and 30 mm, laid one on top of the other and secured separately).
After laying the plywood, check the surface using a level. If differences in height greater than 2 mm per 2 m are found, remove all rises using an oscillating or belt sander. Do not install floating solid wood planks if the height difference is more than 1 mm per 2 m.
When laying two layers of plywood, lay down and secure the first, sand it to even out the differences, and then lay the second layer. When laying this layer, offset the sheets by half the size in length and width. This will bind the layers of plywood together, making the backing as rigid as possible.
Mark the room. Use the same principles as for laying on concrete. Laying with glue ensures the highest reliability of the coating, therefore it is used in rooms with high humidity and high traffic.
When laying in rooms without furniture, with low traffic and humidity, it is permissible to use a floating floor, although fixing it with a stapler or screws will increase its reliability at least twice.
Ways to secure the board
Stapler
To secure, use a construction stapler; it is sold in hardware and construction stores.
Align the board with the markings, press the stapler against the bottom protruding part of the groove, and shoot the staple. Use 12-16mm brackets. Hammer the brackets along the entire length, every 10 cm. First, hammer in a bracket from one edge of the board and check the markings; adjust the board if necessary, then fasten the other edge of the board and check the markings again. After that, secure the rest of the part.
Once you have placed all the brackets, run your finger over them. The brace should feel like a medium-thick thread. If it sticks out, take a large flat-head screwdriver with a blade width of at least 1 mm, place it on the bracket and finish it off with light blows of a hammer.
Strong impacts can crack the bottom of the groove.
Installation with glue
The technology for laying solid boards with glue is no different from work done on a concrete base.
Fastening with a screw
With this fastening method, installation begins from the far corner of the window wall.
Place the board in place and weigh it down with something heavy. For example, place two pieces of plywood measuring 15*30 cm on the edges of the board, and place six bricks on them. This will help you drill through the board and backing, prepare a seat for the screw and secure it.
Drill the hole to a depth of 30 mm, drill diameter 2 mm. Drill at an angle of 30-40 degrees so that the bit enters the base of the ridge and goes under the board. To avoid drilling too much, measure 30 mm on the drill and wrap insulating tape above the mark, which is used for repairs and installation of electrical wiring. The mark will indicate the depth of the hole.
Compliance with these rules will ensure easy tightening and sufficient fastening strength.
Each board is secured with three screws - in the center and 20 cm from each edge of the board. After this, take a drill with a diameter of 3-4 mm, depending on the screw used, and measure 15 mm on it. Install into a drill and widen the holes to avoid splitting the ridge and damaging the board.
After this, drill the board with a drill with a diameter of 10-12 mm to a depth of 3 mm so that the screw head does not interfere with the assembly of the tongue-and-groove lock. Install and secure the remaining floor boards in the same way. Make the width of the board of the last row 0.5 cm less than necessary. This board is fixed on top at a distance of 1.5-2 cm from the wall. The sequence of actions is the same as when attaching to a comb.
Applying the first coat of paint
After sanding, you can apply the first layer of acrylic paint. To do this you should use a brush. Movements should only be made along the grain of the wood.
If during the painting process flaking of the fibers is revealed, then after drying they should be treated with emery cloth and then painted again.
Some craftsmen advise priming the surface before applying the first layer of paint. Paint applied over a primer holds even stronger.
Helpful information
The production of an end cutting board, like any other product, begins with a drawing and calculation. The technology for the production of end cutting boards implies that, based on the size of the product and the thickness of the material, it is necessary to determine the number of plots in the board and their size. This will be the width of the future product. Next you need to decide on the thickness of the shield, this will be the length of the product.
Preparing material for making an end cutting board
When all the calculations have been made, we proceed to the selection of material. One of the most important parameters is the humidity of the board: it should not exceed 6-8%. If you neglect these parameters and use under-dried or raw material, then after production the board will continue to dry naturally. Due to uneven drying of the material, excessive stress occurs in the board, and as a result, cracking of the board.
We purchase material of different humidity levels and carry out the process of drying or drying the boards ourselves to the required levels. Wood is dried in a closed chamber while maintaining a strictly specified temperature. Due to the use of special electrical panels, the temperature is distributed evenly over the entire surface of the material, which allows you to obtain high-quality dried wood of a certain humidity.
Drying boards to the required humidity levels
After checking the moisture content, you need to carefully inspect the boards for cracks, microcracks and other wood defects. Selected high-quality material must be cut in length and width with a small margin. If the board is not edged, you first need to cut the wane along the guide rail.
Determining the required board length Sawing boards to the required length
Sawing boards to the required width
When rough blanks have been sawn, it is necessary to pre-process the material. We go to the jointer and first joint the face of the board, then cut off an angle of 90 degrees.
Planing boards
Cutting a 90 degree angle on a jointer
Checking the correctness of jointing. The angle should be 90 degrees.
When all the workpieces have been planed, we return to the circular saw and cut the plots of the required size. In this case, it is a block with equal sides. All plots should be as similar in size as possible to make them easier to process using a surface planer in the future. If some plot is thinner than the others, it will not be able to be used. Or you will have to reduce the size of all the others.
Preparing plots for processing on a surface planer
After the preparation of the plots is completed, we go to the surface planer and calibrate them to the specified size. Processing on a thicknesser allows you to obtain workpieces of a strictly specified size. Also, after processing on a thicknesser, it is possible to obtain an almost perfectly flat surface, which is extremely important when gluing workpieces. The smoother the surface, the more reliably the bonded surfaces will come into contact, which means the strength and reliability of the product will be higher.
Calibration of workpieces to a given size using a thickness planer
The preparation of the plots is completed, the workpieces are calibrated to the required size and have a flat, smooth surface. We move on to the first stage of gluing. First, we assemble the future shield: we turn the blanks 90 degrees with the sawn sides up, look at the location of the fibers, they should be located in different directions.
Preparing the shield for gluing
At this stage you can see the approximate appearance of the finished board. After the plots are laid out in the required order, just look at the end section of the workpieces. This is roughly what the finished product will look like. Due to the heterogeneity of the wood, the pattern will not be the same over the entire surface of the finished board, but now you can already understand what the end result will be. If necessary, the workpieces can be swapped to achieve the most beautiful surface. After gluing, this will no longer be possible. The main thing is not to forget to alternate the workpieces so that the wood fibers are located in opposite directions.
From the end cuts you can determine approximately what the finished cutting board will look like
Gluing a board to make an end cutting board
Apply Titebond III Ultimate glue to prepared and calibrated blanks of the same size. This glue is non-toxic and does not contain dyes, solvents or other harmful substances. Approved for the production of products that come into contact with food. This means it is ideal for the production of end cutting boards. In addition, Titebond III Ultimate adhesive has increased strength and moisture resistance compared to other types of one-component adhesive.
Titebond III Ultimate adhesive used in the production of end cutting boards
Apply the glue in an even layer over the entire surface of the workpieces to be glued, leaving no unfilled areas. The most convenient way to do this is with a roller or brush, which can then be easily washed with plain water. There must be enough glue to ensure reliable bonding of the surfaces. You shouldn’t skimp on it and apply it in too thin a layer, just as you shouldn’t apply too much. During the gluing process, excess glue will still be squeezed out.
Applying Titebond III Ultimate adhesive to bonded surfaces
After applying the glue, we glue the shield together, tightening it with pipe clamps. They create good pressure, which guarantees high-quality gluing. It is necessary to clamp the shield with clamps on both sides, top and bottom. This is done in order to prevent the workpieces from being squeezed out when tightening and while the glue is drying. It is advisable to use at least three clamps. The more, the more uniform the compression will be.
As mentioned above, excess glue is squeezed out during compression. Glue that appears evenly over the entire surface indicates high-quality gluing of all surfaces. Excess glue can be removed with a dry cloth before it dries.
Tightening the shield using pipe clamps
We leave the shield to dry for 7-10 hours (usually overnight). After the shield has dried, we move on to the thicknesser for calibration. We cut it to the required size and proceed to cutting.
Calibrating the shield on a surface planer before cutting
First you need to trim the shield at an angle of 90 degrees and remove the “step” from the planer.
Trimming the shield at 90 degrees
Next, depending on the thickness of the future product, we saw the shield into pieces of the required size. The optimal thickness of the finished end cutting board is 30-40 mm. This thickness provides sufficient strength when gluing, while the board is not too heavy. The larger the board, the thicker it should be. You can use blanks of greater thickness, in which case the board will be more massive. In some cases this is convenient, but not always. It is not advisable to use blanks less than 30 mm thick, since in this case the board may become deformed during operation. The blanks must be made with a small margin so that after gluing you can level the board on a thicknesser and thereby obtain the desired dimensions.
Sawing the shield into pieces of the required size
We assemble the resulting blanks into a shield, rotating every second part 180 degrees. The more details there are from different shields, the more chaotic the drawing will be. Each end cutting board has its own unique pattern, which depends on the materials used and the direction of the wood grain. Using different types of wood, combining and alternating them, you can get very interesting results.
Assembling an end cutting board from blanks
Next, apply glue in the same way as when gluing the previous shield. We place and glue sacrificial bars, which will later prevent our product from chipping when stitching in a thicknesser.
Applying glue and installing sacrificial bars
We tighten them with pipe clamps. It is important to install clamps on both sides to prevent the workpiece from bending. We do everything exactly the same as before: we tighten it from above and below with at least three clamps. Leave to dry for 7-10 hours (overnight).
Tightening the end cutting board using pipe clamps
Treatment of cutting board surfaces
After the workpiece has dried well, we move on to the surface planer. At this stage, the surface of the board is leveled and calibrated to the desired thickness (recommended thickness 30-40 mm). This is why we sawed the shield with a small margin of thickness. Chips are visible on the sacrificial block on the left. In the absence of sacrificial bars, chips would form on the board itself, damaging it, and this part would have to be cut off.
End cutting board after processing on a thicknesser
The surface of the future end board after the surface planer turns out to be smooth, but rough to the touch. We move on to the sanding process, first the boards are sanded on a drum sander with 120 grit.
Sanding a board on a drum sander
Next, using a circular saw, we cut the workpiece to size in length and width. Standard sizes of end cutting boards: 200×300 mm, 250×250 mm, 250×400 mm, 300×400 mm.
Trimming the workpiece to size in length and width Workpiece after trimming
The saw leaves a rough surface and marks from the teeth of the saw blade. The side surfaces must be finished on a disc grinding machine, having previously rounded the corners of the future product.
Marking corners for rounding
Rounding corners, processing side surfaces on a disc grinding machine
Next, we go to the router and cut out the grips, then we finalize them with sandpaper manually.
Milling grips on a milling machine
Ready-made grips
After the drum sanding machine, longitudinal scratches from the abrasive remain; we remove them with an orbital sander. by car. We start with 120 grain, then 180, 240, 320.
Scratches from abrasive on the surface of the board
Sanding wheels with grain 120, 180, 240, 320 Processing the board using an orbital sander
After the product is sanded, all that remains is to remove the chamfers. From the top plane with a radius of 6.5 and from the bottom 3.2.
Chamfering with a hand router
Partially chamfered edge of a board
Making an end cutting board: finishing
We blow off dust from the boards and proceed to treatment with mineral oil. The board is completely immersed in mineral oil for 30-40 minutes. It can take longer, but less is not advisable, since the board may not have time to soak sufficiently. Mineral oil is thinner than a mixture of mineral oil and wax. It penetrates deeper into the wood structure.
Treating the end cutting board with mineral oil Board completely immersed in mineral oil
Remove the board from the oil and leave it on the stands for 8-10 hours. During this time, some of the oil remaining on the board will drain, and some will be absorbed.
Cutting board immediately after removing from oil
After the oil has been absorbed, we repeat the treatment and again leave the product for some time to soak.
We screw on the silicone or rubber feet. We mark places for fastening, stepping back from the edges of the board by 2-3 centimeters. Then we drill holes in the places where the legs are attached.
Drilling holes to attach the legs Screwing the legs to the cutting board
2 options for legs: rubber and silicone
After the legs are screwed on, the end cutting board must be treated with a mixture of mineral oil and beeswax. The mixture is solid at room temperature, so it needs to be heated to a liquid state in a microwave oven or in a water bath. Using a cotton swab, apply the composition to the product in a circular motion. This composition closes the pores of the wood and is more resistant to wear.
Treatment with a mixture of wax and mineral oil
The finished product is wrapped in stretch film for storage and transportation.
Board wrapped in stretch film. Ready for storage and transportation
As can be seen from everything described above, making an end cutting board is a very labor-intensive process that requires certain skills, as well as special tools and compliance with all technologies. Without all this, it is very difficult to obtain a quality product. Therefore, it is easier to buy an end cutting board than to make it yourself. In this case, you will be sure that you are getting a quality product that will serve you for many years. And if you follow the operating instructions and timely treatment with wax and mineral oil, it will retain its original appearance with virtually no changes.
Second coat of paint
After applying the first layer, the board needs to be dried. The paint dries completely in a maximum of 2 hours. If the layer is thin, this will take 30 minutes.
Next you need to apply a second layer of acrylic. To do this you need to use a sponge. The sponge does not leave streaks on the surface being painted, which is typical for a brush.
We recommend reading:
- DIY furniture decoupage: TOP-150 photos of original ideas. Step-by-step instructions + master class with examples
- Children's room decor: a review of interesting solutions + step-by-step instructions on how to make beautiful decor in a nursery with your own hands (130 photos of new designs)
Laying solid boards with your own hands
Types of boards
A solid board is understood as a finishing material made from dense wood - beech, oak, ash and others. Solid wood is similar to a regular floorboard used for subflooring, and differs from it in the hardness of the wood, texture pattern and thickness. Therefore, the floorboard has two to three times greater rigidity and is used as a base. Whereas solid parquet boards are used only for finishing.
Manufacturers apply different divisions into types applied to solid boards. Some divide it according to the method of cutting logs or blanks. Others divide by type of wood. Third in color and texture.
When choosing a solid board, focus on the following parameters:
- Breed. Classic species - beech, hornbeam, maple, oak and ash are highly durable and therefore last a long time. If the wood species is different, then its performance qualities are unknown.
- Color. When choosing a board, determine the desired color in advance. This will allow you to reduce your search time and choose what you have in mind.
- Texture. Before buying a board, find photos on the Internet of the texture of classic rocks used to make solid boards. Dishonest sellers sell impregnated boards made of pine, acacia, aspen and other soft woods that are not suitable for solid boards.
- Presence of chamfer. Some boards have a milled chamfer along the entire outer perimeter. This treatment allows you to highlight the contours of each board and hide the cracks when the floor dries out too much.
Pros and cons of solid wood flooring
Pros:
- simple installation technology;
- lower requirements for the base than when laying parquet, laminate or cork;
- environmental friendliness - floors made of natural wood do not emit harmful substances;
- service life is twice as long as that of parquet boards, parquet or laminate.
Minuses:
- the price is 30 percent higher than the cost of parquet boards and 80-100 percent more expensive than laminate;
- sensitivity to water.
The pros and cons of solid plank flooring come from the strengths and weaknesses of the wood from which it is made. Abrasion resistance is 2-3 times less than that of a laminate coating.
The use of high-strength acrylic and polyurethane varnishes extends service life, but makes it difficult to mill the surface in order to smooth out unevenness resulting from use. At high humidity, it absorbs water, which leads to swelling and swelling of the coating. After drying it returns to normal.
To increase the moisture resistance of the board, treat the boards with water-repellent impregnations.
Floor marking
For any option of laying the array, the markings are the same. If the board will be laid in a parquet pattern or diagonally, then start marking from the middle of the room. If the board will be located along the room, start marking and laying from the corner farthest from the door, located opposite the window.
If you start marking and laying from other angles, the effect of a distorted floor pattern may occur when, when looking at the room, it will seem that the boards are lying askew.
If the wall with windows is not parallel to the opposite one, then marking and laying must begin from the farthest corner of the window wall, relative to the front door. When laying the array in rooms with a number of corners other than four, or a non-rectangular shape, start marking from the front door and lead it perpendicular to the wall with the front door. Measure the width of the room and divide by the width of the board, this will be the number of whole rows.
Each row should be offset relative to the other by half the length of the board.
Failure to follow these rules will distort the design and weaken the floor. This is especially important when installing a floating floor.
Speed up blow drying
If you don't have enough time, you can use a hairdryer to speed up the drying of the paint. The device must be placed at a distance of at least 30 centimeters from the product, and the air flow should not be too hot. The minimum or, in extreme cases, average speed of the device will be enough.
More ideas
For boards, you can use driftwood and unusual pieces of wood. Sometimes clear shapes are avoided; they make do with grinding and impregnation of the product with protective oil.
You can cut a hole in the finished board to remove scraps, sand the cut, attach legs to the board, etc.
Image overlay
After the second background layer has completely dried, you can proceed to overlaying the image. This is a responsible matter and cannot be rushed.
There are two most common methods of this operation - wet and dry. They will have to be considered separately.
Cutting board on supports
Making a cutting board with your own hands is not difficult. However, making its design with supports and a recess for the plate will be a little more difficult. Based on the presented drawing, you can clearly imagine the design of the future cutting board.
To work you will need:
- oak blanks for the shield (40x33x3 cm);
- 2 oak boards for supports (10x33x3 cm);
- PVA glue;
- varnish;
- sandpaper.
The dimensions of a homemade cutting board are designed for a plate with a diameter of 25 cm and a height of about 10 cm. You can use the dimensions provided, or you can create a board for a plate that will be convenient for you to use in the future.
- Glue three planed oak plates together into a shield.
- When the shield dries, you need to cut out a blank for the board. Length 40 cm, width – 33 cm.
- From one edge of the workpiece, you need to draw a semicircle with a pencil and compass. You can use an appropriate plate instead of a compass. 10 mm from the dotted line, parallel to it, draw a smaller semicircle. This is shown in the picture above.
- Use a jigsaw to cut out a smaller semicircle.
- On the back of the board, mark places for supports and cut them out with a carpenter's chisel. Glue the supports cut from oak into the resulting grooves.
- Carefully sand the surface of the cutting board with sandpaper.
- First, saturate the wood with olive oil, and then varnish everything except the working surface of the board.
An oak cutting board with supports and a recess for a bowl is ready. When the varnish is dry, you can start using the board.
To prevent the cutting surface from retaining the smell of fish, grease the wood with half a lemon and rinse with hot water. It is not recommended to cut meat, cut vegetables and bread on the same board. For each purpose it is necessary to use a board for a specific purpose.
You can see in detail how you can make a cutting board at home in the video.
Dry method
It is simpler and recommended for beginners. First, you need to very carefully cut out the image so that there are no burrs at the edges. After this, you can proceed to applying it to the surface.
The image is glued to the board using glue, which is carefully applied with a brush.
The drawing should lie flat on the board without forming folds. If the latter do occur, you can remove them with a rubberized roller or spoon.
We recommend reading:
- Door decor - 130 photos of exclusive ideas and options. Instructions on how to make decor with your own hands (video + master class)
- Beautiful DIY kitchen decor - a review of the best ideas. Original and modern design TOP-150 photos
DIY wall decor - a review of the best and original ideas. 135 photos of ready-made solutions, all implementation features + instructions
Made from solid material: cut wood, wide board or sheet of plywood
The general manufacturing principle is presented.
Step 1: design
To prevent errors when cutting out a contour, a drawing diagram is used. It can be:
- Draw by hand.
- Print.
- Do it by circling the object. Its shape will become the basis for the board.
Several examples are shown in the photo.
Step 2: Preparing Tools
To create a kitchen board you will need:
- circular saw or jigsaw (preferably electric);
- jointer and planer or hand tools;
- milling cutter;
- sandpaper or grinder;
- mineral oil for impregnation of the finished product.
Step 3: processing the wood blank
The drawing is transferred to the workpiece. If the product is rectangular or square, use a ruler. Another way is to cut out an outline from paper and trace it.
Cut with a circular saw if the board has straight edges, or with an electric jigsaw to create a complex contour.
The edges of the cuts are processed using:
- file;
- sandpaper;
- grinding machine.
When grinding, large chips and small fibers that can get into the products being cut or under the skin are removed.
Step 4: details
Lastly, make a hole for hanging the board and sand the edges. The surface of the product is decorated using any method:
- burning;
- cutting;
- coloring, painting.
For decorative boards, the design can be positioned as desired. For cutting tables, it is worth considering that food may get into the embedded pattern. For this reason, the carving should be shallow. Place ornaments only around the edges. It will become a channel for liquids from products.
Step 5: Protection
In order for the product to serve for a long time and not lose its appearance, it must be coated with protective compounds. For this purpose, safe solutions are used, odorless and without toxic impurities. Mineral oils are best. They are of petroleum origin, but are safe and protect wood well. A suitable remedy from the pharmacy is Vaseline oil.
Treatment:
- The board can be impregnated by dipping and painting. In the first case, the product is immersed in a bath of oil for some time, taken out, wiped, and dried. In the second case, the board is coated with oil using a brush. Apply a thick layer and let it absorb. Apply the surface with a brush 2–5 times until the solution stops being absorbed.
After the first treatment, fibers remaining after sanding may appear. They are removed with sandpaper No. 400–600.
- When the first layer has dried, the product is coated with a mixture of heated oil and natural beeswax in a 4:1 ratio. Apply to the surface with a brush and polish with a soft cloth.
Varnishing
After the glue has completely dried, the product must be varnished, otherwise it will not be durable. The varnish should be applied in several layers, each subsequent one after the previous one has dried.
Thanks to this operation, the drawing will be reliably protected from friction. The shine from the varnish will give the product additional aesthetics.
We hope that in this article we were able to answer the question well enough - how to make decoupage boards with your own hands. Given the desire and time, any diligent person can cope with this task.
Plywood cutting board
Plywood is a lightweight material, it does not deform under high temperatures, is durable and easy to use. For a household cutting board, you should not choose a moisture-resistant one, as it is impregnated with synthetic resins.
When creating a board, to be able to grip it, you should get a comfortable shaped handle or make a special slot.
Manufacturing Guide
The following materials are useful for making plywood products:
- drill;
- jigsaw;
- grinder;
- rasp;
- milling machine.
The main work in the manufacture of plywood boards is carried out with a jigsaw. The cut along the marked contours must be done with a smooth and continuous stroke of the tool for subsequent quick processing of the ends.
Unlike wooden boards, decorative carvings are not made on plywood. The original design is achieved through the contour lines of the product, so the shape should be thought out and drawn on the sheet in advance.
Upon completion of cutting:
- sand the product;
- get rid of chips and irregularities using a rasp and sandpaper;
- remove chips and refine the ends with a milling machine.
Finally, the product should be finally sanded with fine-grained sandpaper, the non-working surface should be coated with varnish, and the working side and ends should be rubbed with wax.
In order to cut a hole in the board, you need to trace its outline, drill a spot and, inserting a jigsaw into it, make a saw according to the marked markings.
Photo of decoupage cutting board
Did you like the article?
1+