How to make an original painting with your own hands from scrap materials?
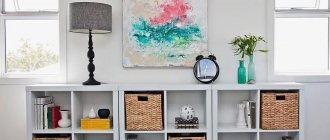
- Paintings in the interior are a key decorative element that enlivens and brings spirituality, sublimity, exquisite beauty and originality to the atmosphere of the room.
- Buying a work by a famous master is a privilege available to a select few or those whose activities are inextricably linked with high art.
Contemporary artists create beautiful works that are available only to visitors to exhibitions and art salon openings.
- However, you can make an equally original painting with your own hands and it will undoubtedly be the author’s!
We offer you several options for creating a picture from what you have in the house. You just need to stop at one of them and get to work.
DIY paintings from scrap materials: painting-dish in oriental style
If the prices for works of art seem sky-high to you, and the desire to decorate the interior with a real masterpiece haunts you, then our selection of instructions for creating a painting with your own hands will definitely come in handy.
- The fact that you did not learn the basics of painting somewhere in Venice or Paris does not mean that you will not be able to make a real painting masterpiece with your own hands.
- After all, the level of skill of most authors who make money by selling paintings and all sorts of trinkets for the interior is no higher than kindergarten scribbles.
- Therefore, we suggest that you do not spend a fabulous amount on buying a beautiful painting to decorate the interior, but rather direct all your efforts to creating it yourself.
Painting dish in oriental style
- If you haven’t thrown away old unnecessary discs in the hope that they will definitely come in handy, now is the time to take them out and use them to decorate a dish in an oriental style.
- Cut the disk into pieces of different sizes and cover a large flat plate. In the same way, you can paste over a sheet of cardboard and insert it into a decorative frame.
How to make a dish in oriental style
Oriental style dish
Step-by-step descriptions of making original paintings with your own hands from scrap materials
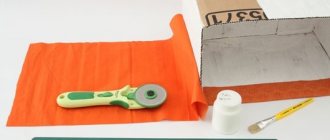
DIY painting on a natural theme
- It is not very difficult to create such a picture. The main thing is to use the right materials, and not look for various replacement options for them.
- We select a beautiful twig with blossoming leaves (you can also use a bouquet of flowers). We place it on a clean sheet of paper and spray paint from a can.
- As a result, we will get a real masterpiece. By positioning the branch differently, you will get another original picture. And three such paintings, placed in identical frames, will take pride of place in the living room. You can proudly tell your guests that you are the author of this triptych.
How to make a nature-themed painting
Tools and materials Time: 3-4 hours • Difficulty: 6/10
- printer paper - 3 or 4 sheets (depending on how many layers you want to make);
- thick white paper according to the number of paper layers;
- corrugated cardboard;
- cutting blade;
- white glue;
- pencil;
- ruler;
- white acrylic paint and brushes;
- Printer;
- LED strip and power supply.
A DIY New Year's paper painting that works on the principle of the play of light and shadow is an original way to beautifully highlight your interior on the eve of the winter holidays!
This painting consists of several layers of paper, cut according to a pattern and placed in a thick frame at some distance from each other. On the back side the structure is illuminated by LED strip. Different layers of paper together create a landscape that is a play of light and shadow and turns the craft into a “magical” winter fairy tale!
If desired, the elements in the picture can be further “customized” and some “special” effects can be added that will make the image even more realistic!
Materials and tools:
Video: Button panel
DIY painting using electrical tape
- Original paintings are obtained using electrical tape.
- To create a bright interior decoration, we lay out geometric shapes (diamonds, triangles, squares) on a sheet of cardboard with electrical tape. You can superimpose one shape on top of another. Fill the resulting pattern elements with a layer of paint.
DIY painting using electrical tape
Painting using duct tape
How to make a painting using duct tape
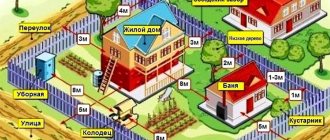
World map transferred to a wooden base
- For such a decorative item you will need a photocopy of the world map and a base made of planks.
World map on wooden base
Volumetric paintings made of wood
Such paintings look luxurious, but require a lot of effort and perseverance. To work, you will need chisels, a special jamb knife, furniture varnish, stain and wooden cloth. You need to transfer the drawing onto the wood and cut grooves of different depths along the contour with a knife to give the image volume. Stain of different colors will add even more volume. Cover the finished painting with varnish.
As we see, there are many opportunities to create a beautiful, unique thing with your own hands. The main thing is that the work gives you pleasure, and that the finished three-dimensional painting fits into the interior and becomes a source of pride in your skillful and hardworking hands.
Video: DIY kitchen paintings
Home decor from old photographs
- You can extend the life of old photographs in the following way: cut out letters of the required size from cardboard, paste them with photographs and create a funny inscription. Such decor will enliven and decorate the interior.
Using old photos to decorate your walls
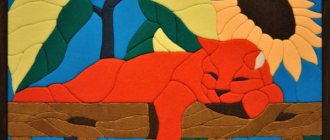
DIY painting - “Swallows”
- We find bird patterns on the Internet. These could be butterflies, pigeons, bullfinches. Print and cut out. We glue paper figurines of birds onto a thick base cut out of cardboard, or we decorate the wall with flying birds.
Painting "Swallows"
Painting "Colorful spots"
- Is it possible to create a real masterpiece in five minutes? Easily! Here are the instructions: Apply watercolor stains to a sheet of paper one by one and dry with a hair dryer.
- Even a child can handle such a creative activity. Colorful spots can be applied randomly, or you can think through the conceptual arrangement of colors.
Painting “Bright Spots”
Stylish wooden accessory
- You can use a piece of any tree as home decor. By gluing a cut paper figure of a person or another picture you like onto the saw cut, you will turn an ordinary piece of wood into a stylish, designer interior decoration.
Wood decor
Original do-it-yourself painting from newspapers
- Ordinary pieces of newspaper can become a real work of art if they are glued together in a special way.
- A tree or other picture drawn on top of the newspaper layer will complete the design.
Using old newspapers to decorate your interior
Volumetric paintings made of fabric
Each needlewoman has stocks of fabrics and many scraps left over from sewing. A good housewife will always find a use for them. Patchwork, a patchwork technique, has been known for a long time and combines the beauty of well-chosen patches and practicality. A skilled seamstress will be able to create from them a real work of art that you will want to look at for a long time.
To create a three-dimensional painting from fabric we will need:
- frame;
- scraps of fabric;
- batting;
- multi-colored threads;
- needles;
- sewing machine with zig-zag function;
- liked the story.
First you need to disassemble the frame: take out the glass and the backdrop. Cover the backdrop with batting and leave it for now. Choose a large piece of fabric that is suitable in color and size, which will serve as the background. You need to transfer the contours of the future painting onto this background using carbon paper. Then transfer the outlines onto tracing paper again and cut out. So we got a “pattern” for which we will select patches of suitable color and size. This process can take quite a long time until the pieces come together nicely.
Now the pieces of the picture need to be stitched onto the background on a sewing machine, using a fine zig-zag and choosing matching or contrasting threads. Individual small elements of the picture can be embroidered by hand. At the end, the finished fabric appliqué is carefully pulled onto the backdrop over the batting and secured to the back with glue. Now you can assemble the frame by inserting the glass and the backdrop with the finished picture.
Another technique for creating three-dimensional paintings from fabric is to cut out individual parts of the painting from thick cardboard, stick foam rubber of the same size on them and cover it with fabric on top. After all the parts are covered with fabric, they should be assembled on a backing and glued tightly to each other, without leaving any gaps.
Video: DIY Painting-Panel. Papier-Mache and Paper Art
Panel of elements with golden glitter
- If you still have finishing materials, do not rush to get rid of them. Try to make an original wall decoration.
- To do this, you need to cut the remaining wallpaper or adhesive film into hexagon-shaped pieces.
- Next, we prepare a thick cardboard base, determine the size of the future wall decoration and begin gluing the hexagons.
Panel made from leftover finishing material
Original panel made of finishing material
Delicate “lace” painting with your own hands
- If you don’t know the technology for making such an interior decor item, then the “craft” seems like a real work of art, and the work itself looks filigree.
- But you can create something similar yourself, using a lace paper napkin and a regular spray bottle.
- A lace napkin can easily be replaced with a snowflake cut out of paper. You just need to place the napkin on the canvas and spray the background with a spray bottle.
lace pattern
Original panel with herringbone pattern
- To work, you will need scrapbooking paper (sold in handmade stores) or leftover wallpaper.
- Cut rectangles of equal size.
- We prepare a cardboard base for our panel and glue in the rectangles, placing them in a certain sequence.
Panel with herringbone pattern
DIY “milk” painting
- To make stylish and expensive decor, it is not at all necessary to purchase special materials. You can use plain paper.
- We choose a simple picture on the Internet, or better yet, several, made in the same style. We transfer the picture onto a sheet of paper using regular milk as a coloring agent.
- If you are not particularly confident in your creative abilities, then use a stencil to transfer the picture. After the image is applied to the paper, you need to run a hot iron over the drawn figures.
Painting using milk