The bed is the piece of furniture on which people rest and gain strength before starting a new day.
Everyone knows that sleep should be not only comfortable and enjoyable, but also useful. In any furniture store you can choose a bed of different shapes, sizes, designs and materials. But, if you have carpentry skills, you can make its frame yourself.
Advantages
The main advantages of making a bed on your own include:
saving money;- the opportunity to make a product to your taste, according to your own sketches and from any materials;
- confidence in the environmental friendliness, safety and reliability of the product;
- the opportunity to express your imagination and realize it.
Having made the bed frame yourself, you can be sure that such a product will be in a single copy. Consequently, you will become the happy owner of an exclusive piece of furniture, with which you can not only sleep comfortably, but also read a book or watch TV.
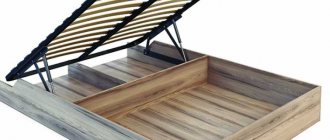
Lifting device
This is a key detail for a transformable bed. Due to it, access to the internal empty part of the structure, which is assigned the role of storage, is provided.
To create a lifting device, you will need, at a minimum, steel strips and shock absorbers. Of course, you can purchase a suitable ready-made mechanism in a special store. But when creating a transforming bed with their own hands, most craftsmen prefer manual methods for making such mechanisms. Therefore, this article will give an example of creating a lifting device for a bed with your own hands.
Important! All parts that will be used to create the lifting mechanism must undergo a strength test! After all, when lifting the bed bars, the load is distributed evenly across them.
To make a lifting mechanism, you will need:
- Top bar. To fix it in the correct position, you will need to reinforce it with an auxiliary bar made of steel.
- The basis of the lifting mechanism. Made from a pair of steel strips.
- Bed rail height controllers. They also consist of a pair of steel strips.
- Bottom bar. It has a supporting function and significantly facilitates the work of hinged supports.
The mechanism is installed in the following sequence:
- The top strip is attached to the base (head) part of the box, the sheathing of the sleeping surface. It is reinforced with the above-mentioned angle bar.
- Attaching the following slats will allow you to adjust the height of the bed frame along with the mattress.
- The bottom support bar is attached to the main frame to facilitate sliding of the hinges. This will allow them to last longer.
- Having completed the installation, it is important to immediately check the smooth operation and strength of the fasteners.
Material
Any manufacture of wooden furniture requires careful selection of building materials. But all of it will be:
- environmentally friendly;
- durable;
- aesthetic.
Information : the tree smells good, is breathable and hypoallergenic.
When creating a wooden bed frame, you can use different materials:
- timber _ Such a product will be distinguished by its luxurious appearance, practicality and ease of manufacture. This furniture can be carved or upholstered;
- boards _ They must be of high quality and free from knots or any other defects. Since the presence of knots will take a lot of your free time to polish them;
- logs _ This building material is used quite rarely, but the products are exclusive and unique;
- array . Such furniture will tell a lot about the impeccable taste of its owners and their position in society. To ensure that the product will serve you for decades, give preference to the following types of wood: alder, oak, beech, ash, pine.
Selection of materials
You need to start by choosing materials for a homemade bed. Three integral structural elements of this furniture: box, base and headboard. Making beds is a process in which every detail needs to be given special attention.
For the box
This element is made from MDF, natural wood or chipboard. At home, it will be easiest to work with the latter material; moreover, it is the most budget option. Chipboard is of low quality and fragility, and this is its main drawback. Moreover, low-quality material contains formaldehyde resins, which are hazardous to health. It begins to release harmful substances under the influence of humidity and heat.
A beautiful MDF bed will be much more expensive, but of better quality. To make these boards, wood chips are used, compressed under pressure and high temperatures. In this case, harmful resins are not used, so the material is environmentally friendly; it is often used in the production of children's furniture. A box made of natural wood will be the most expensive, but it will also last much longer than chipboard and MDF. In this case, the owner will be provided with pleasant tactile sensations, and a special smell will be in the bedroom.
If you decide to make a bed with your own hands, it is better to order cutting at a specialized place. It costs very little, but it will save a lot of time and will be made much better.
MDF
Natural wood
Chipboard
For the base
When making a bed for the bedroom yourself, you should decide on the material for the base and choose wood, metal, chipboard or MDF. The first option is popular among those who value high quality furniture. This material has excellent performance and technical characteristics. The array itself is environmentally friendly, strong and durable. You can assemble furniture from logs or boards. Teak and mahogany are perfect for making a bed base. The most commonly used are oak, beech, pine, ash, cherry, birch, and alder.
Soft woods work best. Pine practically does not crack, while alder often cracks when drilling.
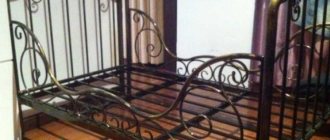
Chipboard and MDF are much cheaper than wood. The toxicity of the first material frightens many, but only low-quality products pose harm. MDF is the best option and is easy to process. In modern interiors, you can increasingly come across interesting ideas on how to make a bed out of metal. This is a particularly durable material, characterized by durability and wear resistance. Such structures are often treated with silver or bronze, covered with fabric or leather. The result is original furniture that will fit seamlessly into a bedroom in modern, country or high-tech style. Another variety is a bed made from a profile pipe. It is not difficult to make such models if you have the skills to work with metal, a workshop and all the necessary equipment.
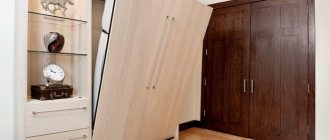
Features and options for placing a bed in a niche, furniture sizes
Tree
Metal
Chipboard
MDF
For headboard
The headboard is an important part of the furniture. This is the first thing the eye stops at, so the detail can set the style of the entire bedroom and have a decisive influence on the interior design. The headboard can be soft. It is important that the material from which the upholstery is made retains its presentable appearance over time. Artificial and natural leather withstand any impact, and also look very stylish. Textiles can also be used for upholstery. A headboard covered with velor, suede or microfiber will look homely. Models with a carriage coupler are very interesting and unusual.
A rigid headboard will make the bed look antique. There are many more design options here. A classic example is a backrest made of wood. Alternatives can be metal, wood panels, plastic, tempered glass and even mirrors. Finally, there may be no headboard at all, which looks very original. In such cases, it is recommended to decorate the wall to form an impromptu backrest from scrap materials.
Faux leather
Genuine Leather
Velours
Suede
Microfiber
Wood panels
Metal
Tree
Plastic
Wood species
You can make a wooden bed from different types of wood:
pine trees
This material is in demand due to its presentable appearance and high technical characteristics. This product will delight you not only with its beautiful texture, but also with its pleasant pine aroma. Products that have been well sanded and varnished are highly resistant to the formation of fungi and do not rot;- oak _ This wood is considered elite. It is distinguished by its luxurious appearance, environmental friendliness, and the ability to create patterns and ornaments on the product;
- beech _ Such beds are distinguished by their original cut patterns, durability and strength. Beech models look noble and fit classic motifs;
- birch trees This type of wood is easy to process, has a high level of strength and elasticity, and is attractive.
Attention : when choosing wood, you should base it on what kind of bed model you need.
To make a wooden product look aesthetically pleasing, but not cost too much, you should know some secrets :
- for decoration and frame it is worth taking expensive material (oak);
- for making legs, cheaper wood (pine) is suitable;
- and for the slats that will be located inside the product, you can choose the simplest option (birch).
Required Tools
To make a wooden bed with your own hands, you will need:
- boards at least 3 cm thick for the frame;
- 4x4 timber to create a support for the slatted base of the mattress, to strengthen the entire structure at the corners, to make legs and a headboard frame;
- 4x6 timber for a partition along the entire length of the frame, if you plan to make a double bed from solid wood;
- carved decorative elements to create backrest lintels;
- slats (lamellas);
- metal corners of different widths;
- stain of the desired shade, varnish, impregnation, glue.
https://www.youtube.com/watch?v=1lvpd-Affg0
Self-production requires the following tools:
- hand saw or electric jigsaw;
- sanding machine and sandpaper;
- screwdriver or drill with a cue ball and a set of drills;
- screwdriver, hammer, measuring tool.
If you plan to make a wooden bed with a lifting mechanism, you need to purchase the most suitable one.
To ensure the movement of built-in drawers, retractable bearing rails will be needed. When choosing accessories, you need to pay attention to the quality of all parts. It is recommended to ensure that there are no plastic components or visible defects.
Drawing 160 by 200
Before you start making a bed, you should decide on its size. The ideal option for two adults would be a double model with dimensions of 160x200 cm.
This drawing should indicate all the main points for the manufacture of furniture:
- exact dimensions;
- assembly materials;
- fasteners.
At the stage of drawing up the drawing, it is important to determine not only the size of the bed, but also the height of the legs of the product. To do this, just imagine from what height it will be most convenient for you to get up.
Attention : too low products, although they are original, are impractical and completely inconvenient to use.
At the stage of creating the diagram, decide on the headboard and footboard . Consider whether you might want to make the product functional and equip it with drawers for linen or a lifting mechanism.
How to make a wooden bed with your own hands
Let's look at how to make a bed with your own hands from wood, using the example of a single bed with a beautiful slatted headboard and separately purchased carved legs.
Frame assembly
Making beds from wood begins with assembling the frame. In this case, transformation of the base for a mattress and additional drawers are not provided, so the whole process is divided into the following stages:
- Marking and sawing boards into blanks corresponding to the main width and length of the bed, followed by grinding the cut ends.
- Preparing pieces of timber to strengthen the frame at the corners. Their length should be equal to the height of the sides of the bed. For the basis for attaching the slats under the mattress, we take a beam with a length that is equal to the side parts. Making the side parts of the headboard.
- The bed base is folded so that the side boards are located between the front and rear backrests. They are connected with metal corners or with pieces of timber. The finished rectangle should allow the mattress to fit exactly inside.
- Then a longitudinal beam is installed in the center of the width of the board, onto which the sheathing will later be attached. You can pre-make grooves about a centimeter deep for more durable installation in increments of 10-15 cm.
The resulting structure will act as the frame of the bed and the basis for securing its remaining components.
Back
Often a wooden bed begins to be created from the headboard and footboard. In this case, the second component is not provided, and the backrest will be fixed when it is completely ready.
To begin with, a headrest frame made of timber is laid on a flat surface, which consists of two side, upper and lower parts. All cuts must first be sanded. For lintels, ready-made carved balusters are used, the quantity of which must satisfy the owner of the product. They are placed between the bars maintaining the same distance.
First, holes are drilled that will go through the bottom beam and continue into the lintels and side pieces. Then they are firmly twisted using self-tapping screws of a slightly larger diameter and the appropriate length. The same manipulations are carried out with the upper part and completely twist the headboard.
Lamels
Beech slats are used to create the base for the mattress. They are highly durable and can effectively absorb the weight of a mattress and a person.
It's easy to install bed slats with your own hands. The main condition is to ensure a slight upward deflection, thanks to which all the functions assigned to them will be performed.
Fastening occurs using a hammer and ordinary nails to the side support bars, which are located on both sides of the frame inside.
First, all the components of the base are installed in their places. If there are grooves for them, this process is greatly simplified. After installation, the fullness of the berth is assessed. If necessary, reduce the step and only then securely nail the parts with 2-3 fasteners on each side.
If a person’s weight is large enough, the distance between the elements should be 7-10 cm. To withstand small loads, an arrangement with a pitch of 15 cm will be sufficient. Since the price of lamellas is rather high, sometimes their quantity plays an important role.
The slats are made in a length that is intended for one sleeping place. Therefore, a double bed made of solid wood is supplemented with another wide beam, which will simultaneously strengthen the entire frame and serve as a central support for two rows of sheathing.
How to make slats and base
With the choice of materials, selection of design and determination of dimensions, you can proceed directly to the manufacture of individual elements of the product. To do this, you should pick up a drawing to check all sizes. The production of parts will proceed as follows :
- We take lumber.
- Mark the cut lines on it with a pencil.
- Using a ruler and a cutter, we detail individual elements.
After manufacturing all the necessary parts, you can begin processing them:
- remove all knots and defects with sandpaper . To do this, we prepared in advance several different types of sandpaper: coarse, medium, fine;
- the headboard and end boards with an electric planer .
Now you need to make the slatted base of the product. Slats are slats that are attached to the base of the bed at a certain distance. This distance should not exceed the width of the lamella itself. The slats are necessary to give the bed an orthopedic effect and to ensure ventilation of the mattress.
It is better to use birch to make them . Since this material is flexible, elastic, and easy to process.
Important : for a double model, it will be enough to make 30 slats.
When making lamellas, you should adhere to the following rules :
- the thickness of each part should be 0.8 cm;
- it is better to give the product a curved shape;
- the width of the lamella can vary between 5.3 – 6.8 cm;
- they are installed on the base of the frame with a distance from each other from 2 to 6 cm.
You can attach the slats to the frame in different ways:
- self-tapping screws;
- using thick edge tape;
- onto the prepared bars.
Elements
Any bed consists of the following elements:
- frame;
- headboards and footboards;
- slats.
When making and assembling a bed yourself, special attention should be paid to its frame . It can be made from cheaper wood (pine, birch). The main thing is that the lumber is of high quality and without any defects or flaws.
As for the headboard and footboard , here you can show your imagination. These furniture elements can be made from either natural solid wood or laminated chipboard, MDF, or OSB boards. Interesting headboard designs are:
- thread;
- artistic painting;
- headboard - lattice;
- headboard covered with leather or any other textile;
- sewing small pillows onto a soft headboard.
The choice should be made based on the overall interior of the bedroom and your personal preferences.
As for lamellas , when making them it is worth choosing elastic and resilient tree species.
Pine or ash would be an excellent choice. As a rule, about 20 pieces of slats are enough for a standard double bed. Their width can vary from 5 to 8 cm, and they are installed on the frame frame in increments of 5 cm. Tip : lamellas can be made by yourself, or purchased ready-made.
Assembling a double bed
The assembly of a double bed is as follows:
We set the footboard and headboard vertically and support them with some objects.- We apply the drawers and check the evenness of the corners.
- We mark the points for the dowels and connect the drawers to the backs.
- We remove the drawers and drill holes in them .
- We assemble the structure by choosing holes on the backs.
- We proceed to the complete assembly of the base - we drive the dowels into the grooves and lubricate the parts with glue . For better fastening of parts, we wrap the product with rope.
- Leave the product for several days until the glue dries completely.
- Next, we make the flooring . For the slatted bottom, we distribute special holders along the frame.
- We select the spaces between the slats so that the mattress can easily be supported on them.
- We connect the slats with longitudinal bars.
- Now you can start installing the legs . To do this, we fix the beams on the inside of the corners of the frame.
That's the whole simple process of assembling a wooden bed frame.
Important : in order not to spoil the appearance of the bed, choose screws whose thickness will not exceed the thickness of the boards.
Instructions for making a bed
The double bed is made of boards; the thickness and width can be adjusted by the master depending on the availability of lumber and the design features of the product.
Choosing bed material
Preparation of frame elements
First, you need to draw up a drawing of the product, which will help you correctly calculate the amount of material, determine the main fastening units and the order of work. When drawing up a drawing, you need to take into account the load on the bed during operation (one or two people will sleep on it, their dimensions), as well as the recommended parameters:
- width: for one person – 95±5 cm, for two – 180±15 cm. For a single bed, 130-150 cm is enough;
- length: for an adult – 200 cm, for a child – about 150 cm;
- frame height – within 40 cm.
Approximate parameters of a double bed
Drawing and assembly diagram of a wooden bed
Drawing of a bed with a drawer back
Step 1: Cut the boards to length for the sides of the bed. You can work with a portable circular saw; the board is fixed on the work table with clamps.
Cutting blanks for sidewalls
Step 2. Level the surfaces using a home jointer (jointer). In our case, the boards are used, the surfaces are quite curved. Such material cannot be corrected in one pass; several repetitions must be done, after each pass the knives are lowered by 1–2 mm. No longer necessary for several reasons. First, not every machine has enough electric motor power to handle a significant load. Secondly, the greater the cutting depth per pass, the worse the surface quality.
Level the surface of the boards
After leveling the surface, all boards must be adjusted to the same thickness. This can take quite a lot of time, but you cannot do without such an operation.
Important. If your machine is weak or you have doubts about the quality of the knife, then it is recommended to run the boards only in the direction of the fibers. If you do not follow this rule, deep scratches may appear on the surface. A powerful, well-adjusted machine with sharp and correctly positioned knives does not react to the direction of the fibers; it prepares lumber faster and with better quality.
Step 3: Align the boards to the width. Cut long boards into pieces to size. The data must be taken from the drawing; it is advisable to first draw up a summary table of parts indicating their sizes and quantities.
Cuts smaller pieces
Prices for the popular range of miter saws
Miter saw
Step 4. Using a circular saw, finally align the sides of the workpieces, work carefully and constantly monitor the dimensions.
Trim boards on all sides
Step 5. Saw the short pieces in half, these will be the bars for the back.
Short pieces are cut in half
Now you have all the pieces for making a headboard and footboard. You can start making these bed elements. But first, sharp corners should be removed from all boards, for which an electric cutter is used. This is a very good universal-purpose tool; it is used to make not only technological fastening seats, but also decorative elements.
Using a milling cutter, grind off the sharp edges of parts
Practical advice. At the first opportunity, make a special table for such a cutter. Drawings and diagrams are available on the Internet; the time spent will pay for itself the first time you make furniture.
Prices for a linear series of milling cutters
Fraser
Preparing the backrest
Free up your workspace. The table must be level and clean, its dimensions must allow the parts to be laid out for proper marking.
Step 1. Lay out two side beams and lintel boards on the table. Mark the joints, before doing this, check the dimensions of the workpieces, they must be completely identical. After you mark the vertical location of the crossbars on the legs, you need to make marks taking into account the placement of the fastening along the width of the bars. To make the process easier, use flat 10 mm thick boards as supports, lay the parts on them and mark the contour lines of the groove. The markings must be done very carefully; mistakes will always be noticeable, and this has a negative impact on the appearance of the bed. All markings must be completely symmetrical for both sides of the headboard and footboard.
Parts for the headboard are placed on the table and markings are made
Step 2. Drill holes in the sides and tighten the parts with self-tapping screws. The cross boards in our example are wide and thick; for reliable fixation, you can use four self-tapping screws for each element. The same actions must be done on the other side of the bed part.
Holes are drilled in the bars, the elements are tightened with wood screws
Don't be afraid that the holes for the screws are visible on the front side of the legs. In the future, they will be closed with special decorative strips.
Screw in the screws on the other side
Step 3. Transfer the distances between the holes to the template and use it to fix another board on the back. You can use a small piece for the template. Secure it on the back side of the leg with a clamp and use a drill with a long drill bit to transfer the holes onto the template.
The foot of the bed is assembled using the template
Important. Never place holes in boards in one line, this increases the risk of cracking. Always make a slight offset and place the holes in a zigzag pattern.
Please note that four holes are made for each board, and only two screws are screwed in. We will tell you why the rest are needed a little below. Place the back and footboard on the floor and check the dimensions of the frame boards (tsars).
Trying on frame boards
Step 4. Glue decorative trims to the legs. Generously coat both surfaces with wood glue and tighten them tightly with clamps. Carefully remove any remaining glue with a clean, damp cloth. Leave the elements to dry for at least 12 hours. While the parts are drying, you can begin to prepare the bed frame.
Wooden overlays are glued to the legs on the outside
Prices for clamps
Clamps
Frame making
Step 1. Trim the boards, the cut angle should be perfectly straight.
Cut the ends of the boards so as to achieve a perfectly even cut
Step 2. Use a milling cutter to chamfer the ends, and use a grinder to polish the parts.
Every detail needs to be polished
Step 3. Place the finished headboard and footboard on a flat floor, try on the location of the side boards of the frame. Place the parts in their place and secure them firmly with clamps. In order to completely eliminate movement of parts during drilling holes, at least two clamps are needed for each board. Assemble the frame in this way, check its dimensions and especially the angles. At this stage, it is not too late to correct the mistakes made.
Assemble the frame, temporarily fixing the boards with clamps
Step 4. Screw the side boards of the frame one by one around the perimeter of the bed.
Screw the sides with self-tapping screws
Step 5. Apply wood glue to the decorative strips for the sides of the headboard. Place them in place, align the position and tighten tightly with clamps. Thoroughly clean the front surfaces of any exposed glue.
The sides of the headboard are covered with wooden overlays
Practical advice. Decorative boards are prepared in advance or as needed. Make your own decision depending on your personal capabilities, the chosen technology for assembling the bed frame and the size of the workshop. On decorative strips, you need to remove the edges with a hand router; the profile of the router can be the same as on the rest of the bed parts, or new.
Glue the strips to all the headboard and footboard boards. After all sides of the parts have been processed and the glue has dried, you can begin to fix the bars to the side boards of the frame. The mattress slats will rest on these bars.
Attaching the slats to the frame
Step 1. Saw off thin 20x30 mm bars to size, the length should be equal to the length of the mattress. The parameter can be found after measuring the length of the bed frame.
Cut the slats to the required length
Step 2. Prepare two short pieces of boards for the template. The width of the template should be equal to the distance of the slats from the top edge of the long side boards. Install them on the side walls, secure with clamps.
Two templates are attached to the sidewall from the inside
Step 3. Apply glue to the back side of the slats and side boards, and use clamps to install them in place.
Glue the strip to the side
Step 4. Drill holes in the parts and screw in screws of the appropriate length. The distance between the hardware is no more than twenty centimeters; these units will be subject to heavy loads. In addition, slats can further increase the strength and stability of the bed.
The slats are screwed with self-tapping screws, pre-drilling holes of the appropriate diameter
The same work must be done on the other side, give time for the glue to dry completely.
Practical advice. Never continue work unless the wood glue is completely dry. At the slightest fluctuations, adhesion indicators decrease critically, and the gluing efficiency tends to zero. The bed will begin to creak while turning, the sounds are very unpleasant and irritating. We will have to urgently repair it, and for this it is necessary to disassemble the structure.
Prices for popular models of screwdrivers
Screwdrivers
Preparing the slats
These elements are made from 100×150 mm timber.
Step 1. Using a circular saw, cut a piece of lumber to the appropriate length. First you need to cut it off, and only then measure the length. If the saw cannot cut the entire thickness of the beam in one pass, then you will have to turn it and make cuts in two passes. There is no need to worry if discrepancies are noticeable at the end; this is not critical for the lamellas. If desired, you can prepare boards with more precise dimensions, but for this you need to leave an additional margin in length.
Measure and cut timber
Step 2. Pass the timber through the router, align the planes of the workpieces.
Level the sides of the timber
Step 3. Place a ruler on the machine and align the side edges of the beams.
Use a circular saw to remove a thin layer of wood from the sides of the beam
Step 4. Set a straight edge one centimeter from the saw teeth and file the slats for the mattress. The quantity depends on the length of the bed; the gap between the boards should not exceed their width.
Set the desired cutting width and cut lamellas from the timber
Step 5. Pass all the lamellas through the router, trim their surface and thickness. Adjust the boards to the same size in length; they should fit into the bed frame without wobbling, but large gaps are not welcome. The block is only two centimeters thick, so it will not withstand a heavy load. In addition, to increase the strength of the structure, some boards can be screwed with self-tapping screws, which means additional tensile strength.
Level the surfaces of each lamella
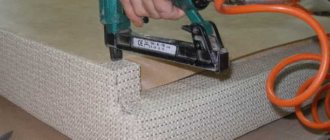
Step 6. Place the boards in place, evenly distributing them along the length. To prevent the slats from moving when using the bed, they can be secured with two tapes on the sides of the bed. The tapes are fixed to the boards with a stapler.
The boards are evenly laid out inside the frame
For a double bed, additional reinforcement of the frame with a longitudinal beam in the center is required
The bed is ready, now all that remains is to paint or varnish it. Before coating, it is recommended to saturate the wood with stain; this composition emphasizes the beauty of natural boards.
How to paint a wooden bed
Finishing
To make a wooden product attractive, it must be covered with stain and varnished two to three times . This will not only give the bed a presentable appearance, but will also improve its performance characteristics.
When choosing a varnish, give preference to polyurethane-based material. It is harmless and does not release toxins. In addition, this material is wear-resistant and resistant to mechanical damage.
Attention : by giving preference to matte varnish, dust and scratches will be less noticeable on the product. And the glossy coating will immediately reveal all your mistakes in work (irregularities, cuts and other defects).
Some people prefer fabric and foam upholstery. But this is suitable for products made from cheap lumber. The beautiful texture of oak or beech should not be hidden under fabric . If desired, the product can be painted, choosing a color that matches the overall interior. Again, this option is not suitable for elite and noble wood. You can also emphasize the originality of the product and make decoupage on its headboard.
Advice : if you are serious about furniture for the bedroom, try making a dressing table, bedside table and changing table. You might also be interested in a loft-style wardrobe or table.
Decor options
Three boards serve as decorative finishing. They can be decorated with carvings, which are made on a milling machine, or with engraving. How to attach decorative elements:
- After cutting and sanding, decorative boards are attached to the top of the frame;
- Wood glue is applied to the ends of the wooden planks, and the planks are pressed with clamps until they are completely secured;
- This decorative finish will not only reduce the risk of injury to the sleeper on the ends of the frame boards, but will also give the bed a more beautiful appearance;
- It is advisable to press decorative boards with clamps using small pieces of wood. They increase the area of pressing 2 boards against each other, and also protect decorative boards from marks left by clamps.
In addition to attaching decorative boards, you can use a carved headboard as decoration, or choose bed designs that include a footboard. As a beautiful decorative element, you can create a special place for the cat at the bottom of the bed, or rather under it. Making this place is easy with just a few boards. To ensure secure fastening, as well as to prevent the bed from creaking, all holes prepared for self-tapping screws must be filled with wood putty after finishing the work. In this case, the bed will not creak while sleeping.
As you can see from this article, which includes step-by-step instructions on how to make a bed out of wood, if you have enough tools and materials, the work can be done at home. Wooden furniture does not belong to the class of simplest furniture; it is considered elite, and therefore is very expensive. There is simply no other way to save on luxury furniture other than making a bed yourself.
Photo
Despite its apparent simplicity, assembling the frame leaves ample opportunity for self-expression:
Models
A classic frame with a headboard, with drawers built into the head of the bed, frames with lifting mechanisms for access to the drawers inside, models with pull-out containers for storing things.
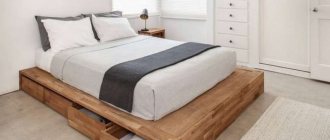
DIY floating bed
How to make such an unusual model? The model received this name because upon external inspection its support is not visible, so the impression of levitation is created. The advantages of this option: when attached to the wall and floor, it is very stable, despite the flying effect.
Made from available materials. Will add originality and uniqueness to your bedroom. There are also disadvantages: fastening the structure to the wall is mandatory, so there are not as many options for arranging furniture as we would like.
In this type of bed you cannot install drawers for linen. The main rule when assembling is that the bed support should not be visible when entering the room. The support can also be made of material with a mirror surface.
Double bed
The standard size is considered to be: width 160-230 centimeters, length 190-220 centimeters. The frame must be able to withstand high loads well, because this model is designed for two people. Oak wood is suitable for this type of furniture.
carved
Such furniture is recognized as exclusive, it is exquisite and emphasizes the refined taste of the owners. Classic carvings made from different materials do not lose their relevance and originality.
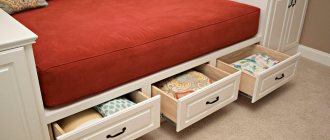
With drawers
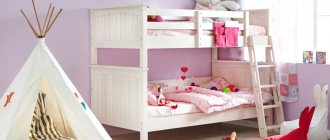
They are divided into double and single rooms. Differences in the volume of built-in drawers for things installed on guides. An excellent choice for a children's room.
Cot
A wooden crib for a child is the best choice. Eco-friendly material. You can make a crib connected to a changing table and drawers below. There are cribs with unusual designs.
For example, you can also make a house bed with your own hands even without special skills. Children especially like this crib model, because it creates a unique fairy-tale atmosphere in the children's room.
When assembling the frame of this model, be guided by the size of the child’s mattress and the child’s weight, which increases with age; the side upper bars should easily support the child hanging on them. Bars measuring 45*45 are suitable for assembly. Pre-drilling holes for self-tapping screws will also have a positive effect on the quality of use of the wood.
The side planks are taken the same size, the contact angles are filed at 45 degrees. Careful processing of the wood with a sanding machine or sandpaper is mandatory, because no one wants a child to catch splinters. You can decorate the frame with a garland of light bulbs or decorate it with curtains.
Bed sizes for a child are selected according to age and are standard.
Up to three years of age, beds of 120 cm by 65 cm are chosen. Small children will be able to sleep comfortably in it until they reach the age of five.
Until school age. For children during this period, comfortable bed sizes are considered to be 140 by 170, 160 by 70 and 80 by 190-195 centimeters.
For schoolchildren, standard size single beds are selected.
Materials, tools that you will need if you decide to make a bed from timber with your own hands:
- timber
- Laminated particle board
- Fastening small things - plugs, self-tapping screws, dowels, eccentrics.
- Edge finishing material
- Glue
- Stain, it will emphasize the natural beauty of the wood texture and improve performance.
- Brushes for sizing and painting
- Putty for working with wood.
- Carpentry tools (plane, electric saw, jigsaw, screwdriver)
- Sandpaper, marking pencils
- Laser level, metal ruler for marking
Let's consider an example of cutting and assembling a wooden frame of a double bed with a headboard with dimensions: width 160-230 cm, length 200-230 cm.
First you need to draw a drawing of the future base for the bed, taking into account the dimensions of the mattress. The length of the mattress that is comfortable for sleeping should be up to 20 cm greater than your height. Determine the type of construction connections. They are detachable and not. It is better to choose sanded wood, there will be no knots on it, and the finished frame will look neat.
If this is your first experience in making frame furniture with your own hands, you can use the ready-made diagrams and drawings presented in this article. How much consumable material do we need for this? Let's look at it in detail.
Boards for assembly
- Frame. Pine or oak is the main frame material. Dimensions 2.5*20*240. We need 4 of them
- Support beams. 5*10*240 in the amount of three pieces
- Decorative finishing. 2.5*5*240 is the same amount as we buy for support beams.
- Legs. Bar 10*10*240 It is acceptable to use fir. 1 PC
- Slatted frame bottom. 2.5*7.5*240, 19 pcs.
Making a bed frame
It begins with cutting the material according to the drawn up sketches in accordance with the dimensions according to the drawing. The process of forming a frame from hardwood. Having cut the parts to the dimensions required according to the drawing, we drill holes in each for fasteners up to 30 mm in size.
The end parts of the boards are carefully cleaned with sandpaper or a sanding machine. Then we cover the parts with adhesive for wooden surfaces in two layers, always waiting for the previous one to dry.
Afterwards, fasteners are inserted into the finished holes, and the parts are assembled. Remember that the screws are drilled into the component frame of the board at an angle. At the end of the work, the straightness of the corner joints is carefully checked. You can proceed to the next stage of assembling the frame.