Options for constructing country pools
All pool designs can be divided into two large groups: stationary and temporary. Stationary structures include all structures partially or completely dug into the ground, which cannot be moved without destruction. The bowls of such pools are made of monolithic concrete, brick, and sometimes concrete blocks are used in construction. They can use a polymer liner (plastic bowl) or provide waterproofing using film or coating waterproofing materials.
The initial stage of construction of a permanent pool
Temporary pools are mainly inflatable and frame. They differ in that they are installed in the spring, and in the fall they are rolled up and hidden.
Which swimming pool is better for a summer residence? If you are not yet sure whether you need such an “attraction” on your site or not, buy the cheapest and fastest to install: inflatable. It holds water due to the inflated ring. The disadvantage of such a pool is that it is not very deep: 1.2 meters including the sides is its limit.
But, if you want it for children, then you can’t think of anything better, and adults can “hang” on the wall and relax after “relaxing” at the dacha. Depending on the quality and intensity of use, it can last from a couple of years to four to five.
Even an adult can relax more or less comfortably in an inflatable
A frame pool is a little more expensive and a little more difficult to install. It already has a frame in the form of pipes, on which a special film in the form of a bowl is hung. The depth of such a pool is up to 1.8 m.
Stationary swimming pools are for those who have decided that they simply need a swimming pool at their dacha. Construction and maintenance are not cheap. First, a pit is dug, then a monolithic slab is poured, and in the second stage, the walls are erected. It is necessary to take measures to waterproof the walls outside - so that underground and melt water do not penetrate into the bowl. Next comes insulation of the walls. If this is not done, heating the water will be problematic. After this, a set of measures begins to waterproof the walls inside the bowl, and then finishing work begins.
A large pool requires constant maintenance
But the finished bowl is not the entire permanent pool. It is necessary to clean the water: leaves, dust and debris fall into it, bacteria and algae multiply. To bring the water into order, you need a pump, a filter system, chemical reagents, and also means for “scooping out” leaves and sediment from the bottom. Some equipment is also needed to maintain a temporary pool, but since the volumes are smaller, you can often get by with manual cleaning or water replacement, or you can use improvised means. And if there is at least 5-6 tons of water in a stationary pool (this is a small 2*3 bowl with a depth of 1.4 meters), then even such a volume is problematic to manually clean.
Swimming pool for a summer residence: types and features
All pool designs can be divided into two large groups: stationary and temporary. Stationary structures include all structures partially or completely dug into the ground, which cannot be moved without destruction. The bowls of such pools are made of monolithic concrete, brick, and sometimes concrete blocks are used in construction. They can use a polymer liner (plastic bowl) or provide waterproofing using film or coating waterproofing materials.
The initial stage of construction of a permanent pool
Temporary pools are mainly inflatable and frame. They differ in that they are installed in the spring, and in the fall they are rolled up and hidden.
Which swimming pool is better for a summer residence? If you are not yet sure whether you need such an “attraction” on your site or not, buy the cheapest and fastest to install: inflatable. It holds water due to the inflated ring. The disadvantage of such a pool is that it is not very deep: 1.2 meters including the sides is its limit.
But, if you want it for children, then you can’t think of anything better, and adults can “hang” on the wall and relax after “relaxing” at the dacha. Depending on the quality and intensity of use, it can last from a couple of years to four to five.
Even an adult can relax more or less comfortably in an inflatable
A frame pool is a little more expensive and a little more difficult to install. It already has a frame in the form of pipes, on which a special film in the form of a bowl is hung. The depth of such a pool is up to 1.8 m.
Stationary swimming pools are for those who have decided that they simply need a swimming pool at their dacha. Construction and maintenance are not cheap. First, a pit is dug, then a monolithic slab is poured, and in the second stage, the walls are erected. It is necessary to take measures to waterproof the walls outside - so that underground and melt water do not penetrate into the bowl. Next comes insulation of the walls. If this is not done, heating the water will be problematic. After this, a set of measures begins to waterproof the walls inside the bowl, and then finishing work begins.
A large pool requires constant maintenance
But the finished bowl is not the entire permanent pool. It is necessary to clean the water: leaves, dust and debris fall into it, bacteria and algae multiply. To bring the water into order, you need a pump, a filter system, chemical reagents, and also means for “scooping out” leaves and sediment from the bottom. Some equipment is also needed to maintain a temporary pool, but since the volumes are smaller, you can often get by with manual cleaning or water replacement, or you can use improvised means. And if there is at least 5-6 tons of water in a stationary pool (this is a small 2*3 bowl with a depth of 1.4 meters), then even such a volume is problematic to manually clean.
Installation of a frame pool at the dacha
Regardless of whether you are going to install an inflatable or frame pool, you need to prepare a site for it. These pools can be buried a little in the ground, or they can be placed on a prepared site. It doesn't matter. It is important that the surface is level and a lawn is not the best option, even if it is level. The grass under the bottom begins to decompose, and the appearance of the area after the pool is removed is very pathetic.
At the dacha they installed an Esprit Big swimming pool with a diameter of 450 cm and a wall height of 130 cm. It was decided to bury it almost halfway. So what did they do? We started by preparing the pit:
- We remove the subsurface layer of soil in an area that is 40-50 cm larger than the pool in all directions. This indentation is minimal. The instructions indicate a value of 1 meter. If possible, do more.
- The depth of the pit for a “surface” pool is about 20 cm; for a buried pool, add the desired depth to which you plan to dig. In this case, the pit was dug to a depth of 80 cm. The bottom was leveled, stones and roots were removed.
- A layer of sand was poured into the pit and compacted. The compacted layer should be 10-15 cm. If the soil drains water well, the sand is leveled with a rake and then watered. The pit can be filled completely. When the water goes away the sand will be leveled. If the water drains poorly (as in our case), we take a tamper and trample the sand with it. In any case, the surface must be leveled and compacted so that no footprint remains. This is a prepared pit with a layer of geotextile
- To prevent the bottom from going into “waves” later, you can lay a layer of geotextile. This is a non-woven material (black in the photo). It will prevent roots from germinating, and also serves as a barrier to bugs/worms that can make holes in the film.
A frame or inflatable pool can be placed on such a base. This pool design has a metal frame wall and support posts that are attached from the outside. It is advisable to insulate the part of the walls buried in the ground. You also need insulation on the bottom: so that the water heats up faster and does not cool down.
First, we lay out a U-shaped profile at the bottom into a ring. Then we take out the metal side, lower it into the pit (one person can’t handle it - it’s hard), unwind it, put the bottom edge into the unfolded profile, and connect it. The operation is simple, everything is clear: in the right place the sheet is connected into a ring.
The internal frame of the pool has been assembled
Next, we take the EPS and lay it out on the bottom of the pool, cutting off the edges, trying to keep the gaps minimal. After laying out the polystyrene, the joints and edges were sprinkled with sand (according to the instructions). Why was polystyrene foam chosen rather than the much cheaper foam? The foam will be flattened under the weight of water, and the effect of such insulation will be zero. EPS can withstand heavy loads, although it is expensive.
The interior is lined with polystyrene foam
Next, we bring the film liner inside, more or less straighten it, and temporarily attach it to the sides with tape. Next we start swimming. Pour a little water to the bottom - 10-15 centimeters, straighten the folds on the bottom, trying to keep everything even. Then gradually adding water. We level the film on the walls.
Film leveling process
Note - it is better to carry out the work on a sunny, warm day, and not only because the “swimmer” is cold. In the sun, the film softens, making it easier to straighten. We worked without the sun - wrinkles remained, although this did not affect the pleasure of swimming.
After the water procedures, stiffening ribs were installed on the outside, installing fixing strips along the upper edge of the pool. Next we started insulating the walls. In the photo above, laying of one layer began, but in general they laid two - 3 cm each. Thicker slabs are difficult to bend, but thin slabs are easy to bend. Therefore, the installation of polystyrene did not take much time.
Having installed the insulation, they began to fill the pit. Since ours is clay, we used native soil to prevent water from leaking under the walls. They poured a small layer, tamped it down, and so on until the top. One point: the bowl must be filled with water.
This is after backfilling the pit
The instructions include a recommendation to make external supporting walls. In this case they were not made. The staircase was half buried, as it was designed to reach its full height, but here 65 cm was buried. They buried it to this depth from the outside. All that remains is the installation of equipment.
As recommended, the included filter and pump were installed. After connecting, it turned out that there was a small leak at the connection point. After partially draining the water and drying, the area is coated with sealant (neutral silicone moisture-resistant). The problem has disappeared.
Where was it dripping...
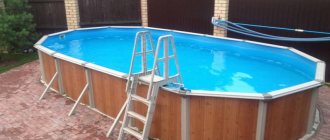
That's it. The swimming pool at the dacha is ready for use.
This is already with all devices
The model was chosen to be frost-resistant, so as not to put everything away for the winter. The bowl is covered with wooden shields.
The recommended method for installing a frame pool is demonstrated in the video.
Prefabricated frame pool
If leaving something on the site is dangerous, you can buy another design. It's just a system of stands and a film liner hung on it. A pool looks like the one in the photo below; it is never buried, but installed on top.
Prefabricated frame pool
Although in the photo he is simply standing on the lawn, this “feat” is not worth repeating. In addition to turning the lawn into a dirty mess, the soil sucks out all the heat. The swimming season with this setup is extremely short. Moreover, even in the heat in the morning the water is cold; children can swim only from lunch. In general, it is better to make an insulated deck under the pool. Its installation does not take much time and money, but using the pool is much more convenient.
The beginning is the same as described: a pit is being dug. Its depth is about 20-25 cm. First, pour crushed stone into the pit in a layer of 10 cm, compact it well. Lay out geotestile. It will prevent sand and gravel from mixing. On top of it is sand, which is also compacted. You can already install a pool on sand, but this is also not the best option. sand drags around the whole dacha, and cats also love to walk in it. Therefore, it is better to lay at least homemade concrete slabs, paving slabs on top, and sprinkle with pebbles, as in the photo.
Sprinkle the perimeter of the pool with pebbles to make it more comfortable to walk and prevent sand from running around the area
You can also knock down a shield from wooden boards, but the boards must be sanded and treated with antibacterial impregnation. You can use WPC - wood-polymer composite. They definitely do not rot and are not afraid of water or frost. A swimming pool can be placed on such a base. But even in this case (except for a wooden platform), it will be difficult to warm up the water.
Pool on a wooden base
Insulation required. This is at least 10 cm of EPS, laid under the bottom and covered with geotextile - as a temporary option. For a permanent insulated platform, a deeper pit is required: increase the depth by 15 cm. The sequence of layers is as follows: crushed stone, geotextiles, sand - 10 cm, EPS - 10 cm, geotextiles, sand - 5 cm, paving slabs or slabs.
Inflatable pool at the dacha
Inflatable pools are placed on the same base. Only they are installed quite simply: take the pump and start pumping up the ring. When it is filled with air, water begins to be poured inside. The ring gradually floats up, raising the edges of the pool. When the entire wall is level, the pool can be considered installed.
Choosing a pool design.
Choosing a pool design
Pools are mainly divided into two types - the pool bowl is buried in the ground, and the bowl is located on the surface of the earth.
- made of concrete;
A concrete pool is made monolithic, which allows it to become an almost eternal and very reliable thing. The disadvantages include labor intensity, if there is no special equipment or a group of assistants, and significant time to build a pool.
If installed incorrectly, it will only cause expensive problems instead of joy.
Alternatively, you can make a pool bowl from cinder blocks or polystyrene foam blocks.
- frame
This type of pool can be purchased ready-made and assembled on your site. For the winter, the pool can be disassembled and removed from the site.
You can also make the frame yourself from boards and metal profiles. In this case, the pool bowl is ordered separately of the required size from PVC film. Afterwards the bowl is placed on the frame and the pool is almost ready.
- made of polypropylene.
The pool bowl is made from this material. The bowl is installed in a pre-dug pit.
- made of fiberglass;
In essence, this type of pool is similar to a polypropylene pool, but its thicket is made of fiberglass. This is a more expensive and durable material.
Today, such pools are quite common and in demand. The thing is that they are made of durable material, and thanks to this they do not need additional coating, and they are also not afraid of serious mechanical loads.
Plastic pool: DIY installation
The easiest way to make a stationary outdoor pool at your dacha is from a plastic or composite (fiberglass) liner: a ready-made cast bowl. This is one of the easiest ways to make a stationary pool in your country house or near your house. A pit is dug under it, into which it is installed. One of the installation options is in the photo report.
Purchased plastic pool bowl
The size of the selected plastic bowl is 183*415*140 cm. The simplest shape was chosen for easier installation. It all started with marking out the area for the foundation pit. The bowl was turned upside down, the contours were outlined, and 5 cm was added to the boards (the plan was to install it in a wooden frame). So they nailed down the pegs, pulled the twine, and started digging.
Start of earthworks
It was decided to leave part of the side outside, so the depth of the pit is 1 meter. A layer of sand about 15 cm is poured onto the bottom, everything is filled with water to compact the substrate.
Sand is poured, water is poured
While the water is draining, the sand dries up, and boards 2.5 cm thick are assembled to fit the dimensions of the pit. A 50*50 mm beam was used as a frame, and it was also placed on top of the boards. The upper edge of the plastic bowl was attached to this beam.
Shield assembly
All boards are treated with an antiseptic for direct contact with the ground. The manufacturer promises 10 years without rot...
The panels are installed in the pit
When all the walls were assembled and secured, the bowl was inserted inside. The bottom lay tightly, the height was calculated correctly.
Placed a plastic bowl inside
There should be a reinforced concrete edge around the perimeter of the pool. To tie the bowl more tightly to the concrete, corners are installed around the perimeter. They are attached to the beam and the edge of the bowl through and through, with stainless bolts and nuts.
We fasten the corners around the perimeter of the pool
To prevent the plastic from “walking” during operation, we grab the edges with a clamp.
The clamp fixes the position of the bowl when attaching the corners
The fittings are attached to the installed corners. We used 15 mm, placed 4 rods: two on top and two on bottom. Knitted with special wire.
Strengthening the reinforcing belt for the side
Formwork is installed around the perimeter. First, sand was poured under the reinforcement, so external shields were installed. The inside of the boards is covered with a thick film to make it easier to remove the formwork. Mortgages were also installed: overflow pipes. They will be placed outside the pool and will protect the bowl from overflowing.
Formwork and drain pipe
Before pouring the concrete, they began to fill the bowl with water. This is necessary so that the concrete does not crush it. At the same time, the gaps remaining between the walls of the bowl and the plank frame were filled with sand. This means that the bowl is fixed in a better position. When it was almost filled, concrete was poured into the formwork and treated with a vibrator to increase strength and uniformity.
Concrete poured
Four days later the formwork was removed. The side turned out to be 40 cm wide and the same height. Next, we begin to prepare the foundation for finishing the adjacent area.
We had to pour sand on one side and remove some soil on the other.
Since the site is slightly sloping, soil had to be removed from one side. Sand is poured and compacted around the perimeter. Roofing material is rolled out over the leveled surface.
Roofing felt is laid on leveled ground around the pool
Another layer of sand was poured onto it, into which the paving slabs were laid. The cracks between the tiles are also filled with sand.
There is still sand on top of the roofing felt
Paving slabs laid
To prevent leaves from falling into the pool, debris and other contaminants from getting into the pool, a polycarbonate greenhouse was purchased, assembled and installed as a cover for the pool. It turned out that it was very convenient: warm and light.
Greenhouse installed outside
You just need to fasten it firmly; a strong wind moved it from its place. I had to make adjustments. The swimming pool at the dacha is also used in winter, but only after the bath - the ice hole is cut down. For winter, empty bottles with screwed caps are thrown into the water. When water freezes, they serve as a damper, taking most of the load from the ice onto themselves.
This is a DIY pool at the dacha
And until late autumn we swim just like that, we just installed a water heating system to make it more or less comfortable.
Construction of an in-ground swimming pool.
Marking the pit.
Armed with all the necessary tools and materials, you can begin laying the first stone. In other words, we are waiting for marking the pit for the pool and digging it. We take stakes, tape measure, cord, rope or wire and mark the construction site. The platform should be 0.5 m larger than the size of the desired pool on each side. To clearly mark the boundaries, you can drive stakes into the ground along the perimeter and stretch a rope or cord between them.
Formation of sand and gravel backfill.
We begin to dig a pit of the size we need. Keep in mind that the bottom of the pit should be 25-30 cm deeper than the depth of the pool itself! Also try to immediately make the walls of the pit relatively smooth. To ensure that unnecessary water does not accumulate under a ready-made pool, but rather drains, the bottom of the pit is made with a slight slope, approximately 5-7%, and this slope is directed to the place where the water drains.
After digging a pit, you need to make a sand and gravel backfill. First, a layer of sand 20-30 cm thick is poured, and then a layer of gravel about 10 cm thick is laid. All this is compacted tightly. At this stage, you can already think about installing a bottom drain. If you decide not to drain the bottom, then you need to provide a special recess in the bottom of the pool bowl, into which you can lower the drainage pump and pump out the water.
Waterproofing and insulation of the outer side of the pool bowl.
Before pouring the floor screed, you need to take care of its waterproofing. If this is not done, then groundwater will slowly destroy the concrete.
As waterproofing, you can use fused bitumen rolls such as Bikrost and TechnoNIKOL. This material must be laid starting on the walls of the pit. This is necessary for subsequent waterproofing of the outer walls of the pool bowl.
When it comes to waterproofing the side walls of the pool, before fusing bitumen rolls on them, it is necessary to pre-treat the walls with bitumen mastic.
As a waterproofing material, you can use a special pimply membrane for waterproofing foundations. It can be purchased at almost any large hardware store.
In order for the water in the pool to warm up faster and cool down more slowly, it must be insulated. Not only the side walls of the pool are insulated, but also its bottom. As a bottom insulation, you need to use a special high-density insulation - foam glass. Under no circumstances should foam plastic be used for these purposes. Over time, it can sag under the weight of water and thus cracks will appear between the bottom and the walls of the pool bowl.
Extruded polystyrene foam with a thickness of at least 50 mm can be used as insulation for the walls of the bowl. This insulation is glued after waterproofing the walls.
Pouring pool floor screed with concrete.
Before pouring the floor screed, it is necessary to install the reinforcing mesh. For these purposes, you can use reinforcement with a diameter of 8-15mm. The cell size should be approximately 150-200mm. This mesh should be at some distance from the compacted pillow. This can be done with the help of supports - large stones, pieces of board or brick.
Before pouring the screed, you need to install metal or wooden beacons so as not to miss the height level and to control the thickness of the screed.
Pouring concrete screed.
At this stage, it is advisable to raise the reinforcement bars up along the future walls of the pool. In this way, the reinforced floor belt will be connected to the reinforced wall belt.
Pouring must be done on the same day so that the slab turns out monolithic. If this is not done, cracks may appear in the slab as the soil subsides or moves.
The thickness of the concrete monolithic slab must be at least 200mm.
To avoid uneven drying of the concrete slab and the appearance of cracks, it should be periodically watered. This is especially true in the hot season.
Construction of swimming pool walls from monolithic concrete.
The thickness of the walls of a pool up to 1.8m deep should be approximately 250mm. This must be taken into account when installing the formwork.
Before making the formwork, it is necessary to make a reinforcing lattice for the pool walls. To do this, place reinforcing bars around the perimeter of the pit in 30 cm increments. Maintain a 50 mm gap between the reinforcement and the edges of the future pool. Fasten the reinforcement bars with wire.
Now you can start making formwork and pouring the walls . To do this you will need a 30 mm board. Instead of boards, you can use laminated moisture-resistant plywood.
Advice
To preserve the board after formwork, it can be covered with film.
Pool formwork.
If you want to create a pool of any unusual shape, then, therefore, the formwork should be of the same shape.
In addition, it is necessary to strengthen the formwork structure with stiffeners and spacers. There is no need to skimp on spacers. If they are deficient, the concrete can squeeze out the formwork and the result will be not a flat wall, but a convex one.
When installing the formwork, you should try to make it as level as possible. This will reduce the cost of leveling walls with plaster.
It is worth noting that at this stage it is necessary to provide for the presence of mounting holes necessary for the pool equipment (skimmer, lighting lamps, nozzles, counterflow). You also need to allocate a place for a pit in which the filter station will be located. The dimensions of the pit inside should be approximately 1000x1500mm.
It is recommended to pour concrete in horizontal layers of 150 mm, slowly and gradually, so that it is better distributed. After a few days, the concrete should harden well.
To ensure that there are no air bubbles in the wall monolith, you should use a deep vibrator.
Construction of walls from polystyrene foam or expanded clay concrete blocks.
The walls of the pool do not have to be built from monolithic concrete. They can be made from other materials.
The construction of such a pool begins with a pit. Afterwards, a concrete floor screed with mandatory reinforcement is performed. The reinforcement of the floor must be done so that reinforcement bars stick out from it along the perimeter of the walls of the pool. After the walls are erected, excess protruding reinforcement is cut off. Polystyrene foam blocks will be placed on these rods. Instead of polystyrene foam blocks, you can use any others, for example, an expanded clay concrete block with round holes.
Economy option: swimming pool from a banner
If you need an express option for a pool at minimal cost, you can get by with a thick film. For example, an old banner. The fabric used for them is thick, and you can buy an old one at an agency for mere pennies. If you need a pool in your garden, this is exactly the material: the costs are minimal.
So, armed with a banner, we dig a pit, which is significantly smaller in size than the canvas.
We lay out the banner in the pit
We lay the film in the dug pit and straighten it. For testing, a small pit was dug in case it wasn’t to his liking. Since the banners were old, after all, they laid two. They also tried to straighten the second one.
The second banner was laid on top
To prevent the edges of the film from being blown away by the wind, they were pressed down with bricks and a hose was thrown in to collect water.
They threw a hose
While the water was being collected, a little earth was poured around the “bowl” under the film, forming sides. They were lined with bricks.
While water was being collected, the edges were pressed with bricks
We left the “pool” to bask in the sun. Three hours later the tests were carried out. I liked the result. It was decided to expand the “swimming” part.
Testing a pool at the dacha
This, of course, is not a great option, but you can freshen up. It took 2 hours for “construction”. The main thing is to dig a pit. And what happens next is a matter of several tens of minutes. The photo below shows the same idea implemented on a larger scale. We bought the film for swimming pools and soldered two pieces together to create a more voluminous “sea”.
Larger film pool
Here, by the way, are several country pools made from scrap materials: an excavator bucket and a huge tire.
A long-lasting pool in the country is easy
Gorgeous!
How to decorate a pool with your own hands?
A house with a pool is beautiful in itself, but a swimming lounge area can be made even more attractive and atmospheric. To do this, you just need to use your imagination and buy a couple of things. For example, install a small artificial waterfall or fountain for the pool, and children will certainly enjoy a small water slide. Place sunbeds and umbrellas nearby so you can relax right by the water. And don’t forget to use photos of completed projects from leading architects for inspiration when creating a pool interior. If you are just looking for ideas for renovation and arrangement, or already know for sure that a swimming pool is your option, we have collected for you 313,562 photos from real projects of interior designers, decorators and architects from Russia and around the world, including such proven professionals as Andrey's Workshop Sukhotsky and GraphX studio. The beautiful pools in our photographs are the best examples of competent design and layout in different styles and colors. If you like any design option, for example the pool from the second photo, you can contact the author and order the ideal design project for yourself. See our photo gallery, look for inspiration and professionals, and you will see why Houzz is the best resource for apartment and home interior design, renovation, home construction, architecture and landscape design.
Photos of country pools
To protect the water from debris, you need a canopy over the pool.
You can make a deck around the pool
An inflatable pool is a great option for children
Another option for a polycarbonate pool cover. Built using the same method as gazebos
The plastic liner can be round
An inflatable pool can also be buried, leaving only a ring on top
The folding canopy is also convenient
The bowl can be placed outside by making a frame for it
Super!
What type of pool for your summer cottage should you choose?
Thanks to the huge selection of different shapes, sizes and types of structures and their installation, private home pools have ceased to be a luxury and have become affordable to many. The first thing you need to decide is how often you plan to use it and whether you have a permanent place for it. The mobile and simplest options are frame and children's inflatable pools, which can be installed at the beginning of the summer season and dismantled in the fall. Those who want to swim all year round, regardless of the weather, need an indoor pool - it is usually located either inside the house itself, or is attached as a separate room to the main building. The outdoor pool can only be used in the warm season, but in the hot summer it can be an excellent place for the whole family to relax outdoors.
A stationary pool is more in demand
More economical and no less reliable is the pit type of pool - with a concrete base and finished with ceramic tiles. You can build such a pool in your yard after you buy the necessary building materials and fittings:
- Concrete grade M350 - M400, water resistance - W6. To model a concrete pool bowl with your own hands, use heavy concrete with plasticizers and hydrophobic additives from well-known brands.
- Cement, grade 500 or better 700.
- Sand, preferably quartz, granulated.
- Plasticizer.
- Ruberoid, preferably with fine-grained topping, double-sided.
- Fittings: pipes made of stainless metal alloys, multi-way valves with filters, blocking and return flow balls, ball valves, shut-off valves, etc.
- Boards for formwork.
- Wire.
- Sealant.
- Bars.
- Hydrophilic rubber.
- Plaster mortar waterproofing plaster.
- Facing tiles or other material: polypropylene, composite materials.
We begin to build a swimming pool in the courtyard of a private house with our own hands:
- Dig a pit 20 cm more from each project size.
- Depth - depending on the functions (jumping from the side - 2.5 meters, going down the stairs - 1.5-2 meters).
- Use a level and a plumb line - since the bottom should be slightly inclined towards the drainage hole or drain (slope - 4 cm per 1 meter).
- A layer of sand, a layer of gravel...
- We strengthen two layers of roofing felt with mastic and sealants.
- We concrete the bottom and walls.
- Pre-install the formwork.
- Pour concrete. We leave the necessary openings for communications: draining, filling with water, etc.
- Plastering.
- Let's start finishing work.
My personal beach
Based on the experience of forumhouse.ru users, we will tell you about different types of pools: from simple inflatable ones to technically complex and expensive stationary projects. To understand why you need a pool and what you expect from it, you can first buy, as forum member Perela , a cheap inflatable one “and see if you need it at all.” A concrete pool is very expensive, and it would be a shame, having invested money and effort, to receive an unnecessary and unusable thing that cannot be thrown away or taken apart.”
Perela:
- An example is my relative. A luxurious concrete pool stands in the middle of the site; in winter, excess snow is dumped there, and in summer, dirty water is used for irrigation. It’s difficult to clean, difficult to warm up, and they don’t want it at all... So it’s better to swim in a small pool this season, but you’ll understand whether you need such joy.
Inflatable
The passion for swimming pools begins, as a rule, with a small inflatable “trough” near the bathhouse, then a prefabricated pool is installed, which is gradually upgraded to a stationary one.
The main advantage of inflatable pools is that they quickly, one might say, quickly assemble: (you just need
inflate the top ring and pour in water - the ring will float up and straighten the walls, and voila! Swimming season is open). Even the cheapest pools have a valve for the garden hose to drain water and connections for pumps, filters and heaters. In principle, if you need a pool only to splash around in it after a steam room, an inflatable one is quite enough. And children love to frolic in it. By the way, inflatable pools can be either very small (with a capacity of 300-500 liters) or quite impressive - up to 17 tons.
This is the most budget-friendly and simplest option, it can honestly serve you for several years, folds easily and does not require much storage space.
Artemy:
— My friend has an inflatable pool at his dacha, after the bath we jump into it, without worrying about the sides: we slipped or fell. I weigh about 100, my friend about 140 kg. It’s been standing for several years now, and we’ve been jumping into it for several years. It’s easy to assemble, just inflate the top with air and fill it with water, the inflatable ring floats up on its own.
It is believed that an inflatable pool can be installed directly on the lawn, but judging by the experience of users, this is not the best idea. It is better to place it on a prepared site.
leon42:
— I have an inflatable pool 4.6*1.22 (I don’t remember the displacement). I laid paving stones under the pool with a 0.7 m offset in a circle, which made a circle with a diameter of 6 m. Paving stones warm up better in the sun than soil with grass, and it’s cleaner. A heater is a good thing, but we can do without it. It would be a hot summer, but the bathhouse would be heated. In cold weather you won't even be able to carry a heater.
The main thing is to keep domestic cats and birds away from such a pool. And although holes from claws and claws can be repaired using special glue, not everyone is ready for this.
Somik69: — My birds loved to sit on this circle. The claws are so-o-o-o-small, the hole is ma-a-a-a-a-a-a-a-a-la. I washed it with a sponge and sealed it. PySy. then I bought a frame.
Collapsible
Prefabricated pools are larger and more convenient than inflatable ones, and most importantly, they can be improved and improved to the level of “the main decoration of the garden.” A modernized and improved prefabricated pool is one of the most popular options among our forum members: some build a pedestal for it, others a deck - look for details in the special section of the forum “installing a frame pool.”
The generally accepted depth of such pools is 1.5 meters. Assembly and installation of the frame can take several days, although, for example, forum member eSergeY claims: “ a 457X122 beer pool can be assembled in a maximum of 30 minutes.”
Before installation, a flat horizontal base is made according to the size of the pool, and it is better for the base to be serious, preferably concrete, and on top you need to put a material that will not only protect from sand, but will not stick to the base of the pool. You can, for example, buy thick fabric like tarpaulin. Consultant forumhouse.ru Besrom reminds: “pay attention to the height of the groundwater, a drainage system may be needed.”
Sendrey:
— 1. It is still highly advisable to remove the turf, or cover the ground with geotextiles, then sand, and then the bedding for the pool. These beddings are quite thin, and our weeds are such that they can easily break through linoleum or a couple of layers of agrospan.
2. 10-15 cm of clean sand cannot be placed on top of the ground. The edges of such a pillow will crumble over time and be washed away by rain. The walls of the pool will settle, and the middle will be higher. It’s not for nothing that the instructions for almost all swimming pools strictly prohibit pouring something under the pool to level the area; you can only remove the soil. Ten tons of pressure on this sandy pancake will easily squeeze its edges outward, if there is somewhere to squeeze it.
Irina_D:
— I’m even thinking of pouring the platform, and on top of the concrete - polystyrene foam or something like that? Just add sand - it will spread like semolina, compacted soil - it doesn’t matter, either a root or a stone will come out - and goodbye, pool. I won't just pour concrete, I'll reinforce it and connect it with supports. This will already be a rigid structure. To be honest, I thought it would be simpler.
Of course, a swimming pool requires financial investments and labor costs, and, as skeptics note, “two months of our summer fly by quickly.” But the pure childish joy it brings pays off any investment a hundredfold.
Technikbti:
— In the summer, I put a high-definition video camera on a tripod and filmed for about half an hour how we splashed around there, and in the winter I watch it on TV and can’t wait for the warmth to go swimming again! I also want to deepen it in the middle from 30 to half a meter, for the acuity of sensations, and on one side I want to make a platform, or something, from where it will be more convenient to descend and jump!
Some users of our forum have inexpensive frame frames successfully standing on their site for 6-7 years. True, there are opinions on the forum that it is better to immediately throw away the pumping and filtering device for such pools, and in 80-90% of Russian cities there are no stores that sell normal components. A sand filter for a pool in Vladivostok is invigoratingly expensive, “come on, let’s move this bandura from Moscow.” Nevertheless, as Zabanenny , “No one has canceled online stores that send out mailings. A handicraft brush for a water vacuum cleaner can simply puncture the wall of the frame.”
The larger the pool, the more pleasure, benefits and unexpected bonuses it will bring. So, for example, the daughter of a forum member I just learned to swim in such a pool.
I'm just me:
— My pool is 457x122cm. A depth of 122 cm for a pool, in my opinion, is minimal, unless, of course, there are small children! The width is also 457 cm, a critical minimum for round pools.
cityzen:
— And on the topic of size - it’s better to immediately take a larger one. I bought myself 488 by 975 cm. I am very pleased. Sometimes we even put up a volleyball net when friends come over. Lots of fun.
Many users of our forum believe that a frame frame of the correct size, but not buried, looks terrible on the site. Indeed, an in-ground pool looks very cool, especially if you build a wooden deck around the pool. When deepening frame pools, experts recommend strengthening the walls, otherwise the frozen soil will put pressure and can break them - such a sad experience, unfortunately, has been experienced by many forum users.
sokolsok:
Why not actually dig in? 1. A fool 1.5 meters high does not look very aesthetically pleasing. 2. Water warms up much faster. 3. The deck around is a great place for sunbathing. Actually, here's a photo^
If you are interested in how the insulation is made: - bottom: 50 mm extruded polystyrene foam, seams taped with tape for pipe insulation. — walls: 20mm extruded foam, sheets are simply inserted into the gap between the pit and the pool. Deck: larch, treated with terrace oil. The outside of the frame is covered with lucobond.
DGVlad:
— My pool looks like this. Got it done faster than I thought. I haven’t swam yet, the water is 16 degrees.
By the way, from experience I just find it much easier to make a dome for a rectangular or oval pool than for a round one.
I'm just me:
— Now I’m thinking about ease of use: making a deck with a gazebo and a sliding dome for the pool, so as not to deprive yourself of the opportunity to swim in the fresh air on a hot summer day, and not in a closed greenhouse with high humidity. So, a dome is much easier to make for a rectangular or oval pool than for a round one. So, in the process of choosing a pool, who else should pay attention to the dimensions and shape, and most importantly, for what purpose you need the pool.
An in-depth collapsible pool, and even with a dome, becomes stationary. And perhaps at this stage it is already worth considering concrete or composite pools.
Composite
Alexeid had an idea “about the need for an outdoor pool on the site, which, in the process of painful deliberation, was transformed into the idea of an indoor pool. ” It was decided to attach a swimming pool (a room of about 50 square meters) to the bathhouse. We dismantled the porch and roof of the bathhouse, dug a pit, arranged it, and installed a bowl.
Besrom: - This is one of the problems with the composite (first the pool, then the building), with polypropylene you can do it inside the finished building, but concrete has become very labor-intensive and unjustified in terms of construction time.
alexid:
— there is ventilation, like in bathrooms, drops do not accumulate. The dehumidifier performed well: after the start of bathing, the humidity rose from 45% to 85%, then the dehumidifier turned on, worked intermittently, the humidity dropped to 70%
— everything is insulated with EPS in one layer, 5 cm.
— when covered with film, the temperature in the pool is less than 20-22 degrees and does not drop from 28 degrees in a week.
— in this case, water heating does not work, only filtration
— heating: heated floor to the entrance to the pool — on weekdays, on weekends gas.
- between the wall and tiles and the ceiling and tiles - SIP panels, “it turned out to be a cocoon over the extension to the bathhouse.”
- the side walls are covered with gypsum fiber board + tiles, and there is a suspended ceiling on top
— the floor of the bathhouse was taken as zero and the foundation for the rest of the building was added, additional ones were inserted. reinforcement, there is no groundwater nearby - the foundations do not move (I used the same technology to add a 6x4 extension to the house)
A composite pool is not a cheap pleasure; tat1770 cost 1.5 million rubles turnkey. If, as forum users say, “green is choking,” then there is always an inspiring example of a user Igor Astrakhan before your eyes. He simply lights up many people!
Concrete
Igor Astrakhan built “with one hand and on a limited budget”; the only thing was that his friends helped pour the concrete. Igor chose the concrete option as a durable structure that can be constantly improved, and “perhaps the pool will someday be attached to the main house.” Here is the project budget, but, of course, the main component is not taken into account here - the golden hands of a forum member:
Igor Astrakhan:
— Size 6x3 main (adult) part and 2x2 shallow (children's) depth; in the big one - variable 1.25 and 1.75 (in the area of the bottom ladder -1.8).
— The formwork was made from boards, the material was completely available.
— The basis of the cost is the cleaning system (pipes, fittings, mortgages, spotlights, filter, pump) — 60 thousand rubles.
— Concrete M300 10 cubic meters + mixer cost (7 hours) — 55 tr.
— I can’t say exactly the cost of the fittings because some were available, but somewhere around 30 thousand.
— Extruded polystyrene 30mm (the entire bowl is lined) — 10 tr.
— Penetron Admix (a waterproofing additive for concrete) needed 40 kg, I had to take 2 buckets of 25 kg each — 13 tr.
— Paint for swimming pools hydrostone 6 t.r.
— About 5 thousand more rubles were spent on all sorts of consumables.
— I welded the stairs myself (there were scraps of profile stainless steel).
Total so far is about 180 tr.
And also thanks to my wife for her patience (I lived in this pit for almost six months, both after work in the evenings and all weekend long).
“Building a swimming pool is comparable to buying another car. According to many parameters: cost (you can drive a Zaporozhets, or you can drive a Mercedes); it also needs to be maintained, and also be able to operate it correctly,” says forumhouse.ru user Step48 . Whatever option you choose, may it bring joy to you and your loved ones for a long time.
Your path to your pool will be much easier if you explore the information in the following links.
Here, experienced pool builders forumhouse.ru answer questions from beginners.
By the way, you don’t have to buy a frame pool, but make it yourself. We also advise you to watch a very good video about the pools of our forum members: https://www.forumhouse.tv/video/442/ and https://www.forumhouse.tv/video /129/ . And if you are still not familiar with the legendary “Tahir method” (this is an inexpensive and absolutely harmless method of disinfecting pools, which was invented by our forum member Tahir), read about it here.