If you have decided to make your own furniture from materials such as chipboard or MDF, you will need to take care of protecting the end parts. This is necessary to make the product look more aesthetically pleasing and last longer. A special edge is used to protect the side surfaces. In this material we will talk about what types there are, how best to glue it with your own hands and other important nuances of how to glue the edge to the tabletop.
If you have decided to make your own furniture from materials such as chipboard or MDF, you will need to take care of protecting the end parts.
Features of gluing edges to tabletops
To perform high-quality gluing of the material to the tabletop, you need to take into account many nuances, since this process has its own characteristics. Proper preparation will allow you to avoid mistakes during the edging process and will allow you to get a high-quality result, which, firstly, will perfectly cope with its functions, and secondly, please the eye with an aesthetic appearance. Next, we’ll look at what an edge is, why and where it is needed, as well as other important features.
To perform high-quality gluing of the material to the tabletop, you need to take into account many nuances, since this process has its own characteristics.
Edging chipboard and laminated chipboard
This procedure is carried out for a number of reasons. First of all, laminated chipboard should be subjected to edge processing due to government standards and environmental safety. In manufacturing, companies use binding materials that can release harmful substances over time. The edge helps to avoid this negative effect. Well, of course, it is needed to protect the product from various influences, as well as to give it a more aesthetic appearance.
As for technology, after the slabs have been cut, two main stages begin:
- Applying an edge directly to the cut of a part;
- Removing overhangs, processing corners and other operations due to which the products will have an attractive and marketable appearance.
As for edging methods, there are two of them. The first is mortise, it involves inserting the edge of the chipboard into a special groove made by milling in the cut of the slab. The second option is the overhead type. It is quite in demand. A variety of materials can be used for it, from plastic to acrylic. The average thickness is 0.4-3 mm.
What is edge
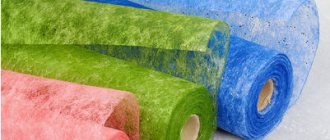
Furniture edging is a strip of melamine, polyvinyl chloride, ABS plastic or other material that acts as decoration and a way to protect the product. if the furniture is made from cheap materials, then you cannot do without such an addition, otherwise it will not be possible to avoid the effects of formaldehyde resins on the health of household members, and also to protect the furniture material from moisture. If the edge has been glued, the service life of the product increases.
Furniture edging is a strip of melamine, polyvinyl chloride, ABS plastic or other material that acts as decoration and a way to protect the product.
Why do you need an edge?
Many people believe that this element is necessary solely for beauty and a neater appearance. In reality, the edge, of course, performs a decorative function, but this is not its main purpose. The main task of the edge is to protect furniture from moisture. The kitchen is a wet area in the house, and therefore this aspect is especially important here, and closing the ends with the help of such a trick is a necessity. In addition, if the ends of the product are covered, then formaldehyde emissions from the chipboard material will not harm human health.
In reality, the edge, of course, performs a decorative function, but this is not its main purpose.
There is an alternative option that can be used instead of adhesive edges - these are end caps. Their installation is a fairly simple process, but some elements in this case may look superfluous and harm the appearance of the product.
There is an alternative option that can be used instead of adhesive edges - these are end caps.
Edge Features
Furniture edging is usually understood as a strip made of melamine, polyvinyl chloride or ABS plastic. It can also be made from another material and act as decoration or a way to protect furniture. It leads to an increase in the service life of the product. Many owners of houses and apartments are convinced that the product is used solely for beauty, but this is not entirely true. Of course, it has a decorative function, but it also protects furniture from moisture penetration.
Due to the development of advanced technologies, modern manufacturing companies produce different edges. However, not all of them are optimal for attaching at home. Melamine-type tapes are produced with a width of 19-54 mm, and their thickness ranges from 0.2 to 0.4 mm. This means that absolutely any countertops can be refined. There is also an impressive selection of decorative solutions and shades.
Where should edging be done?
As mentioned earlier, edging is necessary not only to make the product look beautiful. In addition, it helps protect furniture from moisture and households from exposure to chemical elements. Based on this, we can conclude that edging is necessary:
- in the kitchen - during family meals, household members should not inhale fumes of resins that are in the chipboard material, as well as in the kitchen space there is high humidity and water is often used, therefore, in order to avoid premature failure of furniture, swelling of surfaces from moisture and other unpleasant consequences from interaction with moisture, be sure to trim the ends with an edge.
- in living spaces - a table made of chipboard can be in a children's room, and children will study lessons behind it, or it can be in a study or office - it doesn't matter, in all these cases safety and protection from formaldehyde is important, which edging can provide.
Types of furniture edges
There are several types of edges that can be used to decorate the ends.
Paper with melamine
The best option for DIY home edging. It already has an adhesive layer, making the process much easier. It is easy to glue such material, but in terms of its performance characteristics this option is inferior to other types of edges.
davThe most optimal option for DIY home edging.
PVC
PVC edges are strips of polyvinyl film. Their direct purpose is to seal the ends of panels and countertops. There is no adhesive layer provided here, and it will be difficult to glue such material with your own hands.
PVC edges are strips of polyvinyl film.
ABS (ABC) plastic
But this type of edge will be easy to glue on your own, because there is already an adhesive layer, which greatly simplifies the task. It is for this reason that this option is most popular in use.
But this type of edge will be easy to glue on your own, because there is already an adhesive layer, which greatly simplifies the task.
Veneer
Veneer is not at all a popular material for edging furniture. It is a section of wood that has been shaped into a strip and painted. More often, such an edge is used in furniture production and exclusively for edging veneered furniture products. To use such material, you need to have a lot of honed skills, knowledge about working with this material and experience. Such material is expensive. In general, there is no reason to use veneer for DIY edging at home. However, it is necessary to know about the existence of such a variety so as not to accidentally acquire it through ignorance.
To use such material, you need to have a lot of honed skills, knowledge about working with this material and experience.
Acrylic
Such products are made of transparent acrylic. A pattern is applied to the reverse side. Due to the fact that there is a layer of polymer on top, a feeling of a three-dimensional pattern is created, which looks very impressive. For this reason, this variety is called 3D edge. You should not use this material at home. This is too complicated from the point of view of the technological process, and there is no practicality in using such material. As a rule, it is used in professional furniture production if it is planned to make furniture with unusual design solutions.
Due to the fact that there is a layer of polymer on top, a feeling of a three-dimensional pattern is created, which looks very impressive.
Profiles
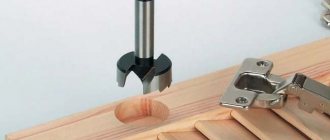
Profiles are mortise. In this case, the T-profile is inserted into a milled groove at the end of the chipboard. When a special machine for PVC edges was difficult to find, and there were a lot of milling machines in the shops, this option was especially popular. Today he has faded into the background.
Profiles are mortise. In this case, the T-profile is inserted into a milled groove at the end of the chipboard.
The profile can also be overhead. This option is convenient because it does not require special equipment and can be used at home. As a rule, such a U-profile is simply enough to be put on the end and glued with liquid nails. However, there is also a drawback - a few millimeters of the edges will protrude, and dirt and dust particles will get stuck under them.
The profile can also be overhead. This option is convenient because it does not require special equipment and can be used at home.
Kinds
Currently, there are several options with which the ends of the tabletop can get a presentable appearance. So, to make an edge with your own hands (at home), you can use only 2 options.
- Pasting using melamine tape. The glue that is applied to it makes the process easier. But the fact is that the resulting edge is very susceptible to moisture and is not resistant to mechanical influences. Currently, it is considered the most accessible, and therefore is often used in the manufacture of furniture.
- Finishing using PVC strip. This option involves incurring more expenses, but the edges are more durable. The product is extremely popular because it has an ideal balance between price and quality characteristics.
Both of these types are common and therefore are especially popular.
How to glue an edge to a tabletop with your own hands
First of all, it is important to pay attention to whether the tabletop was cut with high quality. This directly affects the edging. The fact is that it will not be able to hide unevenness, and will only hold well on a perfectly executed cut. We will divide the entire subsequent process into small stages.
- First you need to position the tabletop in such a way that it is convenient to work with the end.
- The end itself should be wiped with a damp cloth to clean the surface with a damp cloth to ensure a strong fit.
- Next, you will need scissors - cut the edge to the required length.
- When the end has dried after wiping with a damp cloth, you need to apply the cut edge to the surface with an adhesive layer.
- You need to align the edge along the top edge of the tabletop, then carefully trim the edges.
- Next, you will need an iron for ironing synthetics - heat it up.
- The edge needs to be covered, for example, with newspaper. One layer will be enough. It needs to be ironed for 3-5 minutes. This procedure will allow the glue to melt and stick the materials to each other.
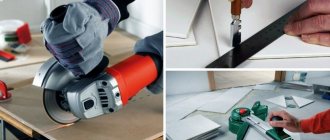
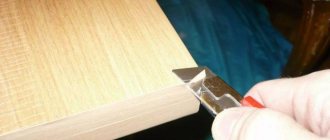
- After the glue has “set”, the edge must be carefully trimmed with a knife.
- If ABS plastic was chosen as the edging material, then cutting such material will be difficult. To prevent unevenness from spoiling the appearance, you can carefully remove them using a sander.
How to stick it yourself
For work you will need a sharp knife, gloves, glue or a heating device, depending on the selected edge parts. You also need to stock up on a rag or roller to press the parts together.
See also
Types of PVA glues and how they can be diluted if they have thickened
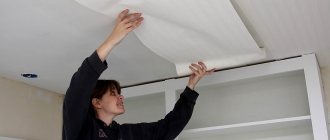
Using an iron or hair dryer
The melamine and PVC edges are coated with hot-melt adhesive, which becomes sticky when heated. To work with such products, you need an iron or a hair dryer. The surface on which the edge is glued is installed horizontally. Cut a piece of material 2-3 centimeters longer than the length of the cut. Set the iron to mode 2 (“Silk”) and put on a protective cover (cover the sole with a cloth if there is none).
Run the iron along the edge, melting the glue. It is better to start work from the middle and move one by one to the edges of the part. Do not press too hard on the sole so as not to move the edge and squeeze out the glue. After the glue has melted along the entire edge, the iron is removed and the part is pressed with a rag, ensuring a tight connection.
The edges are cut close to the end with a sharp knife. If the edge is wider than the part, it must be cut lengthwise. Use a knife and a metal ruler. For PVC it is better to use a manual milling machine; melamine can be easily cut with a knife. The cut edges are smoothed with sandpaper to remove burrs.
Sticking tapes without glue
Experts consider non-self-adhesive edges more convenient and reliable. You need to purchase glue that is recommended for this material and follow the instructions exactly.
The technology is simple:
- apply glue without excess to the cut and edge;
- wait the recommended time (if required in the instructions);
- carefully combine the parts;
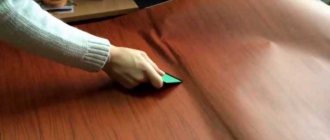
- Using a roller or folded cloth, press the edge firmly against the edge of the furniture;
- Any leaked glue is quickly removed so that you don’t have to use a solvent.
The parts must be pressed tightly and ironed with a cloth until they stick together to prevent bubbles from forming. After completion, remove the glue particles, trim the ends, and sand the edge with sandpaper.
Material and tools for work
To do the edging of the tabletop yourself, you need to prepare all the necessary tools:
- an ordinary household iron or a hair dryer for heating the edge;
- construction knife (it is important to stock up on new blades);
- fine-grained sandpaper;
- scissors.
The materials you need to prepare are:
- tabletop on which the edge will be glued;
- the edge itself, matching the color and thickness.
Which glue to choose for edges
Modern furniture manufacturers use hot melt adhesives. This type of glue has long proven itself and has virtually no equal in its quality characteristics. However, there is one significant drawback to using them - you need to have special equipment that can perform gluing at high speed and of good quality. For those who plan to make furniture professionally, it makes sense to purchase such equipment. If you are just an amateur and do not plan to make furniture, then this option is definitely not suitable.
Modern furniture manufacturers use hot melt adhesives.
At home, the use of PVC glue is common. It does an excellent job of gluing paper materials to any other materials. It is important to consider that this glue is not compatible with moisture, so it should not be used for kitchen furniture. But universal adhesives will not only reliably glue materials to each other, but are also not afraid of moisture. It will take 3-4 hours to dry, after which the product will be ready for use. This glue is inexpensive, besides it is available - it is available in almost every store, and it is safe. Professionals who plan to use hot melt adhesives should pay attention to products from the Kleiberit brand.
Professionals who plan to use hot melt adhesives should pay attention to products from the Kleiberit brand
How to glue an edge without adhesive
Sometimes it happens that edges with an adhesive layer are out of stock or for some other reason it is not possible to purchase them. In such a situation, you can use an alternative - an edge without an adhesive layer. However, you still have to buy glue separately.
In such a situation, you can use an alternative - an edge without an adhesive layer.
Additional Information! You can safely purchase glue from brands such as “Moment” or “Lux 88”. You definitely shouldn’t buy “88 Luxe” glue, especially if the edge is made of PVC.
It is better to apply glue both here and there - on the edge and on the end of the tabletop. Pressing must be done using a hard roller. If excess glue is visible, it must be removed immediately using a damp cloth. After the glue has completely dried, the edge can be carefully trimmed.
It is better to apply glue both here and there - on the edge and on the end of the tabletop. Pressing must be done using a hard roller.
How to stick PVC edge
It is better to fix the laminated chipboard horizontally so that the front edge protrudes above the tabletop. The PVC edge needs to be trimmed with a small margin (about 2 cm) (Fig. 5)
(Fig.5)
Holding the edge in one hand, we heat its edge with a hairdryer, about 10 cm. It should be heated from the glue side (Fig. 6). After about five seconds, the glue melts and the edge becomes more elastic, this is an indicator that it’s time to glue it.
(Fig.6)
It is more convenient to glue a PVC edge with two people: one melts the glue and guides the edge exactly along the end of the workpiece, the other presses the edge with felt (Fig. 7). If you glue it alone, then warm it up in small sections, no more than 25cm. (Fig. 8), after which you should immediately press it (Fig. 9).
(Fig.7)
(Fig.8)
(Fig.9)