Requirements for floors on balconies
Balconies can be open or glazed, which means that the requirements for flooring will differ significantly. Much depends on how the balcony is used: as a relaxation area, a study, a greenhouse or a warehouse for unnecessary things. In each specific case, you need to take into account the operating conditions so as not to make a mistake when choosing materials.
Open balconies
Open balconies
The floor on an open balcony is constantly exposed to temperature changes, exposure to sunlight, rain and snow. Therefore, the floor covering must have high strength, frost resistance, not absorb moisture, be easy to clean from dirt, be non-flammable and non-slippery. Such requirements greatly limit the choice of materials, but it is still quite wide: ceramic tiles and porcelain stoneware, rubber tiles, decking, special rubber paints, PVC panels. Linoleum is also suitable for balcony floors, but not ordinary, but frost-resistant, which appeared on the construction markets not so long ago.
Closed balconies
Closed balconies
On glazed balconies, the floor is protected from rain and snow, fades less in the sun, and is less dirty. The most important factor here is the presence or absence of heating. A heated, insulated balcony is practically no different from a living room, and any covering can be laid there. If the balcony is not heated, but is insulated, the floor covering must withstand temperature fluctuations in winter and summer. If the balcony is simply glazed, without insulation of the walls and floor, the floor covering must be frost-resistant.
Balcony operating conditions
Relaxation corner with soft rug
When planning to create a relaxation area on the balcony, choose a material that is pleasant to the touch, environmentally friendly, but at the same time resistant to abrasion and ultraviolet rays. If you do not plan to have a warm floor underneath the covering, you should not lay tiles or make a self-leveling floor - such a surface will be very cold. It is better to use laminate, any wooden coverings, or linoleum on a thick backing.
Linoleum on the balcony
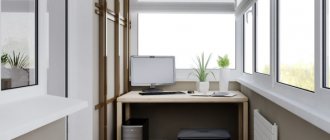
Any practical covering is suitable for a work office, not necessarily expensive or overly decorative. The material should be easy to clean from dust, not emit harmful fumes, and not be pressed under the legs of a table with a computer or other furniture.
Office on the balcony. Covering: ceramic tiles
If you plan to arrange a mini-greenhouse or winter garden on the balcony, the floor must be waterproof. When watering and replanting plants, water often spills on the floor, soil, and flower fertilizers get in. It is very easy to slip and fall on a dirty wet surface, which means you also need to choose an anti-slip coating.
Balcony - greenhouse. On the floor there is fine gravel and wooden boards
In the case when the balcony is used as a warehouse, it is best to cover the floor with an easy-to-care material that is not afraid of temperature changes and mechanical stress. It can be ordinary tiles or the same linoleum. It is not practical to lay expensive decorative materials on such a balcony. So, knowing the list of requirements for floor coverings, you should study in more detail the properties of the most popular materials.
Features and tips for arranging the floor
Depending on the further work carried out on the loggia, either restoration work or new construction work should be carried out, with the installation of new floor structures.
First of all, you should inspect the construction part of the floor for the quality and reliability of the structures. Solve the question of how to level the floor on the balcony and what is needed for this.
Before installing decorative coverings on the loggia floor, let’s consider some features and tips:
- When finishing a loggia in a house with an old building, you should choose lighter structures so as not to create additional loads on the load-bearing slab;
- When installing, you should calculate how thick the floor screed on the balcony should be and when using additional installation of heated floors;
- The mixture is poured onto the floor after screeding to level the surface;
- After installing the frame made of wooden beams, the subsequent installation of insulation is carried out;
- On wooden logs they install wooden floors, parquet, or sheets of plywood, DSP, under carpet, laminate, linoleum.
Tile
The advantages of tiles are obvious:
- highly decorative;
- long service life;
- strength;
- frost resistance;
- resistance to chemicals;
- environmental friendliness;
- absolutely non-flammable.
Tiles for the balcony
It is easy to care for; installation, although it requires some skill, is not particularly difficult. All this makes tiles an almost ideal floor covering for a balcony. To reduce the load on the floors, lightweight tiles are produced, and for open balconies there are a lot of options with a rough anti-slip surface.
Balcony floor tiles
Flaws:
- tile floors are cold to the touch, so on closed balconies it is recommended to lay them on top of underfloor heating systems;
- The surface of the tile has very low sound insulation, and when walking there are booming sounds from steps.
The range of floor tiles is unusually wide; models differ in manufacturing method, decorativeness, size, presence or absence of glaze.
Ceramic or tile
Tile
This type of tile is considered the most common. It consists of a mixture of sand, clay and modifying additives, pressed and fired at high temperature. After cooling, a decorative glaze coating is applied to the surface of the tiles, which gives the tiles such an aesthetic appeal.
Porcelain tiles
Laying porcelain tiles on the balcony
When making porcelain stoneware, the working mixture is fired at higher temperatures than tiles, so the finished material has an external resemblance to natural stone and has the same technical characteristics in terms of frost resistance, strength, and durability. Porcelain stoneware is produced both in pure form and with a glazed coating; it looks very decorative, but is a rather expensive material.
Clinker tiles
Clinker tiles
This type of tile is durable, very wear-resistant, and is not afraid of moisture and freezing temperatures. This coating is ideal for an open balcony; moreover, the cost of clinker tiles is lower than porcelain tiles.
There are several other types of tiles, among which Cotto and quartz vinyl tiles are worthy of attention; each variety has its own characteristics. To make this coating look most impressive, follow several important rules when choosing.
Clinker tiles Feldhaus klinker, Stroeher
- Large tiles visually make the balcony smaller, so the smaller the area, the smaller the tiles should be. For balconies of standard size, experts recommend choosing 40x40 cm tiles.
- Dark colors also visually make a room smaller, while bright and light shades make it feel more spacious. This is especially important for balconies located on the north side, where there is too little light.
- For a glazed and insulated balcony, you should purchase tiles with wear resistance class PEI 3. The higher the rating, the more massive and heavier the material.
- Tiles should be purchased at one time, and with a small margin - about 5-7%. The tiles from the second batch may differ slightly in color, and if you suddenly have to buy additional material, the coating will be uneven.
If the room will be insulated
If the loggia is planned to be glazed and the structure well insulated, then the floor surface can be finished with a variety of materials; you can also use the above options - porcelain stoneware and ceramic floor tiles, and other materials.
Boards
A classic of the genre is a wooden floor. The technology for laying floorboards has been developed to the smallest detail, so the work can be done with your own hands. Many people decide to make a wooden floor, since it is an environmentally friendly material that creates a healthy microclimate in the room.
Advice! A wooden floor will look especially good if the walls of the loggia are lined with wooden lining.
If the loggia is fully insulated, then the wooden floor also needs to be insulated. The insulating material is placed in the gaps of the sheathing, which form joists. Foam or mineral wool is usually used for insulation. The floor covering itself is created from tongue-and-groove boards; they must be tightly fitted to each other so that the covering does not have gaps.
The only drawback of wood is its insufficient resistance to moisture and biological hazards (molds, etc.). Therefore, in order for the wooden floor to serve for a long time, the boards are coated with paints and varnishes.
Laminate
As in residential premises, laminate flooring can be used on loggias. This material is valued for its practicality and a wide variety of shades and patterns. In addition, they are quite easy to install with your own hands.
However, these finishing options can only be used on an insulated loggia; in open spaces these materials will not last long. An important point in preparing for installation is to carefully level the base, otherwise the floor will creak and the coating will quickly collapse.
Linoleum
This coating option is ideal for a glazed and insulated loggia. The material is available in a wide range of colors, patterns and patterns. You can choose linoleum, the decorative design of which very realistically imitates the surface of wood or stone.
Many people also choose linoleum because it is very easy to lay it with your own hands. You just need to make sure that the base for laying is sufficiently level, otherwise the material will quickly tear in places where there are differences.
Carpet
This material is not often used to finish the floor on a loggia, but if you plan to turn the room into a relaxation area or office, then this is an excellent option. Moreover, today you can find different types of carpet on sale. The samples differ not only in color, but also in the length of the pile. For example, you can choose a carpet whose surface resembles young grass.
Advice! You can use other floor finishing options. For example, make a self-leveling polymer floor or use a cork floor. These options are perfect for loggias, however, they are rarely used due to their high cost.
So, it is almost impossible to find a definite answer to the question of which flooring option is best to use for a loggia. When choosing, you need to take into account many nuances. These include operating conditions (cold or heat-insulated room), the overall design of the room, and the individual tastes of the owners. There are especially many coating options available if you plan to insulate the loggia. In this case, you can use the same materials that are used to cover the floors in rooms - laminate, linoleum, ceramic tiles, porcelain stoneware, etc.
Linoleum
Linoleum
Advantages of linoleum:
- great variety and decorativeness;
- ease of installation;
- ease of care;
- relatively low price;
- water resistance.
Modern types of linoleum are characterized by increased resistance to abrasion, fade less in the sun, and are more resistant to aggressive substances.
Linoleum is an inexpensive and practical coating
Flaws:
- short service life;
- some species emit harmful fumes;
- when the temperature drops, linoleum loses flexibility and may break;
- deformed under the influence of mechanical loads.
Some types of linoleum can even be laid on open balconies
Traditional types of linoleum are not intended for installation in unheated rooms, especially on open balconies. But thanks to the development of technology, frost-resistant linoleum has appeared, as well as coatings with an anti-slip surface. Add to this the aesthetic appeal of the material - and you get an excellent coating for a balcony, regardless of its type and the presence of heating. Of course, the cost of such linoleum is higher than usual, but not by much. Linoleum can be baseless, as well as on a jute and foam base.
| Linoleum base | Description |
| Baseless linoleum | This material is characterized by a homogeneous structure throughout the entire thickness of the layer. This means that during long-term use the coating will not fade and the pattern will not be erased. Some models have a rough surface, so the risk of slipping is minimal. The thickness of such linoleum is 3 mm, and it must be laid on a carefully prepared, even base. |
| Foam based | This type of linoleum is considered the most durable and easy to use. Due to its immunity to moisture, it can be used in absolutely any room. On a closed, insulated balcony, such a coating will easily last up to 10 years with proper care. |
| Jute based | The thick jute base retains heat well, so this linoleum is quite suitable for a glazed balcony. It can be laid directly on a screed, self-leveling floor, as well as raised floors made of chipboard or plywood. This type of coating cannot be used on open balconies. |
Eight solutions
Option 1 – painting
This is the simplest method, suitable for both closed and open structures, the workflow in this case is very simple:
- When purchasing paint, it must be a wear-resistant composition that is resistant to atmospheric influences. Compositions based on polyurethane, acrylic or epoxy are well suited. To work you need a brush or roller;
High-quality paint is the key to the durability of the coating
- The surface must be prepared - cleaned of dust and dirt. If there are stains on the floor from bitumen or other compounds, they should be removed using solvents or other means;
- The paint is applied in an even layer over the entire surface. It is important to treat every corner well so that there are no open areas left on the floor. ;
To avoid staining the walls, apply masking tape around the perimeter
- After the first layer has dried, the second is applied. This allows you to achieve maximum strength and resistance to temperature changes when it comes to an open balcony.
The painted floor looks simple, but lasts a long time
Option 2 – laying tiles
Ceramic tiles are suitable for flooring on both insulated and open balconies. This flooring is much more attractive than a simply painted one, which is why its popularity is higher. First, let's figure out what is needed for the work; the information is presented in the table.
For open structures it is better to use porcelain stoneware
| Material | Description |
| Tile | For insulated balconies, any floor option is suitable. For open ones, it is better to take a more durable porcelain stoneware with an anti-slip surface. The quantity is calculated based on the floor area |
| Tile adhesive | Choose high-hold compounds that are suitable for outdoor use. They can be used both indoors and outdoors |
| Crosses and grout | To make the seams perfectly even, you will need crosses. And to protect the joints from the penetration of water and dirt, you need to seal them with a special compound called fugue. The color is selected depending on the tile you use |
| Tool | To work, you need a container, a drill with a mixer for mixing the solution, and a notched trowel for applying glue. The plane is controlled using a building level. Cutting tiles is best done with a special device called a tile cutter. |
It is impossible to carry out work without tools
Now let's figure out how to make a floor on the balcony with your own hands.
The process in this case looks like this:
- The surface is cleaned of dust and debris, after which an adhesive composition is prepared and applied to an area of the floor measuring about 1 square meter. In order for the layer to be uniform, it must be distributed using a notched trowel or trowel, this way you can quickly remove the excess. The tooth size on the instrument should be 8-10 mm;
The smoother allows you to distribute the glue in the desired layer
- The tile is carefully laid on the surface, after which its position is checked using a level. If necessary, the position is corrected using a rubber hammer or even manually. Gently hit the desired area with the back of your hand, then check the surface again, repeat the procedure if necessary;
It is important to immediately align the position of the tiles while the glue is fresh and you can correct the element
If work is carried out on an open balcony, then it is better to lay the floor with a slight slope towards the edge of the balcony. This is necessary so that puddles do not accumulate on the balcony, and you do not have to constantly remove excess water.
- Laying continues in the same way until the entire surface is covered. Crosses are placed at the joints so that all seams are perfectly even;
Crosses allow you to make the seams uniform over the entire surface
- If necessary, some elements are cut and laid in the same way. The surface after covering should dry within 24 hours. During this period, you cannot move on the floor;
The pieces are cut out after the fact, the surface is left for a day after laying the tiles
- The seams on the tiles are rubbing. To do this, the composition is diluted with water as prescribed on the package. It is most convenient to apply the fugue with a rubber spatula; the mixture should fill all the voids in the seams. After 12-16 hours, you can wash the floor to remove excess fugue from the tiles .
Excess fugue is wiped off with a sponge
Option 3 – installing a wooden floor
Let's figure out how to make wooden floors on a balcony. This option is very popular among developers, as it is easy to implement with your own hands, and the price of materials is low.
To work you need the following:
- A block for constructing a flat and solid foundation;
- Floor board with a thickness of 32 mm or more;
- Insulation;
- Fasteners;
- Paint and varnish composition for the surface.
Floor boards are an excellent solution for closed balconies
Now let's look at the workflow:
The scheme of work is not complicated
- The bar is set at the required level . You need to cut the elements to size (not forgetting the 5 mm gaps around the edges) and lay them on the surface. When working, a level is used to set a perfectly flat plane. You can make marks on the walls to see landmarks, this will greatly simplify the work;
Pieces of wood are placed under the block so that it becomes as needed
- The base is insulated . For work, you can use either polystyrene foam or extruded polystyrene foam, or mineral wool. The thickness of the layer should be at least 5 cm if the balcony is insulated below, and at least 10 cm if the structure below is open. When laying, place the material as tightly as possible, pieces of mineral wool are cut 1-2 cm larger so that they fit tightly, and the foam must match exactly in size;
The denser the insulation, the warmer the floor
- The joints are filled with polyurethane foam . This step is necessary if you used solid materials that cannot be packed tightly into the sheathing. The process is simple: foam is applied to all cracks, both between the material and the sheathing, and along the perimeter. The better you fix all problem areas, the fewer problems you will experience later;
Polyurethane foam allows you to eliminate all flaws in the laying of the material in a matter of minutes
- The floor board is being laid . To do this, the material is cut into pieces of the required size and fixed to the surface using self-tapping screws. The outermost element is placed with the tenon forward and fastened along the edge through the top (this area will still be covered with a plinth) and into the groove. The next part fits very tightly with the previous one (if necessary, the board is hammered through a wooden spacer) ;
Fastening through the groove eliminates the need to screw the fasteners through the top and makes the floor look much better
- A protective composition is applied to the surface . This can be either paint, varnish or another composition that does not hide the structure of the wood. It is important that the surface is wear-resistant and well protects the floor from negative influences and moisture. It is best to apply in 2-3 layers to ensure maximum reliability.
The protective layer is an essential part of the work process
It is better to paint the floor before attaching the baseboards, so that you can treat the entire surface completely.
Option 4 – laying laminate
This solution is suitable exclusively for closed and well-insulated balconies. The insulation workflow resembles the option described above, so there is no point in considering the initial steps. We will begin the description of the process from the moment of insulating the space between the beams on the floor.
The following work needs to be done:
- Flooring is being done . For work, you can use plywood, chipboard or oriented strand board. The thickness should be such that the surface does not sag under load; most often, options of 16 millimeters or more are used. The decking is fastened using self-tapping screws, which must be at least twice as long as the thickness of the material;
Chipboard is well suited as a base for laminated floors
- A substrate is laid on the base . It allows you to compensate for minor irregularities and has sound and heat insulating properties. There is a soft and hard option. The second solution is available in slabs, it is better to use it, just lay the elements on the surface, the joints can be glued with tape, or you can leave it like that;
The rolled material is simply spread out and cut in the right place
- The first row is laid along the wall , connected with end locks. Leave a gap of 5-7 mm in order to compensate for material deformations. You can simply place plates or pieces of cardboard along the walls;
- The second row starts with half a panel . The end joints should not coincide under any circumstances, so it is necessary to offset the joints in adjacent rows by at least 30 cm. Rows can be combined either one panel at a time or by assembling the entire row along its length and snapping it into place. It all depends on the design of the locks on the laminate;
Installing laminate flooring is very easy
- The plinth is attached around the perimeter of the balcony . It closes gaps and gives the floor a finished look. The easiest way is to use plastic elements with rubber edges that match the color of the laminate. Fastening is done using dowel-nails if the walls are made of concrete, or using self-tapping screws if you need to fix the plinth on a wooden surface ;
Laminate is inexpensive and looks great
Option 5 – laying linoleum
This is the most budget solution, which is characterized by simplicity and reliability. The base for laying linoleum can be different: either a leveled screed on an insulated floor or a flooring made of boards or sheet materials.
It is important that the surface is smooth, and the workflow looks like this:
Linoleum is great for balconies and loggias
- First, buy linoleum of the required size . It is best if the entire space is covered in one piece without joints or seams. If you decide to glue the covering, then buy an adhesive composition, but due to the small size of the room, this may not be necessary. I usually stick with double-sided tape around the perimeter;
- The material is spread out on the balcony and carefully straightened out so that you can level the linoleum and place it as needed. You can leave the panel for some time so that it is leveled and settled;
First, the material is straightened out so that you can see how best to place it.
- Linoleum is cut around the perimeter . The work is simple, but requires care and precision. It is necessary to press the material at the junction of the wall and the floor and cut it with a construction knife. While working, make sure that the blade does not move, otherwise you will cut it incorrectly;
Cut linoleum carefully
- Linoleum is glued to the surface . If you use glue, first the material is folded in half and one side of the floor is covered with adhesive, after which gluing is done, the second side is attached in the same way. If double-sided tape is used, it is glued around the perimeter, after which you can gradually remove the protective layer in individual areas and glue the coating .
The glue is applied in a thin layer over the entire surface
Option 6 – carpet installation
This type of flooring is suitable for those who plan to spend a lot of time on the balcony and make it a relaxation area. The floor in this case will be very soft and warm, and you can even walk on it barefoot.
The workflow will be very similar to the linoleum option, so we will look at it in general terms:
Carpet - an original solution for a balcony floor
- The material is spread out on the balcony floor . It needs to be leveled and positioned the way it will lie after fastening. Allow the material to level out, for this it is best if it sits for about a day;
- Excess material is cut off around the perimeter . To do this, you will need a sharp knife with replaceable blades. Cutting carpet is not difficult, the main thing is to be careful so as not to spoil the material;
You need to cut the carpet very carefully
- The carpet is glued to the floor . Everything is very simple here, double-sided tape is glued around the perimeter and in increments of 50 cm over the entire surface. Next, the protective top layer is separated from the surface in order and the carpet is fixed. Everything is easy here, the main thing is to be careful and place the material so that there are no folds or distortions.
You can glue the material only around the perimeter
Option 7 – self-leveling floors
Making a self-leveling floor on a loggia with your own hands is not as difficult as it seems at first glance.
The workflow in this case consists of the following steps:
- The surface is cleaned and primed . If everything is clear with cleaning, then the primer is applied in one layer over the entire surface on which the coating will be poured. The type of primer is selected in accordance with the recommendations of the self-leveling floor manufacturer;
The primer strengthens the surface and improves the adhesion of the finishing layer.
- A border tape is attached around the perimeter . It will create an expansion joint and prevent damage to the floor when the structure moves due to temperature changes. The tape can be self-adhesive, or it can be attached to the walls with dowels or self-tapping screws;
The tape provides the necessary deformation gap
- The composition for the floor is being prepared . The work is carried out strictly according to the instructions, observing the proportions of water and mixture (usually you need 6 liters per bag of dry mortar). It is very important to thoroughly mix the composition; this is best done using a drill with a mixer attachment;
- The solution is poured onto the floor and leveled . Usually the mixture itself spreads in an even layer; sometimes it needs to be distributed using a needle roller. The main thing is that the mixture is applied in the required layer and the surface is not damaged until it dries completely. It usually takes about a day to harden, after which the floor can be used.
The composition is poured and leveled
The finished result is reliable and durable
Option 8 – cork floor
This type of coating has an attractive appearance and a very comfortable surface for movement.
At the same time, installing the floor on the loggia is very simple:
- First of all, you need to purchase material ; I advise you to choose options in panels with self-latching locks. Adhesive tiles are not very convenient, and the process of gluing them is tedious and requires care. Also don't forget about the backing;
- First, the substrate is laid . You can use a version made of cork material, it is very suitable in our case. The work process is simple: spread the material and cut it to the size of the balcony;
The substrate compensates for minor unevenness
- Laying begins from the corner of the room . The first element is placed at a distance of 5 mm from the walls, after which it is joined to the second, and so on until the entire first row is laid out. To provide the necessary indentation, you can place slats of the required thickness along the wall;
It is important to lay cork at a distance from the wall
- The following rows are joined . It is important that the end joints do not coincide and are shifted by at least 30 cm. For this reason, it is best to start every second row with half a panel. If necessary, you can knock out the panels with a hammer, and in order not to damage the ends, use a spacer made of a wooden block;
Joining such panels is as easy as shelling pears
- After laying the floor, the plinth is attached , and the work is completed.
The finished floor looks great
Garden parquet
Garden parquet
Garden parquet, decking, decking - all these are names for very practical and decorative coverings made of wood-polymer composites or very hard wood.
Advantages:
- low weight of the coating;
- water resistance;
- weather resistance;
- aesthetics;
- ease of installation.
Garden parquet (decking)
The coating is produced in the form of compact modules that can be laid on logs or mounted on a flat surface, connecting like a construction set. The only disadvantage of decking is its cost, since not everyone can afford it. Garden parquet is suitable for floors on both open and glazed balconies, goes well with any type of decoration and gives the room a touch of originality.
How to make the floor on the loggia warmer and at low cost?
Before laying a frame made of timber or installing insulation boards, you should line the room with foil penofol and foil inside the room.
Electric mats or underfloor heating wires are mounted on a flat surface.
- When installing the floor on a loggia with cold glazing, a small amount of thermal insulation is made of foam foam or a cushion made of building materials, expanded clay, etc. is used;
- For a loggia with warm glazing, you will need to carefully insulate the floor to prevent cold from entering through the floor and ensure a comfortable temperature;
- How to make balcony floors with your own hands? You should study the sequence of work via online video, calculate the size of the room and purchase material and tools.
PVC tiles
PVC tiles
Vinyl tiles are an excellent solution for an enclosed balcony. Thanks to the variety of colors, you can independently create an original pattern on the floor that will decorate your balcony.
Advantages:
- ease of installation;
- water resistance;
- non-flammability;
- resistance to aggressive substances;
- highly decorative;
- small thickness;
- durability;
- environmental friendliness;
- practicality.
PVC tiles - a variety of shades and textures
In addition, the top layer has antistatic and anti-slip properties. The material is easy to cut, and therefore, when laying, you can even make an applique on the floor by choosing the appropriate pattern. There are plain models, wood, marble, and other natural materials. No glue or mastic is required to attach the covering to the base: the bottom layer of the tile is self-adhesive.
The material is laid on both a wooden and concrete base, the main thing is that it is as level as possible. If you have a wooden floor on your balcony, you can freshen up the interior by laying tiles on top of the boards. Such repairs will take a minimum of time, and the result will be very impressive. If laying is done on a cement screed, first grind and clean the surface from dust, then prime it. When installed on a dusty or uneven substrate, the quality of the coating will be very poor.
| Name | Characteristics | approximate cost |
| Bamboo parquet | Durable, wear-resistant, environmentally friendly material | from 1950 rub./m2 |
| Marmoleum | Non-flammable waterproof material with high decorative properties | from 980 rub./m2 |
| Liquid tile | Unique coating with 3D effect, impact-resistant and UV-resistant | from 14990 RUR/m2 |
| Leather tiles | Elite coating with high decorative properties, strong and durable | 2500-4000 rub./m2 |
| Glass floor | High-strength non-flammable coating, resistant to abrasion, mechanical stress, and chemicals | from 4000 rub./m2 |
Terrace board for loggia
Terrace boards are a relatively new type of flooring with high performance and performance characteristics. The board is great for use on open loggias without glazing.
This material is not subject to negative influences and is quite durable.
Leveling the surface can be done using a screed, but laying the decking boards is done, in most cases, on wooden logs or bars that are attached to the rough base. Before installation, it is recommended to raise the floor surface in any way. The boards can be adjusted during the laying process, for which special fastenings are used.
In stores today you can find a large selection of decking board models. The material can have different shades and colors, have a unique structure and texture. Which option is best for the loggia is up to the homeowners to decide. To install decking boards, special fasteners are used that come with the material, so the covering can be done quickly and with your own hands.
Before laying the floor, careful leveling of the rough surface is not required. It is worth noting that when using a decking board, it will be possible to raise the floor surface well. It is not recommended to lay boards on plywood sheets.
Laminate
Laminate
Laminate can only be used on closed balconies with good waterproofing. Some types of laminate are even suitable for laying on heated floors. This coating is durable, has an aesthetic appearance, and if the panel is damaged it is easy to replace. The main condition for installing laminate flooring is a flat, smooth surface, which means that the base must be properly prepared.
Laminate on the balcony
Advantages of laminate:
- withstands long-term loads;
- does not fade in the sun;
- tolerates temperature changes well;
- fireproof;
- Resistant to chemicals.
The range of laminate flooring is very wide, the colors and textures are incredibly varied. You can easily choose a covering to match the interior of your balcony.
Laminate classification
Which laminate to choose
Wooden floors and parquet boards in the design of balconies and loggias
The use of solid wood and parquet boards is permissible for closed balconies and loggias, since precipitation and open sun have a negative effect on wood. The material has a number of undeniable advantages, among which are the following;
- naturalness:
- attractiveness;
- environmental friendliness;
- durability.
Among the disadvantages, it is necessary to note the sensitivity of wood to temperature changes, humidity, exposure to the sun and pests. Careful care and the use of special impregnations will extend the life of the wooden covering. If desired, a worn-out wooden floor can be transformed by removing a thin layer from above, sanding the surface and re-coating it with varnish or paint.
Helpful advice! For balconies and loggias combined with a living room, the most successful covering option is parquet boards, which look like expensive wood, but are much cheaper.
Natural wood flooring is not the best option for laying on a “warm floor”
Wood-based coatings are not suitable for installation with a “warm floor” system due to the low thermal conductivity of the material. Floors made of oak, beech, yew or birch have a longer service life. Boards made of linden, pine and cherry will last less, as they are soft.
An alternative to expensive solid wood material is parquet boards. This is an excellent solution to the question of how to arrange a loggia as comfortably as possible and create a cozy atmosphere at minimal cost. Parquet board is a three-layer material, where the top layer is expensive wood, the bottom two are cheaper wood. Unlike solid wood boards, parquet material can be combined with a “warm floor” system.
Other types of coatings
Very often, floors on closed balconies are made of wood. Both ordinary boards and wooden lining give the balcony a very cozy, lived-in look and saturate the air with the smell of wood. Of course, natural wood is expensive and requires high-quality protection from moisture. In addition, the wooden surface must be periodically treated to restore the structure. But at the same time, the tree is not afraid of freezing, it is durable and does not contain harmful substances. This coating is suitable for closed balconies, both insulated and not insulated, as well as for heated balconies, but only if it is not a heated floor system. When installed on a heated floor, the wood becomes deformed under the influence of heat, dries out, and begins to creak.
Wooden floors
Another good option for a closed, insulated balcony is carpet. This coating is soft and cozy, pleasant to the touch. If the balcony is used as a relaxation area, carpet will be an ideal option for arranging the floor.
Carpet
If the balcony is open and you have no desire to tinker with tiles or porcelain stoneware, use rubber paint for the coating. It does not fade, adheres firmly to the base, does not wear off for a very long time, and is not afraid of water, frost, or summer heat. To apply paint use brushes, rollers or a spray gun. The most important thing is to properly prepare the base. To do this, the concrete screed is leveled as much as possible, ground, and treated with a primer. Please note that even small errors under a layer of paint are clearly visible, and this reduces the attractiveness of the floor.
The floor is covered with rubber paint
Rubber paint was named so because the film formed on the surface of the paint is very flexible; if desired, it can be rolled into a small tube
There are many other coverings that can be used to cover a balcony, and it’s quite difficult to describe everything. The listed materials are the most popular and affordable; you can find them in any construction supermarket. In addition, each of the above-described coatings is easy to install independently, without resorting to the services of craftsmen.
Comparison table of floor coverings
| Type of coverage | Service life, years | Decorativeness | Ease of maintenance | Resistance to mechanical loads | Environmental friendliness | Maintainability |
| Parquet | 15-20 | average | average | not high | high | low |
| Linoleum | 3-7 | low | easily | not high | low | Can not be repaired |
| Tile | 5-15 | average | average | average | high | average |
| Carpet | 1-5 | low | hard | not high | low | Can not be repaired |
| Laminate | 3-7 | low | average | not high | low | Can not be repaired |
| Polymer | 10-30 | high | easily | high | high | high |
Video - How to lay the floor on the balcony
The feasibility of using linoleum on the balcony
Linoleum is considered a universal floor covering. It is used in bedrooms, living rooms, kitchens, and most often people choose it when deciding what to make the floor from on a loggia or balcony.
The popularity of the material is due to its numerous advantages, among which the following stand out:
- low cost;
- wide choice of colors and patterns;
- ease of care;
- ease of installation;
- durability;
- strength;
- high moisture resistance;
- reliable heat and sound insulation.
Despite its many advantages, the material also has its disadvantages:
- characterized by low resistance to ultraviolet radiation, so it is better to lay it on glazed balconies and loggias;
- dents appear from furniture and heavy objects, which can lead to damage to the coating;
- There are many low-quality products on the market that quickly wear out and lose their appearance.
Linoleum is one of the inexpensive flooring options for balconies.
Linoleum on the balcony can be used in conjunction with a heated floor system. However, for this it is necessary to choose a special multilayer heterogeneous linoleum, the layers of which expand equally, which prevents deformation when heated.
Linoleum floor on the balcony: how to make it yourself
To finish the floors on the balcony, it is better to choose insulated linoleum, which is characterized by increased practicality. Strength and thermal insulation are provided by a thick fibrous base. Insulated material is more expensive, but its quality is much higher.
Helpful advice! It is best to use a single piece for installation. If the floor shape is non-standard, then it is necessary to measure the widest and longest places and add 5 cm as allowances.
Before making the floor on the loggia, you need to prepare the base. To do this, it needs to be cleaned and leveled. After purchasing linoleum of the required size, it needs to be laid out at room temperature and allowed to level out. After a couple of days, the sheet is adjusted to the desired size using a sharp knife. Heavy objects are placed on the edges. It is advisable to leave two centimeters at the edges. Excess material will hide the baseboard, but if it dries out, gaps will not form.
Linoleum is easy to install, so it’s easy to do all the work yourself
Fastening the baseboard affects the overall quality of the linoleum installation. It is recommended to choose models with a flexible edge that fit perfectly at the joints. The length of the plinth is measured taking into account the joints and mounting of the corners. It is important that the corners are well pressed and attached to the wall.
Often, a loggia is equipped according to the residual principle, so pieces of linoleum that remain after finishing other rooms are used as a covering. This work requires certain skills, as it involves the use of the “cold welding” method. The glue is first applied to the back of the linoleum, and a dense material is placed under the joint. Next, the joint is heated with a construction hair dryer to bond the surfaces. You need to make sure that the glue does not bleed through the seams, as it is quite difficult to remove.
Floors
61 votes
+
Vote for!
—
Vote against!
A loggia is the best option for continuing the apartment at the junction with the open space of the outside world. There are fewer and fewer adherents of the open space of balconies, terraces and loggias. Most townspeople try to glaze and insulate their loggia in the best traditions of modern technology. Self-installation of the floor on the loggia is one of the simplest tasks when renovating or furnishing an apartment. But it is important to do this with a professional approach, in accordance with technology, so that the floors are durable, warm and beautiful.
Table of contents:
- Selection of materials for the floor on the loggia
- Leveling the floor on the loggia
- Construction of a simple wooden floor on joists
- Laminate floors
- Linoleum finished floors
- Insulating the floor on the loggia
- Finishing the loggia floor with tiles
Selection of materials for the floor on the loggia
A well-equipped loggia is unthinkable without glazing and insulation. This allows you to improve the microclimate of the room adjacent to the street and make it more suitable for growing indoor plants or morning exercises in the fresh air. Even with conventional glazing, the temperature on the loggia or balcony increases by 5-7°C, and on the south side by 10-12°C. An insulated loggia is a complete addition to a city apartment, where it is not necessary to dress warmly and protect yourself from bad weather when you need to breathe fresh air.
If it is planned to combine the area of the loggia and the adjacent room, then full insulation of all planes is necessary. And if the apartment owners are faced with the question of what kind of floor to make on the loggia, it is worth considering all the options in order to choose the best one.
Experts have developed several methods of floor insulation, including “warm floor” systems, which use a special warm cable. However, before laying it, you will first have to complete other stages of work:
- floor leveling;
- thermal insulation;
- protection against fire.
Only after this do they begin laying the heating elements and finishing. Example – high-quality floors on a loggia, photo:
The choice of materials for leveling, insulating and finishing the floor varies, based on the capabilities of the owners and the characteristics of the room. Taken into account:
- design features of the loggia;
- degree of insulation of all surfaces;
- glazing type;
- financial opportunities;
- expected temperature after insulation.
If insulation and glazing are not expected, then even a basic arrangement of the floor on the loggia requires:
- surface leveling;
- finishing.
Finishing the loggia floor should be economical, reliable and aesthetically pleasing. It is performed using building materials that can withstand:
- exposure to an unfavorable external environment;
- temperature changes;
- the onslaught of elements and precipitation.
The type of loggia is also taken into account. For an open type, experts recommend using a cement screed with expanded clay and finishing with tiled materials:
- tiles, porcelain tiles or ceramic tiles;
- natural or artificial stone.
For a glazed balcony, finishing materials that are more sensitive to temperature changes are suitable;
- laminate or laminated chipboard;
- natural wood (lining);
- thick linoleum on a warm backing.
Leveling the floor on the loggia
Houses with a standard layout often show all the “jambs” of the builders – poor-quality finishing and uneven surfaces. And while there is no decision on which floor is best for the loggia, it is worthwhile to level it, without which high-quality repairs are impossible. Why do you need floor leveling? So that water does not accumulate and flow into the room, and also so that it is possible to install balcony furniture, exercise equipment, etc.
1. If it is noticeable that the surface of the loggia floor is not ideal, even at a quick glance, it must be leveled for a high-quality finish.
2. Small unevenness and defects can also be eliminated; it is enough to use a self-leveling mixture.
3. Rough defects are leveled with a screed or joists are placed under the wooden flooring on the loggia or balcony.
Floors on a balcony or loggia should be made of lightweight materials so as not to create additional load on the support. Whatever the finishing materials, the floors need to be prepared, which involves:
- removing old tiles, linoleum or paint;
- removal of areas of rot and dampness;
- sealing seams and cracks through which precipitation penetrates;
- treatment with a construction antifungal drug;
- leveling and sealing;
- priming or preparing the base for final finishing.
Before making the perfect loggia floor, it is important to choose the right leveling method, for example:
- classic cement screed without insulation and fillers;
- dry screed with filling for insulation (expanded clay, expanded polystyrene);
- dry and semi-dry screed with insulation;
- alignment under warm heating pipes under the floor;
- plank floor on joists (with or without insulation);
- leveling using any of the above methods under linoleum or laminate flooring;
- laying finishing on polystyrene foam or expanded clay with or without joists;
- screed for tiles;
- with Nexans cable.
Advice. When using expanded clay bedding, the layer should be no more than 3 cm to ensure sufficient insulation. If the floor on the glazed loggia is sealed, you can add dry sawdust to the expanded clay.
The screed is made on the basis of a cement-sand mixture, where the proportion depends on the ratio of water and sand, taking into account the brand of cement. For example, a semi-dry screed requires a minimum amount of water, and cement and sand are thoroughly mixed. Rare mortar cracks when drying, especially at high or low temperatures, and thick mortar is difficult to install.
For leveling the floor, the ideal consistency resembles mashed potatoes or thick sour cream. Such a solution completely covers expanded clay or other filler, which can float if the mixture is too liquid.
Laying gypsum fiber or fiber cement slabs - a dry screed, which is laid on a surface that has been poured and carefully leveled with expanded clay. The joints are glued and connected with self-tapping screws at intervals of approximately the palm of your hand. After this, foiled polyethylene foam and laminate (insulated linoleum) are laid on the floor.
Construction of a simple wooden floor on joists
If you don’t know which floor is best for a loggia, then use environmentally friendly and durable materials - you won’t go wrong. For example, wood, along with clay, is one of the most ancient materials for finishing floors in residential premises.
Wood is a universal finishing material that can be used not only for finishing floors, but also for lining internal surfaces. The simplest floor arrangement on a loggia involves:
- cleaning and preparation for leveling the base;
- standard screed;
- waterproofing film over the dried screed;
- laying lags with fastening to the base;
- backfilling with expanded clay or other insulation;
- laying the base layer or base for finishing.
When laying the floor on joists, the height of the threshold of the balcony door and the insulation layer are taken into account. The cross-section of the log beam is selected individually, since sometimes it makes sense to raise the height of the floor surface on the loggia. For example, if full multi-layer insulation is expected. The timber sheathing is placed directly on the concrete slab of the balcony or loggia. It is also advisable to lay film waterproofing.
It is easier to align the logs on the loggia crosswise at the same intervals, since short bars are easier to adjust horizontally by checking with a level. Between the fixed bars, expanded clay is poured into the finished cells. If such leveling is difficult, use 1-2 cross members. The board for finishing the floor is nailed directly onto the joists, but you don’t have to nail it, but lay a finished wooden board and secure it with a plinth.
Important addition: Don’t forget to design an aesthetic threshold that will hide the gap and the difference in the floor level of the loggia and the living room.
Laminate floors
If the insulated loggia is small, then you should not skimp on the costs of high-quality laminate flooring. It will go a little, and a small difference in price will not significantly affect the budget. But at the first serious water leak, the base will get wet and warp, and then it will become clear why it was necessary to immediately choose an exclusively moisture-resistant laminate.
Tip: When laying a heated cable of a “warm floor” system under a laminate, select a laminated parquet board or laminate with the appropriate marking, although this will cost a little more.
Linoleum finished floors
One of the most practical coatings for finishing the floor of a loggia is insulated linoleum. It differs from ordinary thin linoleum in thickness and the back side is fibrous. An insulated one will cost a little more than usual, but you will feel the difference when you calmly stand on it without indoor slippers or warm socks.
It is also recommended to lay linoleum on a leveled and insulated base. Simple cheap linoleum can also be “insulated” if placed on a heat-insulating base or on top of plywood in a “warm floor” system.
The ideal option is to lay a single piece on the loggia. If the loggia has a complex configuration, the dimensions are calculated based on the widest point and length plus 2-5 cm for allowances. After purchasing such a piece, they spread it at home, let it rest, and after 2-3 days, when the edges have rested, the shape of the sheet is corrected with a sharp knife, pressing the edges around the perimeter with something heavy.
Attention: If, when trimming a piece of linoleum, you “missed” a little and cut off 2-3 cm of excess, do not worry, these defects will be hidden by the baseboard.
The final result of laying linoleum largely depends on the quality of the baseboard fastening. Experts recommend finding dismountable skirting boards in a hardware store, equipped with an elastic edge that ideally fits around the joining surfaces. Can be laid under the baseboard;
- wires and communications;
- electrical cable;
- landline phone;
- cable for router for internet;
- antenna cable for television.
A piece of plinth is measured with the expectation that there will be a connection with a fixing decorative corner. After all the segments have been laid and adjusted around the perimeter, we assemble the corners. Each corner is pressed tightly against the wall and fixed to the wall. The plinth between the corners is also attached to the wall with self-tapping screws with the same spacing.
A more complex option is joining pieces of linoleum. This often happens when, in order to save money, what is left from the renovation of residential premises is used for the loggia. To do this, they use the “cold welding” technique, tightly fitting the perfectly evenly cut edges of the pieces. A strip of dense material (for example, cardboard) is placed under the joint to heat the glue applied to the back side. The joint is heated with a hairdryer or a warm iron so that the glue for PVC products “sets.” It is undesirable for the glue to bleed through the seam - it is difficult to remove. When the glue has had its effect, the tape and thick cardboard are removed, leaving an even seam.
Insulating the floor on the loggia
The best completion of the arrangement or repair is the installation of a heated floor on the loggia. For high-quality insulation, all seams and cracks at the joints of surfaces must be carefully sealed. Full floor waterproofing is also required. The easiest way is to use polyurethane foam, silicone or facade sealant, but everything should look aesthetically pleasing, all traces of foam or silicone stains should be cleaned off.
Warm floors require 2 layers:
- roughing worker with heating system;
- top finishing.
Everyone chooses the surface material to their taste, suitable:
- marble slabs;
- porcelain stoneware;
- tile;
- carpet covering;
- parquet board or laminate, etc.
For the main layer for insulation with warm cables or steam heating pipes, a certain height around the entire perimeter is assumed - 10-15 cm. The difference in levels is indicated by a threshold, so it is worth slightly raising the height of the loggia floor for the comfort of your feet.
Advice: We recommend entrusting this part of the arrangement to professionals. To save money, just prepare the base with a screed. You should not install Nexans heating cable yourself if you do not have the appropriate skills or the slightest idea about the “warm floor” system.
Finishing the loggia floor with tiles
Any tile is an ideal finish for an open loggia, especially over a cement screed. You can choose any color or pattern, texture or imitation of natural material. Most often, ceramic tiles, tiles or porcelain stoneware are used. These are durable and reliable materials, especially if you do not test their strength by dropping heavy objects on the tiles. But this finish, in addition to a lot of “pluses”, has 2 “minuses”. Loving tiles, more or less slippery and cold. Usually a warm, soft rug is laid on top of such a floor.
The simplest installation option:
- cleaning the floor from old building materials and preparing for leveling;
- waterproofing with film material;
- laying insulation;
- *heavy or leveling with mixture;
- laying the tiles using the appropriate adhesive according to the usual method with “crosses” to maintain the same thickness of the seams;
- treatment with grout or sealant.
Tip: It is best to use durable porcelain tiles that imitate any natural stone or other surface. The only drawback when laying it is that it is difficult to cut, it is so strong. There are also special tiles for laying without joints, giving an ideal “solid” surface, for example, marbled.
How to make floors on a loggia - video:
No. 7. Self-leveling floors
Today, Levl Coat flooring is in increasing demand, and is widely used not only on year-round sports fields, but also on open balconies and loggias. Among the main advantages it is worth highlighting:
- record wear resistance;
- moisture resistance;
- ease of operation;
- resistance to sunlight;
- stylish appearance.
Self-leveling floors can be safely called indestructible. They are made according to the principle of concrete screed, and the main disadvantage is the high price. In addition, the surface turns out to be quite slippery, so it is better to additionally use polymer mats.
Carpet on the balcony
You can also use carpet on the loggia. This material has a long service life. Adapts perfectly to various conditions. Carpet can also be used on uneven surfaces. However, to make it convenient and comfortable to walk on it, it is necessary to make the concrete screed as even as possible.
You can walk on the carpet barefoot, as it is pleasant and soft to the touch. A large selection of colors makes it possible to select materials for any interior.
The disadvantage of this coating is that it absorbs a lot of dust, so you need to vacuum it often.