Wedding accessories
- How to decorate a wedding bottle: ideas
- How to make a bottle outfit for a wedding with your own hands? Step-by-step instruction
- DIY wedding bottles made from satin ribbons: master class
- How to paint bottles for a wedding?
- How to decorate a bottle with your own hands
For most couples, a wedding is an exciting and desired event, so they approach the preparations with all responsibility. At a wedding, you want everything to be perfect; even the smallest accessories should be consistent with the unified concept of the celebration. What wedding would be complete without champagne? And it is this drink that the newlyweds pay special attention to; bottles with this sparkling drink are decorated and stored until the first anniversary.
From plastic bottles
Mermaid or kikimora
The most beautiful place in a plastic bottle is the bottom. We cut a lot of them at once. They will decorate the hem of the dress, the bodice, and you can use them to glue together an original crown. For a mermaid or kikimora costume we will need green bottles.
After cutting off the bottoms, you still need to cut off the necks, and then carefully and evenly cut the rest of the bottle lengthwise into three equal parts. Burn small holes in the narrow part and gather them on a cord into a garland, which will become a skirt. Glue, sew or staple the bottoms along the edge of the skirt.
It is better to make the bodice of the dress by covering an old T-shirt with green plastic parts. But the crown can be assembled from lush feathers cut from bottles and attached to a hoop or ribbon.
Princess of Flowers
The standing skirt for this costume is made from a wire frame. Any thin fabric can be stretched over it. This is where the difficulties end and the creative part begins. Cut petals from bottles of different colors, collect them into flowers and attach them to the skirt. Cut half-liter bottles in a spiral and attach the “serpentine” to the skirt.
Astronaut
A boy's costume can be made from scrap materials by simply tying two plastic bottles together and attaching them upside down to the astronaut's back using straps. To make our jetpack functional, glue red-orange patches simulating fire into the necks with your own hands.
Helmet, hat, crown
The largest plastic bottles are simply specially produced in order to make various headdresses from them for a hero, an alien, a king, a gentleman, a puss in boots, etc.
The photo shows how to make these hats. Cut out the fields from thick cardboard.
How to make a bottle outfit for a wedding with your own hands? Step-by-step instruction
Bottles of champagne decorated to match wedding dresses look original and at the same time elegant on the wedding table. Today, many people choose not classic outfits: a white dress for the bride and a black suit for the groom, but dresses and suits in original colors. The decor of the bottles can be based directly on your wedding dresses.
Photo of how to decorate bottles for a wedding with your own hands
So, how to make bottle wedding clothes? The task is not difficult and even an inexperienced craftswoman can master the technology of sewing clothes. You will need several small pieces of fabric of different colors and structures, pearls, golden sequins, small flowers, tulle and any other decor at your discretion:
- Sew pieces of white fabric (tulle, satin, velvet) in the shape of flounces.
- Decorate the dress with sparkles, pearls, beads, possibly flowers.
- Place on the neck of the bottle.
- You can additionally make a veil and attach it to the cork using a glue gun.
- Additionally, you will need white ribbons for decoration.
- Making a tuxedo for the second bottle of champagne is also not difficult. Take measurements of the bottle in terms of volume and height, cut out a square pattern. From black fabric, cut out a square onto which you need to sew a white flap like a collar, sew on beads (instead of buttons) and make sleeves. The neck can be decorated with a butterfly, and a small black hat can be placed on the cork.
Photos of decorating bottles for a wedding with your own hands
Costumes from…
Dress made of leaves
It is quite natural to go to an autumn ball in a dress made from autumn leaves. To create such a masterpiece with your own hands you will need few resources: just a piece of fabric or an old dress, a large bag of maple leaves and glue.
It's good if the leaves are a little wet. If they dry out, the edges will curl and the dress will become “shaggy”. Spray them with a little water from the sprayer and start gluing them to the fabric.
Do this from bottom to top, overlapping the previous row. Try to maintain the color scheme. You can straighten the leaves using a warm iron, ironing them through damp gauze.
This dress is very beautiful, but not durable. If you are not going to wear it to the ball right away, spray it lightly every 4-5 hours with cold water so that moisture does not get on the fabric.
Dress made from bags
Take garbage bags of two colors, cut them into one continuous sheet, and build a costume... for example, rain.
Dresses made from improvised materials turn out amazing. Few people know that bags, even the largest ones, are glued together so tightly that they can be inflated like balloons. Inflate 15-20 bags and attach them to a long skirt in several rows. The world has never seen such a gorgeous princess.
You can, on the contrary, not inflate the bags, but cut them into fringes, and then sew them on with lush red flounces.
Queen of newspaper prints
If you have stacks of old, read newspapers lying around waiting for the next repair, it's time to put them to work. See what kind of royal dress of the Lady of the Seal you can make with your own hands. All you need to do is take a printed sheet, fold it in half for rigidity, roll it into a bag and attach it to the skirt in any way. The assembly procedure is the same as in the autumn costume.
DIY wedding champagne bottles in white and green tones
Only, at first glance, it seems difficult to decorate bottles without having certain skills. Get acquainted with detailed master classes and such doubts will disappear.
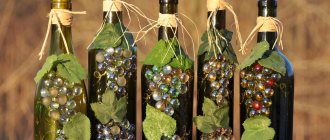
We suggest decorating wedding champagne with your own hands for the holiday in shades of white and green. This decor is also suitable for a wedding decorated with green apples.
Choose green bottles of champagne, which is necessary for the basis of the main symbol - the apple.
To decorate bottles you need to stock up on the following materials:
- white acrylic primer;
- white and light green acrylic paint;
- decorative white and green roses - fabric or made from polymer clay are suitable;
- beads with a diameter of 3 mm, pearl and green;
- satin green ribbon 25 mm wide;
- green tulle.
To work you will also need an available tool:
- flat brushes with bristles No. 12 and No. 20;
- foam brush with a round pad;
- hot glue gun;
- tweezers.
Additionally, you will need glue and regular alcohol. When preparing the workplace, don’t forget to lay out cotton pads, several napkins and paper towels or newspapers.
To begin with, we completely clear the bottles of industrial labels.
This is easy to do if you place them in a soap solution for half an hour. After this, it will be enough to walk with a sponge to remove all the paper and glue. All that remains is to rinse the container under running water.
We wipe them dry and begin degreasing the surface. We will treat the glass with cotton pads soaked in alcohol.
Now you can start painting. But before applying the primer, you need to make the base of the future “green apple”. To do this, find a suitable picture of an apple.
You can use a ready-made template: copy the picture to your computer and print it on a printer.
Cut out the finished image of the apple along the contours. All that remains is to moisten it with plain water on the reverse side and apply it to the bottle.
Before applying the base paint, the glass must be primed. We will do this with white acrylic primer. Please note that the primer must be suitable for working on glass, as not all materials are suitable for this.
To apply primer to glass, it is better to use a brush with a flat base.
Advice! Apply primer in one direction.
After the first layer has dried, you can cover the bottles with base a couple more times. This is important when working with glass.
When the material is completely dry, we move on to working with paints.
Since the outline of the apple has already been outlined, the template can be removed at this stage.
If the sticker is difficult to remove, use a regular blade.
If desired, you can paint the champagne bottles the same color. But for a wedding it is better to make them multi-colored. In our case, we will paint one container snow-white, the second bright green.
You can choose the appropriate shades and even color scheme yourself.
To apply acrylic paints, we need a brush with foam rubber in the form of a round pad.
But even if you haven’t found such a tool, don’t be discouraged. Take regular foam rubber or cut a piece of dishwashing sponge.
Advice! Apply acrylic paint by touching the foam to the surface. Do not smear or rub the paint.
Paint the bottle 3 to 5 times in total to achieve a uniform and dense surface.
The paint on the bottles must be completely dry.
Only after complete drying do we begin to decorate the wedding champagne with our own hands. We start by decorating the contours of the apple with beads.
Carefully remove excess paint from the very base of the apple with a blade. But the outline will still remain sloppy. Therefore, it is better to decorate it with beads in the color of the bottle.
The beads will be glued with instant glue “Crystal”, which does not leave marks or streaks on the surface. Apply glue using a gun and immediately glue the bead, which is best taken with tweezers.
Arrange the beads so that the holes overlap adjacent beads. Don't be afraid to make mistakes. You can remove an incorrectly placed bead at any time. In this way we process the entire outline of the apple.
Now let's start decorating the bottle with roses. Pick up ready-made satin flowers in the store.
By the way, decorative flowers are easy to make yourself from satin ribbon.
If desired, you can decorate the bottle with ready-made petals and flowers made from polymer clay.
Imagine how to lay out a pattern of roses yourself.
In our case, the flowers are glued as a decorative trim above the apple and along the bottom of the bottle.
Just like beads, roses can be peeled off if they are placed incorrectly and moved to the right place.
In this case, it is better to apply the glue to the base of the flower itself and attach it to the painted surface of the bottle using tweezers.
All that remains is to tie the ready-made wedding champagne with a satin ribbon in the form of a bow. If desired, you can place tulle under the ribbon, which will give a more festive look to the wedding “bulls”.
A beautiful pair of champagne bottles is ready for the holiday.
It is ideal for a spring or apple wedding, as well as a holiday in white and green colors.
If decorating the bottles did not cause any difficulties, use the same technique to decorate wedding glasses, which will perfectly complement the composition.
Alien costume
The most flattering outfit is the alien dress. Yes, because no one knows what he really looks like. Come up with whatever you want, cut it with your own hands, glue it, draw everything your imagination allows. To indicate that you are wearing an alien costume, simply attach an antenna to your head and paint your face green.
How to paint a bottle of champagne for a wedding - 5 lessons
Do you dream of having a beautiful wedding? Then our 4 master classes on how to unusually paint a bottle of champagne for a wedding are definitely for you! Economical, hand-made decoration will not leave guests indifferent and will significantly reduce spending on trifles. But a beautiful bottle, painted with safe acrylic paint, is also pleasant to open and pour into glasses!
Do you want to know how to paint a bottle of champagne for a wedding so that guests exhale in admiration? Then hurry up to prepare the necessary tools and let's get started!
Champagne bottles covered with gold paint
To make wonderful gilded bottles we will need the following tools:
- Newspaper/fabric that you don’t mind getting dirty;
- Decorative gold sparkles (gold glitter) - you can buy ready-made ones, or you can work a little and cut them yourself;
- Aerosol gold paint;
- Empty bottles/alcohol bottles;
- Glue – you can use both aerosol and special liquid for decoration;
- Paper towels;
- Gloves;
- Shallow bowl.
Cloud
The cloud suit is made of padding polyester. Take a white cloth or an old pillowcase.
Cut a hole in it for the head and sew in lots and lots of white synthetic fluff. White tights will complete the look.
You can make masquerade costumes from plastic bottles, maple leaves, synthetic padding, or cardboard. See how to make a skirt out of plastic cups for a carnival.
A masquerade costume will be useful for a home party, a party at school, or in kindergarten. To look beautiful at the carnival, you don’t have to buy such outfits. You can make them yourself from almost nothing.
Bottles for a wedding
The bride and groom are always given two bottles of champagne for their wedding. This is an established tradition, the roots of which can no longer be found. At a wedding, they act as decoration on the festive table. After the celebration, they are hidden and the first one is opened exactly a year later, and the second one is opened upon the birth of the couple’s first child. As a rule, the container is decorated either in the form of a symbolic bride and groom, or to match the general theme of the wedding. The necks are decorated with doves (symbols of fidelity), rings and satin bows. They try to make the costumes of the “bottle” bride and groom look like the originals.
Men's clothing - a black jacket or tuxedo, with a ribbon, a bow tie, button beads and miniature cufflinks. To imitate a bride's dress, they use lace, openwork, airy fabrics, tulle, and sometimes even wire crinoline. Bottles decorated in a wedding theme are wrapped in layers of ribbons of beautiful colors, which are combined with artificial pearls, openwork stripes, beads, bows and voluminous flowers. The neck of the “female” container is decorated with a miniature tiara with a veil, and the “male” container is decorated with hats or top hats.
Compositions with candlesticks and glasses, which are decorated in the same style, look interesting. Some weddings also use boutonnieres, baskets woven from ribbons, or paraphernalia around the wedding chairs in the same color scheme and with similar motifs.
Masquerade costume made from plastic bottles
Almost everyone has such goodness. In a dress made from plastic bottles, your daughter will be simply irresistible at any occasion.
You can make a dress on a variety of bases. If it is fabric, then cut the bottom of the plastic bottles, paint these parts, then glue them to this base, as on the model on the left. Create a wreath using canvas from plastic bottles. And if you want to make green, you need to take bottles, cut off the top and bottom parts and cut this cloth in half. The result is a canvas from which you will create a new thing. And the skirt can be made from bottle halves. Such masquerade costumes are decorated with flowers made from the same material. See what they can be like.
To make such flowers from plastic bottles, you first need to cut off the bottom, then make slits on them and scorch this blank over a candle flame.
Then the edges of the flowers will curl and look realistic. Now use an awl to make a hole in the center and connect other pieces of various sizes here. You will get voluminous flowers from plastic bottles, which can then be attached to the dress.
Additionally, you can decorate this creation with artificial stone or by attaching beautiful glass buttons inside the flowers.
Watch the master class with step-by-step photos, from which you will learn how to make a fancy dress costume from plastic bottles.
To create a full skirt you will need a base. If you manage to get an unnecessary lampshade, then remove its fabric, make the inside so that the girl can put on this skirt frame. Another option is to make such a base from strong wire. Create flowers from different types of plastic bottles, paint them, then attach them here.
But first you will need to additionally cover the frame with fabric.
Cut thin ribbons from the remaining plastic and glue them to the bottom of the skirt so that they hang beautifully.
Also create the top part on the basis of a canvas, it can be a T-shirt or a top, to which you glue flowers with a glue gun. Here's what these decorative elements can look like.
All that remains is to make the headdress. To do this, also cut out pieces of plastic and process them over a burner flame to give the desired shape. Then glue the flowers and use them to create head decorations.
Now you can go to a masquerade ball and shine in such a wonderful outfit.
New clothes can be created from a variety of materials. Even use autumn leaves for this. Of course, such a dress is short-lived, but it is only needed for one day.
DIY wedding champagne: photos of decorated bottles
More ideas for decorating wedding bottles using various coloring techniques can be seen in the gallery. Keep in mind that you can paint both the bottles for the newlyweds and the rest of the champagne for the guests.
You can cover wedding bottles with aerosol and acrylic paints, silver and gold, broken New Year's toys and glitter.
The top can be decorated with ribbons, bows, satin and polymer flowers, petals, tulle and lace.
Use your imagination, and you will definitely get exclusive wedding bottles that will perfectly fit into the wedding concept and emphasize the individuality and creativity of the couple.
Masquerade costumes for boys
To make a cowboy costume, take:
- carton boxes;
- scissors;
- stationery knife;
- twine;
- glue gun;
- stick;
- wide braid.
Follow the following instructions:
- On a large cardboard box, cut out a circle with which the child will put this part of the horse’s body on himself. Below, using a stationery knife, you will need to cut off the bottom of the box.
- Make a horse's tail out of twine and glue it in place. From a small box you will make a head. Bend part of the workpiece and cut out triangular ears. Also use twine to create a horse's mane.
- Connect these two parts with a stick, it must be inserted into the hole of both boxes and secured with glue. Glue a wide ribbon onto the horse's body so that the child can attach this part to his shoulder.
- Have him wear a wide-brimmed hat to make it clear that this is a cowboy costume.
- If you need to quickly put together an outfit, then use a hat and jeans. You can make a horse on a stick using a plastic bottle. Create elements of the animal's face from cardboard. Make a mane from threads.
You will also create a dinosaur costume from cardboard. You will need several boxes of different sizes. The largest one will become the body. You will need to cut two holes in it so that the child can put his hands through it. Glue the sides of the smaller box onto it to create a neck. Attach a small box on top, and glue two toilet paper rolls into the two holes; they will become the eyes of the dinosaur.
Make his teeth out of cardboard, cutting out a box in a zigzag pattern in this place. In the same manner, sew the seams on the neck of this animal.
Decorating with ribbons
For work we will need:
- white satin ribbon – 10 m;
- black satin ribbon – 8 m;
- golden satin ribbon;
- lace – 10 cm;
- wide white bow or nylon ribbon;
- Moment glue, pencil, ruler, scissors, thread, needle.
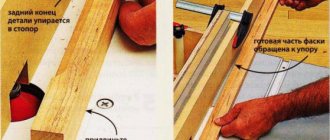
In this master class we will look in detail at making a bride's dress, since this is the most difficult thing.
First of all, you need to carefully remove the labels from the bottle.
On a note! In order to do this job faster, you need to soak the bottles in water for a while, this makes the labels easier to clean off.
We cut the required length of lace along the neck and glue it in the same way as in the photo.
Related article: Crochet baby blanket using a simple pattern for beginners
Now we proceed to gluing the thin satin ribbon. Since the bottle expands towards the bottom, it is better to cut off the tape after gluing each turn, this will take less time to work. Lubricate the bottle with glue, grabbing a little of the previous turn of tape, and glue it.
Advice! To prevent your drawing from moving to the side, it is recommended to draw a line with a marker along which you can align.
So we cover the entire bottle.
Now we sew a skirt that will consist of three frills. In order for our skirt to turn out fluffy, you need to take about 1 meter of nylon tape for each frill. Using a thread and a needle, we make these 3 ruffles.
Glue a golden ribbon onto one frill.
Let's assemble our skirt.
Here is our outfit for the bride, you can add beads or rhinestones, if desired.
The groom's outfit is made in the same way.
How to make a fancy dress costume from padding polyester?
Such carnival costumes are light and will allow the girl to really float like a cloud. To create one, you need to take:
- loose dress or pillowcase;
- scissors;
- padding polyester;
- glue.
If you are using a pillowcase, make a slit for the head and arms. Now glue these pieces of padding polyester onto it, placing them tightly together. All that remains is for the girl to put on white tights to temporarily turn into a cloud.
You can make a snowman costume for a boy. You also don't need a lot of materials for this. Take:
- two white large T-shirts;
- scissors;
- a piece of red cloth;
- padding polyester
First, take the first T-shirt. Cut out circles from red fabric and glue them on it as if they were snowman buttons. Now steam the sleeves of two T-shirts. Sew the T-shirts together. Then stuff it with padding polyester, placing it between these two fabrics.
All you have to do is insert the elastic band down and you can try on the suit.
You can complement this costume with mittens and a red cap.
How to decorate champagne for a wedding
Champagne is the main drink at every wedding. They raise it to the glory of the young, they celebrate this day with it, they drink it to the dregs, chanting: Bitter! And if wedding glasses should at least be made of crystal, decorated with ribbons and flowers, then a bottle of sparkling drink should be one too. If you want everything at your wedding to be harmonious, stylish and exclusive, then start creating right now. With this master class you will learn how to make a festive accessory from an ordinary bottle of champagne.
DIY dress made from plastic cups - master class and photo
If you have a lot of such empty containers, use it to make a fluffy skirt for your outfit. As a top, you can use a sweater or a T-shirt of a matching color. Take:
- disposable cups;
- napkins of two colors;
- garbage bags;
- stapler;
- scissors.
The skirt consists of several tiers. For the bottom tier you will need 24 glasses. First, connect them in pairs with a stapler, then connect them together to make a circle.
The next circle consists of 22 cups. Connect them together in the same way.
Then you need to use the same tool to connect two circles to make two tiers of a skirt.
The 3rd tier consists of 20 cups. Make as many rows as your daughter needs. In this case, there were 7 circles. Unwind a strip from a set of colored garbage bags, pass it down through the resulting hole and secure it on the sides of the cups with a stapler. This will be the belt. It is needed to put on a girl’s skirt, and then tie the new thing at the waist using these bags.
How to make a hat, helmet from a plastic bottle?
For such a helmet you will need a container large enough to fit the child’s head. Trim off the excess from the bottom. Then paint the helmet with gold paint or immediately take a bottle of that color. Decorate with geometric shapes and red paper ribbons. This decor is glued. Make a hole in the cork and secure a bunch of red thread here.
See how bottles need to be cut to make hats of different textures.
If you want a hat with a brim, then take a rectangular canister, cut off the top and glue a ring of cardboard as a brim. In order for them to attach well, you will need to cut the cardboard a little along the outer circle.
Masquerade costumes will be wonderful if you complement them with hats like these. To make a helmet, you can use the upper master class or attach feathers instead of rope. If you need a rounded hat, take a large bottle of this shape and cut off the neck. You can seal this hole. Glue cardboard brims onto this headpiece.
The same material will help you create an Astronaut costume.
Glue two plastic bottles together. Paint them silver. Cut fire petals from fabric and glue them to the neck of each bottle.
Glue a wide braid onto this blank so that it becomes a kind of straps. The child will wear this thing, which will imitate a jet engine.
You can make an Astronaut or Alien costume from foil. Complete it with a jet engine like this.
These are the unusual masquerade costumes you can make from scrap materials. If you would like to see in more detail how to make a cup skirt for a fancy dress costume, then check out the video below.
You will understand how to make a Musketeer costume when you look at the following selection of photos.
- Article on the topic: How to make a mask, Batman costume, fox for the holiday
To create such a kit you needed: a large number of plastic bottles, thermal glue - a gun, paint in cans of different colors, wire, scissors, a candle.
The flowers themselves were cut out using various patterns. Flowers were made both from the bottom of the bottle and collected from petals cut from the main part of the bottles. The edges of each petal, leaf, and curl were processed in the fire of a candle. Flowers are unique and inimitable.
The paints used for painting should not curl up on the plastic. It is necessary to cover from a distance, in a thin even layer, preferably in the open air.
The feces were made from a rectangle, folding it on one side to form a flower cup. Covered with white and yellow paints. The base of the flower was well glued and attached to the wire.
The frame of the dress was welded to order according to the model's measurements. Additionally, wire was attached around the entire perimeter for attaching flowers. Painted white.
A composition was created separately to decorate the top. A master class on how to make it was given earlier.
Creating such a dress is a labor-intensive process. Every detail in it is made by hand. A large number of blanks of flowers, petals, leaves, curls are needed. When the flowers were assembled onto the frame, small LEDs were inserted into the centers of the flowers and attached to a battery. Remember New Year's garlands? The principle is similar. In such a dress you can “shine” even at night!
Master classes on decoration
Even without design knowledge, it’s easy to decorate a bottle of champagne yourself. Equipment and materials should resonate with the theme of the event, the design of the hall, and the time of year. A little time combined with imagination will be required to create a unique souvenir that will become the central composition of the table. A master class on decorating champagne for a wedding will help you determine the level of skill and tell you in detail the number of devices and materials required.
Polymer clay
When decorating bottles for a wedding, you can turn to polymer clay elements. The technique completely replicates working with plasticine; you will need a set of multi-colored clay, a board, rubber gloves and toothpicks.
They roll out the clay into sausages on a board, cut it into pieces and begin to sculpt decorations. You can collect flowers from individual petals or sculpt them all at once. The products are moved to the oven to dry. It is recommended that after work, thoroughly wash the oven to remove clay fumes.
If you don’t want to do sculpting, then decorative parts are selected in a craft store. They will offer not only flower arrangements, but also individual berries, rings, twigs, and bouquets.
Use a glue gun to attach decorations to the container. You can spray the composition on top with white or gold spray paint, wrap the champagne with ribbons or lace, and glue beads, rhinestones and beads along the contour.
Use floral arrangements made of polymer clay in minimal quantities, otherwise the bottle of champagne will turn into a bulky arrangement, too pretentious for a wedding celebration.
Decoupage
Decorating bottles for a wedding with decoupage is a simple solution to quickly apply a professional design to the glass.
To work you will need:
- special postcards for decoupage with a wedding theme;
- a bottle of champagne;
- foam sponge;
- PVA glue diluted with water;
- fan brush that leaves no hairs;
- white acrylic paint;
- clear acrylic varnish;
- beads, rhinestones, stones, ribbon bows.
Even novice craftswomen will like the decoupage technique; glasses and vases on festive tables are decorated in a similar manner.
Master class principles:
- Remove labels and degrease the glass surface.
- Using a foam sponge, cover the container with white acrylic paint. A brush leaves paint streaks, and a sponge stains glass.
- Apply two layers of acrylic varnish to the selected postcard and leave to dry.
- With a slight movement, remove the top layer of the postcard. It should come away without damaging the design.
- Carefully cut out elements from the postcard.
- Coat the area of the container with the glue solution, attaching the prepared parts. Use a brush to smooth out any irregularities, removing any bubbles that have formed.
- The part of the container free from decor is coated with any paint.
- The design is outlined with a dark or silver outline.
If desired, complement the composition with lace and artificial pearls. Use a foam sponge to apply strokes over the surface, attach artificial flowers or ribbon bows.
Labels are removed and bottles are primed
Cover with a non-woven towel
Apply several layers of white paint
Preparing napkins with a pattern
Glue the napkin onto PVA and cover with varnish
We glue the decor
Apply white structural paste
Apply glitter
Satin ribbons
The decor of satin ribbons on bottles looks original, especially when using material in a contrasting color. They think through the composition in advance so that it matches the outfits of the newlyweds.
Necessary materials:
- a bottle of champagne;
- golden or silver brocade ribbon;
- dark blue or red satin ribbon:
- beads, beads, lace fabric;
- glue gun
Before you start decorating bottles for a wedding, measure out a sufficient amount of tape with your own hands. It is better to take excess material, which is used to decorate other wedding paraphernalia.
Subsequence:
- The edge of the satin ribbon is attached with a glue gun to the neck of the prepared container. They try to overlap the left end with the right end, carefully lowering down.
- The tape is overlapped, gluing the layers with glue.
- The next layer is wound to the expanding part of the container, so a longer piece of tape is measured. 5 turns are enough.
- The lower part of the container is covered with festive brocade ribbon. They begin to fasten the material from below, going up.
- The remaining free space is covered with a piece of satin ribbon.
- To mask the joints, glue a 10 cm piece of satin ribbon at the top.
Uneven areas are covered with lace or satin bows, beads and seed beads. It is recommended to make several small golden roses by attaching bottles diagonally.
Engraving or photo of the young
A wedding in a classic style will be effectively complemented by engraved champagne bottles. It is impossible to do this type of decoration on your own; here you need to contact a qualified specialist. The master will offer you to choose from a huge assortment of patterns; you should familiarize yourself with the catalog of his works. You can choose a heart with the initials of the newlyweds or choose a complex engraving with intertwined floral motifs. Even a simple motif on dark green glass attracts with its sophistication of lines and will turn into an original souvenir.
A creative approach to decorating wedding paraphernalia is reflected in touching images of a loving couple. It is enough to select joint photos and go to the photo laboratory, where they provide label production services. All that remains is to order framed frames with doves or hearts, cupids or shooting stars. The frames are applied using a special technique to adhesive tape, which is removed in one motion. The photographs are attached to the prepared bottles without any remaining labels, the contours are covered with beads or rhinestones.
Artificial or fresh flowers
Floral arrangements made from artificial flowers are often used to decorate wedding champagne. Craftswomen can independently make twigs and flower buds from satin ribbons or go to a specialized store with ready-made products.
Decoration materials:
- white, gold or silver spray paint;
- ribbons, beads, rhinestones, artificial pearls;
- glue gun;
- contour for drawing on glass;
- artificial flowers and leaves.
The bottle is thoroughly cleaned of labels and the surface is degreased. Treat with any spray paint and leave to dry in the open air. Using a stencil, apply patterns to the prepared containers and attach a composition of flowers, beads, rhinestones, pearls and ribbons with a glue gun. The decorated bottle is additionally painted with a golden outline, giving it a festive look.
It is not recommended to decorate champagne with fresh flowers. Even if you pre-treat the composition with water, you will be disappointed - the petals will quickly fade, leaving an unpleasant aftertaste. Wedding bottles should be stored for at least a year in the new family, so choose reliable decoration elements.
Bride and groom suit
Bottles that replicate the attire of the newlyweds are considered an increasingly popular paraphernalia. The composition is complemented by glasses with similar decorative elements.
Necessary materials:
- satin ribbons in white, gold and black;
- a piece of tulle or lace;
- rhinestones, buttons, boutonniere;
- glue gun
Work begins well in advance; in a hurry, mistakes are inevitable. Sharp scissors and a lighter will come in handy for evenly cutting and burning satin ribbons.
Bridal bottle decoration:
- The neck of the container is wrapped with a piece of lace, fixing the ends with a glue gun.
- Measure out a piece of white satin ribbon and glue it behind the lace.
- The next piece is attached slightly lower than half of the previous row.
- The pieces of ribbon should be at the same level in order to cover the unevenness with jewelry later.
- Continue decorating until the container is completely covered with ribbons.
- Cut out several round pieces of tulle or lace along the diameter of the container for the skirt. The blanks are placed on top of each other in several layers, then sewn together with white thread.
- A multi-layer skirt is placed at the bottom of the bottle, and a piece of golden ribbon is glued along the top edge.
- From the remnants of tulle they construct a veil for a bottle of champagne, attaching it to a cardboard hat.
The container is also decorated with rhinestones, roses and beads. For a themed wedding, the bride's decoration element is repeated.
The groom’s bottle is decorated using a similar principle, only taking into account the nuances:
- Instead of lace, a ribbon with ironed corners is placed along the neck, imitating a shirt collar.
- The next rows will be several turns of white tape.
- Cover the entire container with black tape. Strictly in a circle they finish wrapping with ribbons at the bottom of the container.
- A bottle of champagne will be decorated with a stylized tie. Use a piece of black tape and stick it on the white background of the shirt.
Finally, attach a row of buttons from the collar to the bottom of the container. A cardboard hat and a boutonniere made of artificial flowers are a must.
Painting with paints
Beautiful decoration of bottles for a wedding celebration is achieved by using stained glass or acrylic paints. Additionally, you will need a set of brushes, a special contour for glass surfaces, acetone and a washable marker.
Step by step guide:
- After degreasing the containers, they begin to decorate. Use a marker to apply the selected design to the bottle. You should draw dashed lines to outline the sketch.
- The outline is drawn along the strokes. Marker traces should be removed with warm soapy water after the outline has completely dried.
- Paints fill the space inside the sketch. You don’t have to use only white paint here, depending on the theme of the wedding.
- After drying, you can scratch thin patterned lines with a needle.
It is even easier to use aerosol paints from cans, which evenly color the glass. A bottle of champagne for a wedding will be transformed after decorating it with silver, golden or mother-of-pearl shades. It is enough to use adhesive tape to cover the areas of glass containers that do not need to be painted. Other holiday paraphernalia is decorated in the same palette.
Rustic style
To decorate champagne for a rustic wedding, you will need simple materials that echo the uniform decoration of the hall.
First option:
- Cut out a pre-printed label with the names or photos of the newlyweds.
- A hole is made in the label with a hole punch, and a grommet is inserted for fastening.
- A 40 by 40 cm piece is cut out of burlap.
- The material remains folded in the middle and darned like a bag.
- Champagne is placed in a sewn pocket.
All that remains is to tie a piece of twine at the neck, gathering the resulting bag into folds at the top. Attach a label to the wedding bottle.
Second option:
- Turns of twine are attached to the surface of the container that has been cleared of labels, being careful not to leave gaps. The rope is also wound around the neck of champagne.
- After drying, glue a strip of aged lace around the container.
- Impromptu bows and rosebuds are made from burlap and glued to the neck.
Burlap jewelry is in demand due to its low cost and availability. If you don’t succeed in decorating the champagne the first time, you can repeat the experiment without fear of ruining the material.