SHARE ON SOCIAL NETWORKS
FacebookTwitterOkGoogle+PinterestVk
Growing various crops in greenhouses is an activity loved by many summer residents. But there is not always room on the site for large and bulky structures suitable for this purpose. As an alternative to a simple and convenient option, a Butterfly greenhouse can be used, the design, features and advantages of which will be discussed in this article.
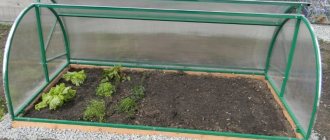
The Butterfly greenhouse has a convenient design that provides access to plants from both sides
Greenhouse “Butterfly”: design features and photographic examples
The “Butterfly” design is considered universal. It can be accommodated on a spacious hacienda and a modest four hundred square meters. This greenhouse is especially convenient in that it can be moved to a new location if necessary.
In “Butterfly” you can grow seedlings of tomatoes, cucumbers, peppers and cabbage. Radishes, salad greens and cucumbers will do well here.
The name of the greenhouse comes from the peculiarity of its design: the lid opens on both sides, resembling the wings of a butterfly. Thanks to this, it is possible to regulate the temperature and microclimate in the greenhouse, providing the most comfortable conditions for the growth of seedlings. In addition, it is very convenient to approach the greenhouse from both sides and care for the plants.
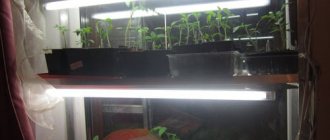
For your information! A small greenhouse can be heated to preserve seedlings during late frosts. Heated models are available for sale.
Typically, such greenhouses are made of lightweight metal profiles and transparent polycarbonate. In homemade versions, summer residents use wood for the frame and plastic film.
The best DIY butterfly greenhouse projects
Whatever the initial purpose of creating a miniature greenhouse, simple rules should be taken into account.
Compliance with these requirements allows you to obtain an ideal design that meets the modern requirements of gardeners
For a project to be truly the best, it must combine the reliability of the frame and ease of installation
Dimensions, types and materials of the Butterfly greenhouse
The size of the greenhouse depends on two factors: its purpose and the available space for placement. If you plan to grow only seedlings in it, a size of 1x2 m is sufficient. If you need to place cucumbers or radishes in a greenhouse for growing in the cool season, you can increase the dimensions of the greenhouse to 8-20 m².
For large greenhouses, the lifting parts of the roof are divided into several sections
The second factor influencing the dimensions of the Butterfly is its location. It is clear that in a small area it is difficult to install a large greenhouse in such a way that it is convenient to approach and service it from all sides. There should be at least one meter of free space around the perimeter of the greenhouse so that you can turn around with a watering can and bend freely over the plants. As for the types of Butterfly greenhouse, three main configurations can be distinguished:
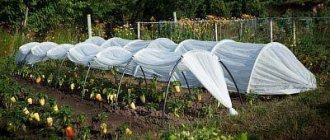
- a greenhouse with solid walls and straight “wings”. Closed walls protect plants well from the cold, but force them to actively stretch upward;
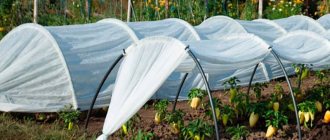
- greenhouse with transparent side walls. The sides can be made of glass or polycarbonate. This design provides the seedlings with more light;
- greenhouse with arched “wings”. The high transparent roof of the greenhouse makes it possible to plant medium-sized plants in it.
The greenhouse can be as small as you need
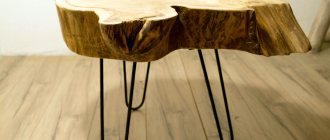
The materials for making a greenhouse are the same as for other popular greenhouses. The frame is made of metal, steel or aluminum profiles, and the transparent parts are made of dense reinforced film or cellular polycarbonate. Experts recommend making the closed parts of the greenhouse from wood or OSB boards. The photo shows greenhouses of the “Butterfly” design in different designs.
Related article:
Do-it-yourself greenhouse made from a profile pipe. A separate review provides detailed instructions for the design and construction of a structure from a profile pipe with photo examples.
How to choose and buy a Butterfly greenhouse: features and costs of various models
If you want to purchase a butterfly greenhouse, the price plays a very important role. It is important for every summer resident to save money, but at the same time get a quality product. As an example, consider a greenhouse with polycarbonate Butterfly 4 m, which is the easiest to buy, as it is widely popular.
Today on the market there are many options and sizes of Butterfly greenhouse designs for any need.
Greenhouse-greenhouse from the domestic manufacturer Mister Hit Butterfly 4 m. This structure is made of painted steel pipe, cross-section 20x20 mm. Cellular polycarbonate should be used as a covering material, which, however, is not included with the greenhouse and must be purchased separately.
With a width of 4 m, the greenhouse has a height of 1.15 m and a width of 1.25 m. The frame, packed for transportation, weighs 26 kg. At the same time, the manufacturer provides a guarantee for its product - 12 months. It is quite rare to find a 4 m Butterfly greenhouse with polycarbonate on sale. Most often, it is not included in the price of the kit. And in this case, the cost of the frame will be 6,400 rubles.
The same company offers its customers models in other sizes. For example, for those who want to install a very small greenhouse, you can purchase a structure 2 m long. They are made from painted steel pipe of the same section. At the same time, the height and width of the structure are preserved. Only the length changes and, accordingly, the weight, which is only 14 kg. Such a greenhouse costs only 3,600 rubles.
Finished greenhouse products are no less reliable than homemade ones
Designs of these sizes are purchased by summer residents for personal use and almost always have extremely positive reviews. If you want to see a greenhouse of a non-standard size or shape on your site, then you should inquire about making them yourself.
Advantages and disadvantages of the Butterfly design
Whether a greenhouse design is convenient or not can only be determined in practice. Reviews from summer residents about the “Butterfly” shaped greenhouse give a complete picture of the advantages and disadvantages of this configuration. We have highlighted the main points that will help you make your choice.
Advantages:
- Saving free space. A greenhouse is not a greenhouse in which you need to allocate space for internal passages. This is important if you have little space and need to save every meter.
- Easy to care for plants. The plantings in Butterfly can be approached from two sides, so there are no problems with loosening, watering and planting.
- There are no problems with installing the structure. The Butterfly device is very primitive, so any summer resident can handle its installation.
- Affordable price. You can quite cheaply buy a ready-made “Butterfly” greenhouse made of polycarbonate or make it yourself from scrap materials left over after construction on the site.
- Reliability. The squat greenhouse will withstand wind gusts of up to 20-25 meters per second. If you have a film coating, it will cope with a ten-centimeter layer of snow, and a plastic structure can withstand even greater snowfall.
Flaws:
- Unreliable fastening of frames. According to user reviews, the main and, as they believe, terrible drawback of the Butterfly greenhouse is the unreliability of fastening the wings when open. It’s as if they are specifically trying to hit you on the back while working with seedlings. This deficiency can be corrected by installing reliable supports.
- Defects in factory designs. Finished models often suffer from factory defects: the edges of the greenhouse are poorly processed, the paint does not adhere well, and weak hinges. All these unpleasant moments are eliminated manually.
The popularity of the “Butterfly” design is evidenced by the fact that the demand for this product is steadily growing. You will find commercial offers on many trading platforms. If a product has been purchased for many years, it means it suits summer residents.
Related article:
Do-it-yourself greenhouse made of plastic pipes. A separate review provides a detailed overview of the use, design and installation of greenhouses made from PVC pipes.
Manufacturing of parts and assembly of the structure
The dimensions of the future greenhouse are determined based on the layout of the site and the needs of the crops that you intend to grow in it. So, melons do not require high sides, but other plants are not so unpretentious. A universal solution is an arched frame design, but it is more difficult to make yourself than a rectangular one. Knowing the dimensions, mark the area.
For
the foundation , a pit 50-60 cm deep is dug around the perimeter and filled with concrete.
For greater strength, concrete is reinforced with steel rods. Then the sides are made. boards are chosen as the material for the frame , then their thickness should be from 2.5 cm. The sides can be:
- single;
- double;
- folding
To grow melons and melons, it is better to make them transparent, for example, glaze them. This way the seedlings will be protected from bad weather, but at the same time be under maximum lighting. The sides are adjusted as tightly as possible and placed strictly according to the markings, attached to the base with metal corners. The flaps are attached to the concrete using door or piano hinges.
The frames are also attached to the sides using hinges. If the frames are glazed, then additional supports will be needed to avoid sagging of the structure. Install metal or wooden posts in two rows along the center line of the greenhouse and secure the upper part of the greenhouse to them, and frames on hinges go to this part.
Butterfly frames cannot hold themselves open. To work safely in a greenhouse, you will need stops for them. For example, specially prepared wooden beams with a U-shaped bracket at one end. For reliability, provide overhead plates on the sides in which these bars can be clamped. And so that the wind cannot tip the frame in the opposite direction, special cords are used to hold it in the desired position.
Cover the greenhouse with polycarbonate, film or glaze it - and the greenhouse is ready. It is very important to ensure the tightness of the joints. As mentioned above, silicone sealant will do this well. The places where the sides come into contact with the foundation or soil need additional protection - a piece of linoleum or rubber will do just fine.
All wooden elements must be impregnated with an antiseptic and treated with oil paint.
For ease of working with plants, we recommend providing hooks on the sides for buckets and other things.
How to choose the right place for a greenhouse
What is important for choosing a location for a small greenhouse? First of all, pay attention to the quality of the soil in the selected location. In principle, it is possible to completely replace the soil under the greenhouse, but it is much easier to immediately install it on suitable soil.
If the ground is too soft, the greenhouse may sag, so immediately consider installing a small foundation
Advice! Avoid areas with clay soil and high groundwater levels when installing a greenhouse or greenhouse - clay retains water, and plant roots will rot from excess moisture.
Another significant point is the direction and strength of the wind on the site. With the top open and closed, the structure has a decent windage; if you place it in a heavily blown place, the greenhouse will periodically blow away. The third important factor is the level of illumination of the selected area. It is recommended to install greenhouses in the south and southeast. The sun here not only fully illuminates the plants, but also warms up the greenhouse.
Do not place the structure near a high fence, building or tree
It is not advisable to install “Butterfly” or “Novator” type greenhouses on a slope. If the situation is hopeless, you will have to make a foundation and level the ground.
Related article:
DIY polycarbonate greenhouse. Drawings, types of structures, step-by-step construction, advice and recommendations from experts and much more in a separate publication on our portal.
Instructions for assembling the factory model of the Butterfly greenhouse
A ready-made “Butterfly” greenhouse with a polycarbonate coating in sizes from 1 to 4 m² can be purchased in online stores or retail outlets for summer residents in your city. The products are supplied unassembled and include detailed installation instructions. You can find information on the procedure for assembling the Butterfly greenhouse in the video below.
There is nothing complicated in the assembly process. All parts of the frame are bolted together, and the frame itself is then covered with film or polycarbonate sheet.
Video: how to assemble a “Butterfly” greenhouse
Preparing the greenhouse for winter
If polyethylene is stretched over the butterfly frames, then before the start of winter it will have to be removed, washed and, after drying, stored in a dry place until spring. Glass and polycarbonate are also washed at this time. The structure, freed from vegetation, should be cleaned, all accumulated dirt and dust should be removed, then the frame should be washed thoroughly. Such procedures will reduce the risk of pests with the onset of spring.
The soil in the greenhouse structure also needs to be treated; bacteria and fungi have probably multiplied in it over the summer, so the soil is disinfected using special means.
It is better to repair detected defects in the frame immediately, since during the winter period, for example, a crack may increase, which will reduce the stability of the structure and may lead to destruction in the event of heavy snowfall or wind. Having completed the sanitary procedures, the metal parts of the frame are lubricated with oil, and heavily rusted parts are replaced.
As you can see, in general, a “butterfly” greenhouse can become a very useful device for a summer resident, if, of course, you skillfully handle and care for it according to the rules that we have described. And be sure to share your experience, it will definitely be useful to someone!
How to use the Butterfly greenhouse correctly
For shading, you can use a special fine-mesh mesh
There are several simple recommendations for operating a greenhouse that are suitable for designs such as “Butterfly”, “Innovator” or “Breadbox”. They have been tested by many years of experience of summer residents:
- Don't forget to ventilate the greenhouse. If there is a lack of fresh air, bacteria multiply in the warm, damp air of a greenhouse, which can destroy your seedlings.
- Securely secure frames when open. The point is not only that a suddenly collapsed frame will break, it can cause serious injuries to the gardener.
- If you place plants in the greenhouse during hot summers, use gauze or other shading material on sunny days. The material is placed on top of the slightly open “wings” of the “Butterfly”.
- If the greenhouse is not used in the summer, remove its lid so that the ground is saturated with rainwater and can be naturally ventilated.
- During operation, do not forget to thoroughly clean the greenhouse windows so that they let in as much light as possible.
- Regulate the temperature for hardening the seedlings by opening the doors slightly for ventilation and closing them at night.
- Use a greenhouse in winter to store plants that do not tolerate soil freezing well. You can install it over strawberries or a bed of tulips and lilies.
Preparing the greenhouse for winter
If you do not plan to use the structure in the cold season, it is better to disassemble it. Remove the film or polycarbonate. The film can crumble in cold weather, and the honeycomb material will be better preserved in a barn or garage. If you don’t want to disassemble the metal structure, just check the integrity of the paint that protects the metal from rust, and renew the coating if necessary.
The ground under a stationary greenhouse needs to be cleared of weeds, disinfected and dug up so that the pest larvae freeze out
Advantages and disadvantages
The Butterfly greenhouse, like any other structure, has its pros and cons. And you need to know them before you decide to purchase this structure or choose to build it yourself.
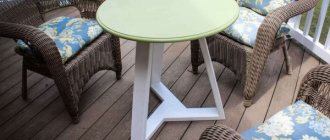
Unusual design option
The main advantages of the Butterfly greenhouse.
- For its parameters, it copes well with adverse weather conditions. The Butterfly greenhouse will perfectly withstand quite strong winds - up to 20 m/s.
- “Butterfly” is not afraid of snowfalls - a 10-centimeter layer of snow is not at all scary for a greenhouse.
- A greenhouse does not take up much space on a summer cottage, and its low height is its advantage, because it does not shade the space around it.
- Plants in a greenhouse are very easy to care for. And in general, any work in the “Butterfly” is very simple - the small width and raised doors provide excellent access even to the farthest corners.
- Widely folding slopes allow for excellent air exchange for plants.
Widely folding slopes allow for excellent air exchange
- The “butterfly” quickly warms up in the sun.
- It is easy to transport or move the factory greenhouse to another place - it is lightweight and quickly disassembled. It can be transported in any passenger car.
- The factory greenhouse is durable: the service life declared by the manufacturers is 10 years, and the metal profile of the frame is painted with powder paint, which protects against corrosion.
- There is no need to build a foundation for the “Butterfly” on a summer cottage - the greenhouse is lightweight and does not need it.
Butterfly design
But during the operation of the factory “Butterflies”, summer residents also identified the main disadvantages of this design. As it turns out, not everything is as rosy regarding the greenhouse as the manufacturer writes, and you can’t always believe the advertising.
Definitely, the use of rising wing wings is very convenient in a small summer cottage, but the disadvantage of this design is that it will often have to be opened/closed. And in places where there are any friction, fastenings or screws, the paint peels off very quickly. Without this protective material, rust will quickly reach the frame. It is important to immediately touch up all those places where the paint has fallen off. Of course, I don’t want to modify the greenhouse after purchase, but what can you do?
The greenhouse has to be opened/closed frequently
By the way, the hinges on the doors of a factory greenhouse are quite fragile - they do not always withstand the declared service life. Very often the hinges and canopies on the wings quickly break off.
Also, one of the disadvantages (not of the design itself, but of its configuration) is that the instructions are not always clearly printed. Some gardeners were unlucky enough to buy a “Butterfly” greenhouse and had to suffer with it during assembly.
Most likely, this is why many people build the “Butterfly” on their own. This is not difficult to do, but this design will be many times more reliable.
Open greenhouse made of window frames with seedlings
Prices for greenhouse Butterfly
greenhouse Butterfly
Making a “Butterfly” greenhouse with your own hands from cellular polycarbonate
You can make a simple “Butterfly” design yourself. The frame will require a steel or aluminum profile. You can also use wooden slats. In a simple design, you just need to hang the doors on the hinges and think about the supports.
Related article:
Do-it-yourself greenhouse made from scrap materials. Design features, the use of various materials to create a reliable load-bearing frame and high-quality cladding, step-by-step installation instructions with rules for choosing a suitable location on a plot of land are in our publication.
Drawing with the dimensions of the Butterfly model greenhouse, which you can make yourself
Any design begins with a drawing. It is impossible to do without accurate measurements of the site. Remember that for ease of maintenance of the greenhouse you will need a meter area around it. The more accurately you prepare the drawing, the less hassle there will be with fitting the parts.
For example, we offer you a drawing of a greenhouse model “Butterfly” at 4 m:
Materials and tools for work
To make a frame, you will need a profile pipe with a cross-section of 20x20 mm, hinges or hinges for a movable roof, handles, polycarbonate 3 meters wide and a length corresponding to the size of the greenhouse, metal screws, boards or OSB board.
The tools you will need are a hammer, a drill, a screwdriver, a welding machine, a primitive pipe bender and a grinder.
Step-by-step instructions for making a “Butterfly” greenhouse
For good plant growth in a greenhouse, it is necessary not only to choose the right place, but also to follow the installation technology.
| Illustration | Description of action |
| Cut the pipes into lengths according to the drawing. You will need pipes for the main arcs, a rectangular frame and “wings”. | |
| If you don’t have a pipe bender in your arsenal, you can contact any workshop where the arcs will be bent for you to the required dimensions. | |
| Weld cross members onto the finished arcs. One at a height of 30 centimeters, the second at the very bottom. | |
| Weld the parts of the rectangular frame so that you get a lower base of 8 pipes and an upper longitudinal strip on which the roof wings will be attached. | |
| The greenhouse arcs are welded from two straight pipes and two bent ones. If the greenhouse is long, an additional bent pipe in the center will be required. The finished wings are attached on two or three metal hinges to the upper central rail. | |
| The frame of the greenhouse is sheathed with polycarbonate. For this design, a thickness of 4 mm is sufficient. | |
| Thin polycarbonate can be easily cut with a construction knife. | |
| Attach the polycarbonate sheets and cut them exactly along the lines of the frame. | |
| The covering is attached to the frame using a screwdriver and roofing screws. | |
| The location of the screws on the top rail should be such that when open, the heads do not rest against each other. | |
| To fix the greenhouse in the open state, metal stops with a number of holes are used. |
Assembling a Butterfly greenhouse made of polycarbonate
The Butterfly greenhouse, made of gable polycarbonate, will be an excellent solution for every summer resident. You can install the finished kit quickly and easily yourself, without putting in significant effort. Each complex is accompanied by detailed instructions.
Assembling a greenhouse involves sequentially performing the following actions:
- Connection of all frame elements;
- Attaching support beams;
- Installation of polycarbonate.
To assemble the greenhouse you will need a set of screwdrivers and wrenches. Thanks to these simple steps and strictly following the instructions, you can quickly install a greenhouse that will last for a long period of time.
Important! Before starting construction, you definitely need to decide what exactly the shape of the doors will be, since they can be made straight or arched.
A Butterfly greenhouse less than 4 meters long with polycarbonate is an original and functional design that is quite possible to build yourself. To make a Butterfly greenhouse yourself, you need to choose a location, prepare the required materials and tools, make a foundation, and assemble the structure.
Which greenhouse is better for a summer residence: “Butterfly” or “Breadbox” - choose the option for yourself
The “Breadbox” differs from the “Butterfly” model in that only one half of it opens. If you don’t need a wide greenhouse, you can get by with just one flap. But for proper care of plantings, the “Butterfly” is still more convenient, because you can approach the garden bed from both sides.
In terms of construction cost, the Bread Box wins because it has fewer moving parts, which means it will cost you a little less
Another reason for comparison is the assessment of tightness. The “bread box” retains heat better due to its design. But in the warm season, “Butterfly” is better ventilated. Which of these models to choose is up to you to decide. It all depends on the tasks you set for this greenhouse.
Ready-made greenhouse “Butterfly”: asking price and best offers
Practice shows that it is cheaper to make such structures yourself or order them from local craftsmen. So, you will seriously save on delivery. But if you are satisfied with a small design, you can purchase it through the online store. We've found several inexpensive models that might interest you.
| Model | Image | Dimensions (Width×Height×Length), cm | Average cost (as of May 2020), rub. |
| Greenhouse-greenhouse “Butterfly”, 2m (Mr. Heat) | 125×115×200 | 3100 | |
| Greenhouse "Butterfly", 4m | 125×115×400 | 5400 | |
| “Butterfly”, polycarbonate frame | 125×115×200 | 3500 |