Where to get the material?
In addition to craft boxes, you can use paper dishes, foil rolls, cling film, paper towels and toilet paper, food packaging, paper egg boxes, and dairy product packaging.
And if you need large containers, you can buy them in special stores or ask for unnecessary ones in the warehouse.
Since you cannot use water for cleaning, it is better to give preference to pure raw materials, as it will decorate the environment or be used for childish fun.
Manufacturing stages
Products made from thick paper differ in shape, size and complexity of assembly. Regardless of the purpose of the design or the number of components, the manufacturing stages for each of them are the same. The step-by-step instructions include several mandatory points.
Create a drawing
The first step is to take measurements of the place or room where the furniture will be located. According to the parameters, calculate the dimensions of the desired product. Next, draw a drawing of the future furniture on an A4 sheet, be sure to indicate all the obtained values, observing the scale. You can do all this in a special program if you have experience working with it.
You can take ready-made drawings for furniture manufacturing and adjust them according to your wishes and measurements.
Regardless of how the diagram is executed - manually or using a program, it must contain a three-dimensional image of the object, general view projections from above, side, back, as well as separate projections of the constituent elements indicating the exact dimensions. Then the drawing is transferred to sheets of cardboard using a pencil, tape measure and ruler. You can use ready-made patterns; just place them on a sheet of cardboard and trace them with a pencil.
How to make your own furniture polish using improvised materials
Before starting work, it is important to make a drawing of the future product
Manufacturing of parts
The raw materials for the manufacture of all elements must be smooth and without creases, since it will be impossible to straighten them later. Each detail is drawn separately using a pattern or projection from the main drawing. Then it is cut out with a stationery or construction knife. The sections must be wiped down and covered with paper or tape.
The patterns should mark the folds and grooves, which are also cut out.
Strengthening the structure
Many novice craftsmen are interested in how to make cardboard furniture durable. To do this, you should follow simple rules:
- protect the finished product from moisture and increase its strength by applying parquet varnish to the surface;
- maintain symmetry, since asymmetrical furniture is less stable;
- take dark cardboard - it is stronger than light cardboard;
- increase the number of transverse inserts, as well as the layering of the part by adding sheets;
- cover the edges with craft paper;
- if necessary, use stiffeners to strengthen the structure.
Kraft paper is a type of wrapping material that is made from wood and is highly durable.
Parquet varnish will protect the surface of the product from moisture and increase its strength. Dark cardboard is stronger in operation than light cardboard.
You can strengthen the structure by gluing the edges of the product with kraft paper
Assembly
Before assembly, you should check all parts for possible defects. If there are dents in some places on the cardboard, they need to be filled. Further finishing will hide all inaccuracies. During the assembly process, all parts can be glued, inserted into grooves or extended. The latter method is used to strengthen the structure and give it optimal thickness. Elements assembled from several layers of cardboard must be placed under a press after gluing and left to dry for a day. Upon completion of assembly, the resulting ribs are treated with kraft paper.
Grooves and stiffeners must be coated with glue, thereby extending the service life of the structure.
Plug-in parts Glued elements
Extended design
Dent filler Pasting the edges of the product with kraft paper
Decoration
Having completed the assembly, you should start working on the external design of the structure. Decor options are selected individually:
- finishing with fabric, patterns (decoupage), decorative stone;
- painting with acrylic paints;
- pasting with wallpaper, colored paper.
Nuances of making furniture drawings, review of useful programs
Possible options can be used individually or combined. After finishing decoration, it is recommended to coat the product with varnish to secure the result.
Fabric finish
Painting with acrylic paints Pasting with wallpaper or colored paper
Number for the apartment
As you know, a theater begins with a coat rack, and a home begins with the front door. The license plate will highlight its uniqueness and tell guests about the creativity of the owners.
To work you need:
- sheet of plywood of the desired size;
- scissors;
- printer or stencil with an unusual font;
- gold or silver plating and tassel;
- a short piece of ribbon or lace;
- glue or gun;
- bulk product (found in craft and hobby stores).
You can print an unusual font on a printer, draw it yourself, or use a stencil. Make a shape out of paper on which the apartment number will be displayed and glue it to the base.
Paint the numbers so that they appear painted and dry. Paint the entire sign with finishing solution and allow to dry.
Attach a lace or ribbon to the reverse side. The original license plate is ready!
Antique decoration
Thanks to the huge number of construction sources, as well as interior items, it is possible to recreate any style in apartments.
Beautiful antique items add special color and warmth to the interior decoration, but not everyone is able to purchase such items. The next master class is for antique lovers: making a “copper” painting.
Required tools:
- flexible plywood;
- glue tool and liquid analogue;
- hobby gold coin;
- shoe polish;
- finishing product for volume.
Draw patterns or a picture on the surface using a gun. It is recommended to use Aleene's Tacky Glue as it will leave a denser mark. Leave until hardened.
Tip: following the instructions, the patterns are applied to a horizontal surface, because they will begin to spread from the sides.
Crafts from glue: 150 best ways to use glue to create crafts + simple diagrams and photos of finished works- DIY crafts from matches: step-by-step master classes and DIY craft ideas + simple and quick photo diagrams
Crafts from tubes - unusual ideas, step-by-step master classes for beginners + photo reviews of ready-made DIY crafts
Cut the shiny wrapper into thin strips and place it on top of the glue-covered design. Gently iron the surface so that the patterns appear through it. Place an additional layer of foil on top, repeating the product. Lightly touch until the lines appear.
Apply the voluminous product and let it dry for 10-15 minutes, blot off any excess with a well-absorbent cloth. Cover the painting with shoe polish and carefully wipe off anything that can be removed.
Apply a layer of finishing solution on top and dry completely. If desired, the painting can be hung on the wall or placed on a chest of drawers.
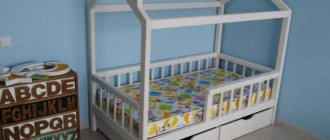
Features and benefits of cardboard
Despite the fact that cardboard is not the most durable and reliable material, compared to wood or metal, it has a number of advantages. The first of these is light weight. This option allows you to easily move cardboard products from place to place.
A cardboard bed will be very light.
The second advantage is low cost. Cardboard can be purchased or even found for free. Many stores provide their customers with the opportunity to pick up boxes in which goods were previously stored.
Furniture made of cardboard is quite rare in mass production,
Cardboard is an environmentally friendly material, it does not harm the environment and does not cause allergic reactions. This material can be processed an infinite number of times, returning to its original state.
Furniture made from corrugated cardboard is popular.
For furniture you will need corrugated cardboard. It consists of three layers - flat top and bottom and one wavy in the middle. This structure makes the sheets stronger and more rigid, and also increases their resistance to shock and stress.
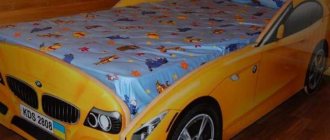
You can make furniture for a child from cardboard.
Cardboard, like any other material, differs by brand. They vary depending on the number of layers, and, consequently, the strength of the product itself. This makes the sheets universal, and allows you to choose the material for the manufacture of almost any type of furniture.
Cardboard will allow you to cut out any bed.
Toys for children
Crafts can be made together with children or as a pleasant surprise for games. Classes develop imagination, fine motor skills, accuracy and perseverance.
The hours spent with parents working together will remain in the child’s memory for a long time, and perhaps turn into a family hobby.
Plywood toys are made for any holiday, for example, for the New Year to decorate walls and Christmas trees.
House
Children love to build play houses, covering tables with blankets, matching chairs, barricading cozy corners with ottomans.
In these “fortresses” they create comfort and feel safe. Adults can take part in this exciting activity and help their child build a real home out of boxes.
What is needed for “construction”:
- large items from household appliances;
- stationery knife;
- glue or similar gun;
- scotch;
- paints and brushes.
The easiest way is to build a house without glue, just leave the frame and use its closing parts as a gate. Or assemble a rectangular square from the boxes, connecting the corners with tape if necessary.
Cover with a triangular roof and fill the side voids with appropriate pieces. Cut a hole for entry in one of the walls, and windows in the others.
The home is decorated inside and out for comfort and beauty, for example, with fabrics, garlands or painted. Pillows, blankets, rugs will complement the interior well.
You can build a castle for dolls in a similar way, just choose smaller packages. The interior decoration is also assembled from cardboard material.
Cardboard sofa for dolls
Not long ago I took part in an exhibition, and I was faced with a problem - what furniture to place my Tildas on. There was no time to travel all over the city looking for something suitable, and I didn’t want to spend too much money.
Therefore, after scouring the Western Internet, I found an idea on how to quickly make a good sofa from scrap materials.
In addition, at the exhibition, buyers asked to sell my Scops Owls with a sofa. It was somehow awkward for me to sell the sofa, I immediately remembered that I had glued the bottom carelessly, and it wouldn’t hurt to improve it. But the buyers gave me very compelling arguments about the need for such a sofa: the dolls can be neatly placed on the bedside table (shelf) right next to the sofa, rather than nailing hooks for them, not placing them on the bed after making the bed, in general, they won’t have to rack their brains about where I would like to place the dolls.
Introduction results:
— such a sofa can be quickly made for an exhibition to beautifully decorate an exhibition space by seating dolls on it
— so that the dolls fit well into your interior, you can make such a sofa from fabric that was left over, for example, from sewing curtains. Or choose fabric as an accent for your bedroom or nursery.
- if you sew Tilda (or other non-standing dolls), you can offer customers such a sofa as a set (sew it to match the doll)
- you can make it for children to play with (in the original idea, such a sofa was intended for Barbie).
And to make a sofa we will need:
- corrugated cardboard (I used a box)
- textile
- foam rubber
- glue (I used a hot gun - I had several glue sticks, so stock up on them)
- a few clothespins.
The dimensions of the sofa are such that two standard Scops Owls dolls fit on it with difficulty. So, if you wish, you can take a larger width of the sofa and immediately increase all sizes.
1. Cut out one piece A (the sofa itself) from cardboard, measuring 20 x 32 cm
We bend it with an accordion, measuring along the long side of the distance: 5 cm, 8 cm, 7 cm, 12 cm. You need to bend it well, you can run it along the folds with the non-cutting side of the scissors.
2. Cut out two parts B (side backs) measuring 20 x 9.5 cm and bend them in the middle.
3. Cut off pieces of foam rubber: for the backs, approximately 5 cm wide, 9.5 cm long; and for part A, one piece is 7 x 20 cm, the second is 8 x 20 cm. We glue the foam rubber: on the side backs on the fold, on part A on the two central parts (as if on the seat and the main back):
4. Cut the fabric, the cut size should be approximately 1.5-2 cm larger than the details on all sides. We cut the corners a little.
5. We lay the parts in the part where the foam rubber is glued to the fabric, wrap the indents and glue them.
6. Now fold the side backs in half and glue them together. To speed up the gluing process, you can press with clothespins.
7. Now we form the back of the sofa, again by gluing
8. Now the most important thing - you need to glue the side backs to the sofa. Moreover, you need to press it well with something and also make sure that the backs are glued evenly (for stability and beauty)
Now the main thing is to make sure that the dolls don’t fight over such a gorgeous place. Now the young lady has kicked out the yawning man and took his place:
I hope that my master class helped you. Good luck!
Puppet show
You can create it yourself from unnecessary cases. One of the simpler versions is the shadow analogue. It's easy to develop and fun to play, adding new characters as needed.
Useful for creativity:
- shoe box;
- white transparent tracing paper or tissue paper;
- black dye and brush;
- pencil;
- thin wooden sticks;
- Super glue;
- scissors and a stationery knife.
Cut off the bottom, leaving a thin border on the sides. Glue tracing paper to these sides.
To create characters, you can print templates from the Internet or draw them yourself. If light paper was used for them, then the figures are painted over black and allowed to dry.
Using glue or small pieces of tape, the characters are attached to the sticks. Lighting is installed behind the figures. The show can begin!
Here are some more ideas for theatrical performances.
Master class No. 2
From sheets of cardboard you can make not only a shoe rack, but also hanging shelves. They will be a real find for owners of apartments with a small hallway, in which every centimeter of space counts.
How to make cardboard shelves with your own hands:
- Divide two large sheets of cardboard into rectangles (the size of your shoes) and cut them.
- Roll each rectangle into a pocket and secure with tape.
- Insert the pockets into each other, leaving space between them for shoes. Secure with tape.
The stages of work are clearly presented in the photo below.
- Attach the structure to the door. A functional and inexpensive rack is ready. If you wish, you can cover it with the remnants of old wallpaper or paint it with paint.
Finger puppets
To make finger puppets for home performances, you can buy colored cardboard.
The figures are made according to templates or they come up with and draw their own versions, and two round holes are made in the base where they insert fingers and control the characters. Exciting entertainment will unite adults and children.
Zoo
It's amazing how many different things you can come up with from 1 piece of cardboard! Or bushings, which in most cases go into the trash bin after using the items screwed onto them. It will be interesting for children to make their own zoo with many animals and then play with it.
There are many photos and videos posted on the Internet with original thoughts. Elements made from colored leaves are glued onto a cylinder of the required length: muzzles, paws, tails, eyes, noses, and so on.
Before collecting the animal, the roll is coated with paint: blue, yellow, green, or not, at the discretion of the master.
Corrugated cardboard ideas
In recent days, corrugated raw materials have become very popular, which are sold in special stores for creativity.
Beautiful and original creations are made from it, which are not only toys, but can also decorate the inside of a home. It is often used to create masterpieces for mothers in kindergartens and schools.
The above options for what can be made from cardboard are just the tip of the iceberg. New ideas arise every day in huge numbers. Therefore, if you are in the mood to do something creative, but there are no thoughts in your head, you can get them from others.
What materials and tools will be useful in your work?
To make a rack or shelf from cardboard you will need:
- The main material is cardboard. It is best to take a dense one, the strength of the furniture will depend on this. It is believed that the denser the cardboard, the darker it is. However, thin sheets should not be thrown away either. They can be used for gluing joints.
- Any glue will do, but it’s better to use Moment. It doesn't make the paper wet.
- A stationery knife - the sharper it is, the more accurate the cutting will be.
- Sharp scissors.
- Dull knife.
- Roulette.
- Sandpaper.
- Kraft paper.
- Pencil, eraser.
- Dye.
- Remains of wallpaper.
- Colored tape.