DIY children's desk drawings
Category: Furniture
DIY children's desk, drawings, description and order of its assembly. The proposed model will be able to serve your child for a long time until high school.
If your child has gone to school, then you are faced with the acute question of choosing a desktop or desk for his normal development. Correct posture and reducing eye strain require an individual approach when choosing a workplace that can adapt to the growth of each student.
Side view (maximum table extension)
Side view (minimum table extension with table top rotation)
The presented model allows:
- adjust table height from 570 to 720 (mm), adjustment step is 50 (mm)
- adjust the table tilt angle from 0° to 90° (the maximum angle is set theoretically), the adjustment step is 5°
Recommended tilt angle settings: - drawing from 0° to 5° - writing from 10° to 15° - reading from 20° to 30°
Components of a children's desk:
- base
- table top lifting mechanism
- table top
BASE
We will make it from planed boards. From the inside of the guide board, at the end we mill a groove measuring 10x10 (mm). The sharp edges of the parts are rounded. We fasten the parts of the legs together using:
- threaded rods GOST 22042-76;
- enlarged washers GOST 6958-78;
- wing nuts GOST 3032-76
for M8 thread.
We attach the top shelf and footrest to the legs with wood screws
or confirmations.
LIFTING MECHANISM
We will make it from planed boards. From the outer sides of the guide board, at the end we mill grooves along the edges measuring 10x10 (mm). We drill through holes with a diameter of 20 (mm) in the center.
TABLETOP
We will make it from laminated wood or plywood.
We will make the rotating mechanism from sheet metal 2 (mm) thick and attach it to the tabletop with wood screws. Alternatively, it can be made from wooden blocks.
Assembly order:
1. We insert the lifting mechanism into the grooves of the base.
2. Secure the tabletop to the lifting mechanism using pins, washers and M8 nuts.
DIY children's desk assembled. Using the proposed concept for designing and constructing a structure, you can modify and supplement the model yourself with various shelves, pencil cases and glasses for stationery.
Order a drawing
Share with your friends!
Types of transformers
Furniture that most often acts as a transformer:
A few examples of transformable tables:
- Transformable coffee table
- Transformable computer desk
Important! When choosing a transformer, special attention should be paid to the safety of the product in order to eliminate any possibility of injury during assembly and disassembly of the structure. Sharp edges and protruding metal elements are not allowed.
What can you make a transforming table from?
- Wood The most advantageous and simplest to make are tables made of wood. For this, simple solid wood and sheet wood panels (plywood, chipboard, MDF, fiberboard) are used. Plastic Possible for a transforming table, but not a very aesthetic option. Metal Tables are strong and durable, have various decor options, and are made of hollow structures. Glass More complex An option would be to use tempered glass to make transformable tables. Such tables are aesthetically pleasing, safe and have an original appearance.
To make a small chest of drawers (4 drawers), you need the following:
Materials and accessories
- pull handles for all drawers (including two false ones) - 6 pieces; furniture wheels - 8 pieces; supports for wheels - 8 pieces; card hinges - 4 pieces; hinges and hinges for the table top; ball guides (400 - 2 sets, 450 - 4 sets); wooden dark-colored slabs for the table top, external side legs (on wheels), internal side legs, the middle wall (between the drawers), the bottom of the chest of drawers, the walls of the drawers and 2 long walls along which the upper false drawers will slide to the sides; light-colored wood slabs for the front of the drawers (+ 4 fake drawers on both sides) and the back of the chest of drawers. The length of the back wall is equal to the length of two drawers. The remaining space on both sides of the chest of drawers is occupied by a long wall along which false drawers move; a thin piece of wood for the bottom of all the drawers.
- pencil, square, tape measure; electric jigsaw or hacksaw; screwdriver or screwdriver; hexagons; drill with various attachments (including a 15 mm Faustner cutter); minifixes (for eccentric couplers) - 40–50 pieces; Euro-confirmed screws - 50–60 pieces; self-tapping screws (14 mm – 20 pieces, 30 mm – 50 pieces);
Stages of work
Step 1. We draw out and cut out all the details of the future chest of drawers.
Step 2. We draw and attach retractable ball guides (400) on the side walls. On the middle wall we screw the guides on both sides.
Step 3. Screw the middle wall exactly to the middle of the bottom of the chest.
Step 4. We fasten the side internal walls, the back wall and the bottom of the chest.
Step 5. We assemble all the walls of the drawers, screw the handles-brackets to the front sides (including false ones).
Step 6. We attach 2 balls from the guides (on which our drawers will roll) to the inner (which will be inside the chest of drawers) two corners of all drawers.
Step 7. Screw the guides (450) onto the wall for the false drawers and onto the back side of the false drawers. We attach the long walls to the side inner walls.
Step 8. Screw the furniture wheels to the bottom of the chest of drawers and to the side outer legs.
Step 9. Attach the outer side of the false drawers to the outer legs of the chest of drawers and push them into the folded position (place them next to the functional drawers).
Step 10. We proceed to the tabletop. We fasten the three parts together using hinges.
For a dining table, this design is quite complex. Most often, a chest of drawers is used when it is not possible to purchase a kitchen or dining table or when making a huge transforming table (more than 2 meters long).
The second version of the chest of drawers differs not only in size (700 x 900 cm when folded, 2100 x 900 cm when unfolded) and the number of drawers, but also in the transformation mechanism.
The inner side walls are maximally folded out to the distance of the length of the false drawers.
The tabletop, when unfolded, consists of 3 parts - left, middle and right. When folded, the left side rests on the middle one.
The tabletop rotates 90 degrees. The right part is lowered onto the back wall of the chest of drawers (hangs parallel), and the parts stacked on top of each other form the top surface of the chest of drawers.
Wheels are attached to make our chest of drawers easy to move, but they are not required. When the table top is rotated into working condition, it fits into positioning pins, which completely prevent its further rotation.
An interesting idea for a portable folding transforming table - an ironing board built into a closet - is presented in this video:
- Author: Svetlana K. Print
To solve the lack of space, we resort to various tricks. In particular, multifunctional furniture serves this purpose. In this article we will look at how to make a transforming table with your own hands.
The task, frankly speaking, is not the easiest, but we managed to find some interesting options. You may be interested in picnic tables; this is perhaps the easiest thing to do yourself. Also presented are several transformable coffee tables, a dining table, a computer table, a transformable bed table and even a stepladder. In general, if you want to save space, you can always come up with something.
Various transformable table
This table is also called a folding table. It is classified according to its functions:
- coffee table; coffee table - workplace; table - storage system.
The coffee-dining option can be found most often, because the number of friends and acquaintances who come to visit increases over the years, but the living space does not.
The transformable dining table is unnoticeable and does not detract from valuable space.
On ordinary days it plays the role of a coffee table, and on holidays it turns into a real dining table. In order to seat 5-7 people, a few simple manipulations are enough. This is suitable ergonomic furniture for a studio apartment, when the entire space is combined into one.
When creating a coffee table - a workplace, a different type of tabletop is used. There is no need for it to unfold completely or change shape.
This version of the transforming table turns into a desk, taking on the required height. Additionally, the furniture is equipped with drawers to store office supplies. Depending on the fastening system, the table can be given several positions.
Models with smooth adjustment mechanisms are more convenient to use. With their help, you can organize a workplace in any corner of the apartment.
The table storage system has an original design. It consists of two or three drawers and a tabletop. The table opens by rotating around its axis.
Table frame
The duration of operation depends on its strength. Frames come in different materials:
- wooden; metal; with plastic parts.
Structures made of metal and wood are considered the most reliable.
They withstand repeated unfolding and folding cycles well. Frames with plastic components are cheaper, but do not withstand long-term use. But if the table is rarely transformed, this option can be considered.
They serve as a support, so they must withstand a large load, which increases when the table is unfolded.
Thick glass supports have proven themselves to be quite good. They themselves are quite heavy and can withstand considerable weight. Glass legs are perfect if you need a transformable table for the living room.
Wooden supports also cope well with the load. This option is suitable for classic interiors.
Additionally, you should familiarize yourself with the types of countertops. The appearance of the product depends on the material from which the top is made.
Project cost:
- Transformation mechanism – from 3 thousand rubles. Chipboard panels for table tops and legs – from 500 rubles. Fasteners – from 50 rubles. Set of screws and self-tapping screws – from 200 rubles.
It’s possible to make a folding table for $100.
Manufacturing consists of several stages:
- Selecting a folding mechanism. Creating a project. Cutting out parts from a chipboard panel. Initial fitting of parts. Installing the frame. Installing table supports. Installing the table top.
To make a high-quality transforming table, it is better to create drawings in special computer programs. They not only draw a layout of the future furniture, but also calculate how much materials are needed and create a cutting map. The programs are quite simple to manage, so creating a project will take one or two days.
The number of parts and their sizes can be ordered in the same store where chipboard panels are sold. The cut planks only need to be connected with bolts, after which the transformation mechanism is installed. For smooth installation, it is necessary to make markings with a pencil before drilling holes for the screws.
The finished table will be no different from store exhibits if you select a high-quality transformation mechanism and materials for the frame. You should choose this kind of furniture if you don’t know how to create a functional design for a one-room apartment for a family with a child. When folded, the table will occupy a minimum of space, leaving room for children's games.
Sources:
- 6sotok-dom.com
- novamett.ru
- usamodelkina.ru
- www.weareart.ru
There are no similar posts, but there are more interesting ones.
DIY desk: necessary materials and tools, drawings, assembly procedure
Correct posture is very important at an early age. It is in childhood that the human skeleton and its physiology are formed. It is very important to pay attention to this - a properly designed desk will allow the student to improve academic performance and eliminate slouching in the future.
Preparing to assemble the desk yourself
If you decide to make a desk for your home, you need to stock up on materials and tools for construction.
Initially, you will need a diagram of such furniture; you can look it up online or prepare a drawing yourself.
When choosing a material, you should take into account the financial component; you can use different materials, which will save money. The basis for the future desk can be:
- Metal corner (30 mm wide, 2 mm thick).
- Iron pipe, triangular, square (diameter 30 mm and thickness 2–3 mm).
- Wooden beam 50*50 mm.
- Fiberboard.
- Solid slab made of wood (specify dimensions based on the drawing).
- Wooden block (thickness and width at your discretion).
- Furniture fittings for finishing.
- Paints and varnishes.
You will also need self-tapping screws, bolts and nuts. Depending on the selected material for manufacturing, the tool is selected:
- Welding machine (fully equipped).
- A set of screwdrivers or a screwdriver with a set of bits.
- Angle grinder (grinder with disc).
- Circular saw or hacksaw.
- Sandpaper set.
- Furniture glue.
- Hairdryer (you can use a regular one).
- Electric drill (drill for wood and metal).
- Jigsaw. (for figured carving).
IMPORTANT! Wooden parts should be kept in a dry, ventilated area to prevent deformation and cracks. Before assembling the structure, treat metal products with sandpaper.
Making a children's desk
Let's look at several options for designing a table from various materials. Before you start, you should study the drawing and make blanks.
ATTENTION! Pay attention to the angle of the desk, and also decide whether the chair will be connected to the base of the desk.
To use a metal corner at the base of the table, we will prepare sections according to the assembly diagram. In this case we will need:
- 2 corners 50 cm and 2 corners 75 cm. Using a grinder, cut at an angle of 45 degrees, one side of the corner from each edge. We connect them together at the cutting points, thus forming a frame for the table top.
- 4 corners (Length depending on the height of the child 70–80 cm). The corners can be screwed together or welded, 2 pcs. backs to each other for table legs.
- 2 corners 50 cm. Attach these corners to the legs in the center, forming the letter T. For an accurate connection angle, use a construction angle or level.
Next, the finished table supports must be secured to the base of the tabletop in the middle, using welding or bolts. Fiberboard 50*75 cm will be used as a tabletop; it is also possible to use several wooden blocks. Then you should drill holes in the table frame and secure the tabletop using self-tapping screws. Treat the entire structure with paint and varnish.
IMPORTANT! Welding work is carried out in special clothing, protected from fire and in a specially designated place. The angle of the desk is very important to reduce the load on the spine, remember this.
To assemble a table from metal pipes, the same schemes are used as when assembling from corners.
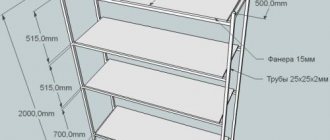
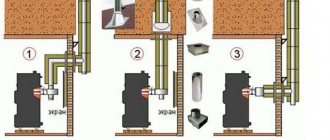
Three sequential schemes for assembling a children's desk with lift adjustment:
Fiberboard desk
To create a desk from fiberboard, you will need a sheet of material approximately 1.5 * 1.5 m. According to the drawing, you should cut out the components with a jigsaw and connect them using bolts or self-tapping screws. Required parts:
- Table top 50*75 cm.
- Legs.
- 3 tightening sheets.
The legs can be given any shape; the stops for the table top and the floor must be level to ensure the stability of the desk. Next, you need to secure the structure with ties, two ties under the tabletop, one at the base of the legs. Finish the edges of the table with furniture fittings.
Wooden desk
To create a children's desk made of wood you need:
- Bars.
- Edged board 20*2.5 cm.
IMPORTANT! Make the details of the drawing according to the calculations and process them with sandpaper. In case of visible wood defects, eliminate or replace.
Stages:
- Cut 3 boards 75 cm long with a hacksaw or circular saw, saw off 2 bars of 48 cm and 2 bars of 73 cm.
- Lay the boards tightly next to each other and secure them along the edges with bars, using self-tapping screws - the distance from the edge of the boards should not be less than 3 cm. For closer contact of the boards, an L-shaped connection is used.
- Connect the legs to the bars at the corner joints using bolts or self-tapping screws. If a two-legged table is used, a tension strip must be made and secured in the center of the legs.
- Treat with paints and varnishes.
Assembling an adjustable table for a schoolchild
In some cases, there is a need to adjust the height of the table and the angle of inclination; this requires the creation of a fixation mechanism.
Depending on the design of the table, the use of the adjustment function will require changes in the design of the legs, except when it is necessary to make a tabletop with a change in the angle of inclination.
There are several types of height adjustment mechanisms; you can choose the right one by searching the Internet. Let's consider one of the options.
Let's take as a basis the assembly of the wooden table described above. 2 guides made of boards 20*2 cm and 40–50 cm long are attached to the assembled tabletop. Holes for fixing must be drilled in them in increments of 5 cm and with a diameter of 1–2 cm.
We make the supporting part of the legs from a block of 5*5 cm and two boards of 20*2 cm and a length of 30–50 cm; holes are made in the boards in increments of 5 cm, with a corresponding diameter and a distance from the block of 10 cm.
For proper fixation, it is necessary to use a U-shaped pin or fasten the stop boards with bars along the edges. The table regulator with the lock is ready.
Source: https://setafi.com/mebel/parta/parta-svoimi-rukami/
We make a table for a child with our own hands
Taking into account the fact that the baby is growing up and has new needs, you need to carefully consider every piece of furniture that is in the children's room. The children's table is no exception. After all, your child will continue to explore the world around him, draw, sculpt, read and make various crafts.
Materials for work
If you decide to make this piece of furniture yourself, then you will need the following tools and materials:
- Solid wood sheet 60x40 centimeters;
- Beams for the frame 4 pcs.;
- Legs with a section of 4x4 centimeters 4 pcs.;
- Electric drill;
- End mill set;
- Clamp;
- Hammer;
- Wood hacksaw;
- Carpenter's knife;
- Sandpaper;
- Furniture varnish;
- Wood glue;
- Ruler;
- Furniture pins.
Important! If you have an old table, then you can use its parts to make a children's table with your own hands.
Before starting work, it is very important to determine the height of the future table. The most comfortable height is the one at which your child sits with a straight back, placing his elbow on the tabletop and easily touching his temple with his finger.
Important! In order to choose the desired table height as correctly as possible, you can use special tables that indicate the recommended standards for the manufacture of tables and chairs for children of different ages.
Work execution algorithm
When creating a children's table with your own hands, you can take ready-made drawings and diagrams. You can find them on construction sites or forums.
We offer you a general scheme for completing the work:
- Taking into account the height, saw off the legs. If they taper towards the bottom, then you can file them. This must be done in such a way that the future table is strong enough and stable.
- The prepared legs are attached to the elements of the load-bearing frame using end mills. During assembly, it is necessary to mark the locations for the grooves, and then combine the paired elements.
- Next, in the marked place you need to drill a non-through hole.
Important! The depth of the hole should be one third of the thickness of the workpiece, and the diameter should be the thickness of the future groove.
- The leg blanks must be clamped one by one in a clamp and the wood must be selected as much as possible using an end mill. This must be done carefully until you get a smooth groove of the desired size. As a result, you will have 8 grooves on 4 legs.
- Using a ruler, you need to measure the dimensions of the groove and make appropriate markings on the bars for the load-bearing frame.
- Using a carpenter's knife and a hacksaw, you need to adjust the ends of the power frame, while creating “tenons” that will easily fit into the grooves of the legs.
- At the end, a test assembly of all elements should be done.
Important! During the check assembly, you have the opportunity to make changes and adjustments to ensure that the table does not become unstable.
- The final assembly must be carried out similarly to the control one, only pre-coating the fastening points with special furniture glue.
- After everything has dried, you should secure the tabletop. To do this, you need to drill a hole in the center of the legs for a furniture pin. And on the back side of the tabletop there are blind holes.
- Coat the pins with glue and connect them into a single structure.
- The finished table must be sanded using fine sandpaper and coated with several layers of varnish.
How to make a desk for a schoolchild and decorate it with your own hands?
When a child grows up and soon needs to go to school, parents inevitably face the problem of arranging a comfortable workplace.
Both his academic performance and health depend on this . When the search for a suitable desk ends in failure (it takes up a lot of space, it is made of low-quality material, it does not correspond to the child’s height, etc.), dads come to the idea that they should make something similar on their own.
A homemade children's desk, which can be made by hand, should be folded and save space, is not so difficult to make. However, it is necessary to take into account a number of points.
What you need to know when making a desk for a schoolchild
When making furniture for the younger generation, be it a desk or a children's table, there are points that cannot be ignored:
Creating and decorating a work area for a schoolchild
- Environmental friendliness of the material. Preference is given to wood species: oak, pine, birch.
- Taking into account the features of the student’s anatomy.
You should not make a desk for growth, since the child’s spine is not yet fully formed, and attempts to “adapt” to the height of the table will lead to scoliotic changes in it with the possibility of complications in subsequent years.The best option that will give a child’s room additional space is a transformable desk, which can be adjusted in height and angle with your own hands.
- Convenience.
A children's desk, created by the hands of parents, should be designed in such a way that when sitting at it, the child does not rest his knees on the tabletop. If this happens, it’s a signal that it’s time for the desk to “grow” with it. - Possibility to adjust table height and tilt angle. It is desirable that the desk have a simple but reliable adjustment mechanism, accessible even to our child. If treated well, it can last all school years.
What to pay attention to when making
It is also recommended to take into account the following nuances:
- Safety (all corners are rounded, surfaces are polished, there are no protruding parts that a student could get caught on and get hurt or tear clothes);
- The design of a children's table should not be flashy, so as not to distract the child's attention from learning activities;
- It is not recommended to cover the tabletop with a glossy varnish, as this can create glare at a certain angle of incidence of light, which negatively affects the student’s vision;
- Stability (a children's table created according to your own design and with your own hands must be stable and not slip on the floor).
Preparation of necessary materials and tools
To make children's furniture yourself, you will need a standard set of tools:
- hacksaw,
- clamps,
- hammer,
- cutters,
- electric drill,
- sandpaper,
- measuring instruments (tape measure, square),
- carpentry glue,
- screws.
The materials for work are as follows:
- plywood 10 mm,
- piano hinges,
- axles for wheels 250 mm in diameter (if you want to easily transport the table),
- wheels,
- putty,
- primer,
- enamel for painting.
If you live in an apartment, then in order to make a children's table according to an original design, you will need to remember your drawing lessons and make drawings of the blanks with your own hands, then you should take them to the carpentry shop. This will save you from the need to cut, which entails the appearance of fine wood dust and shavings. And from the finished parts you can already begin assembling the desk.
Instructions for assembling a desk for a schoolchild
- First you need to cut out the front panel (provided that you do this yourself, work with a hacksaw at an angle of 35-40 degrees relative to the surface), carefully go over it with sandpaper and round the upper corners.
- Then mark the places for the long piano loop (on the right) and the vertical bar (on the left). D
- In order for the right folding wall of the desk to slam shut with the left, the bar is placed under the left hinge. P
- In this case, the thickness of the sidewall should be 15-20 mm less than the strip.
- The hinges and the bar are secured with screws, glued with glue, and the remaining parts are connected using a system of grooves.
- The side walls of the desk must have a special recess and grooves. They are made slightly wider than the thickness of the plywood itself from which the structure is constructed.
- In order for the grooves to be uniform on both sides, the templates are pressed against each other with a clamp.
- During assembly, the grooves of the lid and shelf (on the front pillar) and the seat (on the rear pillar) should fit into these grooves.
You are convinced that making a children's table is not at all difficult.
To ensure that it does not interfere during the holidays, it is collected and placed in a special case-frame, which is also prepared for this occasion.
Making a case for the assembled desk
The frame is made of thin boards and plywood corners in such a way that the front panel can be placed in it, resting it on the crossbar. The other side of the frame is equipped with a stretch cord (for example, from an expander) and corners for fixing the remaining parts of the desk.
The frame is placed on wheels attached using improvised hinges (for example, from bent nails), into which a 250 mm axle is inserted (for example, from an old baby stroller). A handle is mounted on one of the sidewalls.
Decorating a children's desk
You can find out more information about the corners located in kindergartens in our interesting article.
How to develop patriotism in a child who is still in kindergarten? You will read about this in the material at https://karuselkin.ru/sad-i-shkola/materialy-dlya-oformleniya-patrioticheskogo-ugolka-kak-privit-lyubov-k-rodine-detyam/ link.
Source: https://karuselkin.ru/detskaya-komnata/kak-sdelat-partu-dlya-shkolnika-i-ukrasit-eyo-svoimi-rukami/
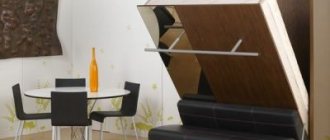
Table with lifting lid
Once you have made a simple model of a children's table, it is ready for use. But if you want to make a more functional option, we suggest you equip it with a lid. Thus, the child will have additional space to store his stationery and other small items.
To make such a table:
- Take a wooden tabletop. Its dimensions should be 90x45 centimeters.
- You need to build a frame from bars measuring 5x5 centimeters.
- Take two pieces of length 8 and 4 centimeters. Fasten them together with nails.
- Insert another piece in the middle.
- The tabletop must be attached to the front of the frame using hinge-type furniture hinges.
Important! You can replace furniture hinges with regular door hinges.
- To create a lifting and adjusting mechanism, it is necessary to fix bars measuring 20 and 40 centimeters in a vertical position on the lid. They should be placed on the opposite side.
- In order for the lid to be fixed in different positions, it is necessary to nail 2-4 furniture hooks to the bars. Next, insert one bolt at a time into the base of the frame so that they partially protrude.
- All parts are processed with sandpaper and varnished.
What can you make a table for dolls from?
Most often for making dollhouses
furniture, any available
materials are taken:
- wood
, plywood, bars, laminated panels, etc.; - plastic
(plastic); - cardboard,
paper; - matchboxes ;
- CDs;
- sticks
, plastic bottle, tin can and much more.
Paper table
Cardboard table
Important!
When making doll furniture, use only safe, non-toxic materials that will not cause allergies in the child.
We make a folding wooden table for children with our own hands
To create such a table model you will need the following materials:
- 4 boards measuring 6x2 centimeters and lengths 72 and 32 centimeters;
- Tabletop made of 2 parts;
- Wood glue;
- Electric drill;
- Furniture pins;
- Sandpaper;
- Dowels.
Important! This model does not take up much space and is suitable for small apartments.
The sequence of manufacturing a folding wooden table is as follows:
- Make 2 frames from the boards. They will “play” the role of legs.
- Using a stencil, drill holes for future fastening in the end sections of the boards.
Important! It is necessary that the lower crossbar of the frames be raised above the floor by 5 centimeters.
- The parts should be connected into frames with pins.
- Pour wood glue into the hole and connect the parts into frames. Fasten them together with loops.
- Drill a hole in the wall for the dowel.
- Attach the first part of the tabletop to the wall. A vertical folding frame must be placed underneath it.
- The second part of the tabletop needs to be attached with hinges to the first and laid out on top of the support frame.
Important! At any time you can lift the second part of the tabletop and fold the frames. Then the movable element of the tabletop is lowered, and the table will take up less space.
Dressing table
Such a table can be made
from different materials.
The easiest homemade table to make is from a cardboard
box, using
foil
and decorating with drawing.
table will be more durable .
Details
dressing table:
- main part
(with space for a mirror) – 1 pc.; - table top –
1 piece; - top shelf
(under the mirror) – 1 pc.; - outer wall of the top drawers ( holder
) – 2 pcs.; - inner
wall of the top drawers (top shelf holder with fastenings to the base) – 2 pcs.; - sides of
bedside tables – 2 pcs.; - shelf
in the bedside table – 2 pcs.; - bottom
of the bedside table – 2 pcs.; - door
with handle – 2 pcs.; - for 2 small
drawers: 4 sides, 2 back walls, 2 bottoms, 2 front walls, 2 handles; - for large
drawers (in cabinets): 4 sides, 2 back walls, 2 bottoms, 2 front walls, 2 handles.
Manufacturing stages
Step 1.
To begin, we draw out and
cut out
all the details of the dressing table with a jigsaw, as shown in the picture.
The bedside tables are mirrored!
Step 2.
First, we assemble both
cabinets.
Please note that there should be round holes for doors on the bottom of the bedside tables and on the shelf
.
Step 3.
We connect the bedside tables with
the back
wall of the table.
Step 4.
We place a tabletop on top of
tables.
Step 5.
We fasten all four walls
of the top
drawers.
Step 6.
We attach the top
shelf
under the mirror.
Step 7
We glue and dry
the boxes.
We insert them into the right places.
Step 8
Glue
the mirror.
Now you can paint
our dressing table and
decorate
.
Self- production
Furniture for dolls does not require skills and large
expenses.
All things can be decorated in accordance with the taste of the little
housewife
and the design of the dollhouse
.
Watch the master class for Barbie in the video:
A small paper chair can be used as a decoration or toy in a homemade dollhouse. You can make this craft in 15–20 minutes.
To make it you only need a piece of paper or cardboard and a little patience.
We make a children's table from furniture board with our own hands
This model is very simple and consists of a table top and legs.
Important! To make the legs, you can use bars measuring 4x4 centimeters.
The tabletop will be a furniture panel measuring 40x80 centimeters. This is already a whole preparation. In order to attach future table legs to the tabletop:
- You mark up future auxiliary elements.
- You need to make an indent of about 5-6 centimeters from the end of the tabletop.
- From the block you make blanks of the required size by sawing.
- Using wood glue and self-tapping screws, connect the bars according to the markings.
- We attach the finished legs to the tabletop using the same pattern.
Important! To ensure that the self-tapping screw that secures the leg does not “break through” the wood, it is necessary to install a metal corner.
- The finished product is opened with varnish.
conclusions
In this simple way, after practicing on a chair, you can make a whole set of things for a dollhouse. To do this, you need inexpensive and readily available tools, such as cardboard, paper, scissors and glue. There are many proven simple schemes using the origam technique.
And such products will also be useful for adults as exclusive elements for the interior. You can use more expensive and beautiful paper to make small crafts. So, unique miniatures look beautiful. For example, it could be a table and two chairs. You can place small dishes on them.
We hope this article was useful and will help you make a lot of interesting miniature things.
Children's games require a lot. In this case, you cannot do without it, which may require a lot. If the furniture in the toys does not fit in size, you can make it yourself. In particular, our master class offers a step-by-step process for making a paper chair.
To work you will need:
- square sheet of paper;
- scissors;
- scotch.
The final dimensions of the chair will depend on the size of the sheet.
Stages of making a paper chair:
Fold the square in half. After this, the edges need to be folded towards the resulting midline. As a result, we got two more folds. The square sheet is divided into four parts, one of which needs to be cut off. We do this with scissors. Fold the resulting workpiece in half. We bend its right edge and form a triangular fold in the upper part. You also need to do the same with the left edge. We bend the right edge of our future chair towards the center. We do the same with the left edge. These will be the sides of the future high chair. We slightly unfold the edges and bend the central part upward. This is the seat of our chair. We give our blank the shape of a chair. Now all that remains is to secure the seat. To do this you will need scissors and transparent tape. We fix the seat from below (on both sides) with small strips of tape. Our paper chair is ready.
Hello friends! Our cardboard workshop received an order to design and manufacture comfortable and durable school furniture for dolls from cardboard. It was necessary to make a school board, a desk and a teacher's table with a chair. Moreover, the furniture was intended for playing with dolls 30-40 cm tall.
The play furniture turned out to be quite large (for a doll size). For a more visual understanding, here are the general sizes of items from our set:
— school board: width — 31.8 cm
, height -
35 cm
, width of racks -
16 cm
;
– table (length×width×height): 30×17×20 cm
;
– chair: seat – 10×10 cm
, height -
21 cm
;
— desk: length — 31 cm
, width -
30 cm
, height - about
20 cm
, bench -
10x30 cm
.
This is what a school desk looks like:
And here you can take a closer look at the chair.
Our model doll is very comfortable both at the table and at the desk. 
Thanks to the use of several layers of cardboard, the furniture is actually durable enough for long-term use. No worse than plywood. And the undoubted advantage is that it is much easier to make furniture from cardboard with your own hands. I will now show you exactly how and tell you in detail.
Making a table out of cardboard
If you don't like working with wood, you can make a table out of cardboard. For this you will need:
- Box for furniture or household appliances;
- Cardboard tubes - they remain after the foil or cling film runs out;
- Stationery knife;
- Glue.
Operating procedure:
- Cut the box.
- Measure 5 pieces with rounded edges and a size of 55x35 centimeters.
- On 4 parts, make circle marks taking into account the diameter of the tubes. Cut them out.
- Fasten these elements together.
Important! In order for the glue to “grab” well, the workpiece must be pressed down with a press and left until completely dry.
- Try on the tubes to the workpiece. They should fit fairly tightly, so adjust the hole if necessary.
- Glue the 5th part to the workpiece. Place it under the press again.
- Spread the edges of the tubes with glue and glue them to the finished tabletop. Leave until completely dry.
Important! Decorate with self-adhesive paper and various applications.
Do-it-yourself Guillaume table-desk based on plywood drawings
Guillaume's table-desk is an example of amazing furniture that will grow with your child. In addition, the children's table transforms into a convenient magnetic board. This versatility allows you to save space in your home and not spend money on buying new furniture every year.
Tools
- Screwdriver. Power tool for tightening screws. Mobile due to the absence of a wire and powerful enough to make holes of small diameter. Screwdriver
- Self-tapping screws 3.5 x 19 mm.
Necessary for connecting desk parts together. Unlike furniture nails, they do not allow connections to become loose. Self-tapping screws for wood - Putty knife. A tool for evenly distributing paint over a surface. Paint spatula
- Short pile roller.
Allows you to quickly and evenly paint vertical and horizontal surfaces. Short nap roller - 600 grit sandpaper. Used for final sanding of parts.Sandpaper
- Masking tape. Limits the area of the part to be painted, preventing paint from getting onto other elements. Masking tape
- Jigsaw.
Tool for cutting parts from wooden panels. Allows you to adjust the cutting direction as you work. Electric jigsaw
Necessary materials
To make a transformable children's desk we will need three-layer wooden panels. The main parts of the structure will be cut out of them. The thickness of the panels is 30 millimeters and dimensions are 1700 x 900 millimeters.
- Adhesive primer. This material improves the adhesion of paint to the surface. Tikkurila Adhesive Primer
- Paint with magnetic properties. Before use, the paint is diluted with water. Magnetic paint Tikkurila
- Paint for school boards. Used for decorative surfaces. Blackboard paint
Assembly instructions
- The photo shows the dimensions. Details of Guillaume's desk with dimensions We mark the main details of the future school furniture on the panels. You can cut them yourself, or you can turn to professionals. The thickness of all parts is the same - 30 millimeters.
- We cut out the parts with a jigsaw.
We process the ends of the workpieces with sandpaper to get rid of sharp edges and burrs.
- Now let's create a magnetic board. Apply masking tape along the edges of the proposed board.
- Prime the surface with an adhesive primer.
The primer must be stirred before application. To apply the mixture evenly, a short-haired roller is best. - Let's go over the dried primer with sandpaper for sanding.
- Using a damp cloth, remove accumulated dust and wait until the primer dries completely.
- After five hours we apply paint with magnetic properties.
It also needs to be stirred before application. Apply it with a roller, stirring occasionally while working. Magnetic paint is applied in three layers, each drying time is 24 hours; applying a new layer before the previous one has completely dried is not recommended. Try to achieve maximum smoothness.To do this, use a short-nap roller and a paint spatula.
- After the third layer has completely dried, apply decorative paint for school boards.
In modern stores you can find any color. Mix the paint and apply it to the surface with a short-nap roller. Wait six hours for the first coat to dry and apply the second. Lightly move the roller in one direction to even out the paint. - Now we assemble the cut out parts of the home table together. Using self-tapping screws, we secure the table stand supports to the bottom panel (numbers 3, 4 and 5 in the diagram).
- We fix the stand and install the table cover holders (numbers 2, 7 and 8 in the diagram).
- We put the table cover on the stand.
- We assemble the chair by connecting the seat to the chair post (numbers 9 and 11 in the diagram).
- Next, we attach the stand with the seat to the bottom panel of the chair using a support (numbers 6 and 10 in the diagram).
Making a children's high chair
It is very important to make a set of table and chair at once. Such a set will not only please your baby, but will also be functional, which is important for a loving parent. We have already told you how to make a children’s table, but for the high chair you will need the following tools and materials:
- Solid wood;
Important! It is best to use beech, birch or pine. They are quite hard, but easy to process.
- Bars 2x2 or 5x5 centimeters;
- Boards 2.5 centimeters thick;
- Furniture panel - for this you can use a sheet of plywood or chipboard;
- Dowels;
- Wood hacksaw;
- Screwdriver;
- Sandpaper or sanding machine;
- Hammer;
- Brushes;
- Varnish or paint.
Important! Before you start making a high chair, you need to make sure that you have taken the measurements correctly. If not, then you need to increase or decrease them proportionally, since the stability of the future product depends entirely on the ratio of height and width.
Making a drawing
In order for the baby to be not only comfortable and comfortable, but at the same time to develop correct posture, it is necessary to make a table that will fully correspond to the physical parameters of the child. You can measure it as follows:
- Measure the distance from the bend of your knee to your heel. This parameter shows you the seat height of the future chair.
- Next, for a test, you should sit the baby on some object that is equal to the height of the chair.
- In this position, measure the distance between the floor surface and the child’s elbow. This will be the height of your table.
Important! Taking into account the fact that children grow very quickly and in order for the future table to last for several years, you should add a few centimeters to the current height parameter.
As for drawings and diagrams, you can find them on the Internet. But it’s best to make the drawings yourself, since you will be making a high chair taking into account the individual parameters of your baby.
Important! If you doubt the correctness of the drawing, you need to test it by making a cardboard model of the high chair.
Selection of fasteners
It is best to use dowels to secure a child's highchair. The advantage is that they can also be made from wood.
Manufacturing of parts
Before starting work, it is better to leave the wood for a day in a dry room to dry. Further:
- In order to make the legs of the future product, it is necessary to cut the bars into several pieces of the required size and sand them with sandpaper.
- The upper and lower crossbars are made using the same pattern of bars as the legs.
- To make crossbars, it is necessary to cut the bars on a flat surface in a vice. This is necessary to ensure that the cutting angle is 90 degrees.
- Curves should be cut from the board.
Important! During cutting, it is necessary that the wood fibers are perpendicular to the bend angle.
- Cut a seat out of wood.
Assembling the product:
- We make holes in the parts of the future chair for dowels. They must first be made with a drill with a small diameter (up to 6 mm), and then expanded with a chisel.
- We attach the parts with wood glue.
- In order for the fastening to be as strong as possible, all elements need to be placed on a dowel, and then secured to a clamp and left for a day.
Chair finishing
It can be produced using water-based varnish or acrylic paint. As for the back and seat, they can be made of foam rubber with a cover made of colored and durable fabric.
In order to make a children's table and chair with your own hands, you will need to spend a certain amount of time and physical effort. But as a result, you will receive furniture that is made with love and is ideal for your child. Using the above tips and recommendations, you will do everything right, and the finished product will delight you and your baby!
As the child grows up, new needs appear. In a children's room, every piece of furniture should be thought out to the smallest detail. There comes a time when the baby needs a children's table at which he will play, draw, eat, and learn new knowledge and skills. Of course, the easiest way is to purchase the necessary furniture attribute in the store, but it’s so nice to do something for your child yourself. In addition, only by making the table yourself can you adjust it exactly to the child’s size. Therefore, many parents are faced with the question: how to make a children’s table with their own hands?
Small desk made from natural materials
A children's desk is a must-have for children's education. This furniture accessory can be used not only at school, but also installed at home. At the same time, in order to make it, there is no need to spend huge amounts of money.
Important! To make a children's desk with your own hands, you need to understand the drawings from the very beginning, and based on them, purchase all the necessary components. In fact, all furniture “patterns” are identical to each other and can only differ in the size of the resulting desk.
Materials for work
To make a desk at home you need to have:
- confirmations;
- self-tapping screws;
- piano hinges, 50 cm long;
- metal corners;
- sandpaper;
- cutting plywood according to the drawing;
- screwdriver;
- jigsaw;
- Sander.
Instructions for assembling the table:
- All plywood template cuttings must be sanded. Achieve the best possible result. Let them be more smooth and less uneven. To perform this operation, you can use a grinder or similar machine.
Important! When sanding wooden surfaces with sandpaper, this operation must be done in three stages. At the first stage, process with P40 grain, then with P120 and P220. In this case, you will achieve the best result.
- All sharp corners on the furniture piece must be rounded using a jigsaw.
- For convenience, we recommend cutting semicircular recesses in the sides of your future home desk. They are necessary to make it more comfortable for the child to sit and learn lessons.
Important! When forming this design, your child will not rest his knees when turning, and he will not be disturbed by the sharp corners of the table.
- At this stage you need to attach the legs to the bottom of the box. This operation is performed with the help of confirmations. Before doing this, you should drill holes for these fasteners.
- Now you need to lower the bottom eight centimeters lower than the edge of each leg.
- We fix the front wall of the resulting workpiece.
Important! It is worth considering that the top edge should be level with the legs. This is necessary to ensure that the structure is almost even and perfect.
- Using a screwdriver, attach the screws to the back wall of the workpiece. At this point you will have a protrusion. It will be several centimeters higher than at the edge of the legs of the structure.
- We secure the tabletop using piano hinges. Once you secure this piece of furniture, you will have a drawer in which you can store various items for homework, drawing, or other items.
Important! Please note that:
- the child should easily lift and lower this structure;
- it should move without sticking or difficulty;
- When closing the countertop, the surface must be level.
A DIY school desk is ready! Now you can start making the chair.
Important! A desk for a schoolchild is very easy to make with your own hands. With minimal knowledge, a lot of desire and a small amount of money to purchase basic materials, you can make an excellent piece of furniture for your child.
Desk for schoolchildren
We will not consider typical
desks that stood in all Russian apartments in the 90s of the last century.
Such tables are boring
to make.
Consider an unusual
table with A-shaped legs (trests) and a solid
long
tabletop.
door
as a tabletop .
Stages of work
Step 1.
We outline and cut out
the tabletop.
We process it with sandpaper or a grinding machine.
The sides can be edged with a special finishing edging,
which is sold at any hardware store.
Note:
with the edging, the width of the finished tabletop will be 72 cm!
Step 2.
We cut 8 boards
at least
75 cm long (if necessary, the edges will need to be trimmed with a jigsaw), and sand them.
Step 3.
The angle
of inclination
of the boards for the trestle should be such that the height of the legs
combined
with the thickness of the tabletop is
75 cm.
To do this, we cut out small
bars
that will be located between the upper parts of the supports.
The width between the lower parts should be 22 cm.
Step 4.
In two boards 70 cm long,
we drill
two 9 mm holes (for attaching the trestle).
The holes must be equally
spaced!
We retreat
about 3.5–4 cm
from the top 9 mm
holes in the middle of the upper part of the legs
We fasten
with furniture bolts and strengthen the structure
with self-tapping screws.
Note:
The size of the bolts is 6 mm, and the diameter of the holes for them is 9 mm!
This is necessary because the table legs are attached at an angle. Step 5.
At the bottom of the trestle
we attach
two bars
19 cm long.
The height of the bars is at least 3 cm from the floor.
We place two boards
on the bars as a shelf,
and secure them with self-tapping screws.
Step 6.
Having measured the distance between the trestles,
we screw
the wooden blocks so that the tabletop does not move.
For better stability
table tops, it is recommended to use
dowels.
To do this, drill holes in the supporting boards with a depth of 8 mm, and in
the tabletop -
22 mm.
The dowels should be dipped in glue
and driven into the board, then carefully place the tabletop on them.
For such a massive
table you need to make 2-3 dowels on each side.
Step 7
All wooden parts of the table should be
treated
with impregnation.
For a children's table, it is necessary to apply at least 3 layers
(so that it is impervious to moisture).
Each layer must completely
.
After the last layer has dried, the table is painted or varnished. You can add a little dye to the varnish
to give it the desired
shade.
Note:
The table can be decorated if desired. The best decorative technique for a children's table is: Just choose a cheerful picture or decorate the tabletop with images of your child's favorite characters.
Master class: how to make doll school furniture from cardboard
Materials and tools:
— sheets of A4 size office paper (for printing templates); — packaging corrugated cardboard (3 mm thick); - standard (stationery) knife; — creasing tool; - metal ruler; - scissors; - double sided tape; - Moment Crystal glue, toothpick; - hot glue gun (optional).
As you can see, the materials needed to make doll furniture from cardboard are more than affordable. Getting packaging corrugated cardboard is now not at all a problem: you can find something at home in the pantry or on the mezzanine, huge quantities of used boxes are recycled in furniture and grocery stores - and there you can quite get the necessary amount of cardboard, and for free.
You can also inexpensively buy corrugated cardboard sheets individually at craft stores, packaging stores, or directly at a cardboard factory (if you have one nearby). In this case, I recommend choosing three-layer corrugated cardboard brand T-24
- it's denser. But in principle, softer cardboard of the T-23 brand is also suitable.
The process of making furniture for dolls, like all our cardboard toys, begins with preparing templates.
Generally speaking, having familiarized yourself with the technology itself, you can, if you wish, design doll furniture according to your dimensions.
Or you can use ready-made templates, carefully calculated and tested in practice. A set of templates for making doll furniture “Playing at School” can be ordered from.
PREPARATION OF TEMPLATES
So, if you took advantage of our offer, print the templates on sheets of A4 office paper.
Cut out small templates (which fit entirely on an A4 sheet) with small allowances.
Glue large templates according to the composition diagrams (see example). And also cut with small allowances.
Place pieces of double-sided tape on the back of the templates. Then each template must be attached to the back
side of the corrugated cardboard.
Note:
The templates have a special round icon indicating the recommended direction of the waves of the corrugated layer. That is, the lines inside this icon should be approximately parallel to the lines that are visible on the wrong side of the cardboard.
It is not necessary to follow this direction exactly. Sometimes you have to adjust to the size of an existing piece of cardboard.
Just keep in mind that a cut made transverse to the direction of the waves of the corrugated layer will be stronger and more rigid. And, conversely, a cut made along the waves wrinkles easily.
Therefore, you need to try to ensure that, if possible, all the edges of the parts are exactly across the waves. In addition, they will look more aesthetically pleasing.
Well, now you can proceed directly to making doll furniture with your own hands. Let's start by making a chair and a table.
TEACHER CHAIR FOR DOLLS
Using a standard (stationery) knife, we cut out the parts of the chair S-4.1
,
S-4.2
,
S-4.3
and
S-4.4
. Long straight lines are cut using a ruler, short and curved sections are cut by hand.
On detail S-4.1
Use the tip of a knife to mark the fold lines (before cutting out the part). Having cut out the part, we crease it. A creasing stick used in scrapbooking is suitable for this operation. You can also score with the end of a flat-head screwdriver or scissors (you just need to act carefully so as not to tear the cardboard: the tool must be tilted as close to the surface of the cardboard as possible).
Carefully bend part C-4.1
.
Cutting out parts C-5.1
,
S-5.2
,
S-6
. There is no need to score anything here. And we will make the folds on the parts in the following way: along the blue lines on the template, we will make cuts to approximately half the thickness of the cardboard (be careful not to cut through), and then separate 2 layers of cardboard in the areas between the cut lines.
To make the layers easier to separate, first bend the piece outward along the score lines. In the end it should look like this.
The chair parts are ready. Let's start assembling.
Glue the part C-5.2
inside part
C-5.1
with Moment Crystal glue. It is enough to apply glue along the edges and around the holes. To prevent excess from leaking out, spread the glue with a toothpick into a thin layer.
Glue the second part of part C-5.1
- it turned out to be the seat of a chair.
Glue the halves of part C-6
(the back of the chair). At the same time, we apply glue to single-layer areas.
Place the glued parts under a press for a short time (for example, several books) for a reliable connection.
Notice how neat and precise the end of the seat turned out - this is due to the fact that in this area we separated 2 layers of cardboard.
Inside part C-4.1
First glue part
C-4.2
, then
C-4.3
and
C-4.4
with the right sides facing out.
Check: when bending the chair legs, the specified parts must fit together exactly at right angles.
When the chair legs are dry, glue them to the seat. Pour glue into the slots of the seat, and use a toothpick to lubricate the protrusions on the legs. We connect the parts as shown in the photo.
Glue the back of the chair. Here, in addition to the protrusion and slot, we also lubricate the back surface of the legs with glue.
We connect everything, press and hold until the glue sets.
The cardboard doll chair is ready.
TEACHER'S TABLE FOR DOLLS
Now let's figure out how to make a table for a doll.
Cut out parts C-1.1
and
S-1.2
: 2 pcs. with slots and 1 pc. - without slits.
Cut out 2 parts C-2
and tabletop parts
C-3.1
and
C-3.2
.
Glue the doll table supports using Moment Crystal glue: 1 piece C-1.1/C-1.2
without slot + 2 parts
C-1.1/C-1.2
with slots. In this case, the parts must be positioned so that on both sides of the support the cardboard is facing out.
We also glue the cross member.
And we glue the tabletop: first we glue part C-3.2 inside part C-3.1, then we bend and glue the free halves. Don't forget to apply glue to single-layer areas as well.
The table elements are ready. Assembling: glue the supports and crossbar, then glue the tabletop. For this operation, you can use a hot glue gun. It will be faster and stronger this way.
That's all. The doll table is ready!
Let's move on to the next piece of doll school furniture.
SCHOOL DESK FOR DOLLS
Using the templates, we cut out the parts of supports P-1.1
and
P-1.2
(2 pieces each),
P-2.1
and
P-2.2
(1 piece each),
P-3
(2×3 pieces).
To speed up the process, repeating parts can be cut in 2 layers
: Place 2 pieces of cardboard with right sides facing each other and secure the edges with pieces of masking tape. In this case, you will not need to print additional templates.
But cutting in 2 layers requires more effort. Therefore, if this method turns out to be inconvenient, it is better to cut all the parts in 1 layer. It will be more careful.
Cutting out the details of the bench P-5.1
and
P-5.2
,
P-6.1
and
P-6.2
. Don’t forget: we only make cuts along the blue lines, then separate the 2 layers of cardboard between them.
We cut out the details of the crossbars for the desk P-7
and
P-8
- 3 pcs.
Using the P-8 template, you need to cut out 3 parts, slightly different in size (3 parallel lines are drawn along one long edge of the template). You can do this as follows:
- attach the template to the cardboard and use the point of a compass (or a sewing needle) to mark all the corners of the part along the outer contour;
- transfer the template to a free section of cardboard and mark the corners of the part with the point of a compass, but now using the middle of 3 parallel lines along one long edge;
- transfer the template again and mark the corners of the smallest part.
Mark with a pencil which part is which and where the top is, so you don’t get confused later when gluing. The differences in size are necessary so that the upper end of the crossbar is at an angle corresponding to the inclination of the desk top.
In addition, we cut out the details of the base of the desk P-9
(6 pcs.). The photo shows parts with rounded corners (although on the templates all corners are straight - for ease of cutting). If you wish, you can do this too. To do this, use nail scissors to round each corner of the part, first cutting off only the top layer of cardboard, then only the bottom.
The tabletop for the desk is made in the same way as for the teacher's desk.
Glue all the parts together as shown in the photo. The principle, I think, is already clear.
And let's start assembling. At this stage, you can use a hot glue gun. Or you can continue to use Moment Crystal glue.
We glue the parts of the bench together by inserting the tabs into the grooves.
We assemble the desk: first we glue the supports and crossbars, then we glue the tabletop.
Glue the desk to the base.
And glue the bench to the base.
The school desk for dolls is ready!
SCHOOL BOARD FOR DOLLS
The final element of our furniture set.
Cutting out parts D-1
(1×2 pcs.),
D-2.1
and
D-2.2
(2×2 pcs.).
If desired, here you can use the method of cutting 2 layers of cardboard (see description above).
Cutting out parts D-3
,
D-4
and
D-5
.
We glue the board itself: inside part D-3
glue parts
D-4
and
D-5
, as shown in the photo. Apply glue only to the edges and spread a thin layer with a toothpick.
We bend and glue the outer parts of the board.
Apply glue in the gap between the main part of the board and the shelf. Bend the shelf and press until the glue sets.
All that remains is to glue the board to the supports. And you're done!
Puppet school board in all its glory. :)
Let's admire the doll furniture in action a little more.
The school furniture for dolls turned out just like the real thing, durable and comfortable. And, most importantly, it is harmless - there are no sharp corners, no small parts that break off, and the material is environmentally friendly!
On the spacious shelf of the board (its width is 4 cm) you can put homemade visual aids, mini-books, pieces of chalk or a felt-tip pen.
You can attach a sheet of paper to the board and write problems on it, or you can glue a special film that imitates a blackboard, and then you can even write with crayons - in general, everything will be for real! And the children will be delighted!
If desired, cardboard doll furniture can be painted. It is better to use acrylic paints for this.
Although, in my opinion, it’s very stylish anyway.
Now you know how to make furniture for dolls from cardboard. And you can easily make the same one with your own hands for your children or for your group in kindergarten. And our templates will help you with this!
I wish you pleasant creativity and entertaining games with your children!
If you have any questions about making doll furniture, write them in the comments. I will be glad to clarify all points.
Yours Inna Pyshkina and the Kartonkino team.
For our granddaughter Mashenka, my son-in-law and I made an age-appropriate small school desk with our own hands and a comfortable chair where you can look through picture books, draw, sculpt from plasticine, or lay out toys.
Required:
50 cm piano hinge confirmations self-tapping screws metal corners cutting a pine furniture panel (for a desk, see diagram 1, for a chair, see diagram 2).