18.04.2018
The modern construction market is increasingly saturated with new types of materials. Exclusive tiles, laminate or parquet will no longer surprise a sophisticated user. Chipboard (chipboard) is also not new. But recently, a new type of chipboard has appeared - tongue-and-groove, moisture-resistant, used when forming a floor to create a flat surface and provide high-quality sound and heat insulation, and moisture resistance. So what is this material and how to work with it correctly?
Moisture-resistant chipboard for flooring
As a material, boards have been used for quite some time, especially in furniture production. But their usual type has certain disadvantages that limit the scope of use. Conventional chipboard, although characterized by an increased level of strength and density, is vulnerable to moisture - it swells and deforms under its influence. However, modern developments have made it possible to create a new class of slabs that are more resistant to moisture.
Moisture-resistant chipboard will be an ideal choice in cases where you need to quickly level the floors, creating a surface without cracks that is not afraid of the effects of water. This slab differs from the usual one in its special composition. It contains components whose main qualities are immunity to moisture. For example, this is an emulsion composition made from paraffin.
As for the rest, when forming the slabs, the shavings remaining after wood processing and the fastening resin composition are still used. The plate production technology involves exposure to elevated temperatures and pressing of products under a certain pressure.
Important! If this type of chipboard is immersed in an aqueous environment for some time, it will still deform.
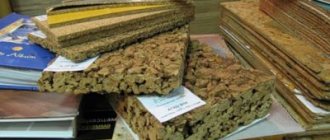
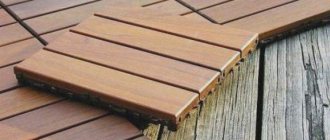
Moisture-resistant chipboard differs from the standard one in color. The first is characterized by greenish-yellow inclusions. Another distinctive feature of a moisture-resistant board will be the presence of a special connection - on one side there is a special tenon, and on the other there is a groove for it. Thanks to these tongues, if the products are laid one to one, they are firmly joined, forming a dense row.
On a note! A moisture-resistant board, as a rule, is tongue-and-groove on 4 sides - each end is equipped with a groove or tenon. This feature will allow you to connect products in all directions, significantly simplifying and speeding up the assembly process (and, if necessary, dismantling).
Typically, such chipboard is marked B (moisture resistance). The slabs may also have markers - P6 and P3, indicating medium and low degrees of humidity, respectively. Chipboards of type P5 are intended for use at high levels of humidity.
In addition, products are divided into types according to the number of layers:
- multilayer;
- three-layer;
- single-layer.
Multilayer structures have become the most popular. Their production technology involves the use of large chips for the internal layers and small chips for the external ones. The thickness of the slabs can be 1.6 cm or 2.2 cm. The dimensions of chipboards are: 1.83 x 0.6 m or 2.44 x 0.6 (0.9) m. To produce moisture-resistant tongue-and-groove chipboard, shavings are used wood mixed with thermally reactive resin compositions.
What is tongue-and-groove chipboard, its types and properties
Chipboard - chipboard. This is a sheet construction and/or finishing material that is made from wood chips of a certain size. A binder - glue - is added to the shavings, a slab is formed from the mixture, which is then dried. A chipboard board can consist of one, two, three or more layers, in which the chips are located in different directions. The layered structure is visible on the edge. It makes the material more durable and resistant to deformation.
Moisture-resistant chipboard tongue and groove on the floor as a finishing coating
The tongue-and-groove chipboard has a formed tongue and groove along the edge. If ordinary material is joined “end-to-end” - simply close to each other, then tongue-and-groove forms a monolithic (almost) coating, since the tenon of one element fits into the groove of another. When a load occurs on any of the sheets, it is redistributed over the entire surface. This is true for the floor - it results in a more reliable and rigid coating. It is not difficult to recognize tongue-and-groove chipboard by sight, since the groove and tenon cannot be confused with a straight edge. And in the marking, the letter Sh is added to the standard abbreviation at the end. That is, the material is called DSPSh. The thickness of tongue-and-groove chipboard is 12 mm, 16 mm, 18 mm, 22 mm.
Making a chipboard floor more convenient and faster using tongue and groove slabs
The material can be cut perfectly with a jigsaw, but it can also be cut with a regular wood hacksaw. When unloading and carrying, you need to be careful - the corners are easily chipped. There is a tenon/groove there, the thickness is small, so it’s easy to chip. To be carried only by two people - the weight of a long sheet is 24 kg.
Moisture-resistant chipboard, tongue-and-groove
There may be moisture present in the floor structure, so they prefer to use moisture-resistant materials. There is such a variety in particle boards. Special substances are added to the composition that increase resistance to moisture. Moisture-resistant tongue-and-groove chipboard also differs in marking: at the beginning there is the letter B, which indicates moisture resistance. That is, the material is called VDSPS. It is usually used for the floor, since no one can be 100% sure of the absence of moisture.
Floor moisture-resistant chipboards can be distinguished by their greenish color. A dye is specially added to the composition
But here we must take into account that moisture-resistant tongue-and-groove chipboard differs in the degree of moisture tolerance. This parameter is indicated in the technical specifications. It may also be indicated in the specification, but then it is designated by the Latin letter P followed by a number from 1 to 6. The higher the number, the better the material tolerates high humidity. For the floor, it is better to take VDSPS category P5 (optimally) or P6.
But do not confuse moisture resistance with water resistance. Moisture resistance is the ability of a material to withstand periodic increases and normalization of humidity, without changing its size or shape too much. The higher this parameter (number), the better the chipboard tolerates high humidity. But if you submerge it in water, nothing good will come of it, because water resistance is required to tolerate the “flooding”. And this is something else. So don't confuse these two properties. For use in floor construction, moisture resistance is usually sufficient.
LVDSPSH - laminated material
Moisture-resistant chipboard with tongue and groove is often used for laying finished floors, as a base for flooring. The slabs are polished, almost ready for finishing - this is quite convenient. But there is an even more convenient material - laminated VDSPS. The front surface of this plate is covered with paper with a pattern printed on it, and the top is covered with a protective polymer film. It turns out something similar to laminate, but on a more rigid base. Such slabs can be laid directly on logs, on a concrete slab or on insulation; they do not require a foundation (if the slab is sufficiently thick).
LVDSPSh is the same moisture-resistant particle board with a decorative coating
The disadvantage of laminated chipboard is the small number of colors. If you use a sealant when connecting, you get a surface that is not afraid of water. If you do not have too high demands on aesthetics, laminated tongue-and-groove chipboard can also be installed in living rooms. And for loggias and balconies, this is generally an excellent option. It installs quickly and gives you a clean finish right away.
Product advantages
Moisture-resistant chipboard is used in many works, including creating a floor substrate. Tongue-and-groove slabs have a lot of advantages, which have deservedly ensured that the product is in wide demand in the field of modern construction. Let's consider the main ones:
- The main advantage of the slabs is moisture resistance. In terms of this indicator, analogues of moisture-resistant chipboard (plywood, OSB, etc.) are significantly inferior. For example, if such a slab is kept in water for 24 hours, the maximum degree of swelling will be no more than 10% of the original dimensions (without significant deformation).
- Environmental friendliness and safety will be another advantage of using this particular product. During production, resins based on polymers that are not a source of harmful fumes are used as a fastening composition (subject to compliance with operating rules). Particle boards are not prohibited for use even in school-age children's institutions. Moreover, the slabs are approved for use in cases where special requirements of sanitary services are met. Among analogues, the products are recognized as the most environmentally friendly type of building materials.
- Increased strength. Withstanding heavy loads and pressure, tongue-and-groove moisture-resistant chipboard is resistant to deflection and breakage.
- Easy to process and assemble. If a technological need arises, the slabs can be easily sawed. This quality will be especially useful if you need to repair or restore the floor. A convenient and reliable tongue-and-groove joint ensures connections without gaps, forming a monolithic base. To install the floor with tongue and groove slabs, you do not need special skills and equipment - a good owner always has all the necessary tools in his arsenal. In addition, the products are characterized by low weight, which also facilitates installation work. In cases where LSP is used for the floor substrate, there is no need for a leveling screed, which allows for some financial savings.
- Long service life. This quality of the slabs ensures their immunity to fungal infections and rot.
- Affordable price. Compared with plywood, purchasing chipboard will be more economical and rational.
- Wide range of applications. Waterproof slabs with tongues are in demand not only for the formation of subfloors, but also in many other production areas.
- High levels of sound and heat insulation. Chipboards perfectly retain heat without letting it out of the house, and also serve as a good barrier against noise penetration, keeping out extraneous sounds from neighbors below.
- Chipboards form an even coating, eliminating additional costs for preparing the surface before finishing.
- If such a need arises, the slabs can be easily dismantled and reinstalled, allowing you to carry out repair work on your own.
On a note! If, when finishing a room not intended for living, there are no special requirements for the floor covering, ordinary surface painting is quite suitable as a cladding.
Floors
142 votes
+
Vote for!
—
Vote against!
Quite a lot of the flooring process uses a material such as chipboard. Among its main advantages are strength and low cost. But, nevertheless, the final result of working on the floor depends on the choice of this material. We will talk about the features and characteristics of chipboard further.
Table of contents:
- Chipboard for flooring: properties and characteristics of the material
- Chipboards for flooring: advantages and disadvantages
- Recommendations for choosing chipboard sheets for flooring
- Moisture-resistant tongue-and-groove chipboard for flooring - characteristics
- Laying chipboard floors: how to build a subfloor
- Chipboard flooring: how to arrange a floating floor
- Installing chipboard on a concrete base
Chipboard for flooring: properties and characteristics of the material
Chipboard is a material in the form of chipboard, for the manufacture of which wood chips are used, pressed using the hot method. In addition, chipboard contains an adhesive substance that is not of mineral origin.
In relation to the design features of chipboard it happens:
- one-;
- three-;
- multilayer.
In addition, there are grades A and B, which differ in strength characteristics to bending, deformation, moisture resistance and other technical indicators.
Chipboard also comes in first and second grade. Material belonging to the first grade has practically no defects in the form of cracks, stains, chips, protrusions or depressions. Second-grade material is characterized by the presence of large defects. In addition, there is chipboard without grade, that is, a board on which there are cardinal defects.
In relation to the characteristics of the outer layer of chipboard, it happens:
- with a fine-chip surface, finishing with polymers is possible;
- standard material, finished with veneer;
- Chipboard with a coarse-grained surface is most often used in the construction industry.
In relation to the level of chipboard surface finishing, there are:
- polished;
- unpolished.
In addition, there is a criterion for the distribution of material depending on the content of formaldehyde components in it. In relation to moisture resistance, a distinction is made between slabs that are prone to deformation when exposed to moisture and those that are not prone to deformation.
It is possible to treat the material with special impregnations that improve its fire safety. In relation to density, there are three classes of chipboard:
- high;
- average;
- short.
Depending on the type of chipboard coating, there are:
- laminated;
- extrusion.
The first option involves a material that has been exposed to high temperature and pressure, and a special film material is glued to it. More expensive varieties of such chipboard are coated with a special varnish, which increases its resistance to mechanical damage and moisture. With the help of lamination it is possible to achieve an attractive appearance of the coating. This type of chipboard is widely used in the furniture industry.
The second option is a material in which the wood fibers are located perpendicular to the slab. Thus, this material has reduced strength.
The use of chipboard is primarily associated with the insulation of wooden floors or concrete floors. It is this material that ultimately allows us to obtain a perfectly flat structure with high thermal insulation and sound insulation properties. At the same time, the costs of arranging this coating will be minimal.
Chipboards for flooring: advantages and disadvantages
Let's start characterizing chipboard with its shortcomings, since it doesn't have many of them. First of all, this is the appearance of the material, which, although it is wooden, bears little resemblance to wood. Also, a significant disadvantage of chipboard is the addition of resins to it, which act as a binder for sawdust or other components of the woodworking industry.
Among the advantages of chipboard we highlight:
1. Affordable price for chipboard flooring.
This factor makes this material one of the most popular in both the construction and furniture industries.
2. Ease and simplicity of work.
The material cuts well, is easy to install and does not require special skills to work with it.
3. Environmental safety.
This advantage is relevant if all technological standards and requirements for the quality of the binder were met during the manufacture of chipboard.
4. Excellent performance properties.
The use of chipboard as a base for laying the main floor is characterized by a significant period of use of the material.
5. Multifunctionality.
Ideal for installing parquet or synthetic flooring.
6. High sound and heat insulation properties.
Thanks to this, chipboard is widely used in the manufacture of doors, furniture, flooring and even wall finishing.
Recommendations for choosing chipboard sheets for flooring
Before you read the tips for choosing chipboard, you should consider the classification of this material. Most often, chipboards are divided in relation to their grade:
- Chipboard 1st grade;
- 2 varieties;
- 3 varieties.
Materials of the first, second and third grades differ in relation to strength, evenness, the presence of grinding, defects and other technical indicators. To ensure that the chipboard has a perfectly smooth edge, special equipment is used.
1. Slabs that belong to the first grade are distinguished by the absence of any coating. Their outer side is the same as their filling. However, these boards are covered with a melamine film, which is similar in appearance to plastic. Various pictures or photos are applied to its surface. The cost of laminated chipboard for flooring is much higher than regular one.
2. Chipboards belonging to the second grade have small scratches and chips. Their cost is much lower than that of first grade chipboard. The scope of application of this material is limited to the construction industry. At the same time, this type of chipboard is an excellent option for finishing the floor.
3. Grade 3 chipboard is characterized by low quality and the presence of a fairly large number of defects, especially of mechanical origin, which are located at the end sections of the boards. This type of chipboard is excellent for the construction of elements such as formwork or partition walls.
In order to buy chipboard for the floor, you should contact any hardware store. In addition, an important factor when choosing chipboard is the emission class. Each of the slabs contains formaldehyde resins to some extent. Certain classes have less of this substance, while others have more. This material is capable of evaporating from chipboard when exposed to moisture or elevated temperature. There are two options that describe the amount of formaldehyde in the boards, class E1 and E2.
The first option is safer and is most often used when arranging residential premises. The standard for the production of class E1 boards allows the content of no more than ten grams of formaldehyde per hundred grams of board. These boards are used in the manufacture of furniture intended for children.
The second class, E2, denotes the fact that one hundred grams of slab contains about thirty grams of formaldehyde. A less popular option, which is practically not used in residential areas due to toxicity.
The scope of application of chipboard is most often associated with construction. This material is often used when carrying out interior finishing work, in the process of manufacturing door structures, bases for ceilings or floors.
Moisture-resistant tongue-and-groove chipboard for flooring - characteristics
As mentioned earlier, chipboard is a material that is manufactured using the hot pressing method. That is why chipboard is practically not prone to expansion. To more conveniently connect the slabs to each other, manufacturers make slabs with two grooves and two ridges on them, which ensure the evenness and tightness of their joints.
When installing this type of chipboard, virtually no tools are required, and installation time is significantly reduced. In addition, moisture-resistant chipboard for flooring contains special additives in the form of moisture-resistant polymers. They allow the use of this material in rooms with an average level of moisture, such as a kitchen or balcony.
Among the advantages of shunted chipboard for flooring are:
- ease of installation. which is ensured by the presence of a tongue-and-groove connection;
- the presence of a perfectly flat surface, on which there are no differences, gaps or other defects;
- ease of working with the material;
- Possibility of use in rooms with high humidity levels;
- good performance properties.
It is the locking type of chipboard that allows you to create an excellent floating floor. In addition, using this material it is possible to construct a false floor or a dry prefabricated screed, without the use of mortar or additional building materials.
In relation to the size of chipboards for the floor, slabs of 1.5x4, 1.5x6, 1.5x8 m and so on are distinguished. The thickness of chipboard for the floor is 1, 1.8, 2, 3 cm.
Laying chipboard floors: how to build a subfloor
A rough floor covering is also called a dry screed, since materials containing water are not used in the process of its arrangement. The subfloor is the base on which the main floor covering is installed.
Instructions for leveling chipboard floors:
1. Logs are installed on the concrete base, the interval between which is 300-400 mm, if the sheet thickness is no more than 1.6 cm and 400-600 mm, when installing sheets 2.2 cm thick. Please note that near walls a gap of 20 mm is left. If there is an uneven floor, all gaps should be filled with sand or slag.
2. If the floor is on the ground floor, then the entire space between the joists is filled with foam or polystyrene foam insulation. Please note that in this case, a vapor barrier is first laid on the concrete base.
3. Using a building level, check the levelness of the base. To ensure that the floor does not creak during its operation, it is necessary to use construction plastic or paper to cover the surface.
4. Start laying chipboard from the wall located in the far corner of the room. Lay the first one and fix it to the floor with self-tapping screws. First, the central part of the sheet is fixed; the installation step of the fasteners is about twenty centimeters. Try to recess the screw heads by at least one millimeter.
5. To seal the edges, coat the tongue-and-groove joints with PVA glue or latex-based construction mastic.
6. Next, the next plate is installed and pressed tightly against the surface of the previous one. To avoid damage to the material, the chipboard comes with bars that are designed to fit it.
7. Then the following bars are installed. They are installed in such a way that the seams between them are located directly on the joists. If the floor of a narrow corridor is being installed, then the frame is positioned perpendicular to the movement.
8. When vertical irregularities form, they are ground and cleaned of dust and dirt. Next, the floor is finished, which involves installation work on installing laminate, linoleum, tile or parquet flooring.
Chipboard flooring: how to arrange a floating floor
The arrangement of a floating floor assumes the absence of a rigid connection between the slabs installed on the floor. Thus, an intermediate layer is formed, which allows for thermal and sound insulation of the floor.
The use of this technology is associated with the arrangement of floors that have severe flaws and differences. To install a floating floor made of chipboard, follow these steps:
1. Place a vapor barrier on a concrete base. If the main floor is made of wood, it is best to use glassine.
2. Add filler in the form of dry expanded clay or slag. Align and level it.
3. Install material in the form of construction membrane or paper.
4. Wedges should be installed near the wall, which is the beginning of installation.
5. Start installing the chipboard; during the work, use glue that will help connect the boards together.
6. Make sure there is a one-centimeter gap between the wall and the chipboard.
Installing chipboard on a concrete base
There are two ways to install chipboard on a concrete base:
- installation directly on the floor;
- installation on logs.
The first option seems possible only if the floor made of concrete is perfectly flat and has no horizontal differences.
If there are small irregularities on the floor, then first fill it with a thin screed. You should wait at least 3-4 weeks for the screed to settle. After the concrete becomes strong, the base is cleaned of dust and dirt using a construction vacuum cleaner. Chipboard sheets are cut in relation to the size of the room.
Advice: Before starting installation work, it is recommended to apply drying oil or an antiseptic to the surface of the chipboard sheets, which improves its performance characteristics.
Marking work should be carried out on the base. In accordance with the markings, holes are drilled in the concrete into which the dowels will be installed. Lay the sheet in such a way as to obtain a gap of 15 millimeters. Use dowels to secure the material to a concrete base.
The second option for laying chipboard involves performing the following actions:
1. The choice of chipboard thickness depends on the step with which the logs were installed. Please note that chipboard is a more fragile material than, for example, plywood or wood, so the logs should be located close to each other.
2. Arrangement of the screed is optional when choosing this method. In this case, there is no need to waste time and extra material resources for its manufacture.
3. In order to compensate for the unevenness formed during the installation of the joists, small pieces of plywood or wood are placed under them.
4. First, you should mark the base in relation to the locations of the lags. Lay the logs so that their laying step is the same.
5. Next, insulation is laid in the space between the joists. With the help of anchors, the logs are fixed to the floor.
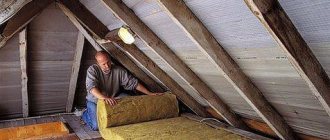
6. Lay insulation; mineral wool is best. It should fit snugly against the joists. All cracks that have formed between the insulation layer and mineral wool are sealed using polyurethane foam.
7. Next, waterproofing is installed, in the form of foil or oilcloth. A fairly acceptable option would be to use penofol, which will play the role of not only hydro-, but also thermal insulation.
8. Then the direct installation of chipboards is carried out, which are fixed to the floor with nails.
Disadvantages of tongue-and-groove chipboard
When deciding to purchase this type of building material, you need to familiarize yourself with its disadvantages:
- for a surface with a significant bend, chipboard will be unsuitable as a base;
- sawed ends will be vulnerable to moisture, so they should be treated with moisture-proof impregnation;
- The slabs are not recommended for use in rooms where people prone to allergic reactions live, since, although in small doses, formaldehyde is still released from them (treating the sawn ends with a protective agent will somewhat reduce the concentration of the evaporating substance).
Area of use of tongue-and-groove chipboards
- Moisture-resistant boards, like standard ones, are used for interior finishing of the following types of structures:
- residential buildings;
- administrative premises;
- production profile designs;
- public premises.
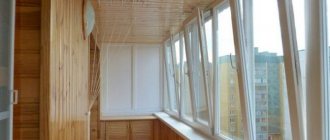
When finishing apartments, slabs can be installed in any room, be it a kitchen, living room, bedroom or bathroom. Due to its increased moisture resistance, tongue-and-groove chipboard can be used for arranging loggias or balconies - places where the influence of weather is especially noticeable and condensation is possible. In conditions of low temperatures and high humidity, the products will not lose their quality characteristics.
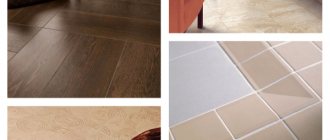
To form the base of the floor, slabs will be the most optimal solution. They will create an ideal surface for laying parquet boards, laminate or tiles. Tongue and groove products are also perfect for leveling and soundproofing walls for basic finishing. Sometimes they are used to build partitions between rooms.
On a note! From chipboards you can make original ceiling structures that can compete with tension ones, but are much easier to install than plasterboard ceilings. Another option for using chipboard is to use it to create formwork. This design is easy to install and then dismantle.
Why are tongue-and-groove joints so popular?
The special demand for slabs with tongues is quite understandable - they owe it to special connections, with the help of which a strong and stable base is created for the floor. Since no gaps are formed between the slabs when laying the slabs, the underlay for the flooring is very reliable.
To obtain a structure with greater tightness, eliminating the need for additional waterproofing, the joints between laid slabs should be impregnated with a special adhesive. This will further increase the strength and invulnerability of the base. In addition, due to the presence of tongues, the load will be distributed evenly over the entire surface of the floor. Joints of this nature will provide a more stable base than simply nailed plywood sheets.
How to lay chipboard over wooden floors?
To lay chipboard slabs on the floor over an old wooden floor, you need:
- clear the floor of furniture and inspect it;
- replace rotten, creaking and loose boards;
- treat old boards with antibacterial liquid to prevent fungal diseases of wood;
- cut the chipboard sheets and lay them on the floor, leaving gaps at the walls of at least 1-1.5 cm;
- check the level of the layout of the slabs;
- place chipboard sheets on self-tapping screws and screw them to the wooden floor;
- joints and places where self-tapping screws are buried in the slabs should be puttied, then, after waiting for the putty to dry, pass over the slabs with a grinding machine or sand them by hand;
- lay and secure skirting boards around the perimeter;
- varnish the surface of the chipboard sheets in several layers, this will prevent the material from getting moisture inside and give it a beautiful appearance.
You can also put a finishing floor covering on top of the chipboard on the floor - for example, linoleum, parquet, laminate, etc.
How to choose the right tongue and groove chipboard?
When choosing slabs as a base for the floor, you should pay attention to the characteristics of the building material. In the future, this will help to avoid some problems - low-quality products have insufficient strength, which will lead to rapid destruction.
Before purchasing, you should pay attention to the following indicators:
- the ability to swell in an aqueous environment should be no more than 5-30%;
- tensile test strength – 0.2 – 0.5 MPa;
- strength during bending test – 10 – 25 MPa.
In addition, it is better to give preference to slabs that have the greatest thickness. These can be three-layer products, but the most acceptable solution would be five-layer structures.
The choice of the manufacturing company is also important. It is better to purchase chipboard from trusted manufacturers - those who, over many years of production, have managed to take a strong position in the modern construction market. Experts recommend buying moisture-resistant tongue-and-groove chipboard for flooring.
How to lay chipboard on a concrete floor
There are two ways to install particle boards on a concrete base. Both methods will make the floor equally comfortable and warm.
Laying chipboard directly on concrete.
To do this, the floor needs to be: cleared of debris; dry; align. To level the surface, additional screed filling is used. Chipboard sheets must be cut and treated with drying oil in advance. The material must be laid taking into account a gap to the wall of at least 1 centimeter. When laying pressed slabs directly on a concrete base, it is better to use dowels for fastening. In this case, you need to make holes with a hammer drill.
Laying chipboard on joists
The advantages of installing particle boards on logs are:
- great thermal insulation;
- the possibility of using additional insulation;
- no additional screed required;
- saving time.
Chipboard is not a strong enough material, so logs must be placed quite often.
In this method of laying pressed slabs, work must begin with the installation of logs. If there are gaps between the beams and the concrete, fill the problem areas with wedges. The outer beams are installed at a distance of 250 millimeters from the walls. All subsequent ones are in an interval not exceeding 400 millimeters.
The logs are fixed in one plane. Check using a level and secure with anchors. Next, lay the chipboard sheets. They are distributed in such a way that the joint of the slabs occurs exactly in the center of the log. Attach with screws around the perimeter at a distance of no more than 30 centimeters.
The heads of the screws must be below the surface of the slab. The seams between the plates are treated with putty, dried and sanded with sandpaper. On the floor prepared in this way, you can put laminate, linoleum or hide it with varnish.
If desired, the concrete floor can be additionally insulated. To do this, the insulation must be inserted into the sheathing or placed directly on the concrete base. This will not only create greater thermal insulation, but will also protect against excess noise. Any filler can be used for these purposes. The most popular are technical cork and isolon.
Cork, with a fairly small thickness (from 3 to 10 millimeters), has very good heat-insulating characteristics. At the same time, it is illogical material. But its main disadvantage is the price. The cost of such products is quite high.
As for isolon, this material is very easy to use. It is rolled out over the surface, cut to the required size, and the joints are glued with regular tape.
Methods for creating a base for a chipboard floor with tongue and groove
There are two options for forming a base from tongue-and-groove slabs. The usual method involves the initial installation of protective waterproofing material, then the installation of logs (beams) and the placement of an insulating layer between them. After all the preparatory work has been completed, you can begin installing the chipboards themselves and strengthening the joints with adhesive. Then the additionally formed base is strengthened with self-tapping screws.
The second option for installing slabs - floating - is characterized by the absence of additional fastening. Chipboards, joined together using tongues, are installed on a sand cushion or insulating layer. As a result of using this installation method, a kind of dry screed is obtained.