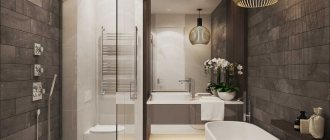
A wall mounted TV shelf not only has functional qualities, it also complements the design of the room. With its help, you can save space in your apartment, as well as create a stylish, aesthetic look for a transformed wall. In addition, you don’t have to spend money on buying wall shelves, because you can make them yourself.
Wall mounted TV shelf
Which shelf should you choose?
Depending on the functional load of the room in which the TV is installed, the most convenient type of shelf is selected:
- hanging;
- wall;
- corner (both internal and external);
- shelf with bracket.
And the most acceptable design of a TV stand:
- console (horizontal panel mounted perpendicular to the wall);
- shelf with side walls;
- shelf with back wall;
- multi-tier shelf;
- combined shelf.
Top ideas for a TV shelf
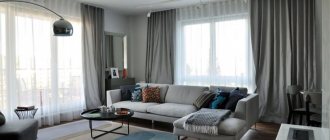
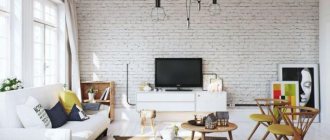
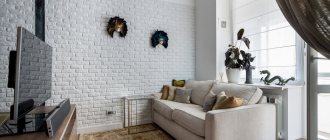
Before you make a shelf for a TV, you need to think about creating a unique design for the wall against which this shelf will be located. Such a wall may differ in color and texture, for example, imitate brick. You can also add accent lighting to add interest and texture to the design. However, care must be taken to ensure that the design solution is not taxing on the eyes. Colorful, geometric patterns and bright colors on interior walls can impair vision and interfere with watching TV.
- You can create an additional wide shelf to complement your wall-mounted TV. This is an interesting alternative to traditional bedside tables.
- The design, reminiscent of a fireplace in shape, will become a symbol of the hearth. This block elegantly separates the TV area from the rest of the house. Two simple shelves provide ample space for CDs and design elements.
- You can frame the TV with a wall box made of stainless steel or wood. This homemade furniture is great for storing books, DVDs and other things you might need for a home theater in your living room.
- Wall-mounted TVs look great paired with open shelves to create contrasts. Therefore, you can create an interesting design by combining open shelves of different sizes. Speakers are installed around the TV, and there may also be a music center there.
- A TV combined with furniture can become a “wall of art.” The shelf is complemented with frames with photographs of different sizes, which are hung asymmetrically at different heights.
- Don't want to install your TV on any of your existing walls? You can place it right in the center of the room. The structure connecting the floor and ceiling can be a very simple design: wooden slats and shelves are attached to vertical steel pipes. The TV can be easily mounted there.
Advice. Always start any project with a drawing, this will make it easy to determine the contours of the furniture and the amount of material needed to create it. Believe me, this is the beginning that makes the further process of work easier.
You can easily create a modern and stylish TV shelf with your own hands in any style: rural, vintage or high-tech.
What to make a shelf for a TV from
Your imagination can run wild when choosing the material for making a TV stand.
Of course, you can make a shelf from Bohemian crystal, marble, mahogany, inlaid with precious stones...
But, remaining true to the principles of minimalism and ergonomics, let's focus on such common and inexpensive materials as:
- wood, chipboard or MDF;
- drywall;
- plastic or organic glass;
- durable tempered glass ;
What to consider when choosing
Since there are quite a lot of TV mounts and their prices can be different, you should choose them taking into account not only personal preferences, but also financial capabilities, because complex and stylish designs are not cheap. You also need to pay attention to the material, type of construction and other equally important factors.
Concealed shelf holder
Material of manufacture
The best material for creating shelves is wood . This is an inexpensive material that has many advantages: it is durable and harmless to others. Almost all the furniture in the house is wooden, so a wall shelf can fit perfectly. Of course, stores may sell shelves made of other materials, but if you decide to make a shelf yourself, then wood is best suited for this purpose.
Wooden TV stands
Prices for TV stands
TV stands
Design features
Wall shelves can be made in different designs, but a wall-mounted product is considered optimal. It is worth noting that the duration and complexity of the work process depends on the type of design.
TV stands
Dimensions
TVs come in different sizes, so be sure to take this into account when choosing a shelf design. First of all, measure the dimensions of the TV, and only then start calculating the future shelf.
TV shelf drawing
Installation location
It is also necessary to decide on the location where the structure will be installed. As a rule, a wall shelf is attached to the wall opposite the armchairs or sofa - this will make watching TV much more convenient. But if you are going to install a TV in the kitchen, then the shelf for it is mainly mounted in the corner so that it does not disturb anyone in an already cramped room.
The installation location must be decided in advance
Types of fastenings
The basis for a shelf of any design is the fastening. Special requirements are placed on it , both in terms of load capacity and functionality.
The most common types of fasteners are:
- Using corners. The easiest and most practical method, which is the choice of most beginning craftsmen. But in order to make such a shelf rotatable, you will have to experiment with fasteners.
- Hanging mount. Wall-mounted shelves fit into the interior, do not require a special approach to the selection of tools, but do not always meet the criteria for the stability of the entire structure.
- Using brackets. Brackets are very convenient, but they will take more time to manufacture. also cannot do without special which will significantly affect the final cost of the entire product.
Important! The brackets allow you not only to attach the TV to the wall, but also to change the viewing angle by almost 90 degrees. Using corners or a hinged mount made of durable and lightweight material (for example, aluminum) you can significantly reduce the time spent on manufacturing the entire structure.
Pros and cons of placing a shelf on the wall
Like any furniture design, this one has its advantages and disadvantages. The advantages include:
- Space saving;
- Aesthetic, modern look;
- Inaccessibility prevents children and animals from reaching it.
Cons include:
- A poorly mounted plane can lead to the TV falling without the possibility of subsequent repair;
- The location of the shelf above/below eye level contributes to their rapid fatigue;
- You need special tools and professionals to install such a structure.
This picture demonstrates a stylish image and, alas, incorrect placement of the TV shelves, which are below eye level, which will cause overexertion and gradual loss of vision
Tools and materials
To manufacture and install a shelf of any design you will need:
- sheet material for cutting;
- electric jigsaw;
- electric drill;
- screwdriver;
- template strip or tape measure;
- mounting knife;
- tool for marking (pencil, marker, etc.);
- mounting kit: fastening (corners or brackets), self-tapping screws, dowels, anchors, etc.
- a set of drills (for metal, wood and for drilling concrete slabs), depending on the material of the product and the type of mounting surface;
Sketch and detailed study
Having decided on the desired appearance of the future shelf, we proceed to the sketch. The contours are drawn on full-size paper . If everything suits you, we transfer the finished sketch to the material.
When making a shelf with shaped elements, a straight section with a length of 40 to 100 mm should be left between the main side and the beginning of the bending (see figure). With this approach, the edge after gluing will be more neat.
Secrets of quality cutting
When cutting identical elements, several sheets of chipboard (or other material) are fixed together using a clamp and the parts are cut out along one contour.
The finished parts of the product can be varnished or painted, depending on the original plan.
Important! If chips appear on the material during cutting, sanding with sanding tape will help get rid of them. For this, sandpaper of K80 or K100 grit is usually used.
Making a hanging shelf
Functionally, this design is not very suitable for installing a TV, as it involves the use of additional elements. But for a certain design solution, this idea may seem interesting.
All work can be divided into several stages:
- in the ceiling , into which plastic spacers and special hooks are screwed in. A shelf is suspended from them, which can be reinforced with a strip of durable material.
- The TV is installed so that the center of gravity is exactly in the middle of the shelf.
- Now you need to install an additional mount that will protect the expensive device from falling. It can be located in the back of the TV or in the center (usually included with purchase).
Making a wall shelf
Wall mounting is the most common and easiest way to install modern TV. The design of the product can be matched to the interior and designed depending on your tastes.
- The standard model consists of lower, upper and side walls, fastened together with corners or other means.
- Next, we make markings in the wall and drill holes for the dowels.
- The pre- assembled shelf is attached to the wall using corners or brackets.
This design can withstand decent loads, takes up little space and is quite functional when using swivel brackets.
A special role in this case is given to fastening. Widespread is angular, with stiffening ribs. The design is considered reliable if its length matches the width of the shelf itself or is slightly less.
Attention! When drilling holes in tiles (for example, in the kitchen), you need to turn on the drill at low speeds and carefully do all the work without changing the angle of the tool. It is best to initially use small diameter drills - this will reduce the risk of cracks and splits.
Making a DIY TV bracket
Now, let's move on to creating a bracket with our own hands. Since you have reached this section, it means that you have already studied the entire store assortment of ready-made brackets, and you were not satisfied with something about them (just like me).
Here's a photo of what we ended up with to make it clear what we're talking about.
The task was to hang the TV strictly opposite the bed, while the curtain should not be affected in any way. This means that the simple option of attaching the bracket to the wall at a right angle was no longer needed.
Having looked at ready-made solutions, more or less suitable options were found for only $80, since a bracket with a 545 mm offset and a significant rotation angle was needed, in general, it was unaffordable. The rotation angle was necessary, but tilt adjustment was not needed, and this already simplified the task, because making a TV bracket with tilts with your own hands is something unrealistic.
It was decided to use a long gate loop as the base. This loop can withstand a load of 50 kg, which is extremely reliable for a bracket.
The loop itself was secured to two anchor bolts, but nothing else is needed here, now the loop can only be pulled out with the wall.
Next, a piece of board was cut out, which serves as the connector of the bracket to the TV. The board with the bracket is connected with bolts with a truncated cone, this is done so that the heads of the bolts are in the same plane with the board, and nothing rests against the TV.
Then the wires were laid in a cable channel, which was secured with glue.
We also installed a separate outlet for the TV.
At this point, the installation of the bracket was completed, and all that remained was to fix the TV on it.