Most often, during inexpensive cosmetic repairs, the wallpaper is re-glued and this is done independently, so as not to spend money on craftsmen. The result is dubious savings if the joints on the wallpaper become visible and they need to be re-glued.
Find out, of course, why the joints become visible, so as not to repeat mistakes in the future, but now something else is more important. On the agenda is how to re-glue the joints on the wallpaper without re-repairing it, and how to disguise badly torn panels.
Why do seams on wallpaper become visible?
The reasons why joints on the wallpaper are visible lie in unprofessional repairs or low-quality wallpaper was initially chosen. More about this:
- The joints have moved apart from each other - the most common problem and the most obvious to anyone who has ever glued wallpaper on their own. The reason is that during the process of wallpapering the wallpaper was allowed to become excessively wet.
The property of all paper wallpapers made from wood cellulose is to swell from moisture. How this happens can be seen with the naked eye. Glue-coated panels should not be overexposed. As soon as it becomes obvious that they are already sufficiently saturated, you need to start gluing them. It must be taken into account that wood cellulose swells unevenly. Because of this quality, you subsequently have to observe how the seam between the canvases either converges or diverges.
Excessively wet wallpaper is the main cause of visible joints
If, through negligence, one panel was allowed to become excessively wet, it is better not to glue it. During the gluing process, the flaw will not be visible, but when the walls dry, all the canvases will return to their original width and the joints will separate.
- During repairs, glue was applied to the wallpaper in excess of the norm. Excess glue is determined intuitively. It is necessary that at the moment of drying, the glue sets first, and only then the wallpaper shrinks.
- In different batches of goods, the shade of the wallpaper may differ slightly, so one edge may be darker than the other. In such cases, the joints will be clearly visible.
In the store, all the wallpaper rolls seem the same. We just take the required amount and take it to the checkout, but no. Don't rush: make sure that all rolls have the same batch number. Do not confuse with the article.
- A low price or discounted wallpaper should alert you. You never know why the price of some wallpaper has been reduced. The fact remains: in inexpensive samples, visible joints are more common.
- There are uneven edges on the panels - a manufacturing defect or you or the craftsman cut it a little obliquely.
- During transportation, the ends of the wallpaper were slightly wrinkled or even torn. Or the wallpaper was purchased long before the renovation and was standing still waiting for its turn for renovation. Store only in packaging in a horizontal position and transport carefully.
How to glue fallen wallpaper
A more global problem is that the wallpaper begins to fall off in entire sheets or peels off from the wall near the ceiling, floor or in the corners. These are the most difficult areas during repairs and this is where defects form. To glue fallen wallpaper, you need to move its edges away from the wall and study why the peeling occurs.
If you need to glue the edge of the wallpaper, you need to apply the glue as deeply as possible
The main reasons for wallpaper peeling off the wall:
- The wallpaper was pasted onto old plaster, which became wet and fell off when it came into contact with the glue.
- The walls were not pre-primed and the wallpaper glue was absorbed into them.
- The glue was too thin because it was not diluted correctly. Or the glue did not fit the chosen type of rolls.
- During the renovation, there was high humidity or a draft in the room.
To prevent the problem from recurring, you need to study why it happens. The wall will have to be well prepared for wallpapering.
Falling off wallpaper is only applied to a clean surface.
How to glue wallpaper that doesn't stick to the wall:
- We remove dust, debris, and old plaster from under the panels hanging on the walls.
- If necessary, we plaster the wall and give the new plaster time to harden.
- We prime the fresh plaster with a special compound or wallpaper glue.
- We apply glue to the walls and canvases, join the detached piece with the wall and other canvases glued nearby.
- We press it, smooth it, remove the air and remaining glue from under it. We are waiting for it to dry completely.
To speed up the drying process, you can use a household hair dryer. In addition, by heating the joints, you can strengthen their contact with the wall and perfectly align them. To achieve the desired effect, press the joints against the wall and wait until they cool completely.
Reasons for gaps at joints
Wallpaper joints diverge due to:
- errors in preparing walls;
- improperly diluted glue;
- non-compliance with the impregnation time of the sheets;
- artificially accelerating drying by opening windows and creating drafts;
- technology violations.
Let's focus on the main reason - impregnation. The impregnation time is indicated on the wallpaper not to broaden your horizons, but for successful repairs. The denser and thicker the fabric, the more time it takes to soak. The exact time is written in the insert, the approximate time is as follows:
- 2-3 minutes for light types;
- 4-8 minutes for medium species;
- 9-15 minutes for heavy types.
If the impregnation time increases, the canvas becomes like rags, greatly increases in size and is easily torn. Hence the difficulties during gluing and large shrinkage, which causes the joints to diverge.
Wallpaper
-19 votes
+
Vote for!
—
Vote against!
If the technology for installing wallpaper on walls is violated, after it dries, the surface loses its attractiveness and joints become visible. The method for correcting joints in wallpaper is determined by the reason for their appearance. We will learn further about how to fix joints on various types of wallpaper.
Table of contents:
- Wallpaper joints - reasons for their appearance
- How to fix joints on wallpaper
- Instructions on how to glue the joints of vinyl wallpaper
- Non-woven wallpaper - joints, elimination features
Wallpaper joints - reasons for their appearance
Wallpaper is perhaps the most popular type of wall decoration in residential premises. However, quite often there are situations when, after gluing the wallpaper, the joints between them become visible. When buying wallpaper, you should already think about the reasons for the occurrence of joints.
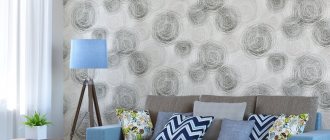
This factor is typical primarily for low-cost wallpaper. Although sometimes joints appear when gluing expensive non-woven wallpaper. By choosing wallpaper that has vertical stripes or a checkered pattern, you can easily hide the seams, even if they are visible. Wallpapers with a glossy surface, vinyl, plain, textured or thin structure always have noticeable joints.
To seal certain joints between wallpaper, a special sealant is used, however, its use is relevant in the case of painting wallpaper. It is possible to further paint the sealant itself in the color of the wallpaper.
If the wallpaper is transported or stored incorrectly, its joints also become visible. When purchasing wallpaper, carefully inspect the roll for damage on the sides of the stripes. Crumpled, damaged ends immediately become visible at the joints. If you have already removed the packaging from the wallpaper, be sure to store it in a standing position.
If the ends of the dark wallpaper are unpainted, then to avoid the appearance of joints, color them with a dark pencil.
Most often, joints appear on paper wallpaper. This happens because the paper stretches under the influence of glue and decreases in size when it dries. Therefore, after applying the glue, immediately glue the wallpaper to the wall without waiting for it to swell. Otherwise, ruptures and uneven shrinkage cannot be avoided.
In order to achieve an ideal joint between the wallpapers, you should carefully prepare the wall for their installation. If there are unevenness on the walls, the appearance of joints cannot be avoided. Therefore, before gluing wallpaper to the wall, take care of puttying, sanding and applying a primer. Without a primer, the base for the wallpaper will contain a lot of dust, which will absorb the glue and will not hold the wallpaper on the wall surface. It is preferable to prime the walls 24 hours before wallpapering.
The process of applying wallpaper glue is another reason for the appearance of joints. If you apply glue in excess or in insufficient quantities, then the probability of joints appearing is almost one hundred percent. It will take longer for a thick layer of glue to set than for a thin layer, while the paper base will already be dry, and the glue underneath will still be wet. The glue, in this case, is not able to keep the wallpaper from shrinking in width. Thus, gaps form between the canvases, which impair the attractiveness of the finished coating.
After applying the glue to the wallpaper strip, it is recommended to fold it and roll it over it using a rubber roller. This way, all excess glue will be evenly distributed on the surface.
After applying the canvas to the wall, using a rubber roller, you need to carefully roll the seams, only in this case will they be securely fixed to the surface.
Some wallpaper options imply the presence of joints, which are almost impossible to hide. These are wallpapers in the form of glossy and vinyl versions, as well as silk-screen printing. Buying expensive and collectible options will in no way protect you from the appearance of joints. Therefore, when choosing wallpaper, focus on wide canvases, and try to place the joints between them in places where furniture or other interior items are installed.
How to fix joints on wallpaper
There are several options for diverging joints on wallpaper. We invite you to familiarize yourself with them:
- the divergence of the joints in such a way that the gap in the wall becomes visible between them;
- ingress of adhesive onto the front side at the joint;
- twisting and lifting the edges of the joint strip;
- color difference between wallpaper joints;
- unevenness or uneven coloring of joints.
To correct these problems, various methods are used, which differ in labor intensity and material costs.
To fix wallpaper that has come apart at the joint, you should first examine the reason for its appearance. The width of paper wallpaper, after applying glue to it, increases by approximately half a centimeter. Once the wallpaper is applied to the wall and dries, it begins to regain its volume. Thus, a divergence of the joint is created.
When working with wallpaper based on paper, non-woven and vinyl, you should take into account the fact that these materials are prone to swelling. In order to avoid the appearance of joints, follow the technological recommendations for gluing wallpaper on the wall:
- the material should not become excessively wet when it hits the wall; after applying the glue, you do not need to wait a lot of time to install the wallpaper on the wall;
- do not allow an excess of glue on the surface of the wallpaper; roll materials often narrow during the drying process, thus the wall does not have time to dry before the wallpaper dries and joints and discrepancies appear;
- To fix the edges of the canvas, use a special glue that will securely hold the canvas on the wall surface, additionally fix the edge of the canvas with a rubber roller.
Several methods are used to remove joints between separated strips. The simplest, on the one hand, and the most costly, on the other hand, is painting wallpaper.
A less expensive method is to use tile grout to match the color of the wallpaper. To do this, a certain color is added to it, and the grout is applied to the joints. It is possible to use a regular marker or pencil to paint over the area where the joint appears.
It is possible to use the top part of the wallpaper connected with PVA glue. That is, if there are crumbs on the wallpaper, then they need to be carefully removed from the trim, then the crumbs are combined with glue and applied to the surface. This mixture is used for puttying joints.
Installing moldings or special panels will not only get rid of joints, but also improve the attractiveness of the appearance of the wallpaper. A simpler option is to install paper borders on the seams between the wallpaper. It is possible to re-glue the wallpaper where the joints diverge. To do this, you should soak the joint parts of the sheet with warm water. Next, apply glue to them and try to stretch them and connect them to each other; if there are small errors, this method will help to correctly connect the wallpaper to each other.
Another problem that arises with wallpaper joints is the presence of glue on their surface. This occurs due to the application of a large amount of adhesive to the wall or wallpaper. Despite the transparency of the adhesive, it is still visible in daylight. In order to avoid such situations, it is recommended that you first study the instructions for wallpaper glue and apply it according to it.
To remove glue from the surface of the wallpaper, be sure to prepare a clean, preferably white, rag. While the glue is still wet, you can use it to get rid of it.
Sometimes a problem arises in the form of curling of the edges of the wallpaper at the joints. Most often, the wallpaper begins to peel off along with the wall decoration. The reason for this is the use of low-quality finishing materials. To remove this defect, it is enough to use wallpaper glue, with the help of which the curled edges are again fixed to the surface. To firmly fix the wallpaper on the wall, use a rubber roller.
Wallpapering the joint is a rather complex process, for which you must strictly adhere to the wallpapering technology.
If there is an uneven color or cut of the wallpaper, the aesthetic appeal of the coating is also lost. This occurs due to the mismatch of wallpaper rolls in color or tone. Try gluing the second canvas upside down in relation to the first. This method of reversing wallpaper installation will get rid of this problem.
To hide an uneven cut of wallpaper or uneven color, you need to resort to painting the joints. For these purposes, special tools are used in the form of felt-tip pens and pencils. Try to choose a pencil color as close as possible to the wallpaper.
Various tapes, edgings, borders, etc. will help decorate the joints of wallpaper. Please note that each type of wallpaper differs in the manifestation of an individual reaction to one or another version of the wallpaper. For example, if you apply glue to paper wallpaper, it will stretch very quickly, but this will not happen with non-woven wallpaper. Before starting work, carefully study the instructions for the wallpaper, their features and installation technology. Only in this case will it be possible to get rid of problems with how to glue the joints of the wallpaper.
Instructions on how to glue the joints of vinyl wallpaper
Particular difficulties when gluing vinyl wallpaper arise when connecting them at the joints and in the corners. Particular care should be taken when processing wallpaper joints in corners.
With proper preparation of the walls, and especially if there are even corners, problems with the appearance of uneven joints in these places do not arise. The main rule for obtaining high-quality corners is to cut through the joint. The canvases on both sides are installed on the wall with a slight overlap of three centimeters. Next, you should cut through this place and you will get a butt joint between the two panels. The joint is coated with glue and smoothed. In this case, it will still not be possible to avoid a slight shift in the pattern. Although sometimes it turns out to combine the drawing perfectly.
In order to avoid the appearance of joints during the process of gluing vinyl wallpaper to the wall, it is necessary to install the sheets with an overlap. If vinyl wallpaper has a non-woven backing, an overlap of 20 mm is sufficient; for a paper backing, this value is doubled. Next, just cut through the joint with a knife level and remove the excess.
After completing the wallpapering work, check the walls for defects in the form of air bubbles, diverging joints, or un-glued areas. Correct them if necessary. It is recommended to install furniture and other objects at the joints to hide them.
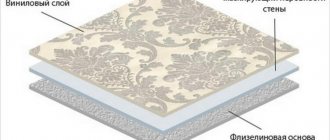
Vinyl wallpaper has a non-woven or paper backing. Depending on this, the adhesive for fixing them to the wall is selected. Using glue for non-woven wallpaper will allow you to fix finyl wallpaper with a non-woven base. This adhesive option is applied to the wall. Wallpaper on a paper basis must be covered with glue before installation. In any case, before starting work, read the instructions for applying glue.
Non-woven wallpaper - joints, elimination features
The popularity of the widespread use of non-woven wallpaper is explained primarily by its fire safety, good heat and sound insulation characteristics and greater mechanical strength.
The process of gluing non-woven wallpaper is the same as gluing paper-based wallpaper. To do this, just follow these steps:
- prepare glue;
- cut the wallpaper into strips according to the height of the room;
- apply glue to the wall;
- install the strip on the wall and glue it;
- get rid of excess glue;
- trim unnecessary parts of wallpaper;
- glue the next strip.
Before starting work, you need to purchase a special glue for non-woven wallpaper and dilute it according to the instructions. Gluing the joints of non-woven wallpaper is not particularly difficult. Using a level, draw a line on the wall that will be the location for installing the first strip. At the same time, watch out for unevenness. Install the strip on the wall, previously coated with glue. In the same way, draw a second line and glue the strip. There are no particular problems with the divergence of joints in non-woven wallpaper, since they are not capable of stretching like paper wallpaper. A regular level will help to make the wallpaper joints even, with the help of which you can draw a line for the location of the strip.
Pay special attention to the corners; the wallpaper sheet should extend into the corner by 10-15 mm. The wall is coated with glue and the sheet is applied to it. Use a roller to flatten the sheet. The next sheet is glued with an overlap. When small folds form, they are cut to remove air and smoothed out.
If it is necessary to paste wallpaper on the outer corners, an overlap of 25 mm should be made. If the angle is perfectly flat, then it is enough to join the strips together. Otherwise, you should still resort to using overlap. Using a utility knife, cut through the joint and get rid of the excess.
Is it possible to re-glue the joints on the wallpaper so that they are not visible?
For different types of wallpaper, the defect is removed in different ways. It is easiest to seal the joints on the wallpaper so that they are not visible, for those that are to be painted. In this case, the seams are simply sealed with a special sealant, which is then tinted to match the color of the walls.
It is the sealant that is used, not the putty. The disadvantage of putty is that over time it will begin to crack and crumble, and the joints on the wallpaper will become visible again.
Let's consider a more complex option, when the wallpaper joints will have to be re-glued. For repair you will need:
- spray bottle with warm water;
- PVA glue;
- brush, sponge.
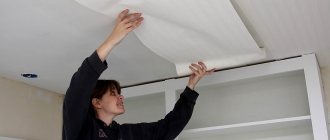
Re-glue the joints very carefully and carefully:
- First, let's try to moisten the edges of the panels with warm water and pull them towards each other.
- They will absorb moisture for a few minutes, then apply PVA glue.
- We will try to align the joints of the sheets using a rubber roller. We will smooth out any wrinkles and air bubbles that have arisen.
If you are working with paper wallpaper, make sure that there are no tears due to deformation and that the wallpaper does not shrink unevenly.
Layered wallpaper (non-woven, vinyl, duplex) is re-glued differently if the joints are visible. We will have to moisten the underside of the edges that we are going to restore. It is important to remember that all of these types, if stretched greatly, will shrink greatly after drying and return to their original shape (unlike paper ones). A rubber roller is a great help for this work; it does not stretch, but only presses the sheets against the wall.
How to replace some wallpaper on a wall
If the wallpaper is damaged over a large area, you will have to completely remove it in that area and apply a patch. Replacing some of the wallpaper will require a lot more effort. The main emphasis is on accuracy.
Attention! To remove is not just to rip it off. In our case, we need to carefully cut out an even figure on the wall, this will make it easier for us to fit the patch, and replacing part of the wallpaper will be perfect.
If the damaged area does not peel off well from the wall, you can wet it with water or apply a special wallpaper remover.
Do-it-yourself wallpaper restoration occurs in the following sequence:
- We cut out a patch from the panels remaining after the repair. If there are none left or you didn’t do the repairs, you can go to hardware stores with a sample. Maybe they still produce exactly this type and luck will smile on you.
- The patch pattern is made several cm larger than the old fragment.
- We apply wallpaper glue, suitable specifically for your type of rolls, to the wallpaper and to the wall.
- Apply and smooth the patch, getting rid of unnecessary air. We try to combine the drawing.
For all the details on how to apply a patch to wallpaper correctly, watch the video:
The glued patch is several centimeters larger, so it overlaps. We remove it with a sharp knife, cutting along the joint between the patch and the old panels. This creates a perfect connection that will be almost invisible after drying.
The joints on the wallpaper are very visible - how to disguise them
There are additional methods for connecting more complex and serious joints. Let's consider one of them, where you will need a sharp stationery knife, wallpaper scraps, tinting paste, sandpaper, decorative edging, and PVA glue.
- Let's prepare a mixture from the leftover wallpaper. To do this, use sandpaper to erase the top layer from the wallpaper.
- We will dilute the resulting shavings with PVA glue.
- Add tinting paste if the shade is not suitable.
- Apply the resulting mixture to the existing gaps so as not to grab the wallpaper. It is most convenient to carry out this procedure using a small spatula.
How to decorate joints on wallpaper using patches and borders
The next way is to make the so-called “artificial joints” yourself, or, more simply, “patches” from leftover material. After the patches are cut, we connect them with two edges (factory and trim strip of wallpaper). The main thing is to combine the existing pattern and “patches” as accurately as possible.
Let's also dwell on an option that seems out of place, but with a good imagination everything can turn out perfect. The places where the joints diverge can be decorated with a paper border. The most important thing is to choose a suitable border that will match the wallpaper in color, quality, and structure.
You can also creatively play with the place where the joints diverge and decorate them with various ribbons, braid, curtains, etc. At the same time, frame a picture or photograph on the wall from the same material. Guests may get the impression that this was intended from the very beginning of the renovation.
How to join wallpaper correctly
It is advisable to take into account certain nuances and follow the recommendations of specialists. Then you will get beautiful partitions with a homogeneous surface, on which it is difficult to find the connection lines of the rolled strips. In this case, it is necessary to take into account the characteristic features of different materials:
- single-layer paper ones are glued with an overlap, since after drying the paper “shrinks” slightly;
- vinyl wallpaper - end-to-end. When spreading the canvases, you need to give them time to soak in the glue a little (5-7 minutes);
- non-woven ones are attached end-to-end, and wallpaper glue is applied to the wall;
- When working with photo wallpaper, follow the manufacturer's instructions.
There are special subtleties when working with different textures, when it is necessary to join rolled sheets with stone, plaster, painted surfaces, and photo wallpaper.