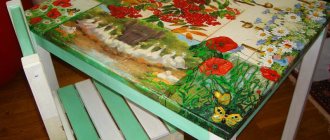
After making furniture from epoxy resin gained popularity in the field of residential decoration, the trend has not stopped developing. Recently, very interesting ideas have been appearing that can be considered unique. We are talking about illuminating the tabletop as a way of additional decoration.
The idea itself is not new, because pieces of furniture have long been illuminated with LED strips or LED lamps. However, backlighting epoxy resin introduced completely new trends in the development of design.
Varieties
Looking ahead, we note that the luminous elements of the tabletop look very beautiful, but this solution cannot be called practical. The fact is that the glow needs to be viewed in the dark, and when you stay in a dark room for a long time, bright elements cause eye fatigue. Thus, an epoxy resin table with lighting will find its use in creating a special atmosphere in the room. You can demonstrate a masterpiece to amazed guests or find relaxation by watching the play of light, but in all these cases, time is limited. Thus, the scope of application of the backlight has been determined.
In fact, guided by the basic principle of the new movement, designers have developed many projects that are simply impossible to imagine. However, every potential owner of such a wonderful table must imagine all the variety of options, so we will try to fill the reader’s imagination as much as possible so that he himself becomes the designer of his future order.
All epoxy tables in which illuminated elements are found can be divided into two groups. The criterion for separation is determined by the nature of light.
- The first group includes products in which the resin contains a special powder - phosphor. As is known, luminescence produces a glow when excitation energy is converted. There are several types of luminescence. In particular, a substance can release light energy after irradiation with ultraviolet rays, as a result of a chemical reaction, as a result of the passage of an electric current or bombardment with electrons. Photoluminescence has found practical application in the field of construction, that is, the phosphor in question, under the influence of natural lighting, subsequently becomes a light source.
- The second group is represented by products with electric lighting; these can be incandescent lamps or LED sources. One of the features of epoxy resin is its dielectric properties. All elements of the electrical circuit can be filled with the composition, and they will be reliably insulated. LED elements have low power, so the power source is often embedded in resin along with the backlight. Such options are considered “disposable”. Indeed, it is not possible to replace the power supply or LED. More reliable models contain a current converter and are connected to a 220 V network.
Step-by-step instructions on how to make a makeup artist's table with your own hands
Having prepared all the tools and materials, I began assembling and installing the makeup table and mirror with light bulbs.
- I drew a diagram for assembling the dressing table.
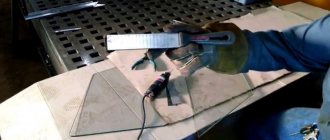
- According to the diagram, I cut the boards with a jigsaw to the required size.
- The balusters were cut with a jigsaw 450 mm long.
- Assembled the main body of the table. I drilled holes in the ends of the side and back walls and the table top from below. I fastened the parts together with wooden dowels and PVA glue.
- The bottom was made from a piece of fiberboard. I nailed it along the perimeter of the body with nails.
- I attached telescopic guides to the side walls inside the case with screws.
- From timber I assembled a rectangular table support frame 800x500 along the outer perimeter.
- Inside, in the corners of the frame, I secured ties for the table legs with screws.
- I made mounting holes in the balusters into which I screwed anchors.
- I inserted the legs into the ties with anchors and secured them with nuts and washers. One of the ties is visible in the diagram.
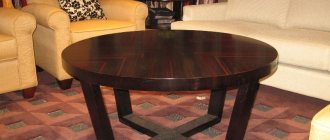
- I installed a tabletop on the support frame, which I secured with metal corners.
- After that I started assembling the box. The facade was made from boards 290x800x20 mm. I chose the dimensions of the front panel of the drawer so that it covered the perimeter of the table body.
- I attached the side walls to the facade with wooden dowels and PVA glue.
- I attached retractable bars of telescopic guides to the outer sides of the side walls of the box.
- I screwed the handle to the front of the drawer with screws through the holes in the board.
- I cleaned all the surfaces of the makeup table with my own hands using a sander.
- The wood was treated with stain.
- I covered the dry surface of the dressing table with furniture varnish in 2 coats.
- I cut the profiled board into 4 pieces, the ends of which were cut at an angle of 45 degrees.
- I used tie corners to connect the profiled boards into a 600x800 frame along the outer perimeter.
- On the inside I secured the mirror sheet with clamps.
- Along the perimeter of the frame, using a reamer installed in a drill, I made 12 mounting holes for cartridges.
- Installed the cartridge. I connected them with a wire to a switch.
- I made a subframe from boards under the frame, connecting it together with corners and strips.
- The entire structure was sanded, treated with stain and coated with furniture varnish.
- I screwed the hangers on the back of the frame. I made indentations through the holes in the hangers using a drill for dowels.
- I used a hammer drill to drill two holes for dowels on the wall. Installed dowels. I hung the ramp with the mirror so that its base rested on the tabletop. The suspension will prevent the ramp from accidentally falling off.
- I screwed 12 LED lamps into the sockets to illuminate the dressing room table with a mirror.
At this point, all work on assembling the furniture was completed. I decided to calculate the labor costs and the cost of materials in order to clearly understand how much it cost me.
Several options
Let us remind you once again that the total number of design solutions with lighting is in the hundreds, so it is impossible to describe all the variety. Considering that a number of models are created using fundamentally similar technologies, we will present the most popular examples of countertop design.
Useful to know > How to fill an insect with epoxy resin, simple technology
Multi-colored lighting is great for creating a romantic atmosphere. Point sources are used, dispersed over the tabletop area in a chaotic manner.
You can order lamps in the online store. Many models can change color. Modes are switched from the remote control.
A striking example of the use of phosphor is a tabletop with cavities that are filled with epoxy resin. These cavities can be natural (wormholes) or cut into the slab with a special cutter.
Typically, a relatively small amount of resin is needed to make such tables, which significantly reduces production costs.
The use of white LEDs will allow you to create pictures that imitate the starry sky.
It would be preferable to use a darker background for the tabletop, but do not forget that most of the time the product is used without lighting.
To make tables, not only longitudinal, but also transverse sections of a tree trunk can be used. The transparency of epoxy resin allows you to preserve the natural pattern. If you add color and phosphor to the composition, you can get decorative illuminated tables.
The river table has gained wide popularity. There are a lot of variations in its execution. The resin, tinted blue, imitates a body of water. The role of the banks is played by a wooden slab. Using decor, you can create a picture of a river or standing pond. When a phosphor is added to the resin, “water” begins to glow in the dark.
A table with fiery lava depicted on its surface requires special consideration. The secret is that an LED strip in epoxy resin is mounted in the cavities of the slab. At its core, this composition is one of the varieties of “river”, only red filler is used instead of blue.
Hot lava is poured onto a slab base or can be formed with a continuous layer of epoxy.
If you use many small components as filling, you can save on the amount of resin, but at the same time it will visually seem that there is quite a lot of it. This effect will be enhanced by the presence of a phosphor in the composition.
How to make it yourself
To make an original product yourself, you need to prepare all the materials and tools in advance. In this case, you need to follow the step-by-step instructions for a table with an infinity effect with your own hands. Diagrams with dimensions can be easily found on thematic forums.
Creating a box
To make it, you need to take 4 boards 25 mm thick, 15-20 cm wide, of arbitrary length. Next, they should be cleaned with sandpaper, the frame should be screwed together using self-tapping screws, or the simplest table should be purchased and the table top should be removed. Then, according to the instructions, you need to work on the mirrors or use glass with a reflective film instead.
Advantages and disadvantages
Furniture items made of epoxy resin with luminous elements are just beginning to fill the market, so they may seem like a curiosity to a significant part of potential buyers. It is necessary that feelings cannot prevail over practicality, so you should talk about the pros and cons of such an acquisition.
- The advantages, of course, include the original design and appearance of the product. There is no need to say what effect the backlight will create when the external lighting is turned off. Such tables help create an atmosphere of celebration, romance or special moment. The lighting is turned on on a birthday while blowing out the candles on a birthday cake, on New Year's Eve, or at a romantic dinner. You can come up with a whole series of other events where the colorful decoration of the table will play an important role.
- Epoxy resin is absolutely harmless, it does not emit toxins and can come into contact with food. Even if metal or plastic elements are used as decoration, they are filled with a layer of resin. This advantage does not apply specifically to the backlight, but should still be mentioned.
- Resin is an insulator for electrical circuit elements, so during installation there is no need to lay the wiring in special sleeves. The resin is poured directly onto the circuit elements.
Useful to know > Types of self-leveling floors made of epoxy resin and features of their use
Unfortunately, there are several disadvantages to lighting for epoxy tables. All of them are taken into account when choosing a table, since the purchase may not correspond to the intended purpose.
- First of all, it should be noted that the cost of backlit models is quite high. Any products made from epoxy resin are considered handmade, and they cannot be bought cheaply. Considering the fact that the production process is becoming more complicated, it is not difficult to guess that the cost of the product will increase.
- When installing electric lighting, you must use only LED strip or, as a last resort, LED lamps. Those lamps that heat up are not suitable, as the resin may begin to melt.
- A significant disadvantage is the inability to dismantle the LED. If you use a phosphor, then such a problem does not arise, but in models in which the tape is filled with resin, and in particular, the power source is filled with resin, failure of the circuit element will be fatal.
- Due to its physical and chemical properties, epoxy resin is excellent for making countertops. However, some caution is necessary. You should not cut food on the table surface, as large impact loads can negatively affect the gloss. It should be noted that any chips or scratches can be easily corrected by applying a thin layer of resin, but if the material is painted, it will be very difficult to find a similar color.
Selecting a lighting fixture
There are several designs of lighting fixtures that can be used to illuminate a computer desk. They have different properties and capabilities, so you should consider them in more detail.
LED
The use of LEDs as lighting began relatively recently. However, LED devices have demonstrated high performance, far ahead of all alternative types of lighting devices. The main advantages of LED backlighting:
- variety of shapes, sizes;
- it is possible to select the brightness and shade of the glow;
- There are single- and multi-color LEDs that make the design of a computer desk more attractive and impressive;
- service life is up to 50,000 hours, which is noticeably longer than other types of backlighting;
- Most LED devices require 12V DC to power them, making them safe;
- There is practically no heating.
Manufacturing technology
The high cost of ready-made tables, as well as the availability of materials, is increasingly prompting novice craftsmen to think about implementing the idea on their own. It should be noted that when working with epoxy resin, deviations from the strict algorithm are possible, but they relate only to decoration. Resin has strict requirements that must be met.
On the Internet you can find detailed instructions for making different options for countertops, including videos and master classes. We will reflect the main stages without going into details and various subtleties of the process. Two types of countertops imply two different approaches to their production.
Useful to know > How to make a coffee table from epoxy resin, design solution
Tabletops with phosphor
The first step is to prepare a draft of the future composition. If you do not have drawing skills, then it is advisable to make at least a sketch. When planning, it is important to follow a few basic rules.
- Resin is poured into the cavities. It is necessary to cut out these cavities in solid wood or slab. Alternatively, you can use several slabs and pour epoxy resin into the space between them.
- You can adjust the brightness of the backlight by changing the amount of phosphor. Do not try to make the backlight too bright, as this may cause eye fatigue.
- It is not at all necessary to mix all the resin with the phosphor. The project can only have individual illuminated zones. It is not recommended to make a large area glowing. It's better to break it up into small zones.
- Phosphor is a powder that does not dissolve in the resin, but is evenly distributed throughout the entire volume. A large area will take a long time to harden. There is a high risk that during this time the powder will settle below and the area will be illuminated unevenly.
After forming the tabletop and fixing the decor, it is necessary to get rid of dust, small sawdust and other parts of the wood that can form suspensions in the resin. The resin is prepared according to the instructions, but it does not indicate how to properly mix the dye and phosphor. Note that the dye and phosphor are added to the base composition even before mixing with the hardener.
It is advisable to fill in portions. For example, all cracks should be filled first. If this is not done, then during the hardening of the resin, air will be released from the cracks, which is presented in the resin in the form of bubbles. Then the areas are filled with resin and phosphor. A day later, the final resin is poured. At the final stage, the surface must be sanded and polished.
Tabletops with LEDs
The LED strip must be laid so that the light sources themselves are not visible. To do this, recesses are made in the slab, and the tape is glued to the horizontal walls of these recesses. It can also be fixed along the perimeter of the slab, but it must be attached to the side edges. If the tape is laid on a horizontal surface, then it is recommended to tint the resin so that the LEDs themselves are not visible.
Often the power source is a household network, so the finished table should be located close to an outlet. It is necessary to ensure that the power cord does not interfere with movement around the room. Do not leave the backlight on unattended for a long time. Otherwise, the filling technology is no different from standard operations.