It is believed that this type of thick paper, such as cardboard, is mainly used for packaging all kinds of products. In fact, the scope of application of this material is quite diverse; even unusual interior items are created with its help. At home, it is quite possible to make original furniture from cardboard with your own hands; patterns and diagrams of such products have long been in demand among craftsmen. But meanwhile, many people still do not even suspect that simple raw materials, with certain efforts, can easily be turned into a real masterpiece of furniture art.
How to make doll furniture from paper
Today there are many ways to make paper furniture. Each of them has its own advantages and disadvantages. Here are the most famous of them.
- Origami technique.
- Manufacturing of furniture according to drawings.
- Gluing according to color schemes.
- Weaving from paper strips or tubes.
- Using matchboxes as a “building” material.
- Manufacturing furniture from corrugated cardboard.
- Painted furniture.
- Production of paper furniture from combined materials.
- Papier-mâché furniture.
Although all these techniques are different, they use the same material - paper and its derivative cardboard. No matter which of them is chosen, one rule remains the same for all: making doll furniture requires special care and attention, because it is almost jewelry work.
Paper furniture for dolls: cut out according to templates
Many girls love to play with paper dolls, which are cut out according to a template. Now in any bookstore or stationery store you can find a whole set of beautiful little paper dolls - Snow White, The Little Mermaid, Barbie, Monster High and many other modern cartoon characters. These dolls often come with pictures, a set of clothes and a dollhouse with furniture. All that is required of you is to cut out the templates, make bends in the right places and glue the house and furniture together.
To make paper furniture for dolls, you should use thick cardboard.
If the set does not include a certain piece of furniture, you can find it on the Internet, download it and print it on a printer.
When a baby plays with dolls, builds a house, and arranges furniture, she learns to be neat, develops imagination and develops creatively.
Requirements for paper for toy furniture
When considering the question of how to make paper furniture for dolls with your own hands, it is worth remembering that each manufacturing method has certain requirements for paper.
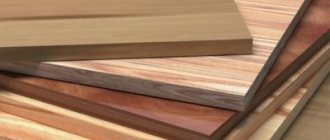
Almost all of the above methods require thick paper from 90 g/m2. It should bend well and not delaminate at the bend. However, for origami, paper is needed that is less dense, capable of withstanding repeated folding and maintaining a beautiful appearance.
The same requirements apply to cardboard. By the way, to make furniture from it, you can use both regular stationery cardboard and corrugated packaging cardboard.
If doll furniture will be made using papier-mâché or weaving, old newspapers or magazines are perfect as consumables.
Manufacturing stages
Products made from thick paper differ in shape, size and complexity of assembly. Regardless of the purpose of the design or the number of components, the manufacturing stages for each of them are the same. The step-by-step instructions include several mandatory points.
Create a drawing
The first step is to take measurements of the place or room where the furniture will be located. According to the parameters, calculate the dimensions of the desired product. Next, draw a drawing of the future furniture on an A4 sheet, be sure to indicate all the obtained values, observing the scale. You can do all this in a special program if you have experience working with it.
You can take ready-made drawings for furniture manufacturing and adjust them according to your wishes and measurements.
Regardless of how the diagram is executed - manually or using a program, it must contain a three-dimensional image of the object, general view projections from above, side, back, as well as separate projections of the constituent elements indicating the exact dimensions. Then the drawing is transferred to sheets of cardboard using a pencil, tape measure and ruler. You can use ready-made patterns; just place them on a sheet of cardboard and trace them with a pencil.
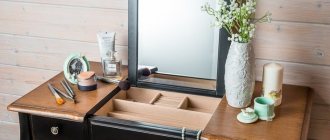
Tips for creating creative DIY furniture at home
Before starting work, it is important to make a drawing of the future product
Manufacturing of parts
The raw materials for the manufacture of all elements must be smooth and without creases, since it will be impossible to straighten them later. Each detail is drawn separately using a pattern or projection from the main drawing. Then it is cut out with a stationery or construction knife. The sections must be wiped down and covered with paper or tape.
The patterns should mark the folds and grooves, which are also cut out.
Strengthening the structure
Many novice craftsmen are interested in how to make cardboard furniture durable. To do this, you should follow simple rules:
- protect the finished product from moisture and increase its strength by applying parquet varnish to the surface;
- maintain symmetry, since asymmetrical furniture is less stable;
- take dark cardboard - it is stronger than light cardboard;
- increase the number of transverse inserts, as well as the layering of the part by adding sheets;
- cover the edges with craft paper;
- if necessary, use stiffeners to strengthen the structure.
Kraft paper is a type of wrapping material that is made from wood and is highly durable.
Parquet varnish will protect the surface of the product from moisture and increase its strength.
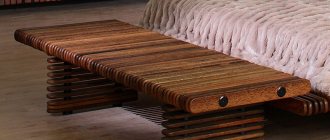
Dark cardboard is stronger in operation than light cardboard
You can strengthen the structure by gluing the edges of the product with kraft paper
Assembly
Before assembly, you should check all parts for possible defects. If there are dents in some places on the cardboard, they need to be filled. Further finishing will hide all inaccuracies. During the assembly process, all parts can be glued, inserted into grooves or extended. The latter method is used to strengthen the structure and give it optimal thickness. Elements assembled from several layers of cardboard must be placed under a press after gluing and left to dry for a day. Upon completion of assembly, the resulting ribs are treated with kraft paper.
Grooves and stiffeners must be coated with glue, thereby extending the service life of the structure.
Insert parts
Glued elements
Extended design
Dent putty
Pasting the edges of the product with kraft paper
Decoration
Having completed the assembly, you should start working on the external design of the structure. Decor options are selected individually:
- finishing with fabric, patterns (decoupage), decorative stone;
- painting with acrylic paints;
- pasting with wallpaper, colored paper.
How to make a doll closet yourself, tips for beginners
Possible options can be used individually or combined. After finishing decoration, it is recommended to coat the product with varnish to secure the result.
Fabric finish
Painting with acrylic paints
Pasting with wallpaper or colored paper
How to make paper furniture with your own hands: origami
The simplest method of making furniture, which does not require special skills, materials, and most importantly time, is origami (the art of folding paper figures).
All you need is a square sheet of paper and a diagram of how to fold it correctly. No glue or scissors are needed for origami (unless, of course, it is a modular subtype).
When making doll furniture in this way, you should first practice on paper from a math notebook (it will be easier to fold because of the squares). And, having mastered this technique, make a table, chair or something else from special paper.
Schemes on how to make a chair, table and sofa using the origami technique
As an example of how to make paper furniture with your own hands (step by step), below are three diagrams for origami. The size of the finished product folded along each of them depends on the size of the sheet. After practicing several times, it will not be difficult to calculate it relative to the doll’s height.
The first diagram shows the method of making a table from paper.
It would be nice to add a chair to the made paper table. How to do this is shown in this diagram.
Instead of a paper chair, in addition to the table, it’s a good idea to use a sofa assembled according to the diagram shown below.
GCD design “Coffee table” preparatory group
GCD design "Furniture" preparatory group
Target :
development of artistic creativity in children through mastering the design technique using the origami method with appliqué elements.
Software tasks:
Educational objectives:
1.Continue to teach children to work with paper, repeat basic geometric shapes, develop creativity and aesthetic taste.
Technical tasks:
1.Improve skills in working with scissors and paper
Developmental tasks:
1. develop children's artistic taste, creativity and imagination;
2. develop children’s eye, accustom them to precise finger movements;
3. develop spatial imagination.
Educational tasks:
1. cultivate interest in paper design;
2. develop children’s artistic and constructive abilities, aesthetic perception;
3. Arouse positive emotions from the results of your work.
Materials and equipment:
paper of different sizes, templates, glue, brushes, oilcloths, rags, felt-tip pens, pictures with coffee table samples.
Methods and techniques:
verbal, visual, questions, sample, explanation, display of illustrated material.
Progress of the lesson:
Educator: Children, guess the riddles:
There are four legs under the roof, and on the roof there is soup and spoons? (Table)
Lisa took out the giraffe, the ball and the gnome. (cabinet)
.
If Vova wants to sleep, he will lie down. (bed)
.
I look a little like a table, I’m in the kitchen, in the hallway, I’m rarely in the bedroom, but what’s my name? (Stool)
Can you sit on it if you are invited to the table to eat? (Chair)
Educator: How to call these items, in one word? (Furniture)
What is furniture made of? (Wood, leather, glass, plastic, iron).
Children look at the samples in the drawings with the teacher and discuss the details. What geometric shapes do you think furniture can be made from? (from a rectangle, square, cylinder, circle).
I suggest you make a coffee table today. Look, I have prepared different pictures for you with coffee tables (we look at them, pay attention to the type of pattern on the tabletops). But before we start making our table, we need to warm up.
Physical training “Furniture”
Let's go to the store in the morning (walking in place)
We will buy furniture there:
Tall cabinet (stand on toes, stretch arms up
)
And a stool, (squat)
Bed - we will sleep on it softly ( put folded palms under the left cheek)
Let's buy a chair (a bent left palm is attached to the straight right palm to make a “chair”)
And the table is big (they spread their arms to the sides)
And we’ll take you home ( turn the steering wheel)
2. Stages:
Educator: Guys, now sit down at the tables, we will make a coffee table according to the scheme.
First, we will make paper blanks. We start by stenciling all the details and cutting them out. We trace a circle according to the template and cut it out, what will it be? (table top). Then we take a rectangular blank, what part of the table do you think we will make from the rectangle? (leg). What geometric figure does the table leg consist of? (cylinder). But in order for us to attach it to the tabletop, we need to make cuts for gluing. Then we make a cylinder from the rectangle and glue it together.
We will paint the tabletop with felt-tip pens, I suggest everyone come up with their own pattern on the tabletop.
And now all we have to do is glue the leg to the tabletop. Let's remember where one leg should be glued? (middle). Carefully position the leg correctly and glue it to the tabletop.
3. Bottom line.
Analysis of children's
work
_
You guys are all great today,
completed the task correctly. Everyone turned out to have very beautiful coffee tables. I mark the most accurate work.
How to make furniture for dolls from paper without glue
Besides origami, there is another way to make paper furniture without glue. However, in this case you cannot do without scissors. You will need them to cut out doll furniture according to the pattern. Then you need to fold it.
A chair or slab made in this way looks more elegant than origami products. But when creating furniture this way, you need to cut and fold it very carefully so as not to spoil it.
To print such diagrams, it is best to use paper with a density of about 100 g/m2.
The finished product can be painted to your liking.
Making doll furniture from color schemes
In the old days, paper cutting houses could be purchased at almost any bookstore. Follow the instructions and use scissors and glue to create a charming dollhouse or palace with furniture.
Knowing the basics of working with any graphic editors and the principles of constructing such diagrams, you can easily make similar blanks. If making a whole palace for a doll is not part of your plans, it wouldn’t be a bad idea to create a wardrobe, chair or bed and, after printing them, make vintage furniture for your favorite. Needless to say, only laser printing is suitable for this method, since inkjet printing, although more colorful, can float or simply fade over time when it comes into contact with water.
As for the choice of glue for this furniture, it is best to use double-sided tape or a stationery glue stick. It is also acceptable to use a glue gun, but very carefully.
Weaving paper tubes as one of the ways to make doll furniture
Weaving is a fairly ancient and popular type of needlework. Today it is experiencing a new revival. However, modern craftsmen increasingly use paper tubes or ribbons for weaving rather than wicker. The finished product is painted and then varnished and in this form can serve for many years.
When choosing a way to make paper furniture for Barbie with your own hands, it would be nice to take advantage of this: today the tendency to use wicker paper furniture in your homes is becoming more and more fashionable.
Among the advantages of this technique are the elegance and strength of the finished furniture, as well as its realism. In addition, the materials will cost nothing, because these are unnecessary old newspaper or magazine sheets.
But among the disadvantages - in order to make doll furniture using this method, you must first master the weaving technique, and also have a certain pattern.
But, having learned how to create toy tables, cabinets or chairs for Barbie, it would be nice to try your hand at making human-sized furniture.
Origami furniture made from paper
First, let's look at the basic principles of making furniture for dolls in the origami style and try to decide why it is needed.
So who is interested in ideas for creating miniature paper doll furniture? First of all, for those who like to play with dolls, that is, for those little girls who cannot imagine life without a fascinating and exciting doll life. And making furniture from paper yourself has undoubted advantages:
- Wide field for creativity: you can fold a wide variety of furniture, differing in shapes, colors and sizes.
- The applied art of origami is useful, because with its help you can develop perseverance, attention, and fine motor skills.
- Such paper crafts and figurines look simply charming, they will decorate any children's room, they can be presented as an original gift, or simply create a souvenir.
The technique for making origami furniture is quite simple, and even a child can handle it. The main thing is to have certain templates and patterns with which you can make crafts such as a bed, chair, sofa from origami paper and much more.
Step-by-step instructions for beginners are a great way to make your fantasies come true by creating a charming doll world with all possible details.
What do you need to make paper furniture? First of all, you should arm yourself with detailed master classes for beginners. These can be photos and videos, or step-by-step diagrams for assembling paper figures.
In addition, you will need the following materials and tools:
- origami paper;
- colored cardboard;
- hot glue gun;
- regular office glue;
- scissors;
- ruler.
All this can be bought in the craft department, bookstore and stationery store.
Next, we will try to disassemble, step by step, individual schemes for making various pieces of origami furniture for dolls.
Matchbox furniture
Among the most used materials for making doll furniture are matchboxes. In fact, they act as bricks for creating tables, chests of drawers, beds, etc. Moreover, if some craftsmen simply paste over the finished product with colored paper or fabric, others decorate matchbox furniture using decoupage, giving the product realism.
To make sure that you can make very beautiful furniture for a doll from a matchbox, below is a master class on making a toy chest of drawers from two boxes of matches. To complete this you will also need stationery cardboard, black and white paint, double-sided tape, sandpaper and two beads.
This method can also be used to successfully make wardrobes, desks and kitchen furniture. The main thing is to have a lot of matchboxes in stock.
Origami paper chair
To work, we will need a square sheet of paper (white or colored). When choosing a size, be guided by the required dimensions of the future chair.
Scheme:
To learn how to make an origami chair, we suggest using a video tutorial. Follow MK's step-by-step instructions and the entire manufacturing process will take you no more than 10 minutes.
Video: Master classes on creating an origami chair
Furniture for dolls made of cardboard
Quite popular today is a technique that tells how to make furniture for dolls with your own hands from cardboard and paper. This method is used to make not only furniture, but also entire dollhouses.
For this method, it is most rational to use corrugated cardboard, the source of which can be any box from a parcel or some kind of household appliance.
Most often, furniture made from this material is covered with paper or fabric, and sometimes painted. However, in recent years, eco-style has become especially popular. Following it, furniture made of corrugated cardboard is not painted, but is left as is. At the same time, do not forget: if there was something printed or written on the front side of the box, it needs to be re-faced so that the picture remains hidden inside the product.
It is worth noting that making real modular furniture from corrugated cardboard is becoming quite a popular trend in the modern world.
True, it is not very durable, but it is affordable and environmentally friendly, unlike plastic, and can be easily disposed of or transported when moving.
Design options
Cardboard makes good household items. With the help of this raw material it is easy to diversify the interior of your home; it is used to make your own dollhouse, tables and chairs for children. In addition, on the floor of the children's room you can place small shelves made of boxes, decorated in a fairy-tale style, in the form of animals or cartoon characters.
Properly selected material and technology make it possible to produce more functional items:
- kitchen sets;
- sofas, armchairs;
- chests of drawers, cabinets;
- coffee tables;
- cabinets;
- wall shelves.
Like any material, cardboard has its pros and cons. Among its advantages:
- Cost-effective - products can be constructed from cardboard boxes. They are taken free of charge at retail outlets or purchased at a wholesale base, which is much cheaper than new products made from expensive raw materials.
- Lightness - the furniture weighs almost nothing, it can be easily disassembled into its component elements, which greatly simplifies its transportation.
- Wear resistance - household items made of thick paper are characterized by sufficient strength and can last a long time. You just need to take a responsible approach to the drawing up of the drawing, the quality of the assembly, and the choice of fasteners.
- Safety - cardboard is an environmentally friendly product. It is made from natural raw materials, so it has no harmful effects on human health.
- Ease of processing - the cardboard sample is extremely malleable, allowing you to expand the boundaries of human imagination. By creating furniture products with an unusual design, you can dilute the interior with exclusive decor.
Types of furniture staplers, their features and scope of application
The disadvantages of furniture made from cardboard are that it is not resistant to humidity and is a fire hazard. The product must be kept in a dry room, at a safe distance from sources of fire. This type of furniture requires special care. Also, the assembly process requires a certain precision; mistakes made can lead to early breakdown of the structure.
Low cost
Lightweight furniture and ease of transportation
Safety of raw materials and absence of harmful effects on human health
Wear resistance of household items with proper assembly quality and fasteners used
Ease of processing the material and the ability to create pieces of furniture with an unusual design
Painted furniture
When choosing how to make paper furniture, do not underestimate the simplest ways. One of them is to simply draw furniture on paper or cardboard and place it in the dollhouse.
Of course, the painted home decoration cannot be compared with voluminous furniture made using one of the above methods, but as an option it is quite suitable for novice dollhouse designers.
By the way, in addition to paper, you can also draw on corrugated cardboard. It is noteworthy that some modern designers are beginning to use the method of partially hand-drawn furniture to decorate real houses.
Decoration nuances
Finished furniture can be decorated with any materials. The range of parts depends on the imagination of the master. Among the main types of decor:
- Fabric - ideal for simulating upholstered furniture.
- Paints - it is recommended to use acrylic or water-based paints. The easiest option for giving the desired image to a product. Using paints, you can not only tint parts, but also decorate them with patterns.
- Self-adhesive paper is a convenient option for beginner craftsmen. It is made in different colors, and the adhesive side allows you to firmly fix the necessary structural elements.
- Beads, rhinestones, stickers - can serve as both decoration and useful components for furniture. Using beads, for example, you can imitate handles on chests of drawers and cabinets.
To increase the strength and stability of the coloring matter, you can mix gouache and PVA glue.
Paper crafts develop not only motor skills, but also imagination. Starting with simple products, you can quickly improve your skills and switch to more complex designs. You should not limit your imagination in creating unique images using various materials for the base and decoration of finished furnishings.
Materials for creating furniture and methods of decorating them
Papier mache
Among the many ways to make furniture out of paper, the papier-mâché method (using paper mass and glue for modeling) stands out.
Most often, this method is used to make masks or some kind of figures, but it is also quite suitable for doll furniture. Like weaving from paper tubes, the papier-mâché technique is very economical, but at the same time it is simpler.
Furniture made in this way must have a frame and dry well before it is coated with paint or varnish. By the way, if you add a little gypsum to the paper mixture, the product will become much stronger.
Each of the above methods for making paper furniture is unique in its own way. Some are complex, others are simpler to implement. But no matter which one is chosen, the main thing is to put your soul into your work. Then the result will definitely please you, and your favorite children's doll will have the best home in the world.
Origami bed
The bed is the main piece of home interior, we will try to make this thing from paper. The assembly process is simple, so both children and adults can master folding skills. To work, you will need a square sheet of medium density (20*20 cm). If desired, take other sizes.
Template diagram:
Step by step description:
- Fold the sheet in half, in different directions (crosswise) and mark the center.
- We bend the side edges towards the center, 1/3.
- Then fold it again to form a rectangle.
- We lower the side parts to the fold line and open the pockets, turning the corners along the contours.
- We bend the corners away from ourselves - we make legs.
- We get a wonderful bed.
Video: MK for creating an origami bed
If difficulties arise during the folding process or some points are unclear to you, then look at the hint from an experienced craftsman.