We make a frame
Any of the elements that we will later use as decor must be attached to something. In order to quickly cope with this task we will need : thick wire, pliers, cardboard. Any frame consists of at least two rings connected by spacers. Decide on the desired shape and size of the future lampshade.
Let's consider the simplest type of frame - conical. The lower ring will have a diameter of 30 cm, and the upper one - 20 cm. To find out the length of the wire that needs to be cut, you need to multiply the desired diameter by the number “pi” (3.14), that is, 30 * 3.14 = 94.2 cm The ends of the wire must be connected and bent using pliers. The height of the spacers will determine the height of the lampshade itself. For the reliability of the design, we recommend making at least 4 transverse fasteners, which will be attached to the rings at an equal distance. It should roughly look like this:
If you are preparing a frame for a future fabric lampshade, then you need to wrap it with thick cardboard so that the fabric has something to attach to. To do this, make a pattern. Wrap the frame in newspaper, mark the line where the newspaper makes a full turn, and leave a centimeter of margin for gluing, and a line for the top and bottom. Cut off the excess and transfer the resulting sketch onto cardboard. You can attach it to the frame using a hot-melt gun with glue, do not forget to coat the joint well, and remove excess glue with a piece of cloth. Your frame is ready, you can start decorating.
Paper or cardboard lampshade
Paper is the simplest and cheapest material that can be easily transformed, has many colors and different densities. The frame wrapped in cardboard can already be used as a lampshade if you decorate it a little. It may not be solid, but have holes in the shape of butterflies, flowers, circles, hearts, diamonds and other shapes, which can then be hung from the edge of the lampshade using a thin fishing line. Using cardboard of different colors you can create smooth transitions or a contrasting composition. Such a lamp will look great in a children's room, because when it emits light, small shadows in the form of cut out figures will appear on the walls and ceiling.
You can decorate the cardboard frame with corrugated paper or
muffin tins . Open one mold wider, drop a little glue into the center and place a second, more closed mold inside. You can connect three or more shapes in this way. You will end up with air outlets that need to be placed as close to each other as possible. As a result, you will have a very delicate and light lampshade, from which a soft, muted light will emanate. Paper figures glued to thin strips and secured to wire frame rings are also suitable as materials. For a more aesthetic look, use paper of different colors, which will form a smooth transition from darker shades at the bottom to lighter shades at the top. Remember that paper is not a durable material, but it is easy to replace if you get bored with the appearance of the lamp and come up with something new.
Fabric lampshade
The choice of fabric depends on the desired luminous flux. Thicker and darker fabrics will give a muted, soft light. The chosen color of the material is also important . Green and blue shades will create cool lighting, while red, yellow, and orange will create warm lighting. Once the fabric is chosen, a pattern needs to be made. You can use the same piece of newspaper as in step 1. To make the fabric cover look more neat, sew it on a machine, then turn it inside out and put it on the frame. You can simply carefully hem the edges of the pattern, iron it and glue it to the frame with glue. In both cases, do not forget to leave some extra space for the seams.
The cover does not have to be made from a single piece; it can be multi-colored rags or a combination of plain and colored fabric.
If desired, you can draw or embroider beautiful patterns on the fabric . A hand-embroidered lampshade will definitely surprise your guests. You can glue a beautiful fringe with beads along the edge or wrap it with ribbon and tie a small bow. This way you can hide minor imperfections. To make such an item look more harmonious in the room, coordinate its color with other interior items. For example, with a touch of curtains or pillows on the sofa.
Making a frame lampshade with your own hands
It is recommended to perform the work sequentially. Not only the service life, but also the appearance of the product may depend on this. You need to prepare materials and tools. When working, speed is often important.
Preparation. Determination of shape and size
The choice of option is made taking into account personal preferences. However, it is important to take into account the subtleties of the room design: color scheme, style, predominance of shapes of other objects (straight, curved lines, etc.). It is also important to choose the right material.
For example, a product made from paper with your own hands is not suitable for a classic-style interior. In this case, it is better to decorate the table lamp shade with fabric and ribbons. Complex weaving patterns are often used. The shape of the lampshade must be such that the product does not cause inconvenience during operation of the lighting device.
We make a frame
In accordance with the dimensions of the future lampshade, the wire is cut. It must be twisted to form rings (2 pcs.). The diameter of the upper and lower products differs by 1.5-2 times. The rings are connected with metal rods. They will play the role of stiffeners. The quantity can be any.
We cover the frame with the selected material
Fabric is often used. You need to make a blank out of cardboard. They wrap the finished frame with it and trim it until the desired shape is obtained. The workpiece is applied to the material laid out on a flat surface. Make allowances of 2-3 cm on each side. Outline the outline. The workpiece is removed. The fabric is cut along the contour. The edge is then folded over and stitched on a sewing machine. However, this stage is not mandatory.
We process the edges. Masking the connection points
If the edge has not been pre-processed, the frame is first covered with the workpiece made. The fabric is attached with glue. The edge is turned up on all sides and glued.
Decorating the finished lampshade
There are many options for improving the appearance of a product. So, if the fabric is plain and light, then decorative elements pre-cut from cardboard are attached to the inside, for example, in the style of a night city. They use a simplified version of the image - the outline of houses, several small windows. As a result, when the lamp is turned on, a shadow from this blank will appear on the lampshade.
The fabric combines well with ribbons. If the edge has not been carefully processed, tape is fixed along the circumference of the frame. Decorative buttons are used to decorate the lampshade. If the interior allows, complement the design with fringe along the bottom of the lampshade.
Threads, yarn, twine
These materials will be useful to us for making a ball lampshade. Even those who are sure that needlework and crafts are not at all their element can make such a lampshade for a floor lamp with their own hands We will use a balloon or an old rubber ball as a base We will also need PVA glue, a deep bowl and a wide brush. The essence of the method is to wind threads around an inflated balloon. The color, thickness and number of threads used are purely individual. If you want to get a more textured and dense shade that will let in little light, use twine and wind until you cover almost the entire surface of the ball.
Before you start wrapping, lubricate the surface of the ball with rich hand cream or oil. You will thank yourself for this when you remove it from its dried-out lampshade. Pre-soak the selected threads in glue, adding a little water to it. Let them lie down and soak up this solution. This must be done so that the layers of wound threads not only adhere to the ball, but also stick together. Inflate the balloon to the desired size and draw a border on it at the top and bottom with a marker.
The upper border will serve as
a place for the light bulb socket. There should be no threads in these places. Start wrapping from the top edge. First, carefully lay out several turns of thread at the level of the mark. You should end up with a small circle, then bring the thread to the bottom border and do the same. If you don't want to, you can do without the bottom hole. Now that you see your limits, you can wind in different directions, creating as many intersections as possible and pulling the thread a little.
Apply glue
to each layer using a brush. When you reach the desired density, cut the thread and hide its edge under the circle of the upper border. Leave your creation in a warm place until completely dry. Just do not place it near the battery under any circumstances. The flow of hot air will cause the ball to deflate faster than all the layers dry, and you will get a lampshade of any shape, but definitely not round. Once dry, puncture the ball. By the way, using threads of several colors you can achieve very interesting combinations. A composition of several such lampshades of different sizes will look very harmonious.
Other types of lampshades
If you don’t want to bother with wire, fabric and paper, you can use completely different materials and techniques for making lampshades. Here are some examples.
Wooden lampshade
To make a lampshade in eco-style, you will need wooden or plastic embroidery hoops, quick-setting glue and slats.
Wooden lampshade
The slats are cut to a length equal to the height of the future lampshade. And they stick to the hoop. That's it, the lampshade is ready. It can be turned into a full-fledged table lamp if several slats are made longer and used as a support.
Any work with wood is always exciting, because it gives you the opportunity not only to show your own imagination, but also to make something that fully suits your needs and tastes. Agree, it’s nice when there is something made by yourself in the house. Read on our website about how to make a wooden box with your own hands . 5 master classes!
Lampshades made from disposable spoons
A 5-liter plastic container is most suitable as a frame for such a lampshade. It is this that is used in the proposed master class on making an original lampshade in the shape of a pineapple. But you can take any other container of a suitable size.
Lampshade made from disposable spoons. What is needed for making
Step 1. Using a sharp knife, cut off the bottom and neck of the bottle, leaving a hole that will accommodate the light bulb socket.
Step one
Step 2. Cut the cuttings from the plastic spoons, leaving “tails” 1.5-2 cm long. We paint the convex side of the spoons yellow with odorless paint. Acrylic is best.
Step two
Step 3. Apply a drop of hot glue to the cuttings and glue the spoons with the painted side out to the bottom edge of the bottle close to each other.
Step three
Step 4. Glue the second and subsequent rows of spoons overlapping the previous one with an offset, in a checkerboard pattern. There should be no gaps between them.
Step four
Step 5. In this way we cover the entire container.
Step five
Step 6. From thick paper or thin green cardboard, cut out a circle with a hole in the center that matches the hole in the top of the bottle.
Step six
Cut the outer edge into large cloves and bend it slightly downwards. Glue it to the lampshade. We cut out long leaves from the same paper and insert them in a bunch into the upper hole, having previously installed a cartridge in the lampshade.
Decorating the top of the lampshade
Note. Lampshades made from materials that are not resistant to fire or strong heat can only be used with LED or fluorescent lamps.
Using this technique, you can create lampshades in a completely different style. If “Pineapple” will look great in a children’s room, then the lamp, the production of which is shown step by step in the following photos, will decorate the bedroom.
Preparing everything you need
Cut off bottom
Gluing spoons
The top is decorated with feathers
Lampshade "Pineapple" with feathers
Tiffany lampshade made from a plastic bottle
A large plastic bottle can be an excellent basis for making a lampshade that imitates the Tiffany style - multi-colored stained glass mosaic.
Lampshade "Tiffany"
The bottom part of the bottle is cut off. The cut can be smooth or curly. Then a drawing is applied to it and the contours are outlined with a special contour paint of golden or silver color. And after it dries, the plastic inside the contours is painted in different colors.
Lampshade made from paper plates
If your old table lamp has a thick cylindrical shade, you can transform it beyond recognition by using disposable paper plates. Their number is easy to calculate by measuring the circumference of the cylinder: one plate is needed for every centimeter.
Manufacturing instructions are given below.
Step 1. Bend each plate in half, step back 5 mm from the fold line in both directions and draw two parallel lines.
Step 2. Attach a ruler to these lines and, with a little force, draw along them with the blunt side of a knife or other pointed (but not sharp!) object.
Make a dent on the plate so that the fold is even.
Step 3. Fold the plate along the punched lines and glue it to the lampshade using hot glue.
Gluing the plate
Glue gun prices
Glue gun
Step 4. Glue the second piece and all subsequent ones close to it and at the same height.
Continued work
This is what should happen in the end.
Final result
Lampshade made of threads
This method is known, if not to everyone, then to many. Instructions included.
Required materials and tools
Step 1. Inflate the balloon to the desired size and lubricate it with Vaseline so that the threads soaked in glue do not stick to the rubber. You can also wrap it with thin cling film.
It is important to consider that the shape of the future lampshade directly depends on the shape of the ball
Apply a thin layer of cream to the surface of the ball
Step 2. In a jar of PVA glue, use an awl to make a through hole just above the bottom.
Thread a needle and pierce the bottle of glue closer to the bottom of the jar, this will be much more convenient when the glue runs out
Step 3. We thread the needle and pass it through the jar, after which we remove the needle.
Step 4. We wrap the balloon with thread and glue in any order until we get the required winding density. It is better to leave the area around the tail of the ball free so that you can then put the lampshade on the lamp.
Wrap the ball with threads in a chaotic manner
You can alternate different colored threads
When a sufficient number of threads are wound around the ball, you can lightly brush with glue in those places where there is not enough of it
Step 5. Wait for the glue to dry completely and pierce the ball. Before this, the lampshade can be painted with aerosol paint from a can.
Gently and slowly deflate the balloon
Mark the future hole at the top of the ball
When the hole is ready, you should make 4 more slits crosswise so that the light bulb and socket fit into the lampshade
Step 6. Decorate a ball of thread with paper, wire or fabric flowers, if desired, and place it on the lamp.
Insert the socket with the light bulb and carefully twist the plastic holder between the threads
Lampshade made of threads
Thread lampshades are suitable for both chandeliers and table lamps
Video - How to make a beautiful lampshade with your own hands
Lampshade in hi-tech style
A very unusual material for decorating a table lamp is metal clasps from tin beer and other cans.
The key ring must be removed from the can. You will need quite a lot of material
For the first row, they are folded in half and secured to the top ring of the frame lampshade.
The key is bent and hung on the frame
For all other locks, cut one ring in half and begin the second row, hooking the lock with the cut ears to two adjacent rings of the first row.
Elements of the second row are cut
Having reached the bottom ring, the clasps are again bent inward with a hook and hooked to the frame.
Connecting elements
Lampshade in hi-tech style
These different, but very beautiful and original lampshades can be made from traditional and, it would seem, materials that are not at all intended for this purpose.
Braid, ribbons, lace
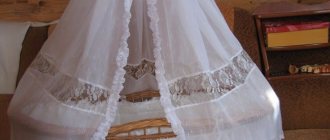
This is a very romantic and delicate type of lampshade that will look great in a young girl’s room. In order to make it, a wire frame will be enough. Cover it with fabric and glue beautiful lace on top, or place lace ribbons directly on wire rings. The fabric must be chosen either in a contrasting color or to match the lace. This will look more impressive. The lace may not be located along the entire perimeter, but only along the edge, this will be even more interesting. Tulle and all kinds of ruffles and bows are suitable as additional decoration.
The most interesting thing about such lampshades is
the delicate shadows that they will cast. multi-colored ribbons as the main material . To do this, fasten the edge of the first tape to the lower ring and pull it to the upper one, make one turn around it and follow it back to the lower ring. Continue in this manner until you have filled all the empty space. To avoid gaps, overlap the previous tape by at least 1/3 of its width. Carefully glue the edge of the last tape on the inside, and to hide the imperfections, make a turn along the upper and lower edges of the lampshade with a wider tape. Such a bright lampshade will resemble a rainbow and glow in different colors. If you have knitted lace napkins and you don’t know where to put them, you can do the same with them as in point 4. Soak it in glue, place it on the ball and let it dry. They will take the shape of a sphere and will look completely different.
Lamp made of beads and artificial flowers
A very beautiful creation that requires painstaking and perseverance. You will need many colors, beads or large beads, fishing line, a needle and thread and glue.
It is most convenient to place flowers on a frame with cardboard. It used to be very fashionable to decorate the walls with bouquets of artificial flowers, so you probably have them collecting dust somewhere in your boxes. And in just a few hours, or even earlier, you will look at them completely differently. Separate the buds and some petals from the stems. You can even remove the plastic holders, but then you need to secure the petals with threads so that they do not fall apart. This way the parts will fit most tightly to the cardboard and stick easily. Arrange flowers and petals on the frame, filling the entire space. It's good if there are several varieties of flowers. You can make a beautiful flower arrangement on a lampshade made of plain fabric.
Imagine that you are making a bouquet, and you yourself will understand how best to act. Along the edge of the lampshade, you can add a fringe of several beads on a fishing line, or glue them in different places on the petals. You can glue a few butterflies or a dragonfly, in general, whatever you consider necessary. And large beads strung on a nylon thread can be used as the main material. As in the example with ribbons, it is necessary to fill the entire perimeter of the frame with beads, fixing the thread alternately on the upper and lower ring.
Knitted lampshade
A very unusual and most comfortable look of our product. If you have the skills to knit various patterns yourself, then this is simply wonderful. Remember that knitting takes a lot of time , so if you want to present such an item as a gift, then start preparing in advance. There are many sets with the required number of threads and pattern patterns, just choose the appropriate size. If you haven't had time to master this skill, don't be upset. Old knitted sweaters and children's sweaters that are too small for your child will come to your aid Depending on the size and shape of the lampshade, you can even use sweater sleeves.
The top and bottom will have to be sheathed to prevent them from unraveling.
Place the selected part on the lampshade, you can tie it with a ribbon on top and decorate it with decorative elements, or you can simply sew it. If you wrap yarn in the color of the lampshade and cord , which will be visible, you will get a rather cute and complete composition. Both a dense knitting made with knitting needles and a more delicate version with gaps, made by crochet, are suitable. To secure this option, use glue. Apply it pointwise to the surface of the wire rings and press. Do not neglect fabric or cardboard frames. With their help, the shape of the ceiling will be better conveyed. Complete the composition with small knitted pompoms or large beads tied with thread. Surely all your friends will be surprised to see such an interior element.
Lamp made from old hangers
Broken wooden hangers, or those that are long overdue for renewal, can be found in every home. Finally, you can not just throw them away, but find a more worthy use. By the way, these may not necessarily be hangers. broken slats will also work They are quite thin and have an arched shape. Before assembling such a lampshade, immediately think about its color. If you're into all things natural, simply sand the wood surface to remove any minor imperfections, then finish with a water-based varnish. If you want to make the composition multi-colored, use spray paints. Now it's time to think about how we will arrange the elements on the frame. The simplest option looks like this:
The picture shows that the metal removed , and the hangers themselves were sawn in half and simply glued to the socket. You can do it this way, or you can work a little harder and get a more interesting result. We will need a screwdriver. Remove the hooks, paint the hangers and drill a hole in one edge. Insert the wire into the resulting hole, placing the required number of hangers on it. Now fasten the edges of the wire, and insert the cartridge with the wire into the space that is formed after fastening. Place the hangers evenly with their backs facing each other and secure them in the middle with a metal tie. You will be surprised by the appearance of the finished lampshade. Making a similar lampshade for a chandelier with your own hands is not difficult and does not take long.
How to make a New Year's lamp from LEDs, a lamp from disks in the shape of a ball?
It’s worth talking separately about hand-made New Year’s lamps. On the eve of the New Year holidays, which evoke associations of miracle and magic, I want to decorate my apartment with something glowing and bright. At the same time, you want the decorative elements to fit harmoniously into the interior of the room. Lamps are perfect for these purposes; making them will not be difficult. Below are some simple options.
Important: A lamp made from an LED garland - nothing could be simpler. Choose a beautiful glass container: it could be a vase, serving cap, bottle. Place an LED garland inside.
The LED garland does not heat up, so it is the safest for lamps of this type.
New Year's lamps
It is advisable that the garland be battery-powered so that you do not have to make a hole in the glass container for the wire. This is what lamps made from bottles and garlands look like in the dark.
Bottle lamps in the dark
Another option for making an elegant bright lamp is from old music CDs. The discs are attached with a glue gun, it is quick and reliable. At the base of the lamp, one disk is placed in the center, then the rest are glued together in the shape of a ball. When the ball of disks is formed, place the garland inside. Take the garland out of the disc holes so that it looks out. Then cover the top of the lamp with a disk, placing it parallel to the base.
Such lamps are suitable not only for decorating a room for the New Year. They can become everyday decorative elements in your room if you love bright, glowing elements.
Lamp made from scrap materials
Plastic bottles, spoons
There are definitely plastic bottles of different colors in every home. So that no one even thinks that this is a product made of this material, we suggest that you take the trouble to cut the bottles into small parts in the form of leaves, flowers, butterflies or any other shapes. We used leaf shapes. Draw several templates of different sizes, trace their outlines and start cutting. When you finish cutting the required number of elements, give them a natural look. Using the blunt nose of small scissors, squeeze out the veins on each leaf. to attach parts to the frame. Either glue a wire to each element and wrap them to the frame at different levels, or glue them to a cardboard frame with glue. We advise you to give preference to the longer, but also more beautiful, first method. This way the lampshade will be more translucent, and all the details will be visible due to placement at different heights.
If this is too
long and tedious for you, simply cut off the tops of the bottles, leaving 10 cm at the top, cut them into thin strips, bend them outward and secure with glue. Glue the finished flowers
There were no bottles, but there are a couple of sets of plastic spoons from the picnic that will also have a use. Let's make a pineapple lamp. For the frame we need a plastic 5-liter bottle. Carefully cut off the bottom and degrease the walls. Now let's prepare the spoons. You need to separate the handle, leaving about 1 cm. When you have cut all the spoons, start gluing them from the bottom row. Each subsequent row should overlap the previous one by about half a spoon. Try to cover the entire frame in this way, right up to the neck, so that you get neat edges that will be hidden under the cartridge. Your lampshade is ready!
DIY sconce lamp made from a plastic bottle
Sometimes at home you can find a base from an old wall sconce that you would hate to throw away. To prevent it from going to waste, you can make a new lampshade from plastic bottles.
For an air lampshade you will need about 10 plastic containers and a gun with silicone glue
Completing of the work:
- Cut off the bottom. Cut the plastic lengthwise into strips. To determine the length of the petals, you need to bend the strip in half and attach it to the base. Cut the remaining bottles in the same way as the first, observing the dimensions.
- On all blanks, bend the strips outward and secure them to the neck using glue or rubber bands.
- Glue the resulting decorative elements onto the base of the lamp. Only an LED lamp can be used in sconces.
Don't throw away tetrapacks
Yes, you were not mistaken, we will create real miracles, practically, from waste. Not all types of packaging are suitable for us, but only those that have a mirror surface inside. This type of lampshade will perfectly complement the interior, in which the emphasis is on various geometric shapes or where strict linear shapes predominate. You will need a lot of tetrapacks for this venture, so you will have to save up the source material for some time. The packaging should be carefully cut into one solid piece. Now we cut it into strips measuring 130x21 mm, divide it into six equal parts and fold triangles from these strips. Now comes the most difficult part - the individual elements must somehow be combined into complex shapes. We cut the fastening tapes measuring 75x19 mm, fold them into four parts, unfold them back and use them to fasten two triangles. Next, according to the same scheme, you need to collect 108 hexagons and 12 pentagons. Don’t be alarmed, when you get the hang of it, everything will work out by itself.
You can get by with regular glue, this will make things much easier and faster. When all the elements are ready, you can assemble them into a sphere or a regular cylindrical lampshade. In the latter case, pentagons will not be needed. Just glue all the parts together. In the case of a sphere, you will have to tinker. You can inflate the ball and use it as a support when gluing elements, and then burst it and take it out through the hole. Now you can be proud of the work you've done. You definitely won’t see such a lampshade in any store, and when you turn on the lamp, the play of shadows will captivate your whole family.
Newspaper tubes
Recently, weaving products from newspaper tubes . Skillful housewives make baskets for storing various items, sew covers for them, decorate, paint and even sell them online. We thought that in this way it would be quite possible to make a beautiful lampshade for a chandelier that would look great in the hallway or dining room. We don't even need a frame, but we will need a lot of newspapers.
If you use the pages of glossy magazines, the tubes will come out much stronger. It is necessary to cut a large number of paper strips, then twist the tubes. This is much easier to do using knitting needle. The ends must be coated with PVA glue and then allowed to dry thoroughly. Try to make sure that the length of the tubes is at least 20 cm. We will need about 100 pieces to make a medium-sized lampshade. Take three tubes and cross them together, you will get a six-pointed snowflake.
This is the beginning of our ceiling.
To make it more convenient to work, place something heavy on top of the intersection so as not to displace the workpiece. Place the next tube on top of one of the rays peeking out from under the weight. The lower element must be wrapped over the attached one so that it rests on the adjacent vine. Repeat this step with all the twigs sticking out. You will be weaving in a spiral pattern. When you completely go around two circles, you need to expand the diameter. To do this, instead of one twig, use two twigs folded parallel to each other. Continue weaving until you reach the required size. Cut off the excess tails with scissors, secure the edges with clothespins and treat the entire surface with glue.
When the frame is dry, use spray paint to give it the desired color and once dry, seal everything with varnish. On top you will have a cross that can be carefully cut off, thereby freeing up space for the cartridge. Instead of weaving, you can secure the tubes with glue, forming a sphere or other geometric shape.
How to make a lamp with your own hands in a rustic, antique, Scandinavian style?
Rustic style is popular in modern interior design. This style involves filling the home with elements that highlight the rough natural beauty. At the same time, the decor and material of the structures are made from natural materials. People are trying to get rid of all artificial elements and surround themselves with natural things. This interior looks rich.
The rustic style has the following characteristics:
- Naturalness of natural forms;
- Natural, simple materials, fabrics;
- Dullness, roughness of products;
- Simple patterns;
- Massiveness.
Important: Rustic style lamps should have warm lighting. It resembles fire and recreates the spirit of antiquity.
To make a lamp with your own hands in a rustic style, wood is suitable. Wood should not be painted with acidic, bright colors. There is also no need to open it with varnish. Rustic style requires as close to a natural look as possible. You can also use stones in decoration. These must be rough stones.
You can make a lamp in a rustic style from a small old stump. To do this, you need to make a hole in the stump for the lamp and cord.
Rustic style lamp
Lamp from an old tree stump
Another option is to decorate the lamp shade with branches of various sizes. The base of the lamp will be a tree stump. The lampshade can be made from wire, and then decorative elements can be attached using coarse thread of a suitable color.
Rustic table lamp
Scandinavian-style lamp should also be made from natural materials. But unlike the rustic style, there may be delicate lines and a light color. A Scandinavian-style table lamp should have features such as simplicity and elegance.
Scandinavian style lamp
To make a laconic lamp from copper pipes you will need the following materials:
- Pipe cutter
- Felt pen
- Roulette
- Pliers
- Screwdrivers: flat and Phillips
- Copper pipes and angles
- Super glue
- Electrical base of the lamp: socket, plug, switch, electrical cord
Step-by-step production:
- Use a felt-tip pen to mark where you need to cut the copper pipe. Take measurements with maximum accuracy.
- Use a pipe cutter to cut the pipes.
- Lay the cable, glue the pipes with the corners.
- The next step is to assemble the electrical circuit. You should connect the cartridge, plug, switch. If you do not know how to do this, it is better to contact a familiar electrician who can easily help you assemble the structure.
DIY lamp
Necessary materials
Connecting parts
A table lamp made from a bottle will also fit into the Scandinavian style. You have to make a hole in the bottle for laying the cable, and also make a beautiful lampshade. The basis of the lampshade will be a wire frame, and linen will be suitable for decoration.
DIY lamp: Scandinavian style
New life for old cans
In order to make a stylish and unusual lampshade that will perfectly complement the interior with its soft, cozy light, you can use ordinary tin cans of different sizes. It is necessary to remove all labels, remove any remaining glue from the surface, wash and dry well. Next we will use a small hammer and nail to make holes on the walls. Draw the desired pattern with a marker, pour water into the jar and place in the freezer until completely frozen. This is done so that when the holes are made, the can does not become deformed . The second option to preserve the shape is to stuff it tightly with paper. All that remains is to carefully make holes and dip the finished product in hot water to remove ice. You will get small cute lampshades, from which it is recommended to create compositions. The surface can be left unchanged, or it can be painted or wrapped in thin paper.
Glass jars are also suitable for us especially if they have a non-standard shape and color. However, you can give them any color, it’s very simple. Prepare sockets and light bulbs in advance. To place them inside, carefully make holes in the lids using an opening knife. In the future you will need to replace the lamp, so give preference to screw-on cans. The hole should be equal to the diameter of the cartridge, no more. Insert the threaded part into the hole in the lid, and then screw in the light bulb. Now let's start designing the lampshades themselves. Wash and dry the jars thoroughly. Now you can paint them, paint them, cover them with beads or flowers, wrap them with colored threads or lace, in general, whatever you want. Secure the surface painted or covered with small parts with clear varnish and screw on the lids. Your lampshades are ready.
Marine lampshade
There are people who cannot live without the sea and try in every possible way to reflect their love for it in the interior of their apartment. Some people bring photo frames made of seashells, others hang pictures of the sea coast, and others cannot return from vacation without a bag of shells, which they then cannot find a use for. If you recognize yourself in this phrase, then especially for you we have prepared a small master class on making a lampshade from shells , as well as beautiful sea pebbles and everything that you couldn’t pass by. To do this, we need a frame wrapped in thick cardboard, glue and your seafood gifts. Think about the color of the lampshade in advance. If you want to leave natural shades, then simply cover all the elements with transparent varnish; if you want to add a few different shades, then use acrylic paints, and then varnish. You can paint the finished lampshade, but the paint and varnish will flow into the joints between the parts and will not come out very neatly.
Now, using a heat gun, cover all or part of the surface of the frame with shells, being careful
to leave few gaps as possible . Small pebbles can be glued in places on top of the first layer, this will add volume to the finished product. Such a cute piece of furniture, with a very characteristic mood, will always remind you of pleasant moments spent on the seaside.
Making lampshades with a wire frame
So, there is a frame, you can think about what to dress it up with. The first thing that comes to mind is new textile clothing.
Fabric lampshades
To make fabric lampshades, you do not need to have a sewing machine or know how to sew. But you will have to make a pattern in any case. What you need is a sheet of newspaper or whatman paper, scissors and tape.
Step 1. The newspaper is wrapped around the frame, the joint is secured with tape and the excess is cut off from the top and bottom. Then the paper cap is cut lengthwise and the pattern is transferred to the fabric, leaving allowances for the hems.
Pattern
Step 2. The edges of the workpiece are folded inward and ironed. Its dimensions after this operation should remain slightly larger than the newspaper pattern.
Frame and blank
Step 3. Wrap the fabric around the frame and glue the seam or carefully sew it with a needle and thread. We wrap the edges at the top and bottom inward and glue them to the frame.
The fabric is stretched over the frame
With tailoring skills, you can make a lampshade of a more voluminous shape. And you don’t have to be tricky with the pattern. You need to cut a rectangle out of fabric according to the height of the frame and the length of the largest circle. This is usually the bottom circle of the frame. Of course, don't forget about seam allowances.
We sew the fabric from the wrong side with the short sides to form a cylinder, the diameter of which exactly matches the diameter of the lower part of the frame. Then we bend and stitch the bottom edge and put the fabric cylinder on the lampshade. We assemble its upper part in uniform folds, temporarily securing them with pins, bend them onto the upper circle of the frame and glue them. All that remains is to sew a braid or lace strip to the bottom edge and tie the lampshade with a ribbon.
Fabric lampshade
You can also insert an elastic band into the upper part of the fabric cylinder - the appearance of the lampshade will be completely different.
Lampshade from an old knitted skirt. Elastic band inserted on top
In the end, you can simply put a children's skirt of a suitable length on the old frame. It can be sewn from any fabric - calico, knitwear, jeans, organza, etc. The main thing is that the color and style should be in harmony with the interior of the room.
Lampshade made from jeans
Lampshade made from old jeans
Organza lampshade
Fabric lampshade
Organza lampshade with ribbon decoration
Lampshade made from napkins
Crocheted napkins and capes now seem to many to be completely unnecessary, old-fashioned things. Well, or simply not applicable in the interior of an apartment for its intended purpose. But it’s a pity to throw away items knitted by your mother or grandmother. But you can make a lampshade out of them, similar to a fabric one. Only first, all the napkins will have to be sewn into one fabric, the shape and size suitable for covering the frame.
Lace lampshade
Advice. To prevent the metal frame from being noticeable through the openwork fabric, paint it, wrap it with tape of a suitable color, or cover it with paper/cardboard, creating a hard inner layer.
Lampshade made from lace doilies
A table lamp with such a lampshade will fit perfectly into a girl's bedroom in the Provence style.
Combination of fabric and lace
Lampshade lace with beads
Lampshade made of stripes and ribbons
Compare these two photos.
Lampshade made of stripes and ribbons
The same fabric is used here, but different finishing techniques. And the second lampshade looks more elegant, richer. The secret is in using not a whole cloth, but strips cut from the fabric and creating the effect of folds.
| Image | Description |
Step 1 | You need to prepare a frame, thread and needle, scissors and durable fabric that does not fray around the edges. |
Step 2 | The fabric needs to be cut into long strips 3-4 cm wide. Things will go faster if you simply cut it from the edge and tear it with a sharp movement. |
| Step 3 | The resulting strips are smoothed with an iron. If desired, you can fold the edges and press them inward, but this is not necessary. Simply trim off any loose threads. |
Step 4 | The first strip is secured to the top of the frame using glue or thread. |
Step 5 | And they begin to carefully wrap the frame in a circle, alternately wrapping the strip around the lower and upper ring. In this case, it needs to be stretched and laid with a slight overlap on the previous layer. Then the next one is hemmed to the first strip, trying to ensure that the seam is on the wrong side of the lampshade. |
Step 6 | Having wrapped the entire frame, the tip of the fabric strip is hemmed from the inside. You can stop there - the lampshade already looks very attractive. Or you can make the edging with contrasting fabric. |
Step 7 | A strip of this fabric 12-15 cm wide is folded on one side, the fold is ironed and double-sided tape is glued to it. |
Step 8 | With the other side of the tape, the strip is glued to the edge of the lampshade and tucked inward. The tape must be glued on both sides, so it is bent along the axis. |
Step 9 | The other edge is finished in the same way, and the excess fabric is carefully trimmed with scissors. |
Instead of one fabric, you can use different ones, alternating stripes by color and width. It’s even more convenient to use ribbons - you don’t need to sew them.
Lampshade made of ribbons with bows
Alternatively, strips or ribbons of different colors are not sewn together, but the ends are left to hang down freely.
The ribbons are sewn only along the top edge
Ribbons and fabric strips are excellent materials for weaving. Having made the base according to the method described above, it can be intertwined with transverse or diagonal lines.
How to make a lampshade from ribbons with your own hands
Lampshades made from braid, yarn, and twine look very original. If the frame has many intersecting ribs, they can be wrapped in different directions.
Decorative lampshade made of twine
Jute Filigree for Beginners: Basic Principles
DIY twine lampshade
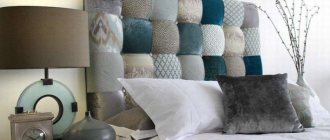
Lampshade with convex ornament
If a smooth fabric lampshade you have or made yourself is satisfactory in all respects, but lacks some zest, you can always decorate it. Beads, rhinestones, paper flowers and butterflies, fringe, etc. But there is a more original and effective way to decorate lampshades... with wood putty. It is best to use ready-made polymer putty. It comes in white and the color of different types of wood. White is perfectly tinted in any shade.
Lampshade with convex ornament
The technology is extremely simple: a flexible stencil is glued to the lampshade using tape, and then an even layer of putty is applied to it. After it dries, the stencil along with the tape is carefully removed along with the excess putty.
Master class on making a lampshade with a convex pattern
Forest handsome
A very unusual and spectacular lampshade that will appeal to nature lovers. Fits well into -style interior . Its name speaks for itself, and you were not mistaken if you thought that we would use as material what we brought from the forest. More precisely, we are interested in tree branches of different thicknesses and bizarre shapes . Twigs that are too thin are not suitable; they will break during the fastening process. The length of the branches should correspond to the desired height of the lampshade. Gather enough material, because during the manufacturing process, not all sticks will definitely suit you. The most interesting thing this type of lampshade can boast of is the shadows that will be reflected on the ceiling and walls. They will create the feeling that you are in a real forest.
The branches must be washed well under hot water and dried by placing them on paper and providing access to oxygen.
Dry sticks need to be refined a little. You can use a knife to cut off what you think are unnecessary knots or thin parts. Cover all elements on all sides with spray paint or just varnish. The gnarlier the branches, the more interesting the lampshade will be. We will need a regular wire frame without cardboard. We will attach the parts to it using thin wire or glue it with a heat gun, whichever is more convenient for you. Not a conical, but a cylindrical base shape . Fill in the gaps very carefully and leave as few empty spaces as possible. You can add gaps in small pieces. After complete drying, the extraordinary lampshade is ready for use. Creating a similar lampshade for a chandelier with your own hands will be fun with your children.
How to make a lamp with your own hands in Oriental, Japanese, Chinese style?
Lamps play an important role in the design of premises. A lamp successfully chosen in style and color can transform an ordinary room interior into a stylish and modern one. There are many options for lamps: wall, pendant, floor, table.
Let's talk about table lamps. They can be used in various rooms: in offices, bedrooms, living rooms. You can make a table lamp yourself. With some effort, you can invent an original designer lamp. This way you will emphasize the uniqueness of your interior.
First you need to decide on the style of your lamp. Oriental style is popular. Let's consider what features a Japanese-style :
- Simplicity
- Strict geometry
- Convenience
- No acid colors
Japanese lamps are usually rectangular in shape. Sometimes you can find round-shaped lamps. In Japanese style, table lamps are rarely used; soft light should come from them. The color range is not rich: black, white, brown.
The decor of the lamp may include the following elements:
- Japanese or Chinese characters
- Applications
- Painting in Chinese or Japanese style.
Important: An oriental-style lamp will fit perfectly into the interior of a room that is also decorated in this style. When choosing the style of your future lamp, be sure to consider the overall style of your room.
To make a lamp in an oriental style you will need the following tools and equipment:
- Base with an old lamp socket
- Wood slats
- Rice paper, tracing paper or plywood
- Wood glue
- Saw
- Square
- Scissors
- Brush
- Paints
Step-by-step production:
- The first step is to make blanks from wooden slats. Using a saw and square, prepare 4 long slats and 8 short ones. Select the size yourself, based on the size of the room, the size of the table or bedside table on which the lamp will stand.
- Sand all the slats with sandpaper to avoid any roughness or nicks.
- Next, you need to glue all the parts together and let them dry. Assembled nails of this design should not be used. You can fasten the slats with rope.
- Paint the lamp frame black, white or brown. Let the paint dry. You can open the structure with varnish.
- After this, cut out 4 layers of the required size from rice paper or tracing paper. For this you can also use plywood, which will be more durable and practical.
- Apply the drawing with paints. You can cut out an ornament on paper by first printing the finished design on a printer.
- If you took plywood, then first print the drawing on paper and then transfer it with a pencil onto the plywood. Cut out the picture on plywood.
- Glue paper or sheets of plywood between the frame frames with glue.
- Place the frame on the base of the old lamp with socket.
Important: For such a lamp, choose an LED or “housekeeper” bulb.
Lamp frame assembly diagram
Japanese style lamp
Space lamp
Many in childhood dreamed of becoming astronauts and raved about distant galaxies. If your child now sleeps and sees himself in this role, we suggest decorating his children's room to match his dreams. Stationery stores sell planet models that we will need. We will make multi-level lampshades in the form of a space system .
To do this, we will need sockets with lamps and several models of different planets.
The layout must be carefully divided into two parts. Before doing this, draw a circle on top, the diameter of which coincides with the diameter of the cartridge. Then you need to remove this area as well. In its place, place the lamp socket and glue the layout back together. These steps must be done for all layouts. If you haven't found any planets, you can get by with globes of different sizes. You can use halves, which is much more convenient, because it will be easier for you to replace the light bulb. The halves are good for making lampshades for table lamps. You can use old maps of the world , wrapping them around the frame on top of white, thick cardboard.
The spirit of travel will always be present in your home and inspire you to new achievements. When making any of the above types of lampshades, remember that all materials are fire hazardous . Especially when they are exposed to frequent heat from incandescent lamps. Therefore, place all the parts at a distance of at least 15 cm from the center of the lampshade, that is, the minimum diameter of your product should be at least 30 cm. By following this simple rule, you will protect yourself and your home from unnecessary troubles.
Tags:Lighting systems
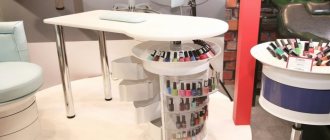
Flower pot table lamps
Flower pots of different sizes can serve as decoration for a table lamp leg. To do this, take pots of different sizes, make suitable holes in them, and place them on the leg of a table lamp. The pots can be glued together using a glue gun or superglue.
Flower pots in the decor of table lamps
Flower pots are not used for table lamp shades as they are opaque. It is logical that light will not pass through such lampshades. But for pendant lamps, flower pots are quite suitable. To do this, cut out the bottom of the pot, attach it to the frame, and then decorate the pot in any way.