Doors
The leaves for a device such as swing gates are welded from a profile pipe (with a rectangular cross-section). For greater reliability, they are reinforced with jumpers, which can be:
- cruciform;
- horizontal;
- fixed at an angle.
When the sashes are large enough, they are further strengthened (strengthened) in one of two ways. The first is to weld pieces of sheet metal cut into the shape of an isosceles right triangle at the corners from the inside. The second one is similar, only instead of a plate, the same pipe from which the gate frame is made is welded at an angle of 45°.
Sometimes a narrow metal strip is welded onto the pipe to make it easier to attach the corrugated sheeting.
It is important that the angle of 90° is strictly maintained at the pipe welding site. To control when welding, it is necessary to use a construction square or a special fastener. Otherwise, it will be impossible to install the leaves evenly in the gate.
The process of making swing gates with your own hands
Some people believe that anyone can build swing structures, even if they do not have special skills. However, this is not quite true. After studying the instructions, most types of work can indeed be done independently, but not all. For example, in order to weld a high-quality frame, you will need the help of a specialist who knows how to handle equipment and has experience in this matter.
The manufacturing process of the structure consists of several stages. Initially, it is necessary to determine the location of the entrance, draw up a drawing, and calculate the required materials. Then you can begin preparing the base, installing racks, constructing the frame and fixing it on supports, and covering it with corrugated sheets. We will consider each individual step in detail in order to avoid accidental mistakes when creating a gate with your own hands.
Consumables and tools
You can calculate the amount of materials needed only after drawing up a sketch. For each specific case, their number will be individual. To complete the work you will need:
- bayonet and shovel;
- crowbar, chipper, if it is necessary to remove old concrete, brick covering or base;
- concrete mixer, old bathtub for mixing mortar;
- buckets, trowel;
- corner, building level;
- measuring instruments, pencil, nylon thread;
- welding machine and electrodes;
- grinder with threaded and grinding discs;
- drill with a set of drills;
- paint brush, roller, spray gun for painting racks and frames;
- self-tapping screws
The following types of raw materials should be prepared:
- corrugated sheeting for covering the frame;
- profile metal pipes of different diameters for racks and frames;
- hinges that can withstand significant loads for fixing the sashes;
- locks, clamps, closures;
- coloring matter;
- crushed stone, sand, cement.
Dimensions of gates and wickets
The starting point for all work is the installation location. The type of structure itself, as well as its parameters, largely depends on it. For example, garage and front doors will have completely different dimensions, which are selected individually for each case. The easiest way is to calculate the height value. To determine it, you need to focus on the fence. The gate must be level with the fence, on average this parameter is 2-2.5 m.
The height of the gate is determined according to the same principle. Its minimum width, according to existing regulations, must exceed 80 cm. This is enough for the free passage of one person, but as practice shows, it is not enough for a comfortable crossing of the door with hand luggage or a bucket. The optimal size of the gate width is 1-1.2 m. Some owners install wider doors of 1.5 m.
When choosing the width for the gate, the situation is much more complicated. In this case, it is necessary to take into account many factors: the distance from the fence to the roadway, the radius of the drive, even the material that was used in the construction of the house. For example, a wooden cottage is characterized by an increased fire hazard; 6 m will be required for a fire truck to enter. For passenger vehicles, 2.4-2.5 m is sufficient, and for trucks, 3.2-4 m.
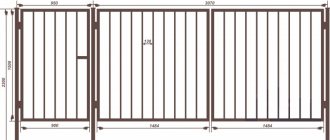
Gate drawing
When constructing a structure, you cannot do without a graphic image that shows all the components and their dimensions. It will allow you to accurately calculate the amount of materials needed for the work and perform a high-quality installation. You can draw up a sketch yourself, even if you have no drawing skills, just make a simple schematic drawing on a notebook sheet and indicate the parameters of all elements on it. The drawing should show:
- racks, their number, concreting depth;
- structure of the frame, indicating the dimensions of all its parts;
- parameters of each leaf;
- position and dimensions of the gate;
- total width of the opening;
- cladding material;
- hinges, their specific installation location;
- valves, clamps;
- elements that strengthen the frame (corners, transverse and diagonal jumpers);
- locks, methods of fastening them, location of lugs.
We install gate supports
We begin installation work on installing gates made of corrugated sheets with clearing and subsequent marking of the territory. Initially, we determine the location of the pillars. Further along the level we stretch the nylon thread, which passes through the centers of the future holes. Then we proceed to the main stage:
- Using a garden drill, we make a hole in the ground. Its average depth is 1.5 m. In some cases, a jackhammer may be needed. If a shovel is used for work, the width of the hole becomes larger, and at the same time the amount of concrete mixture required for pouring increases.
- At the bottom of the hole we pour a cushion of crushed stone and sand up to 30 cm thick and compact it well. If there is severe shrinkage, add a little more building material.
- We build a support at the bottom of the hole. It must be prepared, coated with a protective primer, and painted. We fill the free space around it with stones and pieces of old concrete. This allows you to reduce the volume of solution.
- We level the stand, support it on different sides with bricks and cobblestones, and, if necessary, weld special jumpers.
- In a concrete mixer or by hand, mix the solution at a ratio of 1:3:6 (cement, sand, crushed stone).
- Pour the concrete mixture. We leave the foundation for a week so that the concrete sets well. Periodically, every two to three days, the surface can be moistened with water to prevent cracks from appearing on it.
We manufacture the frame and frame of the gate
When starting to manufacture the frame, we re-measure the width of the gate opening and wicket, taking into account the installed support posts. This will allow you to make timely changes to the drawing, if any. Let's get started:
- Using a grinder from a profile pipe or angle, we cut blanks of the required length, which will directly depend on the method of joining the two elements (butt-end, at an angle of 45°)
- Clean the surface from rust and dirt.
- On a flat base, we form a frame from the components.
- We weld all the workpieces.
- Use a corner to check all corners for evenness. If we identify a discrepancy, we cut off the weld with a grinder and repeat everything again.
- We check whether the sash frames fit the opening. We make sure that they have the correct geometry, and then completely weld the seams.
- We strengthen the frame with stiffening ribs.
Professionals recommend welding corners at an angle of 45°, at least those located on top. This will protect the internal cavity of the pipe from moisture penetration.
Attaching sashes to supports and making fittings
We fix the sashes to the supports using hinges. Their number depends on the weight of the frame. For light models, two elements are enough, for massive ones – three. Let's consider one of the possible installation options:
- We choose a board that matches the length of the distance between the posts. Cut it to the desired size.
- By placing bricks under it, we install it at the level of the location of the lower point of the swing elements. After welding, they often sag, so we place a 2 cm thick support in the center of the block.
- We install the sashes on the prepared base.
- We temporarily fix their upper part to the support posts using a rope.
- We make marks for the hinges and weld them to the gates and supports.
- We check the gate for opening. If no defects or inaccuracies are identified, we finally weld the elements.
Having secured the gate, we proceed to installing the fittings. We weld handles, bolts, clamps (vertical, horizontal). For these purposes, you can use corners, pieces of round pipe, and fittings. We put up locks. There are overhead, mortise, and electromagnetic models. If necessary, we install automation and a security system (alarm, CCTV camera).
Primer and painting of the structure
Painting the frame is one of the most important stages. The service life of the product and its appearance depend on this. The process is as follows:
- Let's prepare the base. This allows for the best adhesion of the metal to the coloring agents. Using abrasive materials, such as sandpaper, we clean the metal surface. We pay special attention to welding seams.
- We wash the structure from dust and stubborn dirt. Using white spirit, we degrease the metal.
- We prime all metal elements. The solution can be applied using a sprayer or a regular brush. Give time for the primer to dry. Usually 12 hours is enough.
- Let's start painting. For work you can use alkyd, oil, acrylic paints. Starting from the top edge, apply the coloring agent with a roller, gradually moving downwards. It is necessary to process all ends and corners very carefully. To paint them, it is better to use a brush. Let the paint dry overnight. After this time, if you don’t like the shade, you can apply another layer.
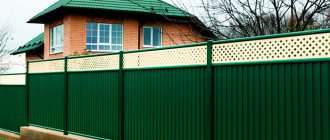
Sheathing with corrugated sheets
At the final stage of construction, it remains to cover the entire structure with corrugated sheeting. This is not difficult to do, but you need to know some nuances. Let's look at the instructions on how to properly fix the sheet:
- We take a profiled sheet and install it on top of the frame. If necessary, trim off excess. We set it by level.
- Holding the sheet in a level position, using a drill we carefully drill a hole in its lower wave and in the profile pipe to which it will be attached. The diameter of the drill should be 1 mm less than the thread size of the self-tapping screw.
- For work, it is necessary to use only special metal screws, which can be externally determined by the characteristic thread pitch. It is advisable to select consumables that are painted in the same way as corrugated sheeting.
- Do not tighten the screws all the way. At best, the elastic band will be damaged, at worst, the polymer layer will be damaged, which will lead to corrosion of the metal.
- The second sheet should be installed so that its covering wave covers the wave of the previous one. The installation of subsequent elements is carried out in the same way.
Crossbar
The sashes have to be strengthened so that they do not sag under axial load from their own weight. There is a simpler solution for this problem. This is the crossbar that is located at the top of the gate, from post to post.
The strength of the structure with the crossbar is solid, but then equipment that is taller than the gate will not be able to enter the yard. And in this case there is a solution: the upper part of the frame can be made removable.
We study the features of the mechanism
Sliding gates made of corrugated sheets are a frame welded from a metal pipe, sewn inside with corrugated sheets. They are arranged on the principle of a wardrobe.
Thanks to the movable mechanism, the barrier sheet moves to the side (along the fence) along the guide. Its position is fixed on the support beam using special rollers. This allows you to completely free the opening and the surrounding area. Forged elements and images painted with adhesive film can be used to decorate the structure.
The main components of the recoil system:
- canvas enclosed in a frame;
- an opening system consisting of a support pillar, a receiving pillar, a gear rack, a supporting beam, and a cantilever part.
When opening, the gate section moves along the guide rail of cantilever blocks installed on a reinforced strip foundation.
Note: the door leaf can be moved either manually or automatically using a drive mechanism.
Preparation of gate components
Welding is the main method of fastening for a structure such as a gate made of corrugated sheets. Pipes for the sashes are cut at the ends at an angle of 45°.
This approach is considered professional, but it requires certain qualifications, as well as the availability of equipment and tools. This is a miter saw for metal, which is of no use in a home workshop. You can trim the pipes manually, but you need to work very carefully.
Elements of rotary hinges are welded to the supporting pillars and sashes. Again, the place for their fastening must be determined as accurately as possible, otherwise distortion is inevitable. It is best to temporarily fix the sash on the pipe and mark it in place. Eyelets for a padlock can be welded already when the gate is installed.
If a gate with a wicket is being manufactured, it is necessary to practically repeat all the same operations described above, from preparing the frame to installing the lock.
Advantages and disadvantages of gates made of corrugated sheets
Light corrugated sheeting does not require powerful support and is easier to work with. It can be made into any shape, shape and configuration using ordinary metal scissors. In terms of price, such gates will be cheaper than most analogues, but they can be of any colors and textures.
Corrugated sheets do not require complex maintenance, regular processing or painting. The average service life is about 25 years, and a damaged fragment can be easily replaced with a new one. Due to its diversity, corrugated sheeting is easily combined with other construction and finishing materials.
But the metal is quite thin, so the gate will need to be used carefully and avoid mechanical damage. Sound absorption clearly suffers, especially on rainy and windy days. You need to cut corrugated sheets very carefully so as not to damage the protective layer along the cut.
Tool used
How to make a gate using only the tools that a home craftsman has in his arsenal? Simple, but a welding machine will come in handy. In order not to master complex techniques, you need to use electric welding.
The screwdriver has already been mentioned, but you should not forget that its working parts (bits) must exactly fit the crosspiece on the bolt head.
To cut pipes, an angle grinder (“grinder”) with cutting, grinding and scraping wheels for metal is useful. This is a universal tool that can do most of the work in this case.
Naturally, you will need a container for mixing mortar, bayonet and scoop shovels, a bucket for water, clamps for preliminary fastening of corrugated sheets, a building level, a plumber's or construction square, a measuring tape and other devices.
A laser level will not be superfluous, which will allow you to more accurately set horizontal and vertical positions.
Preparatory stages
Before you make a gate from corrugated sheets with your own hands, you should think through the sequence of actions and prepare.
The first stage of preparation is determining the size of the gate. The height of the door depends on the height of the fence, but usually does not exceed two meters (two meters and ten centimeters if there are tall men in the family). If the fence is very high, then the gate is not made to cover the entire height of the fence, but lintels are made of a steel profile over the door and covered with corrugated sheets. The width of the opening is usually made one meter to ten centimeters - this width allows you to enter the area with large bags in your hands or bring in furniture. A larger gate width requires a heavier and stronger frame with additional crosspieces; not very convenient to open; there is a possibility of the door skewing during operation.
The second step is to think over the design of the door and support posts and draw a diagram with dimensions.
The third stage of preparation is to prepare materials and tools.