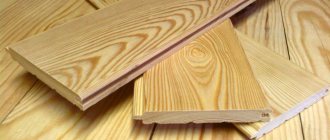
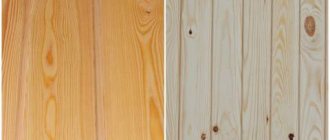
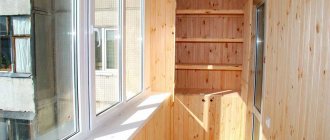
Decorating a room with clapboard is a practical and stylish option for any home. This material is often used as a finishing material for the facades of houses, bathhouses and other premises. But to get the most out of the lining, you need to use the right fasteners. For this case, clamps are best suited. What is it and how to use lining clamps correctly?
What are clampers, their advantages
Clamps are made of galvanized iron or spring steel. They are special brackets for fastening the lining, which are installed on the wall or sheathing using self-tapping screws or nails. Clippers are also used for fastening plastic boards and fixing MDF panels.
Clamps for fastening lining are easy to purchase at any hardware store, and the low price is another advantage. Of course, buying nails and screws is a little more profitable, but the practicality of use and ease of installation with their help completely justify these costs. But besides this, there are a number of other advantages:
- The construction process is 2-3 times faster;
- Installation using clamps completely eliminates damage to the finishing material (cracks and chips), due to the fact that the lining panel itself does not need to be drilled or nailed for fastening;
- This fastening element is not afraid of constant exposure to high humidity. And it is best suited for use in rooms like a bathhouse;
- Easy installation: even an inexperienced person can master the technology of using clamps;
- There is a wide selection of clamps that differ in size, and this will allow you to choose a fastening element that will facilitate fastening in a hidden way and without seams;
- Reliable fixation of finishing panels, without possible shifting in the future;
- The clamps are very reliable, not subject to corrosion and destruction, and are highly durable.
Advantages and disadvantages
The use of clamps has a number of significant advantages over nails and self-tapping screws.
- The process of covering surfaces with clapboard is characterized by ease and simplicity. Even an untrained master will be able to complete it if he calculates and marks everything correctly. You can also dismantle the lining without any problems.
- The clamps are attached to the base, and not to the lining, so hardware cannot contribute to the formation of damage, cracks and other defects on the surface of the board. This ensures a long service life, less likelihood of the skin rotting and loss of beautiful appearance.
- Visual integrity of the structure. Visible elements of fasteners can spoil the uniform appearance of the interior structure. The clamps are installed unnoticeably, so the boards simply fit tightly to each other without forming cracks or differences.
- There is no need to purchase special devices for installation. All work is performed using a hammer or screwdriver.
- The clamps ensure the reliability and durability of the structure, including because they are made of metal.
- Additional protection against deformation.
Like any other construction method, installing decorative boards on clamps also has some disadvantages.
The most significant of them is the cost of the products. Quality staples can make a significant difference in the cost of your finish. Although, by saving, you can reduce the performance properties of the sheathed layer, so this shortcoming is completely covered by all the advantages of these metal products.
How to choose clamps
What clamps are needed to install the lining? Depending on the type and width of the lining, hardware is also selected. To prevent corrosion of the fasteners, it is worth checking the integrity of the galvanized coating during purchase. For clamps, you also need to purchase self-tapping screws: 2-3 pieces per 1 fastener. Under no circumstances should the clamp be attached to one self-tapping screw; this may cause shifting or deformation of the lining panels.
To determine the required amount of fastening, it is enough to carry out simple calculations: on 1 m2 of lining panels, on average, 20 clamps are needed. But it is worth considering:
- The distance between staples in corner areas should be 25 cm;
- The permissible step between clamps on a flat area is 45 cm;
- When lining the extreme zones, there should be a distance of 35 cm between the hardware.
It is also worth considering that the larger the size of the clamps, the smaller the step between them can be.
Types of clamps:
- For finishing with plastic or MDF panels, clamps with a tongue of 1-2 mm are used;
- For eurolining, the height of the tongue should be 4 mm;
- Chipboard panels are fastened with 3 mm clamps;
- The wooden lining is fastened with 5 mm hardware;
- To attach the blockhouse, the height of the tongue must be at least 6 mm.
Dimensions
Fasteners are available in several types, which depend on the thickness of the groove into which the bracket is to be attached. The sizes of clamps for lining are as follows:
- No. 1 – used for fastening PVC lining and panels 5 mm thick;
- No. 2 – used for panels 8 mm thick made of PVC or MDF;
- No. 3 – purchased for installation of eurolining and wall panels made of chipboard;
- No. 4 – mainly used for fastening eurolining;
- No. 5 – used for installation of clapboard boards;
- No. 6 – recommended for indoor block houses.
The ease of installation work and the reliability of the structure as a whole depend on how correctly the size of the metal plates is selected.
If you plan to cover the walls with unusual materials, for example, laminate, it is advisable to purchase another type of clamps, more powerful and designed specifically for heavy structures.
Fixation of clamps
At the moment when it is time to start fixing the fasteners, the sheathing of the surface and leveling of the wall should already be prepared. To fasten with nails, you need to prepare the nails themselves, a building level and a hammer in advance; if self-tapping screws are used for these purposes, you need to take a screwdriver or screwdriver.
It is important to understand that the installation of wooden panels and fasteners is carried out alternately. It is very important to remember the accuracy of the calculations and the correct position of the hardware. The most important thing is to pay attention to fastening the first element, and then installing all other parts will not be difficult.
Fastening with nails is carried out only if there is sheathing. If it is not there, then you need to install it using screws or dowels. The timber for the sheathing should allow for a 5-centimeter gap to be created. Only after this are the clamps attached. Their location must be clearly traced using a level so that the lining panel lies strictly horizontally or vertically. Otherwise, it may affect the durability of the wood panels.
For those who use self-tapping screws, the lathing will also not be superfluous. With its help, it will be easier to record all the details. For convenient installation, we make marks in advance in the places where you need to screw in the screws, or you can pre-drill holes that are smaller in diameter than the screws. The work goes like this: clamps are installed, the lining is attached to them, then hardware for the next lamella is installed.
Peculiarities
A clamp is a bracket made from galvanized iron or spring steel. The design of this hardware provides the possibility of reliable fixation of the lining lamellas. The fasteners perfectly match the shape of the slats with a tongue-and-groove locking system. Clippers are also used for fixing Shtil MDF boards and plastic panels.
On the surface of the bracket there are holes provided for attaching hardware to a rough base or sheathing. Fastening is carried out using nails, self-tapping screws or screws and depends on the material of the working surface. Each clamp is equipped with deep hooks, with the help of which the board is strengthened. Some models are additionally equipped with tenon hooks, which enhance the fixation of the material and provide additional strength to the fasteners.
Clamps are produced in a wide range with a wide variety of varieties and standard sizes, which greatly facilitates the selection of the necessary hardware and systematizes the model range. The classification is based on the height of the tongue and the thickness of the clamp. The minimum height is 1 mm, the maximum is 6 mm. The most common are staples with a tongue height of 5 mm.
This type of hardware is considered universal and is suitable for many types of lining. For installation of eurolining it is better to use a size of 4 mm, and for cladding a block house - six-millimeter models.
Also, clamps come with two- and three-millimeter tongues and are designed for fastening plastic panels and thin lining.
Installation of sheathing
To use clapboard clamps during installation, it is necessary to install the sheathing. What is it for:
Lathing helps you begin installing panels without having to perfectly align the walls. This is especially true for concrete or brick foundations, which simply are not 100% level. We level the wall as best we can and proceed to the next stage.
It is easier to attach the lining to wooden beams than to a base made of other materials.
The space that remains between the wall and the decorative panel promotes good ventilation, which prevents the formation of dampness, mold and mildew.
During installation of the sheathing, in order to increase its service life, it is important to pay attention to a number of the following points:
It is important to use a building level during installation. Otherwise, curvature of the decorative lamellas may appear, which will be noticeable and spoil the aesthetic properties of the finish;
The distance between the bars should be at least 60 cm, this will help prevent deformation or sagging of the lining strips.
How to mark the base
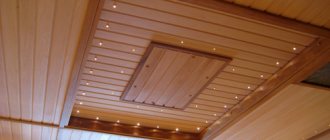
The marking method depends directly on the direction of the panels (vertical and horizontal). Depending on the type of room, the chosen direction of the lamellas can perform not only a decorative, but also a practical function. For example, in a steam room and bathhouse, vertical placement of slats does not allow moisture to accumulate at the joints, which affects the durability of the material.
When marking horizontally, the distance from the floor should be minimal. Just make sure that the hammer has free access to attach the hardware. Sometimes, to emphasize the decorative effect, diagonal markings are made. Sometimes a combined method of installing panels is even used, which allows you to create some kind of simple pattern from them.
For the last two installation options, it is still important to have some kind of construction experience, otherwise it will be quite difficult to carry out the work.
When installing the sheathing, it is important to remember that it is installed perpendicular to the direction of the lining panels.
Installation of lining on clamps
When a suitable clamp for the wooden lining has been selected, we proceed directly to installation. Tools you will need:
- Roulette;
- Building level;
- Hammer;
- Screwdriver;
- Square;
- Screwdriver;
- Marker (you can use thread for marking).
Next, we move on to the preliminary preparation of finishing materials and the base of the wall. The wall surface must be leveled. The quality of work must be checked at the construction level. In some cases, it is appropriate to install metal or wood sheathing. The step width between the slats should not be more than 50 cm.
If wooden elements are used, they must be treated with an antiseptic, after which work can be continued only after the solution has completely dried. After this, it is necessary to make markings for installing the clamps: if you plan to install the planks horizontally, the distance of the hardware from the floor should be 2-3 mm; with a vertical installation method, installation is carried out at a distance from the wall equal to the width of one board.
Installation technology
Clasps for lining allow you to speed up the process of installing panels, but to do the job well, you need to know about some features of the process. For horizontal installation:
- The first panel is inserted into the bracket;
- The fastening element is fixed with self-tapping screws (nails);
- When installing the next panel, you need to connect the groove and tongue;
- Simultaneously with the previous action, you need to secure the panel with the following clamp;
- Installation of panels over the entire area is carried out by repeating steps 3 and 4;
- For the vertical method of installing panels, you must adhere to the following technology:
- The end with the comb must be pressed as tightly as possible against the wall;
- The hardware is fixed with self-tapping screws (nails);
- The bracket is installed in the groove on the opposite side;
- We use this principle to install all subsequent panels.
The difference between clamps and other fasteners
But why should you use this particular fastener for lining? Kleimer has some differences from other options, and this is what they are:
Installation using self-tapping screws and nails increases the likelihood of damage to the finishing material (formation of cracks and chips). This makes it necessary to buy a supply of panels, which increases financial costs.
Brackets can be selected to fit panels of any size and weight.
This mount is suitable for use in rooms with high humidity.
How the lining is attached
To ensure high-quality installation of panels with your own hands, you need to choose the right fasteners for them.
In this case you can use:
- Galvanized nails with a small head. They are driven in one row, separately into each board. This method of fastening is the most reliable, but nails can ruin the aesthetic appearance of the material.
- Thin nails. They are hammered through each facing board, which allows the slats to be fixed from different sides, and the fastening itself is less reliable than with galvanized nails. In addition, this method is more difficult to install. Its advantage is that the appearance of the lining is of good quality.
- Clamping fastening for lining.
Fastening the lining with a clamp
To do this, special staples or clamps are inserted into the groove of the previously laid board and connected to the frame with small self-tapping screws. This is a rather labor-intensive process, but as a result the lining is securely fixed, and its aesthetics are very attractive. Self-tapping screws can be replaced with staples or small nails, but they will not hold the clamps as well.
How are clamps made?
Products are made from metal strip or strip aluminum. The cost of aluminum clamps is higher than those made of steel. But when installing plasterboard partitions over lathing (see Lathing under lining according to all the rules), this option may become the only possible one.
This is due to the fact that wooden lining, when installed using steel clamps, sharply increases the load on the drywall sheets, and they lose their stability. Typically, the thickness of the parts is no more than 0.5-1 millimeters, and only reinforced clamps have a thickness of 1.5 millimeters.
Fixing the lining with clamps
The manufacturing process consists of sequential cold stamping on automatic presses, with the material supplied automatically.
Stamping sequence:
- Mounting holes are punched.
- The protrusion is cut and at the same time the bracket is pre-bent.
- Final bending of the part.
- Cutting along the contour when stamping an element with waste or a piece of a finished product from a strip.
Features of using clamps
Fastening the lining with clamps is used for hidden installation of panels.
Its advantages:
- There is no risk of damaging the material during installation and the need for dismantling. After using nails and screws, small holes remain on the panel, which over time can lead to the formation of cracks in the parts. In addition, moisture can get into the holes, and the tree will rot from the inside.
- Hidden or invisible fasteners. The walls in such a room will look like a single whole, without visible metal caps that spoil the appearance of the wooden panels.
- Easy to install. This does not require the use of special tools: the lining is fastened with clamps according to the dimensions of the panels.
- If necessary, the slats are easy to dismantle. At the same time, the likelihood of damage to wooden surfaces is practically eliminated.
- Reliability of the design. The bracket, made of galvanized steel, shown in the photo below, is not subject to rust and corrosion.
- Fastening the lining to clamps will last a long time. Such a hook is quite difficult to bend; considerable physical strength will be required; the wooden paneling has little weight for this.
Claymer for lining made of galvanized steel
There is no need to putty or mask the ends of the fastener heads.
The only drawback compared to other hardware that is visible during installation: screws and nails, is the high price. It is insignificant, but it increases the cost of covering a room (see How to cover a room with clapboard: everything in order) or the facade of a house with clapboard.
This is especially inconvenient for previously planned budget repairs, which may affect the choice of fasteners.
Fasteners for lining - kleimer, has several varieties:
- To fix the eurolining, the dimensions of the products are 20x90 millimeters, which corresponds to panels of standard height.
- The lining, which imitates a flat beam, is distinguished by a large number of holes for fastening.
- Reinforced panels fix the panels in corners and other problem areas. They differ from the usual version by the presence of a contact surface with teeth, which enter the material of the rail during installation and strengthen it against possible shift from its original position.
Reinforced clamp
Under plastic lining. Characterized by their mobility, such clamps are installed in the U-shaped grooves of the fastening slats and can be moved along them, which depends on the individual installation features.
Useful tips
Compliance with these recommendations will help extend the service life of the lining and preserve its appearance of the panels in their original condition for a long time:
It is recommended to buy clamps for lining in trusted construction stores. This eliminates the possibility of getting a fake instead of high-quality material, which will lead to rapid failure of the clamps.
It is also not recommended to use liquid sealant to form joints; this can affect the condition of the fasteners and cause corrosion.
It is important to control the room temperature during installation work. The difference with the outside temperature should not be more than 10 degrees. When working with wooden materials, the temperature outside should be above zero.
To work with plastic lining, the air temperature must be at least +10 degrees.
To protect both the lining panels themselves and the fastening elements, after completion of the work it is necessary to cover the slats with varnish, wax or stain.
Installation of panels in a horizontal manner begins from the top corner. This will help maintain the aesthetics of the last plank, and if, when installing the outer lamella, it needs to be shortened, this flaw can be covered with a plinth.
Holes for sockets and switches are made before covering the paneling with varnish.
To decorate a room with wooden paneling, the wall itself must also be treated with a primer before starting work.
The purchased material (lining) must lie in the room for at least a day before installation. This will help avoid problems after the material expands or contracts as a result of changes in temperature and humidity.
The lining panels should not be adjacent to the wall, floor or ceiling. This will have a bad effect on ventilation. This will lead to the formation of fungus, mold and corrosion of fasteners.
In order to hide the space between the first plank of the lining and the floor, it is necessary to use a plinth specially designed for this.
When purchasing clamps, it is important to pay attention to the material from which they are made. This is especially true when purchasing fasteners for street cladding.
The metal must not be susceptible to corrosion so that this does not affect the condition of the wooden panels.