Symmetry
For classic interiors, symmetrical placement of plates is perfect. Two identical plate compositions can be hung on opposite walls, on the sides of furniture or around the perimeter of a mirror. Regardless of which item will be central, it is important that the plates are located at the same distance from it. If the plates have a small pattern, it is better to hang them closer to the center point, plain dishes or plates with a large pattern - higher and further from the center.
laurelberninteriors.com
1/2
ballarddesigns.com
2/2
Criteria influencing the choice of fastening method
Before we begin to consider the fastening methods themselves without the use of nails or screws, it is necessary to understand what parameters affect the possibility of their use. The most important indicators
are:
- item weight;
- type of wall covering;
If you do not take into account such an obvious fact as the weight of the painting
or plates, then all your efforts may not be successful. Some fastening methods can securely hold objects weighing up to 9 kg. But most are still intended for small-sized elements weighing up to 1.5-2 kg. It is clear that a heavy clay plate cannot be held using double-sided tape.
The next important factor is the base material,
on which the fastener will be held. For example, the same double-sided tape will not stick well to textured wallpaper. However, it will feel quite reliable on smooth wallpaper or on a plasterboard surface. Brickwork or surfaces made of natural or artificial stone interact well with various adhesives.
Do not forget that it is not enough to securely fix the picture on the wall - it must be done relatively evenly.
Only correctly located objects will create a harmonious environment. To do this, do not neglect the building level or marking immediately before starting work.
Vertical
For interiors in the minimalist style, a good decorative option would be to hang decorative plates strictly in a row. For such an accent, only three or four objects will be enough, which will not take up much space on the wall, but at the same time will play a decorative role no worse than volumetric installations. If you want the interior to become more contrasting and dynamic, hang plates of different diameters in descending order.
ballarddesigns.com
1/2
ballarddesigns.com
2/2
Attaching decorative elements to the wall with your own hands
Once the design has been thought out to the smallest detail, all the decorative elements have been assembled, it’s time to choose the most appropriate option for mounting all the attributes on the wall. You can create fasteners yourself or use purchased analogues.
Almost every store offers convenient Velcro. They usually hold objects very securely and come off easily. If necessary, the Velcro can always be removed and the plate itself can be moved to another place.
Today, supermarkets sell special adhesive discs. They are even more reliable than Velcro. There are different sizes that allow you to attach decor of any format and proportions with your own hands.
Another reliable fastening option is a paper clip. A rectangle is cut out of thick fabric. We attach a massive paper clip to the plate and pour hot glue on it. Then we put the fabric on top of the paper clip and the glue stain. Leave it for a while for the homemade mount to harden.
Similarly, using glue and a fabric covering, you can attach a pin or a homemade ring to the plate. Once the fasteners are ready, the decorative plate is carefully fixed to the surface on the wall.
Wave
Calculate the exact cost of repairs using an online calculator
and receive a free detailed estimate for repairs
Calculate
Large wall surfaces that are not filled with furniture can be decorated with a wave-shaped composition of decorative plates - it will create the illusion of no boundaries, making the room seem larger than it actually is. On a dark background, waves of light plates with delicate paintings look impressive; on walls decorated in pastel shades, multi-colored plates with large patterns will play a more interesting decorative role.
beeyoutifullife.com
1/2
addicted2decorating.com
2/2
Solving the fastening problem yourself
How to fix a plate on the wall if it is not possible to buy ready-made fasteners? Below we discuss in detail the simplest and most effective ways to solve this problem.
We use special glue
How to hang decorative plates on the wall without nails? The answer to this question has already been stated above. Now we will take a closer look at the “nailless” method. To do this you will need “liquid nails” or “cold welding” glue (Poxipol glue).
Procedure:
- The plate needs to be thoroughly washed from dust and dirt and dried.
- Using a sharp object (awl, knife, nail), make several scratches on the part of the bottom where the glue will be applied - for better adhesion (adhesion of materials to each other).
- Degrease the scratched area, for example, with alcohol.
- Apply glue to the treated area, attach a block or piece of thick woolen fabric.
- After drying, use the same glue to attach the plate to the wall.
Important! In this case, there is no need to punch holes, but it will be problematic to re-hang the product. Therefore, think thoroughly and calculate everything in advance.
We use electrical tape and paper clips
Another way to hang a plate on the wall if you don't have a hook is to use paper clips and tape.
Procedure:
- Apply a large paper clip to a clean, dry and grease-free plate in the right place, secure it well at the bottom of the dish with several rows of electrical tape.
Important! The paper clips can be replaced with a loop of twine or braid, and the electrical tape can be replaced with a medical plaster. Glue the tape or plaster very carefully so that there are no air bubbles, otherwise it may come off and your decor will collapse on the floor.
- Now use this clip or loop to hang the product on a nail.
Important! It is advisable to fasten only small and light objects in this way.
We use epoxy resin:
- You can attach a metal ring, a loop of rope or wire to the back of the plate using epoxy resin or “cold welding”.
- A glue gun can also be used, but only for small, lightweight saucers.
- After gluing the fastener, you should wait a few hours for the glue to set and harden, and then hang the finished product on a nail.
We make metal fastening clips for wall plates
In order to make this type of mounting of decorative plates on the wall yourself, you will need aluminum or copper wire with a cross-section of about 2 mm.
Important! You can take a piece of two-core wire, cut it and remove the braid.
Next, consider an example of fasteners for a plate with a diameter of 23 cm.
Procedure:
- Cut two pieces from the wire: 25 cm (top) and 23 cm (bottom).
- Bend a shape from each cut in the shape of the letter M. The legs should be 8 cm, and the middle at the top: two 4.5 cm, and two 3.5 cm at the bottom.
- At the ends of the legs, bend 1 cm in the form of hooks with round pliers.
Important! These curved ends can be painted with nail polish to match the color of the product, as they will hug the edge of the plate from the outside.
- Take two pieces of tight elastic band, 15 cm each, and sew their ends tightly together to make two rings.
- Now place both “Ms” on top of each other, only turn the top one upside down. Connect the tops of the “letters” with rubber bands.
- Now grab the plate from above and below with the hooks on the legs of the fastening, check the reliability.
- At the top “M” (which is now “W”), bend the middle a little to make it easier to hang on a nail.
Important! For your wall plates, calculate the required size of the hangers yourself, increase or decrease the length of the “legs”.
Making such a pendant does not take much time and it turns out to be very cheap, unlike its store-bought counterpart.
Important! Some craftsmen advise making claw legs from paper clips (4 pieces) and connecting them together with an elastic band. Hook the upper part of the elastic onto the nail.
Original figure
Would you like to hang an entire set on the wall? Create an interesting shape out of it, such as a snowflake, cloud or star. True, accurate calculations are needed to complete it. To get the desired result, first think over a sketch of the installation, put it on paper, make markings on the wall according to the diagram, place cardboard patterns of plates on it and evaluate the composition. Did you like how it turned out? Then feel free to change cardboard to ceramics and enjoy the result!
robertgswan.com
1/3
homedit.com
2/3
homedit.com
3/3
The process of installing plates to the wall
Before attaching the plates to the wall, we highly recommend making a paper mockup first. This is especially true if you use nails for fastening. Yes, even without nail fastening - if the plates are not glued correctly, it will also leave an unsightly blemish on the wall.
- Place the plates on the paper, trace them and cut them out. This will give you the exact diameter of the plate
- We lay out the layouts on the wall.
- We secure them with mounting adhesive tape for painting - it does not leave marks on either the paint or the wallpaper.
- We outline with chalk or a pencil, which can be easily removed from the wall.
Cornice above the window
If there are no curtains on the windows, and the empty space between the ceiling and the window opening is very noticeable, create a cornice there from decorative plates. But do not use too voluminous compositions - just a few plates placed in one horizontal row will hide the gaping emptiness and disguise the transition between the walls and the ceiling, making the room appear higher.
Photo: ballarddesigns.com
Methods for installing medium-heavy objects
The same, beloved by many, modular paintings or photo frames made of wood with glass protective sheets weigh much more. And if the format exceeds A4 size, then they can even reach a weight of 1-1.5 kg or more. But this is not a reason to grab a hammer drill and remind your neighbors about yourself. If there are several painless fastening methods that can easily support large objects and heavy plates.
No. 6. Spider hook
Spider hook
- a small, cunning item that, despite its simplicity and modest size, is highly reliable.
It is a plastic product with a flat back side. On the front side there is a hook at the bottom, reminiscent of a hook on a clothes hanger. And on the upper edge there are four sharp spikes. They are the ones who provide reliable fixation. The spider is attached to the wall as follows: a mark is made in the selected location, against which the fastener is placed with the flat side. The thorns will be looking at you. Now, using a small plumber's hammer, you need to hammer these spikes into the wall. Do not hit with all your might so as not to damage the plastic surface or break it. As soon as the spikes enter the wall flush with the plastic, the hook will be securely fixed. Please note that the hook is located at the bottom. Therefore, the loop on the back of the picture or plate must be made at such a height that its surface completely hides the fastening element. The spider hook can support objects weighing up to 2 kg. This is his average. The smallest model is designed for a weight of 1-1.5 kg, and the largest can withstand loads of up to 9 kg. Removing
such a hook is very
simple.
Grab the outer surface of the hook with pliers at the level where the tenons enter the wall and simply pull it out. There will be a mark left in the form of four small holes, which can be easily smoothed out. This is definitely better than a dowel sticking out of the wall.
No. 7. Miracle Velcro
Miracle Velcro, or the “Command” system,
have proven themselves to be a great way to fasten objects on flat, smooth walls. These Velcro are made of plastic. They have a small hook at the ends. This system consists of two parts that have a sticky layer. One part is glued to the wall, the other to the back of the desired item, and then they are connected to each other.
The beauty of these Velcro is that they can be easily removed without harming the surface of the walls and reused,
unlike double-sided tape. There are several types of equipment, which are distinguished depending on the permissible weight. The minimum configuration is 4 sets of 8 small strips. The average one includes 3 sets of 6 strips. In the first case, one Velcro can withstand 100 g, and the entire set - 450 g. In the second case, the Velcro can withstand 400 g, and the entire set - a load of up to 1 kg. To dismantle or rehang the painting, you simply need to remove the white stripe from the system.
No. 8. Kreps fastening system
System
“Kreps”
fastenings are another modern system designed for fastening various elements to the wall without the use of nails and without harm to the surface. “Creps” is intended for objects that are attached to ropes or cables. Therefore, if you like this method, you will also need to take care of attaching the ropes to the back of the decorative items.
The system is a plastic element, the back of which is flat and has an adhesive layer. The surface of the wall should be smooth and even. Then it will be possible to ensure high reliability of fastening. The bottom of the device is retractable and has several rows of small hooks. It is very easy to use this system even for the first time. You need to remove the protective tape from the adhesive tape and stick it to the back of the hook. Now you need to remove the protective tape from the second side and lean the hook against the wall. Press firmly for 30 seconds. Now you can hang the picture. per “creps” is 1.5 kg. To hang a larger item, use multiple fasteners. The main thing is to arrange them evenly to ensure a tight fit of the painting to the wall.
After finishing the renovation and arranging the furniture, there is always a need to add wall accessories to the interior. Most often you want to close a void on the wall in the kitchen or living room. One way is to decorate with decorative plates. They can add zest to any setting. Especially if you decorate plates for walls or stands with your own hands.
Large bright plates on the wall will perfectly complement the interior
You can hang several decorative plates in the bedroom
Even simple white plates will decorate your design
Creating a unique decor for the kitchen or dining room with your own hands is not only a way to save money, but also an opportunity to get designer items exactly in the style and color scheme of the overall decor of the room. There are many techniques that can be used to accomplish creative work.
- Decoupage with napkins, photos, fabric.
- Quilling.
- Stained glass covering.
- Decoration with satin ribbons.
- Artistic painting.
Plates can be placed anywhere and however you want
You can write words in English on the plates
Decoupage
Decoupage is one of the most interesting ways to decorate plates. For decoration, you can use special napkins, magazine clippings, photos and even fabric, with which you can really create original draperies. For work you will need the following materials:
- PVA glue;
- scissors;
- brushes;
- acrylic paints;
- water container (for example, a deep dish);
- a ring from a tin can, if the product will be hung on the wall;
- acrylic lacquer;
- napkins for decoupage (or other selected material);
- plate.
It is not necessary to decorate the plates; simply hanging them on the wall can decorate the interior
Decorative plates on the wall will perfectly complement the interior of the room
A wall completely decorated with decorative plates will look very unusual.
After all the materials and tools are prepared, you can begin decorating the plate using the decoupage technique. The main stages of work are shown in the table:
| Actions | Materials |
| Preparation of the product includes coating the surface with acrylic varnish. In this case, at least 5 layers are required. Each of them must be allowed to dry thoroughly. | Acrylic varnish, brush. |
| If a photo or varnished picture is used, then they are placed in water for 10-15 minutes, after which the image layer is separated from the main part of the paper | A container of warm water, photos, magazine clippings. |
| Cutting out an image. It is better to prepare a round mold according to the size of the decorative plate. Or you can use individual elements of the composition. | Scissors, pictures. |
| Using PVA glue and a soft brush, the images are attached to the product. Smooth out bubbles and wrinkles from the center. | Brushes, glue. |
| After drying, the dish is once again coated with an acrylic fixative. | |
| A ring is attached to the back surface of the product. It will help you hang the plate on the wall. It is better to completely connect with the entire lid on which it is placed. | Tin can, quick glue. |
If necessary, you can use acrylic paints with a thin brush to draw some details of the picture. This way the result will look much brighter. This is done after the base layer has dried before coating with varnish. For wall mounting, in addition to the described method, you can use various hooks or loops.
You can use plates of different sizes in the interior
Plates of different colors will look very nice
Quilling
Quilling is a technique based on twisting thin strips of paper. The method is relatively new and very exciting. So, to create a unique dish you will need:
- plate (it is better to use a plastic or foam product);
- a set of quilling paper (sold in craft supply stores, you can buy a set of the most suitable color scheme);
- tools for twisting paper ribbons (sometimes come complete with strips), they can be replaced with an awl;
- toothpicks;
- ruler;
- a simple pencil;
- PVA glue;
- image.
Designing a product using the quilling technique includes several stages:
- You need to divide the decorative plate into 4 equal parts, marking its center. You also need to use a pencil to mark the location of the drawing.
- Making curls from paper. Using ribbons, you can create entire compositions of flowers, birds, and various patterns. Each element is coated with glue using a toothpick and attached to the plate.
Don’t be afraid to come up with new elements and compositions from paper ribbons. The main thing is to choose the right color scheme that will fit perfectly into the interior of the kitchen or dining room. Also, do not forget about hooks for attaching plates to the wall.
Painting plates in Japanese style
The plates can be decorated as you like
Decorative plates against a white wall look very beautiful
Stained glass covering
Stained glass always looks stylish on any piece of furniture. To decorate in this way, you can choose a transparent glass plate so that the stained glass effect is noticeable.
For decoration you will need:
- glass plate;
- stained glass or acrylic paints;
- circuit;
- you can use various beads if desired;
- degreaser;
- brushes
Before you begin decorating a piece with stained glass, the plate must be thoroughly washed and degreased so that the paint adheres and dries evenly. After this, you can outline the contours of the image with a pencil, or you can start working with paints without them if you want to improvise.
You can make a collage like this out of plates, and place a plate with a clock in the middle
Decorative plate with painting
First of all, a contour is applied to the plate and dried for several hours (the exact time for each type of paint is indicated on the packaging). Dry in a well-ventilated area. It is recommended to apply it in two layers so that the line is convex. Then you can paint the colored areas.
If you want to add additional decorations, it is recommended to do this when the paint begins to dry. You need to lay out the elements with tweezers and lightly press them into the layer. All actions must be clear and accurate so as not to spoil the overall appearance of the product.
You can decorate the plate with artificial flowers
Example of using decorative plates on the wall
You can use plates to create a collage on the wall
Decoration with satin ribbons
Satin ribbons are increasingly being used for interior decoration. And, of course, with their help you can quickly and originally decorate plates. First of all, it’s worth considering ways to create decorative elements from satin:
- Weaving in different ways from several ribbons. The result is a strip of the desired length with a pattern.
- Sewing. It is carried out using thread and needle. A whole composition in the form of a panel is assembled from different pieces.
- Kanzashi - flowers made of satin ribbons.
The elements necessary for decoration are simply attached to the product with glue. Most of the time is spent on preparing parts of the overall composition.
Decorative plates for the kitchen will perfectly complement the interior
You can decorate the plates yourself
Artistic painting
Painting plates is a rather difficult but exciting activity. Any drawn plot is allowed, it all depends on the overall interior of the house. Landscapes, ornaments, fairy-tale or mythical scenes, flower arrangements, animals and birds, Gzhel or Khokhloma paintings look great on decorative plates.
For decoration you will need:
- white plate;
- degreaser;
- pencil;
- acrylic paints;
- brushes
First, the plate is washed and wiped with a degreaser. Then the drawing is drawn with a pencil, after which they begin to paint the product. When the paints are dry, you can varnish them.
Don't be upset if the artist's talent is completely absent. In this case, a stencil can always come to the rescue. The drawing with it will turn out no less beautiful. You can buy it at hardware stores or places that sell craft supplies.
Instead of paintings, you can hang decorative plates on the wall
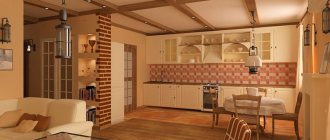
In the kitchen, decorative plates will perfectly complement the interior
An example of the use of decorative plates in the interior
Headboard
In the bedroom, few people welcome plates as wall decor, believing that there is no place for dishes in this room. However, as practice shows, plate decor looks impressive here too. There is empty space above the head of the bed - use it to place a small arrangement of plates, they will make the room more comfortable. The plates above the head of the bed in the nursery look no less interesting - they, for example, can be used to zone the sleeping areas in a room with two children.
ballarddesigns.com
1/3
decorpad.com
2/3
drivenbydecor.com
3/3
What is plate decor
Collectible porcelain gradually turned from a piece of tableware into a decorative decoration for walls, shelves, and racks. The plates in the interior fit into both classic and avant-garde styles. They are selected in stores, souvenir shops, or created with one’s own hands from purchased or scrap materials, each time receiving a single exclusive copy.
Commemorative plates on the wall depicting historical places are brought back from travel as souvenirs. By hanging several pieces in one place, you get a unique composition that will be of interest to guests. Photo salons offer printing photographs on decorative plates. The choice of exhibitions is unlimited. If you put a congratulatory inscription on it, it will be a good gift for a friend. Ethnic and floral motifs, Gzhel, textiles, Chinese porcelain, and abstract figures are also popular. Copper trays never go out of style.
You should stick to the same theme or different ones, but in the same color. It is not recommended to deviate from the principle of combining plate decor with the tone of the finishing materials of the walls, floors, style and size of the room.
Suitable places for plates:
- kitchen;
- bedroom, office;
- living room;
- hallway;
- arch, doorway.
By showing your imagination, you can play with any aspect - theme, shape (oval, circle, square), or create a composition using other design elements.
Hallway
Do you have a small hallway with no room for decoration? Use plates there too. Place them on a free section of the wall closer to the front door - the plate composition will instantly fill a boring room with an atmosphere of hospitality and homeliness, but will not take up a single centimeter of valuable space.
Photo: addicted2decorating.com
Making your own plates
Making such a product with your own hands will not be difficult; the main thing here is to have paints and varnish and simple plates on hand that you will use as blanks.
These elements can be decorated using several methods, while the simplest dishes can always be simply decorated using acrylic paint. For all those whom nature has not endowed with artistic ability, you can use a printer to print the image. Next, all that remains is to transfer the picture onto the surface of the dish using carbon paper. Then color the image.
During the finishing process, it is easiest to work with ceramic dishes, since the paint is applied most evenly to such a surface.
To fix decorative plates to the wall surface, you can buy ready-made options in the store:
- A shelf equipped with holding bars, which will perfectly help organize decorative elements in the interior of the room;
- Wall holder that fits perfectly into the design of the room;
- Transparent holders that are almost invisible. They are able to completely encircle the plate, which will provide greater confidence that the product is firmly fixed to the wall;
- Metal stands that can easily be placed on any surface, be it a wall, window sill, chest of drawers, etc.
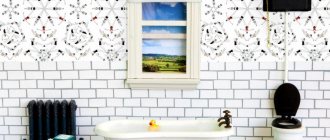
Composition in the bathroom
Plates as decoration for a bathroom or toilet are a rather bold and unusual solution. It will come to the aid of those who want to create an extraordinary and original interior that will have no equal. Moreover, plate decor in the bathroom is interesting not only from an aesthetic point of view - the glossy surfaces of the plates perfectly reflect light, which is always not enough in small technical rooms.
carlaaston.com
1/3
oops-cache.org
2/3
bullcitystudio.com
3/3
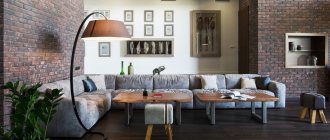
Ideas for placing plates in the kitchen and living room
Where would such plates look appropriate? First of all, this is an excellent decor for the kitchen or dining area. Also pay attention to how they look harmonious in the living room, for example above the sofa or near a large mirror. If square meters allow, then you can also decorate the hallway or wall in the bathroom with plates.