What are the sizes of the slabs?
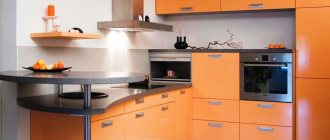
The size of the stove depends on the size of the kitchen. The corner stove measures half a meter by half a meter and has a grill and oven. Below you can see a photo of a kitchen with a gas stove.
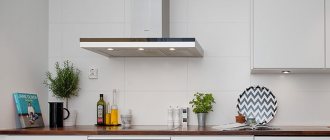
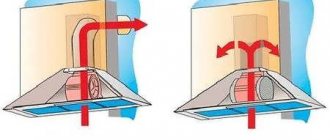
In the kitchen you cannot do without ventilation, a kitchen hood above the gas stove and an air purifier, regardless of the choice of stove. Thanks to ventilation there will always be fresh air. A kitchen hood for a gas stove draws in steam. An air purifier removes any odors.
Installing a built-in kitchen
When developing a kitchen design with a gas stove, it is worth considering all the nuances. It is best to entrust the installation to professionals who know their business. The design decision will depend on the living space. Of course, if the apartment has more than ten rooms, then you can make a separate room for the kitchen. When installing a corner slab, a lot of space will be freed up, allowing you to fit a dining table and chairs.
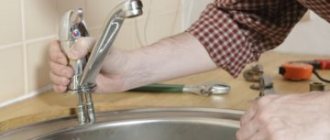
Installing a new gas stove
The whole process is carried out in several stages:
- the gas valve is closed, and at the same time its handle should be raised to the very end;
- the old stove is disconnected from the gas pipeline and removed from the room;
- the new slab is installed in the right place, but the protective film must not be removed from the product so that it is not damaged during installation, and the slab must stand level and secure, since no distortions or wobbles are allowed;
- all components of the equipment are disassembled, and it should also be remembered that the stove must be at a certain distance from walls and other objects so that it can be easily connected to the gas pipeline;
- in the unit located at the junction of the product and the hose, you need to install a special gasket that will protect the stove from various contaminants;
- the connection point must be tightened well, for which two open-end wrenches are usually used;
- the slab is installed at a certain distance from the wall, and this distance must be the same as indicated in the regulatory documentation for the product, and its evenness must be checked using a special building level;
- if the product contains elements that operate using electricity, then it must be connected to the electrical network, for which a suitable cable is used, and it is also often necessary to install a power outlet;
- the last stage is to install all the additional elements of the gas stove that are sold complete with it, and also remove the protective film from the product.
Small flat
Typically, in a one-room apartment, residents try to make one room into a bedroom, and the kitchen room should be at the same time a place for cooking, a dining room and a living room.
The ideal option is a kitchen with a corner stove. The sink, table and cabinets are placed along the walls, and in the free space there is a corner sofa and a square table with chairs for 2-4 people. Even in a small kitchen you can prepare healthy food, have a dinner with your loved ones or host a party.
We arrange furniture correctly
Firstly, you can combine the kitchen with the living room to create a studio apartment. This apartment option is very popular among the younger generation. The dining room can be made in the living room, which will help free up space for kitchen units and furniture, which will give the kitchen greater functionality and comfort.
In a small room, even with well-arranged furniture, you can feel a feeling of constraint. With the right design of a small kitchen with a gas stove, this can be avoided.
It is worth removing the door and installing an arch instead. With its help, the room will visually expand. If doors are absolutely necessary, you can install sliding doors or an accordion, which will help expand the space and look stylish.
Preparing for work
Before you thoroughly understand how to install a new gas stove, you need to dismantle the old equipment and evaluate the future scope of work. Also, “estimate” the list of required tools and materials, which looks something like this:
- gas, adjustable and wrench (22 x 24) wrenches;
- ball valve 1/2ʹ (if replacement is necessary);
- FUM tape;
- concentrated soap solution;
- suitable hose;
- screwdriver.
The walls of the cutout must be treated with sanitary silicone, that is, using a piece of fiberboard or a spatula, rub the silicone into the sections of the tabletop, this way you will protect the tabletop from moisture.
https://www.youtube.com/watch?v=
If you have thermofoil, then additionally stick foil on the ends of the cutout, this will additionally protect the cutout from temperature influences.
| Rice. 7. Treatment of the ends of the cutout under the hob with sanitary silicone |
| Rice. 8. Additional protection of the cutout ends with thermofoil |
First of all, you need to determine the type of oven and hob. These elements can be dependent on each other and autonomous. If the first option is chosen, two elements are placed in one niche. In the autonomous version, the hob can be installed in the center of the unit, and the oven in any convenient place where the gas supply hose can be reached.
Connecting the gas oven cabinet and starting it up begins with installing the equipment in the niche of the unit. To do this, the back panel of the niche must be removed and the oven placed on two bars that are pre-attached to the surface of the furniture set. This will ensure ventilation of the oven and niche to avoid fire.
The next stage is connection to the gas supply system. This installation stage involves connecting the oven cabinet and gas pipe using a hose. It is also necessary to connect the hob to the gas pipeline. In this case, you can use a welded pipe connection. Before starting work, do not forget to turn off the gas supply to your house or apartment.
After the gas oven and hob are connected to the fuel supply, it is necessary to configure all functions of the equipment, check the functionality of the burners and the gas control system. The valve responsible for the gas supply is subject to checking and adjustment.
Detailed instructions for connecting a gas hob and oven are presented in the video.
When connecting the oven to the power supply, remember that the wire should never come into contact with the gas pipe. The maximum heating temperature of the conductor should not be higher than 700C. Do not use extension cords or double or triple sockets. All additional wires and connections may cause a fire. Before you start cleaning the oven cabinet, it should be disconnected from the electricity supply.
Where to put the refrigerator
Upon completion of the renovation, everyone thought about a Khrushchev kitchen with a refrigerator and a gas stove.
There are two-room apartments in which both the kitchen and the room have doors that open onto the same balcony. Then residents install a refrigerator on the balcony, which frees up part of the kitchen space and keeps food close by. Many people do it this way: they make a kitchen out of the balcony, and use the vacated room as a dining room or living room. Or the kitchen is expanded to include part of the balcony, and the remaining part is converted into a cozy balcony.
There is another option: floor cabinets with surfaces that are suitable for cooking, cutting food and decorating dishes are built along the windows. Thanks to this option, the kitchen is uncluttered, bright and easily ventilated. It is advisable to place the stove in a corner. To better ventilate the room. A kitchen design with a stove in the corner will look good in rooms of any size and interior.
How to connect the unit to the system
There are two ways to connect gas stoves at home:
- using a flexible gas supply;
- through a metal pipe and appropriate fittings.
Flexible connection is the most convenient and therefore the most popular option for self-connection. Pipe connection, to which there was no alternative twenty years ago, is today used only in the exceptional cases described above.
Types of modern gas hoses
It is advisable to purchase a hose or flexible connection for connecting a gas stove in specialized stores. Experienced sales consultants will help you avoid serious mistakes and give the necessary recommendations.
In addition, the products in such stores are strictly licensed and certified. Documents confirming this, together with a cash receipt, will be a serious guarantor of quality and a possible complaint (return of goods).
The three most popular types of gas hoses are:
- rubber hose;
- rubber hose with metal braid;
- bellows hose.
There is a certain difference between them according to certain characteristics. They are selected based on preliminary measurements, calculations and operational and technical requirements, which are described in our article.
The rubber hose belongs to the category of the most popular of all flexible connections for gas units. This is due to the relatively low price, while the hose has high strength and sufficient flexibility.
This supply is made of vulcanized rubber reinforced with nylon thread. It performs well at temperatures from -35 to +50°C and can withstand heavy workloads for many years.
A rubber hose with a metal braid is essentially a modified version of the product described above. The metal screen increases strength, protects against mechanical stress and almost completely eliminates gas leakage.
A bellows hose is a flexible metal-plastic corrugated tube with ideal technical parameters . It is produced using the most modern technologies and is resistant to increased pressure in the line and significant differences. The high-strength protective shell has a certain elasticity and allows the lead to be stretched to a length of up to 30% of the original length, without fear of damage.
The main disadvantage of bellows hoses is their high price. However, professionals recommend bellows hoses for connecting gas equipment at home.
Basic requirements for hoses
First of all, for all products, physical properties such as flexibility and strength are distinguished. Dimensional characteristics - hose length, types and ratings of threaded connections - these are already secondary characteristics.
The connecting hose for connecting the stove to the main gas system must meet the following requirements:
- length limitation – no more than 1.5 m;
- no excessive bends, knots or twists;
- sufficient shelf life according to the quality certificate;
- absence of damage - cracks, rust and other visible defects.
Pay attention to the correspondence of the thread parameters of the hose thread at the outlet of the plate and the shut-off valve of the main drain. If the outlet fitting has a 3/8" thread, then a special adapter will be needed to connect to the system. The established standards for threaded connections are 1/2". The characteristic of a threaded connection, whether external or internal (nut-bolt), is of significant importance.
Connection using a pipe
Connecting the stove using a metal pipe is considered a reliable, but outdated method. This type of connection is rarely used due to excessive labor intensity and the need to use bulky equipment such as a pipe bender, gas welding machine, etc.
The disadvantages include the fact that with a pipe connection, the slab cannot be moved away for cleaning and maintenance. Many people are familiar with the problem of removing kitchen utensils that accidentally ended up behind the stove.
In those cases where connection using a pipe is necessary, it is necessary to partially or fully use the services of professional technicians. Even if you have the skills to work with metalworking and welding tools, it makes no sense to purchase expensive, large-sized equipment to connect one plate.
As an alternative, it is possible to order a pipe of the desired profile with fittings (threaded ends, bends, locknuts, etc.). But in this case, you will need to take preliminary measurements of ideal accuracy. Otherwise, the threaded connections will not match and everything will have to be redone. Flexible leads are not afraid of this problem.
How to properly arrange kitchen items and furniture
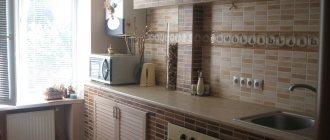
You need to fill a small room with furniture as practical as possible. You can hang shelves for dishes or small cabinets for spices on empty walls. You can put a refrigerator in the corner of the room. The gas stove should be located where the gas pipe runs. The stove should be located 20 cm from the window. A tabletop can be made instead of a window sill, thereby enlarging the room. Thanks to competent specialists who know their business, the sink can be placed anywhere, for example, under a window.
Additional light
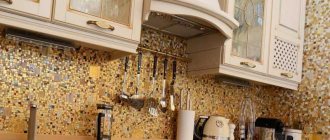
Installing additional light, as well as allowing natural light into the room, helps make the room appear larger. Mirrors or tiles that have a reflective effect are best suited.
Also, mirror mosaic reflects light well. The kitchen room should be bright, so more powerful light bulbs are placed above the table and sink.
Note!
Kitchen designer: purpose of the program, operating rules, pros and cons, secrets of arranging objects in the kitchen
- Bar counter height: types of counters, calculation of dimensions, standard sizes, reviews of modern solutions (photo + video)
Gas pipe in the kitchen: instructions on how to beautifully and safely hide a gas pipe in the kitchen
What colors are best?
Experts advise choosing warm colors: light brown, yellow, gray. It is advisable to choose ecru, pearl or peach color. A bright color scheme is more suitable for a dining room to create a good mood. But at the same time, wallpaper should not stand out. If there are suspended ceilings in the kitchen with a gas stove, then a pastel ton is best suited. Curtains wouldn't hurt as a bright accent.
Safety Rules and Tips
Remember: the answers to most questions related to rules and safety precautions when connecting gas equipment are in their operating manuals. Such brochures are mandatory supplied by the manufacturer, and this rule is especially relevant to gas stoves.
We list the basic rules and regulations when connecting household gas appliances:
- flexible connection to the gas supply system, placed in plain sight in an easily accessible place;
- until the stove is started to be used, the gas supply is shut off by turning the shut-off valve on the supply drain pipe all the way;
- during the installation and connection of the slabs, only high-quality tools, related materials and components are used;
- if for any reason a shut-off valve was not installed on the supply pipe, the nearest valve of the main riser is closed. Even before the connection begins, a shut-off valve is installed at the pipe descent, which is necessary for further safe operation;
- as a temporary measure to close the supply pipe, use a wine cork or thick cloth moistened with plenty of water;
- For mandatory ventilation in the room, open the vents, open the windows and doors.
This is interesting:
Choosing a gas stove: what they are and how to choose yours.
How to clean the burners and how to clean the nozzles on a gas stove.
Lifehacks
Increase the height of the drawers to 90 cm from the standard 72 cm. This way you will have one more shelf in each drawer. In the boxes that will be placed in the corner, install shelves with a carousel mechanism, and in the lower and upper ones - special baskets. There is a disadvantage to using - the mechanisms are too expensive. Boxes can be of different sizes in width and height, which determines their capacity.
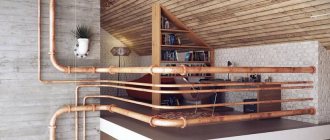
Iron pipes with hooks. Thanks to them, the cooking process is optimized, since everyday items and spices are placed on them. The pipes are attached to the wall and filled with various fasteners at the discretion of the owner. The length of the pipe can be any. An additional tier with drawers that have a pull-out mechanism in which you can place some products and kitchen utensils.
Layout examples
In a 6 square meter kitchen with a gas stove, placing kitchen appliances in one row frees up space for the table. The oven may not fit, but there is room for a washing machine.
At 6.5 m2, even a dining table will fit, but there is no room for an oven and dishwasher. But you can increase the narrow part of the table to 60 cm, and the room will become larger.
With 5 square meters, all the necessary furniture will fit, but there is a minus: the stove and sink will be located too close. In this case, it is better to place the sink on the left edge, this will free up space for the dishwasher, and now there is free space between the sink and the stove.
Even with a properly designed set for a room of 7 m2, there is a drawback - the refrigerator will block the light from the window during the day. You should hang a tulle made of lightweight material to allow as much light as possible to penetrate.
With the help of a corner layout, the room should be used as much as possible. For example, a carousel mechanism for storing various kitchen utensils is mounted in a corner bedside table. An excellent option that should be in a small headset is built-in technology.
How to properly cut out a space for a stove in a countertop
It is necessary to monitor the exact parameters of the plate itself; for this you can use the template and the attached instructions. You need to take a large square to draw a rectangle on your desktop.
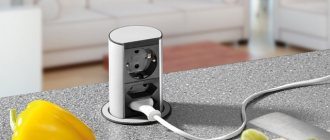
The first thing you should take care of is a 220-volt electrical outlet into which the built-in hob will be connected.
To make the hole you need to find a saw with the appropriate blade. Using a hammer drill or drill, you will first need to drill small holes along all corners of the rectangle.
The process will take approximately 10 minutes. How to properly cut a countertop for a hob.
The choice of location and installation must be completed before installing the furniture.
Detailed correct work flow:
- Determine the contour of the slab.
- Place the unit on part of the table.
- Draw the middle on the prepared flat surface, mark the cutting line.
- Place spacers underneath for precise results.
- Leave 5 cm between the cabinet and the countertop.
- Create initial holes.
- Make cuts along the lines (work with a jigsaw).
- Place the surface into the resulting hole.
- Secure with self-tapping screws and connect.
- Check and evaluate the result obtained.
In addition to the panel, the stove set includes an oven.
Thus, having studied the instructions and rules, everyone can cope with the task assigned to them.
Expanding the space
- The refrigerator should be placed so that it stands at the end of the kitchen unit, which will visually increase the height of the room.
- To create the effect of lightness, furniture made of plastic or glass is suitable.
- Small items create a cluttered appearance. The presence of such furniture visually reduces the room. It is best to place objects of your own size in a small room, despite the fact that they occupy almost the entire space.
- A folding wardrobe will also save space when used.
- The table should be oval or round.
- You should purchase an extendable dining table model and pull-out food boards, since when assembled they take up little space.
Installation procedure for a gas stove
Before being placed in place, the stove is first unpacked. Inside it there are components - racks, baking trays, etc. All this must be removed. After this, you should first screw on those same adjusting feet. This work should be done by two people. Both for convenience and to avoid damaging the surface of the stove.
When connecting the stove, it is more convenient to use a special flexible high-pressure hose. It can be bought in any specialized department, and it is not expensive. A hose, unlike a metal pipe, allows you to move the slab within small limits if necessary. This is convenient for some small repair work (laying linoleum, for example). It is good to attach special clamps to the wall behind the stove in advance, which will hold this hose in a stationary position.
Don’t forget to read the instructions for your stove, as each model has its own characteristics.
Gas stoves are popular products because they are easy to use, compact in size, and easy to install. Installing a gas stove can be done by anyone, since this work is considered simple, but it is important to take into account certain nuances, without which you can get a poor-quality result.