Gluing the shield in the usual way
The quality of glued furniture panels primarily depends on the preparation of the workpieces. The wood selected is dry, smooth and without knots, for example, beech. You can buy ready-made timber and pass it through a thicknesser to get blanks of the same thickness.
The appearance of the glued shield matters, so the blanks are laid out by color. After this, the growth rings are marked with chalk and the arrangement of the blanks is changed so that they alternate in direction. If the growth rings are in the same direction, then when the tree dries, it will bend in one direction. When alternating the direction of the growth rings, there will be no bending.
Tree ring arrangement
Lines are drawn with chalk on the unfolded structure, which are then used when assembling the shield after adjustment.
Shield with chalk mark
Due to the uneven sides, gaps remain between the plots. To remove them, the boards are folded sideways and jointed on a machine.
Preparing boards for jointing
After jointing, check the tightness of fit of the workpieces to each other. If not all defects are removed, then jointing is repeated.
The plots matched to each other according to the marks are placed in a shield and prepared for gluing.
Assembling a shield from fitted boards
The blanks are glued together with PVA glue. It is applied to the end of the board from a special bottle, and then smoothed over the surface with a soft rubber roller.
Applying glue to workpieces
The blanks, coated with glue, are assembled into a shield and then compressed with four clamps: two from below, and two from above. The clamps must not be pinched, otherwise the shield will be pushed to one side.
Compressing the shield with clamps
Clamps are also installed at the joints of the workpieces.
Clamps at the joints of workpieces
After 2 hours, the clamps are removed, and the remaining glue is removed with a shoe knife. The prepared surface is sanded with a soft float and sandpaper size 100-180.
Sanding furniture panels
After sanding, the furniture board is used for its intended purpose.
An example taken from the YouTube channel of Vladimir Zhilenko , video “How to make a furniture board. How to make a wood board”
Selection and preparation of material
When planning to make any piece of furniture, you need to choose the right material. Typically, furniture panels with a thickness of 2 cm (or 20 mm) are used in production. This means that at home it is necessary to make blanks of similar thickness. This is where the difficulties begin: boards with a total thickness of 20 mm are not suitable for gluing the shield. Even the most ideal wood will require additional processing when gluing. It will need to be planed or sanded. Therefore, it is necessary to take boards with a reserve.
The best option for making furniture panels is boards with a thickness of 2.5 cm. An allowance of 0.5 cm is removed in 2 steps: when processing surface defects before gluing and when finishing after it. Thus, the workpiece is brought to a thickness of 2 cm.
When choosing a material, you should immediately discard warped or uneven wood. It is better to cut blanks from a solid board at least 5 cm thick: by sawing it lengthwise into 2 parts, you will get boards with the same color and texture. It is also necessary to pay attention to the length of the workpieces. It should have a margin of 2 to 5 cm, which will allow for high-quality processing of the end sections of glued boards.
To make the material with your own hands at home, you need to prepare the usual carpentry tools:
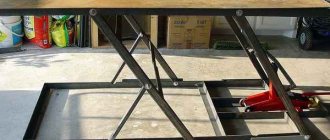
Device of a machine for gluing workpieces.
- planer or jointer;
- surface and belt sanders;
- coarse sandpaper;
- level;
- corner;
- machine for gluing blanks.
You will also need to prepare the wood from which the bars will be cut. It is better if it is wood species such as pine, aspen, birch or oak. Each furniture panel is made from bars of the same type. Typically, the dimensions of the bars have a width-to-thickness ratio of 1:1, but other dimensions can be used, for example, 1:3.
Return to contents
Gluing a shield from blanks connected by slats
If you glue a board from planed boards, then difficulties will arise:
- workpieces clamped with a clamp can “spread apart” and you get a step;
- the step can only be removed with a thicknesser or long-term grinding.
These disadvantages do not exist when connecting the panel parts to an inserted rail. For work, choose the following order:
1. Prepare 40 mm boards. They should be smooth and of the same thickness.
2. Lay out a shield from the boards and draw the base with a pencil. The base mark is needed to make cuts on the desired side and to correctly assemble the boards into a board.
Base mark on the shield
3. On each workpiece, cuts with a depth of 9 mm are made on both sides with a circular saw. The blanks placed along the edges of the shield have one cut made.
Workpieces with grooves
4. Slats are cut from wood scraps, which are 1 mm thinner than the width of the cut, and 1 mm less wide than the depth of the cuts in two boards, that is, 17 mm. The rail inserted into the groove should move easily.
Shield slats
5. For gluing, use PVA glue. It is applied with a brush so that it fills the grooves.
6. The assembled shield is clamped with clamps and left to dry.
7. The squeezed-out glue residues are removed with a sharp tool, and then the shield is sanded. This method of joining workpieces requires minimal surface grinding.
Glued board on slats
An example taken from the YouTube channel Wooden Ware , video “Gluing wooden panels, quickly and efficiently!”
Wood gluing tool
To obtain the most durable connection, when gluing, the wood is pressed - subjected to compression using special presses. At home, improvised tools and means are used for these purposes - vices, clamps, cam devices, frames made of metal corners with clamping mechanisms. The pressure when pressing wood is maintained in the range from 0.2 to 1.2 MPa. In production, large values are possible; at home, such indicators are enough for the structural parts to stick together.
Do-it-yourself laminated wood.
If the gluing technology is followed, the adhesive seam is strong and reliable, and, unlike the method of joining parts with metal fasteners, it does not spoil the appearance.
For those who like to create household items on their own, a topic is open on FORUMHOUSE. You can find out how to organize a convenient corner for working with wood in the article. The video about wooden elements in a country house shows interesting products made by users of the portal.
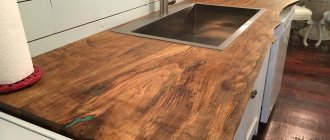
Gluing of furniture panels is carried out not only on an industrial scale. Home craftsmen resort to this technology to make furniture that is as durable as solid oak structures. Tabletops made from spliced lamellas last a very long time, do not warp, deform or swell from moisture. Another reason for splicing is the presence of small-sized bars, which are unwise to throw away and have nowhere to be used. The best option is gluing the lamellas into furniture panels.
Furniture made from natural and environmentally friendly materials with your own hands is valued and in high demand. This construction material is more attractive and practical than MDF and chipboard.
How to glue furniture board at home. Preparing for work
To get aesthetic and high-quality material, sort the bars according to the following criteria:
- absence of knots and cracks on the surface;
- correct geometry (slight curvature can be leveled with a plane);
- correspondence of texture pattern and shade;
- identity of the species - pine is glued to pine, larch to larch.
Photo 1. Carpentry shop "LesoBirzha"
Furniture board gluing technology
How to glue furniture board? The answer to this question depends on the scale of home production. If the work is planned to be one-time for your own needs, you can use the available tools available to each owner.
If you want to organize a small furniture manufacturing business, you will have to acquire several machines:
- planing;
- sanding belt;
- surface grinding;
- band saw;
- milling
Please note that the dimensions of the finished product are slightly smaller than the blanks. Make allowance for finishing the ends. The width of the spliced lamellas should be no more than 15 cm. Only with such dimensions can the absence of internal tension in the wood be achieved.
Photo 2. Finger-joined furniture panel made of larch
For furniture, the optimal panel thickness is 20 mm. However, according to the rules for gluing furniture panels, you need to choose blanks with a thickness of 25 mm. The extra 5 mm is removed in 2 steps. Even before splicing, 3 mm is removed, the remaining 2 mm are removed during the final processing.
What glue to use to glue furniture boards
Basically, furniture panels are glued together with D-1 glue. This glue is produced with varying degrees of water resistance.
There are several water resistance groups in the international classification; domestic industry uses four:
- low;
- two middle ones - A and B;
- high.
However, any wood glue will do at home. If you don’t want to use PVA, take the “Stolyar” adhesive.
Photo 3. Thin pine furniture panel
How to properly glue furniture panels. Slat arrangement options
Long lamellas are spliced only along the width. If you are working with small bars, they should be arranged in a checkerboard pattern. In this case, both the long and short end parts are lubricated with glue.
With two-layer gluing, the bars of the first row are located perpendicular to the bars of the second row. Such shields are particularly strong and durable. Still raw blanks are placed under a press, where they should remain until the glue dries completely. This is followed by careful grinding on special equipment and chamfering on a milling machine. After finishing, the joints disappear, the panels are ready for sawing into parts.
Photo 4. Furniture panel made of larch
How to glue two furniture panels together
The need to connect two panels into one arises when manufacturing products of non-standard width. 600 mm is the maximum standard for sheets, so you won’t find a wider width in all online stores. How to glue furniture panels to make one wide one from two narrow panels? Clients often ask technologists this question.
Photo 5. Furniture board made of pine for furniture production
You can connect two slabs using grooves and a laying strip. At the contacting ends, it is necessary to cut longitudinal grooves with a narrow milling cutter and place a strip coated with glue there. The ends of the panels also need to be thickly coated with adhesive. There are several effective ways to glue wood panels. However, the task is best handled by a professional carpenter.
You can turn well-treated boards into panels by using board jointing. This does not require any special skill, but accuracy and thoroughness in the work will come in handy. The fact is that gluing wood into a single mass has many nuances. We'll talk about them today.
Gluing a shield without clamps
In order for the board plots to stick together well, they must be compressed. To do this, it is not necessary to have clamps; you can use simple wedges.
In this case, the boards are fastened with dowels. This is a connecting wooden element in the form of a cylinder with chamfers at the ends. You can buy such connectors at a hardware store or make them yourself.
For the shield, smooth planed boards are prepared. They are laid out on a flat surface and a sign of the order of display is applied with a pencil.
Marking the order of boards in the shield
A special device is used to mark places for dowels on the boards. They are applied at different levels.
Marking places for dowels
Places for dowels are transferred to the end of the workpieces.
Marking places for dowels at the end of the workpieces
To drill a hole for the dowel, use a jig. This is a device that is rigidly attached to the board and has a guide for the drill.
The hole is drilled with an M8 drill. The drilling depth is marked on it with electrical tape.
Drilling a hole for a dowel
The shield is glued on two stands made to the size of the shield.
Shield stands
The end of each workpiece is coated with PVA glue. It is important to fill the dowel holes with glue.
Dowels are driven into the holes, and then the blanks are knocked into a shield.
Knocking down blanks into a shield
The assembled shield is placed on stands. To prevent the shield from bending, a weight is placed on top, and to prevent it from sticking to the stand, insulation from newspaper is laid.
Laying the shield on stands
The shield is clamped on the stand with four jambs. They are hammered in until glue appears at the joints of the plots.
Shooting joints on a stand
After drying, remove any remaining glue with a sharp object, and then sand the surface.
Sanding the glued board
An example taken from the YouTube channel Mikhail Deryvedmid , video “How to make a furniture panel without clamps and clamps”
Description and characteristics of shields
- Finger-joined furniture panels
This is a wood board formed from lamellas glued along the width and spliced along the length - wooden blocks. Along the length, the lamellas are fused into a mini-tenon. Along the width they are glued together into a smooth fugue. The method is reliable and is used in the manufacture of standard products in 100% of cases.
Compared to solid-lamella structures, spliced panels are considered more reliable, since the tension of the fibers in adjacent bars is uniform and, accordingly, the entire structure is more stable and durable.
- Solid lamella furniture panels
This is a wood board formed from lamellas glued together only along the width. The gluing method is using a smooth fugue. The width of the lamellas is 40-45 or 25-30 mm. Thickness varies from 10 to 150 mm.
Compared to spliced ones, solid-lamella structures have a more uniform texture and color range, since they consist of fewer lamellas.
Joining boards into an array
Joining boards: choosing wood
Before you join wood with your own hands, you need to bring the boards into perfect condition (if possible). The task is to put together a beautiful puzzle from a bunch of different boards. Therefore, a prerequisite is that the color, structure, and texture of the boards match - otherwise the panel will be motley and unattractive.
Merging boards into one array
has one significant advantage: the boards themselves can become deformed over time. However, properly glued solid wood can help the wood avoid this flaw.
Wood for splicing should not be twisted or deformed - this can lead to further distortion of the final product. Try to choose as straight boards as possible.
Splicing boards: preparing the material
— Laying out boards according to structure.
Twist the boards for a long time and meticulously to select not only the pattern, but also the matching direction of the fibers. That is: if the fibers are curved, combine them with the curved structure; if straight - with a straight line. This is the only way to ensure a harmonious fusion of wood during splicing.
— Aligning boards in the direction of the grain
. After the boards for gluing are folded in the form in which you see them in the array, you can proceed to alignment in the direction of the grain. The material can be leveled using a jointer or grinder, or manually using a plane.
— Selection of boards based on growth rings
. The joining of boards into a panel must take into account one detail: if the ends of the array are rigidly fixed, the panel (properly glued) will not be prone to warping. But if its subsequent fixation does not provide for rigid clamping of the ends, most likely such a panel will bend in the shape of a bowl. To avoid this, alternate the boards in the direction of the growth rings.
— Jointing the edges of boards.
The last step in preparing wood for splicing at home will be jointing the edges. If some deviations in the direction of the fibers are allowed when joining, then in case of flaws on the edges of the boards you will not be able to get a normally glued panel. That is, if the edges of the boards are not straight (90 degree angle), not smooth, there will be a gap between the boards, they will not be properly glued and will definitely bend. This is not difficult to fix using a jointer or a circular table.
Gluing boards
So, all the materials and tools are ready, the boards are in order. Now is the time to start gluing the wood. We will not dwell specifically on the choice of glue and the gluing process itself - if you are a beginner, read this material in a separate article
It is advisable to coat both edges of the boards being glued together. The glue for gluing wood must be sufficiently viscous. Thanks to this, gluing the wood will not be accompanied by the accumulation of air in the pores - the glue should fill all the pores. The surface should look shiny. If this is not observed, apply glue to glue the boards again.
Do not rush to remove excess glue with a rag, otherwise the joining seams may become unsealed. It is better to leave the “semi-finished product” overnight or at least for a few hours so that it dries, and then scrape off the dried glue with a spatula.
Massive screed
To prevent deformation and level the panel, wood joining should be accompanied by the use of 3/4″ clamps. Just be careful: metal can leave rust marks on the wood. To avoid these troubles when gluing boards with your own hands, place adhesive tape under each metal pipe.
Panel Alignment
Splicing wood at the stage of clamping with clamps can be accompanied by two types of deformation:
— the panel bends upward.
In this case, it will be enough to adjust (tapping) with a hammer through a wooden spacer.
— the panel bends down.
In this case, the merging of wood should be accompanied by the laying of wooden blocks, which are clamped together with the array.
After this, tighten the clamps until small droplets of glue appear along the seams. The pressure of the clamps must be equalized evenly along the line. Add or remove clamps as needed.
As you have seen, splicing boards is not that difficult, so it is not necessary to buy an array if you just have good boards on the farm. Tatyana Kuzmenko, member of the editorial board of the online publication “AtmWood. Wood-Industrial Bulletin"
How useful was the information for you?
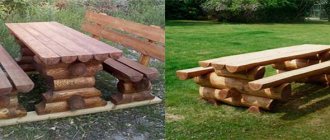
The figure shows another way to connect wooden parts: gluing boards into a shield (panel for carving) and additionally fastening wooden transverse strips in the shape of a tenon. Rafted boards or bars in shields must be directed along the long side of the shield, in square or round shapes - vertically. The material of the component parts is taken from the same wood, mainly from the same trunk; the material of the transverse planks should, as a rule, be from another wood, more durable or with other advantages: for example, it is known that oak is not afraid of moisture, pine and spruce are also less susceptible to hygroscopicity, less worn down by wood-boring beetles, cedar, olive, larch, Boxwood is resistant to rotting and cracking. The crossbars (dovetails) have a trapezoidal profile (“dovetail”) and slightly taper towards the end in the shape of a wedge. They are driven into sawn grooves one towards the other.