0
82411
The apartment has a Soviet-era wall made of high quality natural wood. But over time, the facades became warped, the fittings failed, and the appearance became unpresentable. It’s a shame to throw away this piece of furniture, so many people have a question about how to update an old furniture wall with their own hands and they study photos before and after restoration.
Remaking an old wall: changing the design
Covering old furniture with self-adhesive film is the easiest option for changing the decor. Today, film is available both plain and colored, in different colors, textures and shades. There is no point in gluing a film with a wood pattern; otherwise, it is in trend today. But plain or patterned ones are what can turn an old wall into new furniture. The steps are simple, but the work requires accuracy. But the result is excellent. See two photos. The first one shows an old Soviet chipboard wall before renovation, the second one shows it after.
Updating an old furniture wall - before and after
Now about how it was updated. Compacted furniture self-adhesive film was used, cream color, matte surface. The open part of the old wall was closed with glass doors; a translucent matte film was used for the glass. The edging is furniture layout (also self-adhesive) chrome color. The order of work is as follows:
- Everything that can be removed, you remove and disassemble. Remove old fittings.
- Surfaces must be clean and free of grease. This is easier to achieve with a soft cloth soaked in dishwashing detergent. Then everything is washed off with warm water and a small amount of vinegar. Wipe with a dry cloth.
- Cut out the details. It is better to cut the film 8-10 mm larger. The remains are then cut off with a paper knife.
- Spray the part to be glued with water from a spray bottle. On a wet surface, the film can be moved if something goes wrong. You can even peel it off without damaging it.
- After removing the protective layer from the film, carefully lay it out. Having leveled it, begin to smooth it with a soft cloth from the middle to the edges. Try not to have any bubbles. To do this, you need to move gradually, without jumping from place to place.
- If there is still a bubble, you can pierce it with a thin needle approximately in the middle. Then expel air from the edges of the bubble to the hole and rub the puncture site.
- Having glued the film, take a clean thin cotton cloth, spread it on top and iron it with a warm iron (medium heat).
- We glue the trim and install new handles.
This is the sequence of work with every detail. It’s the same with glass, you just need to glue it to the inner surface. After assembly you have a renewed wall. This technique can be used for any item: chest of drawers, bedside tables, wardrobe, kitchen set, etc.
With lighting, the updated wall looks magical
For example, after a successful experiment with a wall, we remodeled an old cabinet in the same way and added it to the right. Now the entire wall is occupied. You can update your kitchen set in the same way: apply self-adhesive film and replace the handles.
There is a second way. It is a modification of the proposed method, but it is simpler and not so labor-intensive. Only the doors are covered, not with film, but with non-woven wallpaper. The wallpaper is glued with PVA glue. To prevent the edges from riding up, the parts are cut 5 mm smaller on all sides. It turns out a kind of edging. Everything looks good (example in the photo below).
A simple renovation of an old Soviet-era wall: paste suitable non-woven wallpaper on the doors
What's good about this method: it's easy to change the decor. Tired of the old appearance, they tore off the wallpaper and put on new ones. Despite the fact that the method seems frivolous, the appearance is maintained for several years. Its author even tried it on a kitchen set. Only the wallpaper on top is coated twice with PVA glue. In this case, the cabinets can be washed. It is important to apply the varnish layer evenly, without sagging; there are no other difficulties.
Sometimes wallpaper is varnished. But before you do this, try it on a scrap piece: see how they react to it.
When choosing a varnish, you need to remember that acrylic and cellulose varnishes remain transparent after drying, while polyurethane varnishes turn yellow after time. Also, polyurethane is almost not softened by solvents: it can only be removed mechanically (from wood - cleaned with sandpaper).
You might be interested in reading how to make a bar counter in the kitchen yourself (several options)
How to disassemble an old Soviet cabinet?
Wardrobes of the 70s and later periods of the last century were assembled mainly on eccentric ties, wooden dowels and screws. If you need disassembly and subsequent reassembly for moving, follow the instructions:
Stage No. 1: Shelves, drawers, handles
- Prepare the tools: rubber hammer, set of screwdrivers, screwdriver, chisel.
- Clear the floor near the cabinet so that it can be placed.
- Remove the shelves that rest loosely on the shelf supports.
We take out removable shelves first - Remove the fixed fasteners from the other shelves and remove them.
- Pull out the drawers.
- Use a screwdriver to unscrew the screws of the crossbar supports. Take all this out of the wardrobe.
- Using a screwdriver, unscrew the hinge screws on the doors of the building and mezzanine.
- Remove the cabinet fronts and place them carefully to the side.
- Unscrew the door handles.
- Inspect the mezzanine fasteners from the inside at the top of the cabinet body.
- Remove the plastic covers from the mounting sockets.
Stage No. 2: Fasteners and mezzanine
Depending on the type of fasteners, remove them with the appropriate tool:
- The connection on the eccentric coupler is dismantled by turning a screwdriver inserted into the cross slot of the eccentric counterclockwise. The cylinder is removed by prying it off with a flat screwdriver. You can then quickly separate adjacent panels of the cabinet body.
An eccentric coupler is the most popular type of furniture connection. - Disassemble the fastening in the form of a metal arc and a screw inserted into its slot, placed in a cylindrical recess of the panel, using an awl or a piece of thick wire. Insert the point into the hole of the screw and unscrew the pin. Remove the bracket and separate the panels.
- If they do not come apart when pressed with a chisel, tap one of the plates with a rubber hammer. The dowels will come out of their nests. Gently grab the pliers and pull out the wooden dowels;
- Remove the screws from the metal sockets. If the thread does not give way, loosen it with pliers.
- Using a wide chisel, pry the bottom of the mezzanine box, separating it from the cabinet lid, and slightly move the mezzanine to the side. It takes two people to remove it, especially if it is a 3-door wardrobe.
- Carefully lower the housing, freed from filling elements, with its front part on the floor.
Stage No. 3: Back wall, hinges, frame
- Use a chisel to pry up the plywood back wall and lift up the nails. Press the wall back down and remove the nails with pliers.
- Remove the plywood and the connecting strip, if any.
- Remove the fasteners in three corners of the box. Remove the released panels.
- Now disassemble the remaining fastening.
- Place the bottom with the support frame facing up. Remove the frame by unscrewing the screws.
- Also disassemble the mezzanine.
- In the Soviet wall, carefully remove the glass doors, freeing them from the hinge clamps. Then remove the loops from their sockets.
- All of the above also applies to Estonian-assembled furniture.
During disassembly, place the removed accessories in bags. Include sheets of paper with marks of parts belonging to them.
Disassemble the corner cabinet without changing the position of the cabinet. Due to geometric features, such furniture is stable and does not need to be tipped over to the floor.
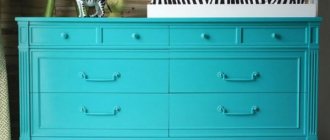
Dresser update
The old chest of drawers had stood for who knows how many years in the attic, but it was very strong and reliable, it had not dried out one bit, only the polish was cracked. It is much stronger than modern products. This is a feature that is inherent in old, Soviet-era furniture. It's not very detailed (to put it mildly), but after standing in poor conditions for several decades, it remains strong. Remaking a chest of drawers is more complex: two techniques were used: painting, and then decorating using polyurethane moldings and wallpaper.
This is what it was in the beginning: an old thing that had been collecting dust in the attic for a long time
Step 1. Remove the fittings and remove the old coating. In some places the polishing was scraped off, in others it was sanded with sandpaper. The chips were covered with wood putty and waited until it dried. At the final stage, everything was cleaned with fine-grain sandpaper. At the same time, the chest of drawers became the same as in the photo below.
This is after it was puttied and leveled with sandpaper
Step 2 . Installation of polyurethane moldings. When choosing moldings, make sure that they are not bulky: too thick ones will look very rough on a small chest of drawers. They should be no wider than 5 cm and as narrow as possible when looking at them in profile.
The purchased polyurethane moldings were carefully cut, the corners were filed at 45°. (Read here how to properly file the corners of moldings). The pattern match must be perfect. We glue them on PVA. For reliability, you can additionally secure it with screws with wide heads. A small recess is made under them, after the self-tapping screw is screwed in, the hole is covered with putty. Try to ensure that the putty immediately lays down perfectly (you can correct it with a wet finger), since it is problematic to clean off dried putty.
Moldings are glued and mounted on self-tapping screws
Step 3. Everything is treated with a primer. You can use PVA glue diluted with water in a ratio of 1:2. After the primer dries, paint (two layers). For this case, water-based acrylic paint was chosen. The color is coffee with milk, although it looks completely different in the photo. Color rendering is inaccurate.
This is after the second application of paint. Cute
Step 4. For decoration, wallpaper was selected whose coating was made using the silk-screen printing technique. Pieces are cut to the size of the inside of the frames from the moldings and glued to PVA. After the glue has dried, the entire chest of drawers is coated twice with water-based varnish.
This is the decor for the chest of drawers
Step 5. And the last to be installed are new legs (furniture wheels) and handles.
We install the handles and legs)) The updated chest of drawers is completely different from the one you saw in the first photo.
As you can see, there are no difficult jobs. Everything is really elementary. But all processes require accuracy - the appearance depends on it. You can also update an old wardrobe in the same way. Get a set for the room. Stylish and original.
When updating furniture, the worst thing is if the surface is varnished. The varnish takes a long time and is difficult to remove. If the surface is smooth and the polishing is not damaged, you can apply primer for complex surfaces and paint after drying. This greatly speeds up the process of painting lacquered furniture.
If you have children and a summer house or yard, you may be interested in reading how to make a playground with lots of photos. You can read about making a sandbox here.
Repaint it a different color
When you paint furniture yourself, you can show your creativity and give the product any look. The most popular paint used in home decorating is acrylic. It dries quickly, is resistant to external influences, is economical and has almost no odor. In second place are aerosol paints in cans, which allow you to quickly update the product. It is recommended to apply them outdoors due to the small splashes that may be generated.
The photo shows old but strong furniture, repainted with a gradient effect.
Before you start remodeling, you need to repair the furniture and clean it of dirt. If necessary, remove the old coating using a spatula, washing or heating. Defective areas should be puttied. Then the surface must be sanded with fine-grained sandpaper and coated with a primer.
It is more convenient to paint hard-to-reach places (joints and corners) with a small brush, and everything else with a roller. If necessary, use masking tape to protect areas that do not require painting. To paint over dark items, at least three layers of paint are required, which should be reapplied only after complete drying. To give classic furniture nobility and sophistication, style it as antique using artificial aging or gilding.
When using chalk paint, which consists of water and chalk with mineral additives, there is no need to remove or prime the old coating.
How to update an old nightstand
In the photo gallery below you can see the process of restoring an old polished bedside table. First, the old polish was removed from it, puttyed, sanded and after processing it was painted twice with acrylic paint. Then paper with an interesting design was glued to the doors (it was a gift paper bag). Once dry, the whole thing was coated with two coats of semi-gloss acrylic varnish.
The sequence of work is not difficult if you know how to do it. All processes will repeat the sequence of actions that you saw in the example of updating the chest of drawers. The result is also impressive.
Read more about how to restore furniture (how to remove varnish from a surface) here.
This is an old bedside table. We will limit it
This is the result of an update: the bedside table has been transformed
After the varnish coating was removed (the sander helped to do it faster), we covered it with a layer of putty, filling up the chips and cracks, then sanded it smooth
The surface, brought to normal condition, was covered with primer, then painted twice with acrylic paint
This package makes an excellent decor for little trees.
Remodeling furniture with your own hands is a painstaking task, but the result is worth it. Below is a photo of a bedside table restored using a simple method: it is covered with embossed wallpaper, and varnish is applied twice on top.
You can hang embossed wallpaper, and to prevent it from getting dirty, cover it with a double layer of transparent varnish
You can read how to make a tabletop fountain here.
How to update a furniture wall with your own hands? Photo, video master class?
Update a boring furniture wall with your own hands -
so that the Soviet furniture wall looks stylish and modern
is this possible?
Ordinary Soviet wall
Updating a furniture wall with your own hands at first glance may seem like a completely unrealistic task, but if you know about the existence of self-adhesive paper, then everything will be very simple.
Over time, a lot of scratches appear on such a wall, which spoil the appearance. In order to hide these scratches, you can buy self-adhesive paper with the same texture as your wall and stick it on the places where there are scratches. For symmetry, you can add pieces of self-adhesive wallpaper on the other doors in the same places, in the same way.
In order to make a furniture wall more modern, for example, you can buy silver self-adhesive paper for this particular wall, cut out squares and rectangles, and then paste them along the contour onto the wall doors. This innovation will add newness to the wall and will go perfectly with the TV.
In my opinion, using self-adhesive paper to update a furniture wall is the easiest and cheapest way.
Here is a good example of how you can update a furniture set in the kitchen
How to restore the Soviet wall?
Several options that I will offer you personally seem to me the most interesting.
Of course, now there is a lot of different furniture in stores, so some will think - why update and remodel old furniture if you can buy new one. Those who think so, don’t waste time and don’t read this answer, let them go to the store.
an old repurposed wall or bedside table in my home if it looked “makeshift”, untidy and it was immediately obvious that it was from the “Do it yourself” , and the one who did it had his hands in the wrong place .
Therefore, the most beautiful option for updating a furniture wall can be modified and made even better, or you can ruin everything.
Let's imagine a wall from the times of the USSR , and then what can be made from it, how to do it, with a photo and a detailed description.
This is what the updated Soviet polished wall looks like.
You already guessed that the wall will need to be painted.
Choose expensive paint, matte, acrylic, and the color can be snow-white, or ivory or light gray, it’s up to your taste. Also buy wood putty and “fine” sandpaper.
Disassemble the old wall. Select the necessary parts and reassemble the cabinets according to the new selected wall style.
Before painting, be sure to sand all surfaces with fine sandpaper and wipe so that no sawdust or dust remains. Then you need to putty it and sand it well again.
You can glue a pattern (cut by yourself or ready-made from the store) on the doors of the bedside tables. You need to paint the doors with the pattern already glued (as in the photo below).
Paint all parts in a thin layer and let dry thoroughly. Repeat two more times. Sometimes three layers of paint are enough, but sometimes you need to cover it four times.
The better the wall was sanded, the smoother you coated it with paint, the better the paint dried between coating the new layer - the more beautiful your updated wall will look at the end of the work.
When all the wall parts are painted and dry, you can hang the doors on the cabinets and bedside tables and screw in new handles.
Please note that the glass on the wall was simple (transparent), but this is not always convenient. You can buy a matte self-adhesive film and before inserting the glass, glue the film on the back side of it.
Now you can see what happened in the end.
You noticed that not all the cabinets and parts were used on the new wall, but only the lower cabinets and cabinets with glass doors, which were turned the other way around - with the doors down and the shelves up.
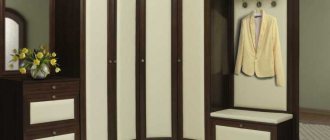
How to update an old wardrobe, nightstand and chest of drawers.
The remaining parts from the wall are a wardrobe, drawers for a chest of drawers, which can be used for furniture in the bedroom or hallway.
This is the kind of design you can come up with for old furniture .
As in the first option, you need to paint all the parts and assemble new ones from them - a wardrobe and a chest of drawers.
Then decorate all the doors with mirror inserts. To do this, you need to order thin mirrors exactly to size and glue them with special glue for mirrors; other glue will corrode the mirror coating and black spots will appear on the mirror.
You can update old bedside tables and cabinets using drawings or decoupage, the main thing is to show your imagination. Or buy ready-made applications; now there is a large selection of them in specialized stores.
There are a lot of options posted on YouTube, you can look there.
To transform an old wall in the living room, you can use several methods:
1) Painting. At one time, I updated the chest of drawers in my bedroom in the same way. This method can completely transform your old wall and room, because you can paint it in absolutely any color that you like and matches the interior. Before painting, you must sand the old surface, so to speak, remove the top layer of varnish. In order for the new surface to be even and smooth, you need to take wood putty (sold in hardware stores), level the surface and sand it again. Next you need to paint it with the chosen paint. I painted with acrylic. After painting, it is advisable to coat the surface with varnish to make it easier to wipe the surface when cleaning.
2) Cover the old wall with photo wallpaper. The main thing here is to take your time so that there are no bubbles left. For me it will look very original.
3) Another way is to decorate an already painted wall using the decoupage technique. Glue paper patterns onto the painted surface and then cover with varnish.
On the painted surface, before varnishing, draw drawings using a stencil:
Ways to update a furniture wall that is outdated know no bounds. The first stage of any stage should begin with the fact that you take out all the things from the cabinets and gradually update the set, working with each cabinet separately. Next, remove all the handles and all the decorative slats to make it easier to get to the front surface. Next, use a knife to remove all glossy surfaces; the set will become ordinary faded chipboard. Next, we begin to update it to taste. Either you glue a self-adhesive film on it, or a mirror, or a piece of new plywood of the color and pattern that you have in mind. As a result, you can get such masterpieces as:
Furniture will find a “second life” if it is covered with a special film (self-adhesive), which can have a pattern of different textures (wood, solid color, stone, vintage, etc.). For restoration, film will be the most suitable and fairly durable material.
The most important thing is to thoroughly clean the surface before gluing. Also, when gluing, you need to make sure that there are as few air bubbles as possible.
Below are possible transformation options.
Also, instead of film, furniture can be covered with wallpaper.
You can also give special attention to locks, handles and closers (lubricate in some places, tint in others, replace in others, and install in others).
Below I suggest you watch the video master class, which shows how to paint furniture, which will also help in its restoration.
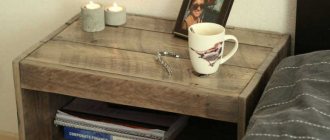
Table makeover
Using the same technology, a banal coffee table can be turned into a modern piece of furniture. In this case, it was covered with wrapping paper. It is dense, adheres well and does not become limp when applying varnish.
Before starting work on decorating the tabletop, the legs of the old table and the edges of the tabletop were painted in a light color: this way it fits better with the new design style. Then the process of its transformation began.
When pasting, the panel is cut out significantly larger than the dimensions of the tabletop. It's necessary. The paper is glued to PVA and rolled with a roller so that there are no lumps or blisters. The surface must be absolutely smooth.
The paper is glued gradually, roll it with a roller so that there are no bubbles
After gluing, take sandpaper with fine grain (it is more convenient to work if it is attached to a block). By running it along the edge, they bend and at the same time separate the excess paper.
How to make a beautiful edge
Even cutting with a guillotine will not give you a fairly even edge. And with this method, it turns out professionally designed. There is no smell of amateur activity.
This is what the edge looks like when all the excess has been removed
After the glue has dried, the surface is coated twice with a thin layer of varnish. It should be applied with a soft brush in a small amount. Layers are applied in different directions: first along the long side, then across.
What kind of shelves there are and drawings for making them yourself can be found in this article.
Furniture disposal
Recycling saves the environment from chemicals and toxins. When recycled, secondary raw materials are obtained. It is used to produce:
- new furniture;
- building materials;
- fuel;
- fertilizers;
- power lines;
- synthetic fibers;
- shavings for fiberboard, chipboard and other things;
- packaging material;
- containers.
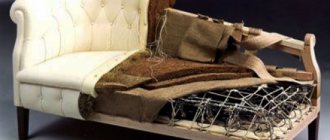
When disposing of sofas, the body part and soft fabric products are disassembled separately. This is necessary since the processing of such materials is carried out in different ways.
Mattress disposal is carried out separately. Needs to be parsed into:
- metal springs;
- plastic parts;
- fabrics;
- filler (foam rubber, coconut shavings, biological fiber is sorted separately depending on its naturalness).
After the organization removes and further processes unusable furniture, it draws up a disposal report.
Who does the processing?
Most organizations that declare the fact of recycling and disposal actually carry out this process only partially. They take out used structures, load them onto vehicles and deliver them to those organizations that deal with the recycling of office furniture and household structures.
The processing process is carried out by public or private organizations that have a special license for this.
Removal of furniture for recycling
To quickly get rid of old trash, contact the appropriate organizations. They are the ones who arrive in transport of suitable size and as loaders. They take it out, load it and send it for processing.
Furniture removal for recycling is available to individuals, businesses and firms. Large organizations, when carrying out an office move, get rid of old things. Transporting furniture to a new office location is not always relevant. Therefore, they resort to the help of organizations that are engaged in export and processing.
We recommend reading: Waste disposer in the kitchen sink: choosing a disposer
Where can you take furniture for recycling?
There are several options for how to get rid of old products.
If a mattress or other interior components were purchased in one of the large stores, for example, Ormatek, Comfort, Askona, then you can hand over their products to them.
Depending on the company, the service can either be free, or the owner will receive a nominal amount for the removal and disposal of furniture and other components from the apartment.
If such an organization is not found, then private organizations dealing with household waste will be able to clear the premises of unnecessary things. The service is provided on a paid basis. The final amount depends on the number of components that need to be disposed of and the remoteness of the place of residence.
Furniture recycling stages
The destruction and recycling of waste depends on the shape and design.
Stages:
- Parsing into individual elements.
- Sorting components according to their material group.
- After sorting, they separate what cannot be recycled.
- Materials suitable for reprocessing are sent to a separate processing facility.
Distributed in accordance with OKPD - the all-Russian classifier of products.
So from wooden parts they get:
- shavings;
- cellulose;
- sawdust;
- fuel briquettes;
- wooden elements.
From plastic elements we obtain:
- agglomerates;
- polymer crumbs;
- granules;
- synthetic threads and fibers;
- plastic recycled materials;
- recyclable materials from synthetics and foam rubber.
Parts that are not recyclable and do not cause environmental pollution may be disposed of in a landfill.
Furniture recycling can only be completely resolved with the help of companies engaged in this activity. According to the rules, it is impossible to get rid of old products in any other way.
Furniture remodeling: photo ideas
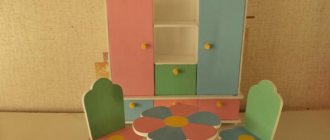
The magical transformation of an old boring shelf
Desk makeover: new design and completely different look
Another nightstand. When decorating it, contrasting wallpaper with a contrasting pattern was used
Remaking an old chair
Chest of drawers decorated with floral designs
An old dressing table makes a great desk
Updating chipboard furniture: the wall has acquired a modern look
Remaking furniture with your own hands is a creative endeavor. Even from a boring shelf you can make a great thing. And it is not at all necessary to repeat exactly what you saw. Many useful ideas come during the implementation of a “project”. It’s just a pity that some of what was planned turns out to be not as attractive as it seemed. Try it, experiment. Fortunately, modern technologies allow this to be done at minimal cost.
Types of update
Before you update a furniture wall with your own hands, you should decide whether it is functional enough. If the answer is positive, it is enough to repaint it in a different color and add or remove decorative elements.
To make furniture more comfortable, retractable systems are being changed. In old chipboard cabinets, the guides are wooden or plastic. It is better to install modern ball and roller systems that allow drawers to be pulled out easily. Replace hanger pipes and door hinges. For convenience, deep cabinets are equipped with LED lamps.
When remodeling the wall, you can leave only the frame intact. Complete renovation of old furniture requires time and space to work and dry. Before you get started, you need to consider the following:
- style;
- color;
- decor;
- how and where it will be located.
In order to change the appearance of the wall, sometimes it is enough to replace the fittings and fasteners with new ones.
Restoration of an old wall
After a skillful transformation, furniture from the 50s and 60s in the minimalist or art deco style will look elegant. If the doors cannot be repaired, they must be replaced by ordering new ones of the required sizes from the factory. Most old walls have a monosyllabic color that imitates the color of natural wood. Modern facades can contrast with the body and consist of one or more colors. The latter option benefits from combining furniture with the tone of the walls and floor.
When replacing the doors of an old furniture wall, you can order not only hinged, but also folding and folding doors. The most popular and budget material option is chipboard. You can order glass inserts or leave some of the shelves open. The hole for the hinges on the body fits modern ones.
Decoration
Today, stencil designs on furniture are popular. They are easy to make using a piece of patterned tulle and spray paint. But you can decorate a Soviet wall without using paint, for example, by decorating some of its details with a decorative cord laid out in a pattern or using metal elements that are also part of the structure.
The nobility of the furniture is given by the decor made of polyurethane, which imitates exquisite and expensive wood carving. The following elements are mainly used for the wall:
Complex relief figurines with balustrades and consoles do not fit all furniture. The decor is tinted to match the color of the wood, silvered or patinated. The stucco molding must be painted 2 days before installation. The polyurethane decor is attached only to a dry base with special glue.
Transforming a wall with furniture varnish
The following varnishes are suitable for furniture:
- oil;
- alkyd;
- alcohol;
- nitrocellulose;
- polyurethane.
It is important to study the instructions and chemical composition of all products that will be used in surface treatment. Primer and varnish binders must be compatible. Do not cover the surface with a thick layer - this will cause drips and bumps. It is better to apply with a spray in 2-3 stages. You should start from the back side of the wall facades. To give the furniture a particular shade, it is treated with stain before varnishing. Treating a painted wall will protect it from scratches.
When updating furniture, you can't rush. After each cycle, you need to leave enough time for drying.
Application of self-adhesive wallpaper
In this way, old furniture can be changed quickly and cheaply. Self-adhesive wallpaper or PVC film can be matte, glossy or with a metallic sheen. For the wall, a material that imitates wood is often chosen, although the market offers many options: stone, marble, leather, fabric, newspaper. A partially wallpapered set looks original when there are only drawers or doors under the wallpaper.
The surface must be free of grease and smooth before gluing, because... even small bulges or dents under the film will be noticeable. It is convenient to cut the wallpaper - its reverse side is lined with horizontal and vertical lines. Having cut out the desired segment, do not remove the entire paper base from it at once. This is done gradually, separating and gluing 8-10 cm of film. It is smoothed from the center to the edges with a rubber spatula. If air bubbles have formed under the self-adhesive paper, you need to pierce this area with a thin needle.
It is not necessary to disassemble the furniture before the procedure, but the fittings will need to be removed.
Restoration using staining
Color radically changes the appearance of an old wall. It is important to prepare the furniture. This can be done like this:
- Remove doors, fittings and decor, remove drawers. If the frame will be painted, disassemble it.
- Remove old varnish or paint. To do this, apply a furniture restoration product containing methylene, chloride or caustic soda to the surface. When the old coating softens (after 15-60 minutes), it is removed with a spatula.
- Fill defects - cracks, chips. After drying, sand.
- Remove dust thoroughly.
- Wipe the surface with a damp and then dry cloth, degrease with alcohol or anti-silicone.
If the layer of old coating is thin, you can treat the entire surface of the wall with white spirit, and the doors covered with veneer can simply be rubbed with coarse and then fine sandpaper along the grain.
Furniture should be restored in a ventilated area, wearing a respirator. It is convenient to work with wall parts, placing them on a large table.
What and how to repaint old furniture? It is preferable to coat chipboard products with oil, alkyd or acrylic paints. Apply at least 2 layers, and the surface to be treated must be in a horizontal position. Water-based paints are popular because they create a durable coating and dry quickly. A wall with a contrasting geometric pattern, which is created using masking tape, looks beautiful.
If there are scuffs and small scratches on the cabinet body, you can use a retouching pencil or marker to remove them. It is suitable for wooden, synthetic and laminated surfaces. The color of the pencil can be matched to the tone of the furniture. The enamel in its composition dries quickly and is resistant to moisture. Immediately after applying the product, wipe the surface with a dry cloth. No additional fastening is required.