Knotty, but beautiful. Why did I choose alder
If you made this sideboard out of pine wood, it would look just as good, but the seller showed me a stack of alder boards (thanks to him for that!). This soft hardwood is priced about the same as pine, but it does not contain the resin common to softwoods. It is easy to process without burns, moss or splinters, and accepts finishing perfectly, absorbing stain evenly, without stains. But most of the boards in the stack were top quality, no knots, and they looked too monotonous, so I had to work hard to select more expressive material with knots.
Unlike pine boards, which are often 300mm wide, alder boards were narrower, and I couldn't find any wider than 150mm, so I had to glue several boards together for the wide parts of this sideboard.
John Olson, designer
Any wood swells by absorbing moisture from the air during the hot summer months and shrinks in winter when the air becomes dry. These seasonal fluctuations are inevitable and, wanting to avoid cracking, we oriented the boards in this project so that they expand and contract equally without interfering with each other. For example, the wood fibers of the central shelves are oriented in the same way as in the adjacent walls of the cabinet. Where the grain directions are perpendicular, for example, backsplashes with overlapping seams (traditionally used for so-called quarter paneling) are screwed to only one edge so that the wood can change its dimensions without gaps appearing between the slats. .
Features and purpose
The main purpose of a buffet is to store kitchen utensils, serving items, and cutlery. Often non-perishable foods (vases of sweets and cookies), as well as drinks, are stored in the buffet.
This unusual piece of furniture easily copes with two functions at once:
- Practical - it is convenient to store in it, and it is convenient to take out various kitchen utensils from it.
- Decorative - with a buffet, the interior becomes unusual, and the kitchen and living room are filled with homely warmth and comfort.
A sideboard can perform both practical and decorative functions.
Sometimes sideboards are compared and even confused with other kitchen furniture. However, we can safely say that despite some similarities, ultimately, the buffet is a unique thing of its kind. For example, if you compare it with a pencil case, then the sideboard is a little higher and much wider. Unlike a cabinet, it has three sections: upper, middle and lower. Finally, very often buffets are “equipped” with a table top and a niche.
Restoration ideas
Let's say you already have an antique old sideboard. But time is not kind to this furniture, and therefore it is important to correct various shortcomings. And even if the furniture is well preserved, its appearance may not fit into the interior of the house. There are a number of techniques that allow you to update an old buffet and give it freshness and additional attractiveness. You can do all the work yourself.
Most people can paint the product in bright colors to decorate the interior. But if we are talking about an antique wooden sideboard, and not a modern imitation of it, applying paint is not recommended. In this case, the furniture will be valued significantly less.
An alternative solution is to emphasize the antique character of the buffet. The style of Provence is emphasized with the help of specially created abrasions. They can be formed in several ways:
- rub with sandpaper;
- apply craquelure varnish;
- apply decoupage.
READ MORE: How to choose a screen for a projector
But before using any paint or varnish, you will first have to perform certain steps:
- sand the surface with sandpaper;
- wash it with soap;
- coat with primer.
Sometimes it makes sense to disassemble and remodel an old sideboard. The upper shelves are used for storing kitchen and decorative dishes, tea boxes and various accessories. The lower shelves are reserved for large kitchen utensils. Covering the buffet with a tabletop that is approximately the same as the other lower cabinets helps blend the buffet into its surroundings. The step-by-step technology that allows you to decorate furniture is as follows:
- the buffet is being dismantled;
- wash off the varnish coating with acetone;
- the residues are removed with a rag soaked in the same acetone;
- clean the carved elements with a separate cloth;
- cover the surface with acrylic tinting varnish;
- dry the product in the sun;
- paint (if necessary) the smallest shaped elements with a thin artistic brush.
A hand-polished buffet can look no less attractive. Important: polishing will have to be repeated from time to time to prevent the furniture from becoming dull. For work, use a small amount of polish, which is smeared with a flannel cloth. Some people recommend using flaxseed oil. Here's how to deal with scratches:
- rub the damaged areas with walnut kernels;
- wait 10 minutes;
- polish the surface with a cloth cloth.
Small defects are eliminated using shoe polish. Important: you need to select it strictly to match the color of the furniture. If this is not possible, it is better to look for another way. For example, use a marker of a suitable color. Sometimes it is worth consulting with specialists, because the consequences of ill-considered actions may be irreparable.
Varieties
Buffet is different from buffet. This piece of furniture can be used not only for the kitchen or living room (this is the domain of classic sideboards). There is also a distinction between a sideboard and a display cabinet. Each model differs in the presence or absence of open shelves, as well as the number of drawers.
The classic model is, after all, a kitchen option, or, as a last resort, it can be placed in the living room combined with the kitchen. Numerous shelves and drawers contain not only dishes and cutlery, but tea, coffee, confectionery and spices. The housewife uses the free niche as a worktop, for preparing snacks, brewing tea or effectively serving ready-made dishes.
The classic model is mainly used in the kitchen.
A sideboard is for a classic living room. Initially, sideboards were low buffets without an upper compartment. Modern models look very similar to their predecessor, and differ only in the absence of a niche. The sideboard has a lower cabinet with two (sometimes three) doors, and an upper compartment with glazed facades. Thanks to such “showcases”, it is possible to display expensive and spectacular dishes.
A sideboard is usually located in a classic living room.
A display cabinet is another type of antique sideboard. This model is considered ideal for the dining area, as it allows you to display decorative items and dishes and also provides easy access to them. Can be with open or glazed shelves.
A display buffet is usually located in the dining area and also has a decorative function.
How to distinguish a polysemantic word from a homonym. Working with a dictionary
All the words we examined are the same in sound and spelling, but they have different lexical meanings.
We already know that words carry lexical meaning . Single-valued words have one lexical meaning, polysemous words have several.
Let's find out how to distinguish a polysemantic word from a homonym. Let's consider the lexical meaning of the word “bell”: a bell is a flower; bell - a small bell. The word bell has multiple meanings, because objects have a similar shape.
Rice. 6. Bell (Source)
Rice. 7. Bluebell flower (Source)
Let's consider the lexical meaning of the word “dachshund”: dachshund is a breed of dog; tax – the cost of travel. These words are homonyms, because they have different lexical meanings and have nothing in common.
Rice. 8. Homonyms: Dachshund (Source)
Polysemantic words and homonyms are written the same way. The main difference between them is that polysemantic words have something in common in their lexical meaning (color, shape), while homonyms have completely different lexical meanings.
If you are in doubt about the definition of a polysemantic word or homonym, an explanatory dictionary will come to your aid. Let's look at the difference in recording dictionary entries:
The root is a polysemantic word that has several meanings:
1. The underground part of plants.
2. Inner part of hair, tooth.
3. Beginning, source of something (figurative meaning).
4. Significant part of the word.
In the dictionary, a polysemantic word has each meaning indicated by a number.
Let's look at how homonyms are presented in the dictionary. For example:
A valve is a shut-off device in the form of a tube for releasing liquid or gas.
A crane is a machine for lifting and moving loads over short distances.
Rice. 9. Crane (Source)
Rice. 10. Water tap (Source)
In the dictionary, homonyms have a separate dictionary entry.
The meaning of homonyms can be determined only when the word is used in a phrase or sentence.
A little history
The sideboard has been used as a piece of furniture since the 15th century. France is considered its homeland and initially it was available exclusively to the wealthy noble class. We used it only for storing dishes. The first models had two compartments: one for storing porcelain, and the other for silver cutlery. To ensure maximum safety of the contents, the buffet doors had special locks.
Initially, the buffet was a piece of furniture in the homes of French nobles.
It is worth noting that the word “buffet” itself is literally translated from Latin as “brilliant table”.
Only in the 17th century did these kitchen cabinets acquire the form we are familiar with today. The upper part of the structure either remained open or was equipped with elegant doors. In the middle there were drawers for storing cutlery, and in the lowest compartment with massive doors they stored heavy dishes to make it easier to get out.
Over time, the buffet began to take on a more modern form.
In the middle part of the structure, between the upper and lower compartments, there was a tabletop. It was most often used to prepare cutlery for serving or to prepare quick snacks. It is believed that it was thanks to this function that the word “buffet” received another meaning - a place for a snack.
Rus' had its own prototype of a modern sideboard, which was a metal cabinet on legs. The model was used to store samovars, various containers for heating water, as well as jars of jam.
Modern buffets are not very different from their “ancestors”. Like the tables and chairs we are used to, kitchen cabinets have not lost their relevance and are still in demand in a wide variety of styles and interiors.
A buffet or sideboard can be found in many modern homes.
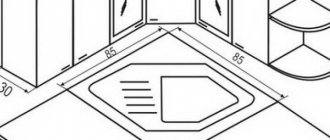
Instructions for making a corner sideboard
The corner of the room is often left empty. If there is a shortage of usable space in the kitchen or living room, a corner cabinet will provide greater freedom.
Prepare your tools. In principle, the list is the same as described in the previous case, only we don’t need clamps.
Select the following materials:
- boards 290 mm wide and 12 mm thick;
- plywood 8 mm thick;
- dowels - wooden dowels;
- wood glue;
- stain;
- furniture or water-soluble varnish;
- self-tapping screws;
- furniture handles and hinges;
- ruler, tape measure, pencil or marker;
- sandpaper.
Specification
All parts are marked in the pictures with numbers in red circles:
- Back wall 1 pc. – (No. 1) 183 cm.
- Trapezoidal shelves 6 pcs. – (No. 2) 77.5 cm in front. The sides are cut at an angle of 45° from the straight sides (see picture)
- Front side strap 2 pcs. – (No. 3) 183 cm.
- Side walls made of plywood 2 pcs. – (No. 4) 41.3 cm x 183 cm.
- Upper and lower cornice 2 pcs. – (No. 5) 67 cm.
- Table top cornice 1 pc. – (No. 6) 67 cm.
- Top molding 1 pc. – 90 cm.
Pass boards 1830 mm long through a surface planer. Mark and cut 2 boards with a circular saw into six trapezoidal shelves. The shelves will have a small base with a width of 1950 mm and a wide side of 775 mm.
Using a circular saw, cut one board into two 60 mm wide slats; from the other slats, make a web for the back wall with a transverse dimension of 195 mm (according to the width of the small shelf base).
Attach six horizontal segments (top cover + bottom base + 4 shelves) to the back wall with self-tapping screws.
On the front side of the case, attach two vertical strips - supports - with self-tapping screws. Embed the self-tapping screws into solid wood so that you can putty the fastener sockets later. Mount the lower base at a distance of 70 mm from the floor. Place the shelves at equal distances from each other. It is important that the third shelf from the bottom, which will be the tabletop, is fixed at a distance of 760 mm from the floor.
To make the side walls, cut 2 boards from plywood according to the height of the cabinet (1830 mm). Attach the walls with self-tapping screws and glue to the bases and shelves of the case.
Prepare three cornices. Make a curly cutout in the bottom bar, as in the picture. Process the middle and upper cornice with a router - make curly grooves and notches.
You can secure the cornices with wood glue; be sure to secure the lower support bar with self-tapping screws.
Making doors
Assemble two transoms from 45 mm wide planks (the length is indicated in the figure). Do this using tongue-and-groove corner joints and coat them with wood glue. On the back side of the transoms we screw the plywood sheets with screws.
You should have two doors with a height from the middle of the bottom bar to the middle of the middle cornice (635 mm). The width will be equal to the distance from the middle of the side vertical bar to the central axis of the body (335 mm).
Treat hard-to-reach areas of the body with a grinder or a block of sandpaper. Paint all surfaces with stain. Then coat with furniture or water-based varnish. If you are skilled in craquelure, you can give furniture a noble, aged look in the form of a patina.
Using a chisel or a router, cut out the seats for the hinges in the sides and doors. Hang the doors by screwing the hinges with screws. Drill two holes in the vertical slats of the transoms in the center and screw two handles.
Install a central vertical stop bar inside the cabinet. The doors will rest against it and will not fall inside the cabinet.
Put the corner sideboard in its place. You can glaze the upper compartments for dishes by installing horizontal guides for sliding glass panels.
Design features
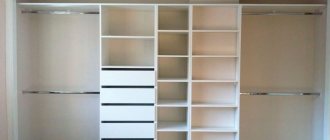
Traditionally, a buffet consists of three parts: top, middle and bottom.
The upper one is usually used to store dishes and kitchen items that are not used every day, such as glasses, wine glasses, fine dinner sets and guest sets. The topmost shelves can be glazed, or they can be completely open. The glazed option is more preferable, since the dishes at the same time remain visible and, at the same time, are protected from dust, moisture and grease.
The upper part is usually used to store dishes that are rarely used.
The middle section has special drawers for storing cutlery and other useful items. In modern sideboards, such departments are located immediately under the upper compartment, and in a buffet they take up space under a niche with a tabletop. A niche is usually intended for storing frequently used dishes, as well as for vases of fruit or sweets. A vase of flowers also looks very impressive on the tabletop.
Some buffet models are equipped with retractable tabletops, which makes the design even more functional. On such a surface you can cook or sort dishes before placing them in their places.
The lower part of the buffet consists of large compartments with shelves, closed with opaque facades. It is there that large kitchen utensils - pots, pans, dishes - find their “shelter”. There is also room for household appliances.
The lower part of the sideboard is designed for storing large items.
Kitchen cupboards: relics of the past or a tribute to modern fashion
Those who value the convenience of sideboards can thank the French for this, who invented this convenient piece of furniture.
Although initially it was a whole room in which kitchen items were stored.
The structure of the then and current buffets is the same. Both of them consist of two sections. There is a closed cabinet at the bottom, and the top is a glass display case with shelves.
But the design of modern fashionable sideboards differs from the products of past years.
A buffet is not a tricky design, so you can create it yourself, or rather remake it from an old buffet.
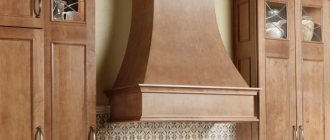
Facade options
The appearance is largely determined by its facade (front panels, doors). Depending on the design, they can be:
- Solid - continuous canvases. Such facades are durable and easy to use. Since they have no seams, they are easy to wash and wipe clean.
- Frame - a base with a frame. Typically, such structures are made from different materials. Externally they look very attractive, but otherwise they are inferior to solid facades.
For decorative framing of panels use:
- Carving (patterns applied to wood). This is a classic design option for buffets.
- Engraving is a design or inscriptions applied to metal or other durable metal.
- Glazing. Option for decorating the top of the buffet. If you don't want the contents of the shelves to be visible to everyone, use stained glass instead of regular transparent glass.
- Veneering. The facade is covered with a thin layer of natural wood. As a rule, this is an excellent option for saving money, since a sideboard made of MDF with veneer is no different in appearance from a piece of furniture made of natural wood.
Business from scratch - the right location for the canteen
It is best to find a building located near large enterprises that employ a large number of employees. Opening a canteen is an expensive business. Factories, offices, dormitories, clinics, hospitals, large shopping centers and other crowded places will provide the establishment with a large influx of customers. It will be good if you can rent the building of the former canteen.
Inspection services are sensitive to social eating places located on the first floors of residential buildings.
If you have found a building to open your dining room, then pay attention to the following points:
- main hall;
- kitchen (it is important that it is lined with tiles or plastic, the materials can be easily cleaned of dirt, they are invulnerable to high temperatures);
- utility rooms;
- accounting;
- the dining room has: sewerage, water supply, electricity and gas;
- automated systems, accounting software;
- It is better to buy cash registers with a plastic card payment function.
To open a business in the catering industry, you will have to study a lot of information, instructions, talk with knowledgeable people who have achieved some success in this field, and take their advice.
Choosing a style
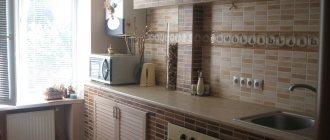
It doesn’t matter whether you buy a ready-made buffet or plan to make it yourself, decide on the style in advance. The most popular are classic, modern, and country.
Classic. Furniture items in this style are distinguished by a noble shade. Brown, beige and all pastel colors look ideal. The decor should be moderate, since the classical direction of design does not tolerate excesses.
Modern. This style is dominated by light and pastel colors. As decorative elements, preference is given to carvings, ornate patterns and ornaments. Lines should be smooth, plant patterns and semicircular shapes are welcome.
Art Nouveau style is characterized by pastel colors and ornate decor.
Country. It is generally considered to be a rustic design. Thanks to this style, any room becomes warm and cozy. The main requirement: the sideboard must be made of natural wood or MDF with veneer finishing. The predominant colors are warm.
The rustic style is characterized by a predominance of wooden finishes.
Additional income
Opening a canteen can bring additional dividends, because the premises allow you not only to feed people, but also to organize corporate parties, children's parties and other events. Creative workers can decorate the hall for the holidays, and this will add additional funds to the canteen’s prosperity treasury.
You can earn a lot. It all depends on the institution’s interest in additional income.
You can start delivering hot lunches to various organizations and offices, the main thing is to advertise the services correctly. With a competent approach to business development, you will never run out of clients.
How to make a buffet with your own hands
The main advantage of hand-made furniture is maximum comfort and correct dimensions. You choose what you will make the buffet from and what its finishing will look like. By the way, an unusual color of a piece of furniture, molding or stained glass can be chosen as decor.
Materials and tools
Today, a wide range of materials for making furniture with your own hands is available. Most often used:
- Fiberboard. The material has a budget price. The main performance characteristics are resistance to a humid environment (which is important for the kitchen), and comparative ease of processing. Typically, fiberboard is used to make the back walls of wall cabinets, drawers and classic cabinets. The material does not deform and is securely held on the fasteners. Thanks to its use, you can reduce the weight of the future buffet.
- Chipboard. Easy to process and also a very common material. It is actively used for the manufacture of a wide variety of furniture. It is distinguished by its aesthetic appearance - the surface may have “woody” patterns. The only caveat: it is recommended to keep finished furniture away from heat sources. Otherwise, the process of evaporation of harmful substances may begin, which will cause allergic reactions.
- MDF. Environmentally friendly material. It is valued for its resistance to moisture and decent appearance. It is not afraid of heat sources, so furniture made from this material can be installed anywhere in the kitchen, even next to the stove. MDF is also actively used for the manufacture of decorative elements.
- Solid wood. The most expensive and environmentally friendly material. For a buffet, pine, oak or larch are best. To save money, it is recommended to make only the facades from natural wood, and make the side and rear walls from more budget-friendly materials.
Having decided on the material to create a buffet, you need to select a set of tools. You will need:
- Drill.
- Screwdriver.
- Wood drills.
- Tape measure and sticky tape.
- Pencil for drawing.
- Vise.
- Milling and grinding machine.
- Sanded sheet.
- Varnish coating.
To work you will need quite a lot of tools and materials.
Well, you need to start the process of creating a sideboard with your own hands from a drawing. Thanks to the right project, you will be able to accurately determine the amount of material and decorative elements you need.
After all the necessary measurements and cutting, the parts are assembled according to the following plan:
- Preparation of large elements, and then smaller parts.
- Mounting the housing and installing internal parts using screws and angles.
- Installation of a façade slab with projections for the doors and rear wall.
- Installation of hanging parts: hinges, doors, decorative parts.
- Reinstallation and checking the functioning of all elements.
- Final decoration: attaching handles, varnishing or decoupage.
A sideboard is a piece of furniture with a centuries-old history. Thanks to modern design solutions, it becomes even more functional. And its decent appearance will effectively complement any kitchen design.
What tool will you need?
To build a buffet you will need the following list of tools:
- drill;
- drills, especially for wood;
- roulette;
- jigsaw;
- a circular saw;
- grinder;
- abrasive sheet with a grain size of 120-240 units;
- screwdriver;
- vice for securing individual elements;
- scotch;
- milling technology;
- pencil for marking;
- other useful builder's tools.
Carpenter's tools
If the kitchen buffet will be varnished in the end, the composition and brush should be purchased in advance. And yet, before construction begins, it is necessary to develop an accurate drawing of the product. This information will be a kind of guideline for the project; in the drawing it is necessary to indicate the exact dimensions of the kitchen with a buffet, indicating the location of the homemade furniture. The traditional or corner buffet itself is drawn in detail: dimensions, number of shelves, types of fasteners, presence of doors, etc.