The placement of sockets in the kitchen must be determined at the initial stage of renovation before tiling the apron. It is easier to do this if the house is new and the wiring has not yet been installed. In old houses, moving sockets causes certain difficulties due to the walls being grooved for wires. Not wanting to chisel the plaster, many solve the problem by connecting electrical appliances through tees or carriers, which is absolutely not allowed. Modern electrical appliances have a lot of power and can create a network overload, which is accompanied by burnout of the electrical wiring. The optimal way out of the situation is the correct placement of sockets in the apron in the kitchen, which we will now consider.
How to determine the quantity?
The number of sockets will never be universal; in this matter, it is worth starting from the number of household and electrical appliances in the kitchen. However, for reasons of functionality, it is worth placing at least three sockets on the apron. It is optimal to install two or three nesting models in several places.
Important! Separate power outlets must be provided for the hob, oven, hood or sink.
It is permissible to connect several low-power devices to one source.
What to consider when locating outlets
There are several standard options for the location of outlets around the perimeter of the kitchen, but none of them will be universal. To make using the kitchen convenient, you need to carefully consider where and how many outlets to place.
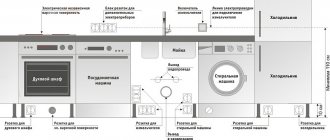
For example, it is recommended to place at least 3 sockets in a parallel connection above the work surface. On the kitchen apron, triple or double elements are installed in several places. It wouldn’t hurt to have a separate outlet for power supply to the stove, hood or sink.
Group of sockets on the apron
When carrying out renovation work in the kitchen, it is recommended to lay a new wire with three copper cores to ensure the operation of European-style sockets. When choosing a wire cross-section, you need to start from the maximum total power of all devices (we assume that all equipment will be turned on at the same time).
When calculating the number of sockets, it is worth considering that it is permissible to connect several low-power devices to one source, but you also need to provide spare elements for connecting additional equipment. The main accumulation of power sources will be observed in the area where the kitchen wall is installed. This will require terminals both on the bottom of the wall and on the kitchen apron.
Height of sockets on kitchen panel
Proper installation of sockets on a kitchen apron involves their location at a height of 10 to 30 cm above the countertop of the set. At the same time, if possible, you should not give preference to the minimum value, since the countertop is often filled with dishes or food, which makes it difficult to access a low-lying socket.
- Sockets for small household appliances should be located at a height of 1.1 - 1.4 m from the floor.
- It is best to place power sources for lighting at a distance of 20 cm from the surface of the kitchen countertop.
- The power supply for the hood should be placed at a height of 50-60 cm from the cabinets.
Methods for attaching glass apron panels
Massive and heavy glass sheets require special installation and fastening.
These are the following types:
• hinged method using pass-through fasteners • using silicone glue • using Velcro.
The main methods of attaching glass panels to the kitchen wall are hinged and pass-through fasteners. Hinged fasteners are fasteners into which a glass panel with a pattern is mounted. Hinged fasteners allow you to quite accurately join panels and join corner elements. With the hinged fastening method, the fastening elements are practically invisible from the outside. Only small metal plates (0.5x1 cm) will be noticeable.
In some cases, it is possible to install only the upper fastener of the glass panel. The lower part is installed using transparent silicone sealant. Sealing the joint between the glass panel and the countertop is an ideal option. Fastening is carried out using collapsible through fasteners. For fastening glass panels, mounting holes are made. As a rule, these are four fastening heads with a diameter of 2 cm. The fastening elements in this case are visible on the surface of the glass panel. However, this type of fastener allows you to hide unevenness or defects in the wall, because the mounted glass panel will be located at a distance of 4 mm from the wall.
Installation rules
When placing power supplies, you should adhere to electrical safety standards:
- The connected device must be within a radius of no more than one and a half meters from the outlet.
- The distance from the socket on the apron to the floor should be from one to one and a half meters.
- Wires and contacts must be waterproof.
- It is strictly forbidden to install sockets in the kitchen apron in areas above the stove and sink.
- Important! The procedure for installing sockets on a kitchen apron itself is not technically complex, but it consists of several stages, in each of which a list of nuances should be taken into account.
If there are doubts that it will be possible to take into account each of them, it is better to entrust the process of installing power supplies to professionals, since errors in carrying out this kind of work can have dangerous consequences.
Interesting article: Current tips for choosing boar tiles for a kitchen backsplash
Glass selection
Not just any glass is suitable for making a kitchen apron. The specifics of operation dictate certain requirements for the coating. Since it is usually installed in the work area, that is, where the stove and sink are located, the glass must be resistant to temperature changes and random mechanical stress. It should be strong enough and at the same time have a beautiful appearance.
Only two types fall under these requirements - tempered or ordinary glass, but with a large thickness. In order for the surface to be strong and durable, the thickness of the product must be at least 6 mm, however, experts still recommend not installing ordinary glass in order to avoid traumatic situations. It is almost impossible to break tempered glass with an accidental blow at home. Even if you succeed, it will crumble into small particles with soft edges that cannot be cut on. If ordinary glass breaks, the fragments will scatter throughout the kitchen. However, an apron made of tempered glass cannot be machined, so when ordering such a product, you must immediately describe the final dimensions for installation.
Ordinary glass, even very thick, has a characteristic “bottle” tint, which can distort the pattern behind it. To make aprons, they use special bleached and completely transparent glass, which not only does not change the image, but even makes it brighter and more expressive.
Advantages of glass aprons for the kitchen:
- basic care - just wipe the surface with window cleaner;
- hygiene - due to the absence or small number of joints, grease and dirt do not accumulate in them, as in ceramic tile surfaces;
- strength;
- durability;
- the ability to choose a pattern or color to match the style of the interior;
- visual expansion of the work area and kitchen space;
- simple and quick installation.
So, a glass apron is much better than the usual tiled surfaces, however, it also has its drawbacks, or rather, a drawback. It lies in choosing the right glass, and good glass is quite expensive.
Fortunately, a large selection of panels allows you to choose an option for every taste:
- Transparent glass will protect the wall from splashes, fumes and dirt.
- Frosted glass - can be uniform or with a pattern.
- Colored glass is a great way to add a bright detail to your interior without renovation.
- Glass with a pattern is made according to individual projects. Applying a pattern manually at home is unrealistic - special factory equipment is used for this.
- A mirror panel visually expands the space, so this option is ideal for a kitchen with a modest square footage. However, you should take care of the mirror surface very carefully, since even minor dirt is clearly visible on it.
Tempered glass is the best option for creating a kitchen apron. It can withstand heating up to 1000C, so it can be safely installed right next to the stove or hob. Please take careful measurements before ordering it. In this matter, as the saying goes, it is better to measure seven times, since then you will not be able to cut such material at home.
Common Mistakes
If there is no installation experience, the following errors may be made:
- The planned number of sockets ultimately does not correspond to real needs, due to the fact that many more devices need to be connected.
- The power source for the hood is mounted in the area of its immediate location.
- Installation is carried out after installing the kitchen unit.
- Sockets are located in close proximity to the sink or stove.
- When choosing power supplies, the choice was made in favor of non-waterproof models.
- The master forgets to punch a groove in the wall on the kitchen apron.
- During installation, the size of the plinth behind the working surface was taken into account, although this should not be done.
- Wiring with an inappropriate cross-section has been selected.
What additional materials will be needed?
To protect power supplies from splashes and soot, it is necessary to choose socket models with special plastic covers or a deep casing with protective curtains.
Today's range of power supplies for the kitchen offers 2 options:
- Internal sockets. The safest option is to cut the hole for the socket and the groove for the wire directly into the wall.
- External sockets. Relevant for houses where the wire is laid over the walls. Most often this applies to suburban wooden buildings.
“Apron design for classic kitchens”
The kitchen socket can be of various modifications:
- Have protective curtains.
- Be waterproof.
- To be supplemented with a residual current device.
- Have an ejector design, which greatly facilitates the process of pulling out the plug without displacing the mechanism of the socket itself.
- Have a built-in timer or indicator of the presence of current in the network.
For installation you will need:
- A hammer drill for forming a socket box.
- Crowns and groove chisel for laying wiring.
- Insulated electrical cable.
- Socket boxes.
- Self-tapping screws.
Also, in modern kitchens, pull-out sockets are often preferred. They are located inside an MDF apron. This design can hardly be called practical, but it certainly adds aesthetics.
“What types of aprons are there for the kitchen: a guide to design options”
When installing a retractable socket, the following 3 conditions must be observed:
- The cable must have an uninterrupted connection to the network.
- Access to the fittings should not be difficult, so that if it breaks, it can be easily replaced with a new one.
- There should be plenty of space below the surface.
Why you should trust the installation of a kitchen glass splashback to professionals
Although the description of the installation of a skinali may seem quite simple, it is very difficult to independently carry out such work at the proper level. If the panels are not fastened correctly, defects or joints will be visible on them. Because of this, the glass kitchen splashback will lose its aesthetic properties.
If you decide to buy a glass apron for the kitchen, it is best to entrust its installation to the experienced craftsmen of our company Skinali-Fresh, who have all the necessary tools and materials at their disposal. After professional installation of glass panels, you can be proud of the interior of your kitchen.
How to install?
Once you have a clearly calculated diagram of the location of the sockets, you should make markings directly on the apron.
Interesting article: Decorative and artificial stone for finishing the apron in the kitchen
The work of preparing the holes depends on the material of the apron itself - in tiles or plywood it will be enough to carefully drill niches for installation, and it is best if the potential location of the sockets does not disturb the design.
If you have to work with glass, then it is better to first take all measurements in order to transfer them to the manufacturer before making the apron. In the case of glass, this is the only way to make holes for the equipment to bring out power.
Information! Using a hammer drill, a place is prepared for the power source. If there was an old socket at the intended installation site, it should be dismantled. Next, the distribution box is installed.
After the sockets are ready, the connections of the sockets are twisted together, cleaned, fixed and properly insulated. This will prevent overheating during operation. The phase and neutral wires should be separated in different directions.
Installation process
The standard installation algorithm is as follows:
- The room must be de-energized.
- The facing material of the apron is mounted on the prepared holes in the wall with a socket box and formed wiring.
- Socket boxes are installed.
- The wiring is laid in the groove and fixed.
- The socket is connected to the wiring in such a way that wires of the same color are connected on one side to the socket, and on the other, using express connection terminals, to the power distribution box.
- Connections are being checked.
- The grooves are sealed with mortar, and the surface is leveled with putty.
- Sockets are screwed in.
- The power to the room is turned on.

