Today, there are many techniques that give old furniture a fresh and unusual look. Among the most popular is decoupage. This technique involves decorating products with designs in the same style by gluing them to the surface. Decoupage is a budget option and does not require much effort.
We will look at ways and ideas for decorating tables in decoupage style.
Choosing an image for decoration
Decoupage with napkins is the most popular technique. You can buy napkins of a wide variety of types in specialized stores.
Printed designs or ornaments are suitable for decorating small surfaces. For example, for the English style, drawings with geographical maps are often used.
Experienced craftsmen use fabric, lace, various book pages and photographs to decoupage an old table with their own hands.
Often there are pale and monochrome drawings, so you should make a base so that the drawing looks expressive and clear.
If you know how to draw, then you can complement the decoupage with interesting artistic ideas.
To create a 3D effect, decorative plaster for modeling is used as a base. It makes the drawing more “alive”.
Decorating instructions
A classic master class consists of several successive stages. It is suitable for decoupaging a coffee table with your own hands or any other interior item with a flat wooden surface. Step-by-step instruction:
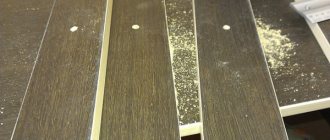
- the table top is sanded with sandpaper;
- prime the surface and leave until completely dry;
- small cracks and gaps are puttied and dried;
- repeat sanding with fine sandpaper;
- prime the surface a second time and allow to dry;
- cover the tabletop twice with the paint chosen for the background;
- the necessary fragments are cut out from the selected samples;
- lay out the cut out parts on the plane of the furniture;
- each decorative element is outlined with a pencil;
- the fragments are coated with glue and fixed to the surface;
- smooth the part with your hands or a roller, expelling the air;
- when all the decor is fixed, apply a thin layer of glue on top of it;
- after drying, the tabletop is varnished several times;
- The table legs are varnished or tinted with a suitable color paint.
For an even finish, it is convenient to use aerosol varnish.
Since acrylic products have an unpleasant odor, it is recommended to dry them outdoors. This speeds up not only the weathering of harmful substances, but also the drying process of the varnished coating itself. If it is necessary to achieve an artistic effect, after gluing the fragments, the details are drawn with a thin brush. In this case, to obtain a voluminous result, it is better to use an acrylic contour.
Creating original round tables with your own hands, tips for craftsmen
It’s not difficult to do table decoupage yourself if you follow the step-by-step instructions and all the recommendations for choosing materials. The end result in the form of an originally decorated piece of furniture will delight you with its individuality. By being creative, you can successfully update the decor of your living room, bedroom or kitchen.
Sand the surface
Prime, fill cracks and gaps, paint the counter top
Cut out the necessary fragments
Lay out the cut out parts
Fix the parts and varnish
Tips for Newbies
If you decide to try to decoupage a table with napkins, it is recommended that you familiarize yourself with all the intricacies of the process.
Basically, this technique is not difficult to perform and involves the use of a minimal amount of material. Except that sometimes difficulties arise if the furniture has a complex shape (patterns, carvings, corners).
To make the finished product look organic and beautiful, you should listen to the following tips:
- When decorating plastic or glass, it is necessary to degrease the surface. This can be done with alcohol.
- If the surface has uneven surfaces, you need to sand it with sandpaper.
- For glass tabletops, it is recommended to use only special napkins for decoupage, since ordinary ones will not work.
- To visualize the finished result, you can look at photos of table decoupage or entire master classes.
Features of the decoupage technique
The main advantage is that with minimal financial costs, you get a unique piece of furniture. This method of updating furniture involves choosing a pattern of a certain direction and decorating the table surface with it. After this, the tabletop is varnished and thoroughly dried.
Do-it-yourself furniture decoupage can save you from pointless spending aimed at updating your decor; it will help you show your imagination and bring some of your soul’s creativity into your home.
In addition to uniqueness, the advantages of the technology include:
- Ease of the process;
- Use of inexpensive materials and improvised means;
- The ability to significantly extend the service life of “old age” furniture.
This technique has several varieties:
- Direct decoupage. In this case, the image is glued to the surface (glass, wood or any other, it doesn’t matter);
- Back. When performing this technique, images are glued from the reverse side to a glass tabletop.
- Volume. Beads, textiles, shells, small pebbles, etc. are used as materials for this technique.
- Art. A very interesting option, as a result of which the line between drawing and appliqué is blurred. The image turns out harmonious, made in the same style.
- Decopatch. The technique is as follows: pieces of paper are glued onto the surface, imitating various surfaces: wood, stone, textiles. In this case, you can work both with ordinary napkins and with special decoupage cards.
Decoupage has gained popularity as one of the techniques for decorating glass or wood products.
In addition, the decoupage technique is also divided into stylistic directions. In particular, the most popular are:
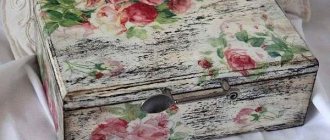
- Provence. This trend, which originated in the French provinces, is considered a reflection of rustic simplicity and romanticism. A light tone is used as a base, onto which scenes from village life and a variety of floral prints are applied. The technique of artificial aging is often used to emphasize the antiqueness and value of the item.
- Ethnic. A distinctive feature of this direction is the abundance of bright colors in elements belonging to a particular culture.
- Simple City. The most affordable style. Old newspapers and magazines are used to decorate the table. In general, whatever you have on hand will do.
- Shabby chic. Another interesting design solution for decorating a table using the decoupage technique. This design is an imitation of antiquity in light colors and with slightly blurred contours of the images.
- Printroom. Old photographs in black and white on a light background. This finish looks very impressive.
- Victorian style. This design concept owes its origin to Queen Victoria. You can’t do without luxury here, a sort of mix of exquisite details of palace life with timeless classical elements.
Dining table decor has become quite popular in everyday life.
Interesting fact: the decoupage technique originates in China in the 12th century. This, so to speak, art (at that time it was not considered such) was the lot of the peasants. In order to somehow diversify the interior and everyday items, peasants cut out drawings from paper and pasted them on various surfaces. Several centuries later, in the 15th century, decoupage as an art was already mentioned in Germany. And in the 17th century, this type of decoration reached Venice, where it was actively used to decorate objects in Chinese and Japanese styles. Since the 19th century, decoupage has been used in many countries, and in Russia it has gained the greatest popularity since the beginning of the 21st century.
Preparing materials for work
Before you begin, you should purchase the following materials and tools:
- primer (acrylic is best);
- fixing clear varnish;
- sandpaper;
- scissors and glue;
- bowl of water;
- napkins for decoupage or printout.
After purchasing the materials, you can begin preparing the surface to be decorated.
Types of decoupage
Based on the surface intended for decoration and the final effect of the finished product, 5 types of decoupage are distinguished:
- direct decoupage - consists of gluing a decorative element onto a previously prepared front side of the surface, followed by varnishing;
- reverse decoupage is used when decorating surfaces made of transparent material (for example, glass). In this case, the picture is glued not from the front side, but from the back side, after which paint, varnish and other layers follow, i.e. the order of work regarding direct decoupage is carried out in the reverse order;
- Smoky decoupage is characterized by blurring the boundaries between the main background and the decorative element. This type of decoupage reliably simulates artistic painting through a combination of various techniques and effects;
- Volumetric decoupage is quite often combined with other types of decoupage. The volume of the decorated surface is imparted using eggshells, special paste, thermal film, fabric and other materials. In addition, the visual volume of the image is achieved by applying a pattern in each layer of varnish, decreasing in size towards the final coating;
- Decopatch in its finished form is associated with a patchwork quilt, but such decoupage from fabric is performed quite rarely. The most common material for this type is special paper that imitates fur, leather, and fabric. In this case, the decorated base is covered completely, and not with separately located motifs.
Despite the similarity of the execution technique, all types of decoupage differ significantly in the results obtained.
Decorating a desk for a child
Usually children study at a desk - draw, do homework. If the table already has visible flaws (drawn or erased surface), then use the decoupage technique.
Decoupage of a desk is an ideal option to avoid buying new furniture. Select the drawing style taking into account the design of the room and the child’s preferences.
For a girl, drawings of delicate flowers or cute animals are suitable. And for a boy, cars or super heroes.
How to choose the right style for decoupage?
There are a large variety of decoupage motifs that are used to style furniture. Their choice is based only on the personal taste of the master and the goals that he has set for himself.
Napkins made of multi-layer paper, which are available to everyone, can become a suitable material for decoration.
Let's look at the most popular motifs used by craftsmen around the world.
- Floral motifs and pastel colors.
- Fruits, grape roses, whole bouquets of herbs.
- Religious theme.
- Birds, animals.
- Chinese and generally Asian motifs.
- Old black and white photographs and postcards.
Remember that you can always come up with your own motive, you just need to use your imagination!
We will also look at some stylistic trends in decoupage.
Provence and Victorian style have always been very popular. Both of these styles came to us from France. A whitened background, small abrasions, floral motifs and pastel colors are what characterize these styles.
Simple City. Created using neat (or, on the contrary, torn) newspaper clippings and old black and white photographs.
This stylistic trend is characterized by the deco patch technique.
Vintage French. The item is decorated using two, less often three, colors – white and black. This style was slightly influenced by minimalism.
If you see frayed edges and washed out textures, rest assured, it's Shabby Chic. The Victorian style with its hunting theme, gold, and bouquets of flowers very often echoes it.
It is advisable to purchase special decoupage glue.
Fabric for decoupage
The decoupage technique involves the use of not only paper drawings, but also fabric. This option has the main advantage - the surface retains its brightness even after long-term use.
- Do-it-yourself orchid: master class on making and step-by-step description of creating an artificial flower (video + 105 photos)
- Old-time charm: vintage, retro and antique
Knitted jewelry - the best jewelry ideas and creating knitted jewelry for beginners (110 photos and videos)
Wooden furniture is best suited for decorating with fabric. Its preparation is the same as for napkins. You just need more glue to secure the fabric to the wood.
How to decoupage a coffee table with your own hands
You can decorate the coffee table yourself. You don't have to use napkins for this. If you are tired of paper as a material for decoupage, you can make it with fabric. The technique of decoupage with fabric is not very different from paper.
All necessary materials for decoupage can be purchased online or purchased at a craft store.
A table decorated with guipure looks interesting. It will fit perfectly into the living room, dining room or decorate the balcony.
Decoupage can be done easily and simply if you follow the instructions and recommendations of professionals. You should pay attention to the material from which the table is made. Usually this is wood or chipboard. These types of surfaces require different preparations.
Surface preparation:
- Tree. It is necessary to sand, carefully cover with putty and prime, preferably in several layers.
- Chipboard You can simply wash with detergent and dry.
Once the surface is dry, you can proceed directly to gluing the fabric. The surface of the table is generously greased with decoupage glue or PVA, then the fabric is applied. You can create a beautiful drapery from the fabric, or you can smooth it well so that the table surface is even. Covering options are chosen based on whether the table will be actively used or will perform only decorative functions.
Decoupage in the kitchen
The kitchen is the place where the whole family and guests most often gather. I want to make this place cozy and beautiful. To do this, you can focus on the kitchen table in decoupage style. Making it yourself is very simple.
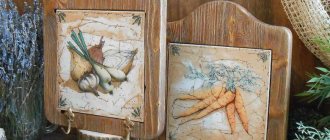
The subject of the pictures is selected taking into account the overall design and color palette of the kitchen. Pictures of fruits, vegetables, flower arrangements, etc. are used as standard.
You can not limit yourself only to the table, and decorate the tray, vases and other small details.
Glass
There are several ways to use glass to decorate a coffee table.
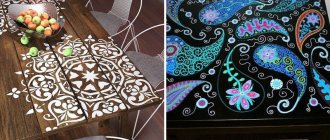
- Option 1: using glass with photo printing. Glass with an applied ornament or photo printing is simply glued to the base, and the legs can be painted in any color. Frosted glass with ornaments will be original.
- Option 2: bars are attached around the perimeter of the tabletop, on which the glass is laid. Any items for decoration are placed under it: colored sand, buttons, beads, shells, pebbles, memorable items. It is better to attach glass to the bars, but for this you need to make holes in it (it is better to order glass where they can do this).
- Option 3: very thick glass is used, simply placed on the tabletop, and photographs, compositions of dry leaves, fabric or paper are placed under it. Since the material is very heavy, there is no need to fasten it; with its weight it will tightly press all the elements.
You can decorate the glass with your own hands: on the back side (the one that will lie on the table) any design is applied through a stencil. This move is relevant if your table has a glass top, but you want to update its appearance. You should choose colors that contrast with the table; you can use both stained glass and acrylic paints - they are more resistant to moisture and safe, since they do not emit toxic substances into the air.
Summarizing
Decoupage varnish: tips for choosing varnish, their main types and application options (100 photos)- How to knit a skirt with knitting needles - the best models, patterns, fashion news and descriptions for beginners on how to knit a skirt with your own hands (95 photos)
- Knitted turban - patterns and options for sewing a beautiful and original headdress (80 photos)
There are not always funds to buy new furniture, but the old one is no longer pleasing to the eye. The ideal option here would be to use the decoupage technique. This will not only help update the interior, but will also give you the opportunity to show your creativity.
Materials and tools for working in decoupage technique
Before preparing the necessary elements, a table and images for its decoration are selected. It is better for beginners to perform their first work on wooden surfaces.
Materials:
- Special napkins or cards, paper wallpaper. Decoupage with cards and paper wallpaper requires a lot of skill.
- Colored rice paper.
- Glue. PVA or decoupage glue, which is used for working with printed images, is suitable. If PVA is selected, then it is diluted with water in a 2:1 ratio.
- Acrylic primer.
- Decoupage varnish to fix the finished design.
Tools for work:
- Scissors, stationery knife, pencil, ruler.
- Flat brushes with synthetic bristles for applying varnish, glue, paint.
- Painting tape to maintain an even paint border.
- Sandpaper for surface preparation.
- Cotton wool and acetone for degreasing.
- Rubber spatula for applying primer.
Preparing the surface of an old table
If there are cracks on the table, they need to be puttied. After the putty has dried, the surface is sanded with sandpaper. Then it is degreased using a piece of cotton wool moistened with acetone. Thin lines draw the boundaries of the future drawing. The area that will be decorated with the image is primed. To ensure an even border of the picture, masking tape is applied before applying a layer of primer. The area for the drawing is primed. After complete drying, the primed surface is sanded with sandpaper. The priming and sanding procedure is repeated again. The surface is ready for use.