Types of mirrors
All mirror canvases are usually divided into two categories:
- with a functional purpose;
- decorative plan, which are usually used exclusively to improve the design.
| Functional | They are used so that a person can look in them while controlling his appearance. They are installed in visible and easily accessible places: bathrooms, hallways. There are cases when living rooms are equipped with mirrors to make them look larger visually. |
| Decorative | They don't look like people. They are intended to become a decoration of the room. |
There are many types of mirrors, and there is no shortage of choice. It all depends on individual preferences, the size of the premises, and financial capabilities. Today, retail outlets can offer the following unusual types of mirrors:
- mirrors patinated look (made in antique style). In this case, special chemicals are used;
- mirrors beveled (having beveled edges, most often in the form of diamonds);
- mirrors tinted or colored (look great in modern interiors);
- mirrors with ornaments, patterns, drawings and all kinds of inscriptions.
Mirror frame: 4 pieces of wood? Master Class
Now I want to tell you how to make a frame for a mirror. Materials: furniture board made of pine 28 mm, plywood 6 mm, mirror 4 mm. Tools: miter saw, table circular saw, router, grinder, drill, screwdriver, lamellar router, jigsaw, clamps and other small items.
Perhaps I'll start from the beginning. Here I am:
Today I decided to take a photo and show the full process of creating what I mainly do. These are mirrors in frames. The photographs show the process of creating a frame for the customer. Therefore, everything is as it is.
Our frame should be small: 90 cm height, 48 cm width. The width of the baguette is 6 cm. The thickness of the frame is 3 cm, the mirror is 4 mm. The location is vertical.
We take a furniture board of the required size:
We dissolve it into three parts, one of which is then cut into two parts. To make it only four. Our shield is 100 cm long. Width - 20 cm:
Next, select a quarter for the mirror and for the backdrop. For the mirror - 4 mm, for the backdrop - 7-8 mm. The backdrop itself will be 6 mm:
After all this rough work, we grind all the ends three times - first with a wheel with a 60-point grit, then 180, then 240:
Since it is inconvenient to sand a quarter with a machine, we do it manually with a sanding sponge at 180:
We cut our blanks to the sizes we need with bevels at angles of 45 degrees:
At the ends of the corners we make grooves for inserting lamellas that additionally strengthen the frame:
The lamellas in the grooves look like this:
We prepare the blanks for gluing: We coat the grooves and the ends themselves with glue:
We tighten the frame with a special tape with a tension mechanism:
Let's take a break while the glue sets. We drink tea with buns. This remains behind the scenes. The next step is to fasten the frame with screws. To do this, drill a guide hole at an angle:
We fix this whole thing with screws:
Let's start preparing the backdrop. Cut out a sheet of plywood of the required size:
We sand the plywood on all sides twice - around 180 and 240:
I leave my signature on the inside:
Making grooves for the hinges on the frame:
In the end it will look like this:
The frame has become rigid. Now let’s sand the edges and everything that needs to be sanded:
Since wood has pores, and we will soon be waxing the frame, we need to make sure there is no dust in the pores. We blow the frame with air under pressure from the compressor:
Our frame will not be white, but bleached. The wood texture will be visible, but the wood itself will be whiter:
Apply wax to wood:
We wait for the wax to dry and polish it. These processes are monotonous, so I don’t include a separate photograph of polishing here. Then we insert the mirror:
We close the top with a backdrop and screw it on:
We fasten the hinges. And we finish our work:
And now, our mirror is ready:
In fact, from the photographs it seems that everything is done quickly and easily, but this is not entirely true. Perhaps I can do without unnecessary afterwords. Everything I wanted to tell and show, I told and showed. Thank you for your attention!
DIY materials for mirrors
To start making a mirror with your own hands, you need to decide what it will be made of. The following materials can be used:
- plastic;
- glass;
- cardboard;
- foil;
- metal.
Currently, plastic is in great demand as a reflective surface. But the technology for manufacturing such items is quite complex, and special vacuum equipment is used, the storage of which at home is impractical, unless the family has a mirror manufacturing business.
As for glass and metal, they can be used at home; highly professional equipment is not required. When silvering a mirror, you will need certain chemical reagents, but they can be easily purchased. The metal is replaced by its analogues - foil. It will be almost impossible to achieve a special quality mirror, and it will be inferior to metal and glass specimens.
Foil - a budget replacement for a mirror surface
Metal mirrors
It must be remembered that not all metals can be used in the manufacture of mirrors. It is worth using only those that tolerate grinding well. These include:
- steel;
- bronze;
- aluminum;
- silver;
- gold;
- special alloys;
- beryllium.
To find large silver or gold plates, you need to try hard, and their cost will be exorbitant. Moreover, expensive alloys are classified as soft and will not be able to rigidly hold the shape of the mirror. Therefore, they are mainly used only for spraying a surface reflective layer.
Bronze has been used since ancient times. Due to its hardness, it withstands polishing. And this is enough to make a mirror surface.
Steel is considered a younger material compared to bronze. It is widely used to produce reflective surfaces. The principle of working with steel is the same as in the previous version: a cast whole mirror surface is purchased and simply polished. To ensure that the surface has a sufficient reflective effect, it can be silvered, but you don’t have to do this.
Do-it-yourself polishing of stainless steel to a mirror finish
You can watch the video for more details about the process of polishing the material to a mirror-like appearance (in English, but it’s not important here):
Aluminum mirrors are also common. Products made from it are light and cheap, but they have a lot of negative aspects:
- aluminum is quite difficult to polish due to its soft structure, so this procedure takes a lot of time and nerves;
- softness does not allow the mirror to maintain its correct shape.
Beryllium and other special alloys are used in the production of mirrors at industrial enterprises with specialized equipment. Beryllium is very hard and toxic, so it is usually only used to coat objects.
Shape selection
There are four classic frame shapes: circle, oval, square and rectangle. Such products are truly universal. Making a standard mirror frame is easy, and it will fit perfectly into any interior style. True, it is not at all necessary to limit yourself to such a set of forms. Geometry offers many interesting options.
For example, you can make a frame in the form of a polygon or parallelepiped.
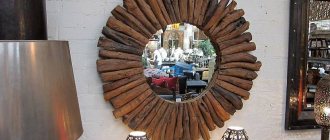
Create a cloud-shaped frame and place several round mirrors there. Products in the shape of animals will amaze your guests. You can place such a mirror in plain sight. You should choose an animal either among your favorites or among those that are easier to make.
Frames in the shape of flowers also look great.
The design for the mirror can have abstract shapes. Wavy edges or monograms in different directions will add originality to the product, and will also make the mirror one of the central elements of the decor.
If you use branches in making, then simply do not cut them to one line - this will give you a unique shape.
Choosing glass for a mirror
If the choice is made of glass, then it should be selected carefully. Bohemian quality is best - it has a well-polished surface and is practically not subject to mechanical damage. It costs expensive.
But you can also take a regular window option, only there are certain requirements for it: its surface should not be covered with shells, cracks and visible scratches. The glass sheet must have perfect evenness and this is checked in the following way:
- The glass is placed on a flat surface covered with a dark cloth;
- A lamp is installed nearby;
- The metal measuring ruler is carefully applied to the surface so as not to cause damage;
- The lamp is directed onto the glass so that the divisions of the measuring instrument are visible on the glass surface;
- If the glass is smooth, then along the entire length of the ruler there will be no gaps between it and the surface, and its divisions will clearly correspond to the reflection without breaks.
Once the choice of glass is made, it must be cut along the contour. It is worth using a sketch that is cut out of cardboard. Such actions require a little experience, and if you do not have it, then let a specialist do the pruning. When performing such actions, precision is necessary to avoid chips and nicks.
But if you decide to carry out all the work yourself, use a glass cutter with a cutting disc. It's better than diamond.
Glass cutting
Stages of work taking into account the material
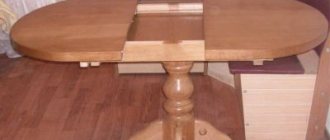
The easiest way to make a frame is from wooden planks. Experienced craftsmen recommend using parts from old window casings; this design is original. You can purchase ceiling plinths at any hardware store.
The choice of material depends on the shape of the mirror. For a product with sharp corners, you should choose wood; for a circle or oval, you should choose a ceiling plinth.
Tree
To work with wood you will need the following tools:
- hacksaw;
- hammer;
- sandpaper;
- ruler;
- pencil for measurements.
If you want to make an object with a complex configuration, you should stock up on cutters and a file. Step-by-step algorithm of actions:
- Divide the window frame into components.
- Select four parts, cut to the desired size.
- Impregnate with a special composition that prevents the development of fungus.
- Assemble, clean and sand. The wooden frame is ready.
- Paint or coat the surface with clear varnish. You can also use self-adhesive vinyl film for finishing.
Next, a plywood backing is made. A mirror in a wooden frame is hung on it. A glazing bead is usually used to secure the product.
To fasten the frame parts to each other, glue and screws are used. The plywood backdrop is cut out with a jigsaw. Grooves are formed in the finished product, into which fittings in the form of loops can then be inserted.
Ceiling plinth
This option looks good on a mirror that does not have sharp corners (oval or round shape). Polyurethane for a DIY bathroom product is easy to process and is resistant to external influences.
Unlike wood, it is not destroyed by humidity and does not crack if the air in the room is dry.
Required tools:
- hammer;
- hacksaw;
- accessories;
- glue;
- ruler;
- pencil;
- breadboard knife
Step-by-step algorithm of actions:
- Select round ceiling moldings of suitable sizes (they are often used as central parts for a chandelier).
- Make a cutout in the future frame 2 cm smaller than the diameter of the glass.
- Place masking tape on the mirror so as not to stain its surface with paint.
- Use glue or fittings to secure the product to the plywood backing.
- Fix the frame from the ceiling plinth on top. Next it is painted. Additionally, you can decorate it.
For coloring to decorate a bathroom mirror, most often they use one color, but you can also take two contrasting ones. Noble shades look impressive: gold, silver, bronze. You can create the effect of artificial patination, antique. The best option is to decorate the entire surface.
If you want to leave certain areas white, they are temporarily sealed with masking tape; after the paint has dried, the adhesive tape is removed.
How to make a glass mirror with your own hands
In order for the mirror to turn out to be of high quality and to serve for a long time, it is necessary to strictly follow the following manufacturing technology:
- Select a table with the correct horizontal surface and place glass on it. To avoid breaking it during the wiping process, you need to place something soft under it.
- Pour polishing liquid over the glass surface. A ready-made “Polish” will do. Then the glass is thoroughly wiped with soft felt, felt or leather.
- Wipe the glass with gauze, previously soaked in distilled water containing a suspension of crushed pumice powder. Afterwards the surface is washed with distilled water.
- Take a wet sponge and wipe the surface with it. Then do the same using gauze swabs that are moistened with a 15% tin chloride solution, repeat the procedure several times. Rinse and wipe thoroughly using a swab.
- After completing these actions, the glass will first become dark, and then quickly lighten due to the fact that silver begins to precipitate. If dark spots appear on the glass surface, they must be removed immediately by wiping with a swab soaked in a pumice suspension, and then using gauze soaked in a solution of stannous chloride. At the end, fill the area again with freshly prepared solution.
- After 7-10 minutes have passed from the start of using gauze or suede for silvering, heavily moistened in distilled water, carefully remove the liquid from the glass in order to pour the mixture there again.
- After 15 minutes, the surface is washed with distilled water. In this case, one edge of the glass rises and the surface is filled with liquid. To determine whether the thickness of the silver deposit is sufficient, you need to look through a mirror at an electric lamp (60W). Its contours should be slightly visible.
- For a mirror to be durable, it must be subjected to high temperatures. In this case, the mirror is given a vertical position and kept in this form at 100 - 150 degrees.
- The “baked” silver film is coated with a mirror-like waterproof varnish. This is done using a spray bottle. As soon as the varnish dries, a thick layer of paint or asphalt varnish is applied to the surface. Coating on mirrors should be done in one direction.
- The final touch is to remove silver stains from the front side using a weak solution of hydrochloric acid using a swab. The making of the mirror is completed.
- If, during the manufacture of the product, droplets of silver get on the skin and clothing, then the stained areas are wiped with sodium hyposulfite and then thoroughly washed off with warm water.
You can also watch an interesting video on how to make a glass mirror using paint and enamels:
Decor of a round mirror with a frame made of pipes: Master class
A very stylish and modern frame for decorating a round mirror can be made from ordinary polypropylene pipes for water supply.
Frame for a round mirror made of pipes
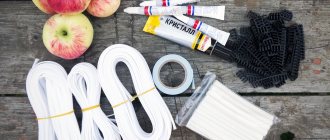
To do this you will need:
- plastic pipe;
- electric saw;
- skin;
- glue gun
Assembly technology
Step 1
- We cut the rings with great care. At the same time, they must have the same width, otherwise the finished product will look sloppy.
- Therefore, a miter saw with fine teeth is ideal.
If you don’t have such a saw, you can use a miter box.
We take polypropylene pipes for water supply - you can choose any diameter at your discretion
Step 2
- Immediately before gluing, the cuts on each ring are processed using fine sandpaper to avoid the occurrence of burrs.
- Since our task is to produce an accessory that has a beautiful appearance, every little detail should look neat.
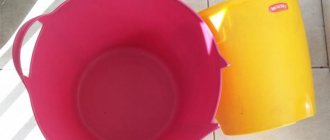
We lay out the rings in any shape you like
Step 3
- The rings are fastened with a glue gun , which will ensure an inconspicuous fastening. Gluing of rings can occur in different ways; a different method may be used than in the photo.
- The shape of the composition can be either square or oval . It is recommended to make it in the shape of a mirror.
We glue the rings together with a gun
Step 4
The mirror is also glued to the rings with a glue gun exactly in the middle. It should be noted that all elements must be cleaned of dust particles and degreased before gluing. You can hang the finished product on the wall using the rings.
So, you can make a product that combines 2 or 3 mirrors, and to give a greater effect it can be supplemented with a glass vase or table.
How to make a metal mirror with your own hands
Bronze and steel sheets can be purchased from a foundry. The Internet can also be used, but you should pay attention to the evenness of the surface in the information. The polishing process takes quite a long time and requires significant labor costs, but the surface layer will be perfect.
The surface is polished using abrasive powder. For a larger binder, solid oil is used. Grinding occurs using a flat iron plate with a smooth surface or a thick sheet of glass. The steps should be like this:
- The sanding pad is placed horizontally.
- An abrasive mixed with grease is applied to the workpiece.
- The workpiece moves along the grinder in various directions, but it should not be brought to the edges.
- The workpiece and grinding pad are freed from the abrasive composition using a flannel rag.
- A soft-grain abrasive is applied on top and the procedure is repeated.
The abrasive is applied up to 6 times, with each subsequent application using a softer fraction. Once the surface is ready, it is polished with GOI paste without using a grinder.
How to make a mirror from foil with your own hands
The most affordable way to become the owner of a hand-made mirror. Retail outlets can offer a huge selection of this material, but it’s worth focusing on the thinnest foil that exists in nature. The most suitable option would be window foil, which protects rooms from sunlight in the summer.
Manufacturing does not require special skills or effort. The glass must be smooth. Take a sheet of foil and cut it to the shape of glass. Then it is glued on the sides. The mirror is inserted into the frame and the product is ready. No complications or negative impact on human health. You can also attach the foil to the glass with tape.
Frame made of ceiling plinth - step by step manufacturing
You can make a beautiful frame for a mirror from a simple ceiling plinth. This decor option is suitable for rectangular and square objects , and below we will provide detailed instructions on how to make and decorate such a frame:
- From a piece of plywood, cut out a figure that matches the shape of the mirror, but is slightly larger in size by two to three centimeters.
- Make holes and thread a loop. Glue the mirror onto the plywood. Press down with a weight.
- Cut parts of the ceiling plinth to the required size and adjust the corners.
- Apply baseboard glue to the plywood.
- Prime the frame, then paint it as desired with gold, silver or another color.
- Leave to dry for a day.
There are plenty of ideas for decorating a mirror, and the best thing about decorating is that you will end up with a unique piece of furniture that others won’t have.
Below is a visual video about making a frame for a mirror from a ceiling plinth:
Cardboard mirror
The cardboard must have sufficient density and thickness. It can also be attached to a more rigid material, such as plywood. It is worth purchasing mirror auto enamel in a can and coating the workpiece with it. The finished product will not last long, and its strength will be minimal, and the reflective surface will be of poor quality. But there is a main advantage of such a mirror: it can be given any shape and decorated in any style.
Mirror cardboard
Cost of materials and labor
approximately 5 hours to purchase, deliver, manufacture and hang the finished product, including cleaning in the workshop.
The cost of materials for making a full-length hanging mirror with a wooden frame with your own hands is no more than 600 rubles: timber, dowels, screws, sanding paper and wood glue. A mirror, depending on the size, thickness and edge treatment, costs on average from 600 rubles/1 sq.m., i.e. a mirror measuring 180x60 cm will cost approximately 800-1000 rubles, and the finished product will not cost more than 1600 rubles .
How to make a frame for a mirror with your own hands
You can make not only mirrors, but also frames for them yourself, using all your imagination. The choice of materials for manufacturing is so wide that you should be guided only by your own preferences, the style of the room and financial abilities.
An example of making a frame for a mirror
Don't think that the frame is a very expensive part. You can even use cardboard and paper tubes for a beautiful frame. Moreover, such a miracle can be done with the participation of all family members, even the smallest. Let's look at some interesting options.
- Frames made of polyurethane. They are durable and lightweight, and are not afraid of excessive humidity. You can always change its color by simply repainting it. Polyurethane molding is used for round and oval mirrors. This frame is easy to make.
- Metal frames. You can use aluminum as a thin and manageable material. If forging will look beautiful, it requires a professional approach, although the look will be unique.
- Mirror glass for frames has gained well-deserved popularity. You don't need any great skills to make it. You can purchase special coated glass or use many small glasses.
- The leather frame is quite original. It can have a voluminous appearance if filled with padding polyester. Instead of leather, you can use good quality leatherette. It is more profitable and not everyone can distinguish it from natural canvas.
- Rope frame. A rather non-standard proposal, but it will make the room more comfortable. Disadvantages include fear of moisture, temperature changes, and impracticality.
- Wooden frames. If you have already worked with this material, then building a frame will not give you much trouble. You can make a carved product, choose a specific design.
How to make a mirror with your own hands - instructions with photos and videos
5 (100%) 1 vote
How to beautifully decorate a mirror surface?
Decorating the mirror itself without a frame is very simple, and you do not have to glue decorative elements as a frame; you can create any design using the following materials .
Transparent stones
Decorative pebbles can be purchased at art or decor stores. Secure them to previously degreased areas with clear glass glue.
Painted decoration
Glass outlines or acrylic paints can create amazing pictures on the simplest object meant to be looked at. Fantasize, create, but do not forget to secure the result with transparent varnish .
We invite you to watch a visual video about decorating a mirror with your own hands:
Beaded edging
Beads and beads are suitable for decorating the mirror around the perimeter. Use subtle colors and a simple thing will turn into a fabulous item. The parts should be glued using transparent sealant. Don't be afraid to alternate large and small beads.