Furniture fasteners and fittings help to carry out high-quality assembly of structures from different materials. The types of fastening systems are varied, differing in the method of fixation and the location of their installation. The fittings not only simplify the process of assembling furniture, but also remain invisible after the work is completed. On the modern market you can find a huge number of fasteners for assembling a variety of furniture, increasing its reliability and service life.
Furniture fasteners and accessories
Assembly technology
Typically, prefabricated furniture purchased in a showroom, store, or market, or ordered from a factory, is delivered to consumers in disassembled form. If the installation of furniture is not specified in the contract, the craftsmen will not assemble it, so the owner needs to do the entire amount of work with his own hands. On the one hand, if you have a drawing, components, and tools, installation is not difficult. But high-quality assembly requires the presence of certain skills and a minimum understanding of the technology of assembly and installation of cabinet furniture. Main stages of the technological process:
- unpack furniture parts, fasteners and accessories supplied in the kit. It is imperative to check that the units comply with the declared quantity, quality and color;
- You should check the availability of instructions, diagrams, detailed drawings according to which the furniture is assembled. If some elements are missing, you can purchase additional fasteners or contact the manufacturer;
- it is required to select and prepare fasteners, mounting fittings, connecting elements, drills, electrical and mechanical tools, hardware and other consumables;
- checking that the holes for fixing the fasteners correspond to the attached drawing. The assembly diagram must contain clear instructions for installing the furniture structure;
- if you have no assembly experience, it is recommended to first mount something small, for example, a furniture box, and then proceed with the installation of large furniture, as shown in the picture;
- furniture assembly is carried out in the following order: installation of shelf holders, hinges, strips, ties, connection of frame elements, installation of doors, gluing mirrors, installation of handles, legs;
- complete design with shelves, drawers, decorative fittings. It is convenient if during assembly you can position the model using adjustable legs;
- built-in furniture is fixed to the wall, and a sliding system is first installed under the sliding wardrobe. Stationary furniture is completely assembled and then installed in the chosen location;
- adjustment of facades - use a screwdriver to loosen or strengthen the bolts of furniture hinges. It is necessary to ensure that there is no gap between the doors;
- checking the plane of the kitchen countertop, clearly hanging the upper sections of the upper cabinets, installing household appliances.
The furniture assembly lesson contains general information about installation technology. The assembly of metal furniture, seating areas, sofas, beds, tables with add-ons, radius compartments is carried out taking into account certain nuances. Simple structures can be assembled independently, without using professional equipment, but if you do not have the skills or the necessary tools, and the project is quite complex, it is better to use the services of the manufacturer - professional furniture makers will assemble the product quickly and efficiently.
When assembling furniture with your own hands, you must not overtighten the fasteners, use low-quality consumables, and when using screwdrivers, you must monitor the precise movement of the bit so that the tool does not damage the panels at high speeds. It is better to remove the protective film from the parts after completing assembly.
Unpacking and studying the instructions
Features of components for glass furniture
As for the fittings for glass furniture, they should be characterized by increased moisture resistance and reliability. Such requirements are explained by the fact that sets made of this material are often installed in bathrooms. The main elements of glass furniture components include:
- shelf supports;
- connectors;
- seals;
- supports;
- loops;
- door handles;
- latches;
- closers;
- locks.
Scope of application of furniture hinges with a closer, installation features
It is necessary to have plastic seals that prevent damage to the glass during use. The surface coating of the screed fittings must also be of high quality, which will reduce the risk of bubbles and peeling.
Nuances of assembling various designs
When it comes to assembling furniture, you need to take into account that it will not be possible to connect elements of different products in the same way - the installation of furniture structures requires special fasteners, fittings and a set of tools. There are certain nuances in the assembly process itself - you need to know them in order to work quickly, accurately and accurately. Floor installation of a bed is significantly different from the assembly of wall cabinets; the connection of upholstered furniture parts and the installation of a built-in compartment are carried out completely differently. Some nuances and recommendations for assembling various furniture:
- A chest of drawers is an example of simple prefabricated furniture with a minimum number of fasteners. You need to install drawer guides on the side panels. Pour a little glue into the blind holes in the sidewalls and ends of the stiffener flanges, insert the dowels and easily hammer them in, connecting the elements, and then attach the confirmations. The top cover is fixed with dowels and minifixes - a pin in the cover, an eccentric in the sidewall, then the confirmations are screwed in until they stop. The next stage is to nail the back wall, having previously checked the diagonal, assemble the drawers, install guides on them, screw the handles into the prepared holes;
- standard sleeping bed. After checking the presence of all structural parts, the base is assembled - the transverse and longitudinal beams of the frame are connected with euroscrews (confirmations) or self-tapping screws. A cross beam is fixed in the center, the lamellas are installed in specially prepared grooves. The side walls of the frame are secured with dowels and plugs. The remaining elements of the bed are fixed with bolts, the legs are screwed in, if there are any, and the mattress is placed in the base box. The double model is assembled according to the same principle;
- bed with lifting mechanism. The standard model consists of a frame (base), a lifting mechanism, a mattress and internal drawers. You will need a screwdriver with a full set of attachments, a screwdriver, a wrench, euro screws with countersunk heads and an internal hexagon, a tape measure and a level. Assembly diagram: connecting three drawers and headboard parts with brackets, corners or ties with screws. In the upper part of the drawers, shelves, corners, a lifting mechanism are mounted - a gas shock absorber (cylinder upwards) is secured with nuts with a stopper, handles and a limiter for the mattress are installed;
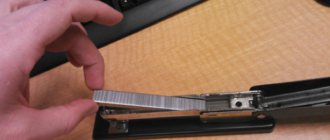
- Stationary cabinets are the easiest furniture to assemble. Sequence of actions: connecting the shelves with the side panels using confirmations and screwdrivers, installing the back wall made of fiberboard, for which furniture nails or a furniture stapler with staples are used. After assembling the box, check the same level of diagonals and compliance with the right angle between the elements. The next step is hanging, adjusting the facades, then all that remains is to install the shelves. If the model has drawers or roll-out shelves, guides for them are installed first;
- sliding body - a stationary sliding wardrobe with a plinth begins to be assembled by screwing the plinth to the bottom with minifixes and dowels, and then driving in support nails. The body is also assembled on minifixes and duplicate dowels; it is important to check the correspondence of opposite holes. Next, fix the back wall (nails, staples, installation in a groove), check the diagonal and angle. After this, you need to install shelf supports, guides for drawers, install shelves and a bar. If the cabinet is without a base and trim in the lower rear part, the plinth is dismantled;
- sliding door system – used for all coupe models. Built-in products do not have side walls and are often made without a roof or bottom. Installation consists of attaching shelves to the walls of the room and installing a sliding system. First, install stoppers and limiters, secure the upper guide rail, there is no need to screw the lower one. The door panel is inserted into both guides into the far grooves, the second leaf into the near grooves, and adjustments are made. After this, you can fix the bottom rail and glue the sealing brushes;
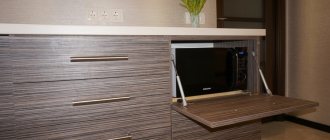
- elements of a kitchen set are complex installation; a full set of tools, diverse fasteners, and special fittings are required. Assembly begins with the preparation of the lower sections - the bottom is connected to the side walls with euroscrews, the planks are installed under the tabletop, the back wall made of fiberboard is secured (stapler, nails in increments of up to 10 mm), and the legs are fixed with self-tapping screws. This is followed by installation of hinges in the mounting slots, hanging of hinged facades, and adjustment. Drawers are assembled using the same principle. After screeding the “bottoms,” the tabletop is installed, checking the horizontal level with a building level.
The upper cabinets of the kitchen set are assembled in the same way as the “bottom” ones; the products do not have drawers, but a more complex installation is required. The upper sections are hung on a mounting strip, anchor bolts, powerful hinges or butterfly dowels on plasterboard at an optimal height of 550-600 mm from the tabletop. An important nuance in the kitchen is that a gap of 2-3 mm is left between the top of the door and the countertop, the mounting rail is installed 30-40 mm below the roof of the hanging sections, the installation of a corner kitchen begins with the installation of a radius or straight corner cabinet.
You can use a power tool in your work, which simplifies the attachment of a particular part to the body
Panels should be coated before assembly, not after, to avoid smudges.
When making cabinet furniture, pay attention to the fact that laminated chipboard may crumble during insertion of fasteners
Select fasteners after you have decided on the main material
Scheme and drawings
In order to independently assemble any furniture structure, the craftsman needs a drawing on which the technological process of installing the assembly unit is “outlined” in detail and clearly. The presence of schematic images simplifies the task. It is worth noting that the manufacturer is not responsible if customers damage wood chips, mirrors, or plastic parts during the assembly process, so the work must be done carefully, use mechanical equipment, and carefully study the attached diagram and instructions. What useful information does the drawing contain:
- instructions for assembling the unit (kit). Typically, the manufacturer indicates that the order’s complete set of parts, fastening, connecting, mounting, and decorative fittings must be checked upon receipt of the goods;
- the assembly of Italian furniture or a regular set from a furniture supermarket begins in the same way - with studying the specification, which indicates the number of parts, their name, size, code;
- a separate table shows the specification of fittings, consumables, and fasteners. For ease of use of the drawing and assembly diagram, the name and size of the fittings are given - screw, bolt, clamp, confirmat, clamp;
- The craftsman needs text instructions to correctly assemble the product - the specification and assembly order are indicated for each unit, and the design details and fittings are marked on the drawing - a template for drilling holes.
The diagram on how to hang a mirror deserves special attention. There are several options for installing mirror panels. To choose the appropriate installation method, you need to consider the weight of the mirror and the strength of the base plate. Technology for hanging a mirror:
- use double-sided tape - place glued strips of tape on the surface of an MDF or chipboard, “try on” the mirror, remove the protective film and fix the glass. The work is carried out with the part in a horizontal position so that the glue on the mounting tape sets. You can hang the mirror vertically, increasing the consumption of adhesive tape;
- acrylic glue - necessary to hang the mirror without damaging the amalgam. The sealant can be applied dotted or in separate strips, distributing the adhesive over the surface indented from the edge of the mirror. It is recommended to glue the slab to the mirror part in a horizontal position. Equipment for work – glue gun, glue dries in 24 hours;
- colorless construction silicone is quite suitable for securely hanging a mirror on a cabinet door. To firmly glue the parts, it is not necessary to apply silicone to the entire back surface of the mirror; it is enough to distribute the substance in thin transverse stripes, attach the mirror glass, and fix the decorative frame to the glued mirror.
As an alternative, you can use fastening hardware made according to the principle of clamping tabs. But the disadvantage of this method is the presence of visible parts of the mounting hardware. To avoid drilling mirrors and glass parts, accessories such as clamps are widely used. There is a large selection of products in terms of construction, design, and material of manufacture - the gluer can be made of plastic, have a transparent structure, round or rectangular shape. A clamp is a universal device that acts as a mirror holder or glass shelf holder. Installation option - fixation with a self-tapping screw or drilling under the clamp.
An example of a diagram for assembling a children's wardrobe according to the manufacturer's drawing: place the right side on a table for assembling furniture, install the rod holder, guides, hinge counters, rods. Place the bottom on the dowels, secure the left side panel using eccentric fasteners. Insert the back wall into the groove, secure the connecting beam, and secure the left side panel. Next, the box is assembled according to the diagram - the rods are screwed in, the sides of the box are mounted, the unit is secured with eccentrics, and the bottom is secured with euroscrews - confirmats.
After hammering in the thrust bearings, the children's closet is placed in a vertical position on the furniture assembly table, and the door hinges are mounted on self-tapping screws (the size is indicated in the drawing). The final stage of assembly is the installation of doors, rods, handles, then a drawer and shelves are inserted into the cabinet. Using such a simple and understandable diagram, which is attached in the drawing to the furniture structure, you can assemble any cabinet unit - a table, a chair, a wardrobe, a bed.
Required tools and fasteners
To properly assemble a furniture structure, you must have a full set of tools, connecting fittings, and decorative accessories at hand. Furniture fasteners are supplied complete with products, but there are situations when not all fittings are available, then you can choose some fasteners yourself. Manufacturing and assembling furniture are two different technological processes. In the first case, sawing, grinding, milling, and gluing equipment is required; in the second, the client assembles the product with his own hands, using a set of tools and components. Types of connecting fittings:
- confirmat (otherwise known as Euroscrew, screw tie) is an inexpensive, reliable, durable furniture connection that does not require precise drilling to add a mounting hole. Used for assembling wooden products and furniture from chipboard;
- metal and plastic furniture corners are the simplest devices for connecting parts. The products are durable, reliable, and easy to install. The scope of application of the fastening is upholstered furniture, cabinet models;
- minifix eccentric design is a common type of connection of elements, the tie of which is performed at a right angle. The mounting option is a corner minifix, designed for complex structures. Withstands many assembly/disassembly cycles;
- Rafix – an eccentric type fastening connection, the fixation of which is carried out in two mounting holes. The design of the rafix, a photo of which is presented below, is an eccentric, a plastic body, a rod, a liner (not in all products);
- self-tapping screws are devices for intersectional fastening of parts, which are convenient to use in places where shelves are mounted, or furniture hinges canopy. Self-tapping screws do not have such high reliability as Euroscrews and minifixes, but they are inexpensive;
- countersunk screw - a simple fastener, usually not supplied with furniture. The area of use of a countersunk screw is the installation of shelves, back walls made of fiberboard, handles, hinges, guide runners for drawers.
A furniture corner is used to fasten perpendicular structures
Using a countersunk screw
Tenon permanent connection
The list of tools required for assembly must be selected depending on the type of furniture structure. Thus, to connect soft products, a wrench and a screwdriver for fastening hardware are used, and when installing parts of a kitchen set, connecting and mounting fittings are required for hanging upper cabinets (anchor bolts, metal hinges). Furniture units supplied ready-made are accompanied by a drawing, assembly diagram, and prepackaged fastening components. The drilling for connecting fittings is carried out by the manufacturer, so the master’s task is to assemble the furniture with his own hands according to the drawing, which indicates where the holes are drilled.
Currently, for the production of cabinet furniture, the demand for which is steadily growing, the same type of materials is used, so assembly requires a standard set of tools. We are talking only about connecting finished (processed, glued, drilled) parts.
List of tools for furniture assembly:
- A screwdriver is a tool that is easy to use and maintain, with which the master performs almost all operations - tightens self-tapping screws, minifix rods, screws, clamps, dowels. A screwdriver with a battery is used for assembling all types of furniture - coupes, dressing rooms, hallways, kitchen and bathroom sets, beds, sofas, coffee tables;
- bits for magnetic holders. Types of bits – Phillips, asterisks, hexagons. To use a screwdriver, the consumable fasteners are fixed in a magnetic holder. Cross bits are suitable for self-tapping screws with Phillips slots and installation of eccentric couplers. Star bits are necessary for installing built-in household appliances, hex bits are necessary for installing confirmat couplers;
- a stationery knife, a level, a tape measure - a list of tools without which assembling and repairing furniture is impossible. Using a level, they control the position of facades, countertops, doors in the horizontal and vertical plane, all measurements are made with a tape measure - if the parts have drilling for self-tapping screws or cutting with a milling cutter for minifixes, you need to check the accuracy of the holes;
- hammer drill, drill, jigsaw - a professional tool that may be needed for inserting a sink, making holes for communication systems, and installing the upper sections of kitchen units. Which tool to choose depends on the design of the furniture, installation features, and the need to disguise communication systems (bathroom, kitchen).
A set of hexagons, a clamp, drills and bits, as well as a screwdriver for adjusting hinges, a hammer, and pliers may be required for a craftsman to assemble furniture with his own hands according to drawings and assembly diagrams. A pencil will not interfere with your work - before you start assembling the furniture, you need to check the alignment of the holes according to the attached diagram. If they are located inaccurately or incorrectly (this sometimes happens), you will have to fix the fasteners yourself in a strictly defined place, using drilling jigs. Such devices are templates with which you can accurately make holes for drills, euroscrews, and dowels. Furniture production and assembly will be more accurate if you use overhead jigs - they are suitable for making holes on flat parts made of chipboard and MDF.
In addition to common mounting and connecting fittings, furniture structures use supports, tenon permanent connections (rods, fixation on dowels for seating with glue), ties for fixing tabletops, intersectional ties, transformation mechanisms and support rollers (upholstered furniture). All parts must be available, otherwise the furniture assembly at home will not be completed correctly.
An important point is that handles, hinges, shelf holders, canopies, legs, sliding systems, railings, moldings, that is, finishing fittings and parts of internal filling systems, are installed by the manufacturer of furniture structures. But if the model is large in size, the parts can only be connected at the installation site. In this case, professional furniture assembly is preferable to self-assembly.
Hammer
Screwdriver
Pliers
Tool level
Hexagon
Screwdriver
Types of fastening hardware
Depending on the type of furniture and its purpose, the designs of fastening elements differ. They can:
- fix the product from the inside, creating a strong frame;
- secure the furniture base to the floor or wall.
Each type of fittings has different characteristics and features. Some fasteners will be appropriate for assembling glass furniture, others for chipboard.
Main types of furniture fasteners
Furniture corners
One of the simplest and oldest types of fasteners. Even a novice furniture assembler can handle such a corner. Based on it, you can design and assemble almost any structure. The main advantage is that installation can be carried out with a minimal set of tools, without any specific skills.
Table 1. Main types of furniture corners.
| Material | Description |
| Plastic | Installation is carried out using self-tapping screws. These corners are different:
|
| Metal | They are a part with stiffening ribs. Made in the form of a 90 degree angle. To fix them, you can use screws, couplings from:
|
Often, corners are used to fix all cabinet parts together. This is also a common fitting used to equip cabinet kitchen furniture. The main disadvantage of such fasteners is that they need to be tightened regularly, as they will gradually become loose.
Confirmat
The second name of confirmat is Euroscrews, Euroscrews. This is a fairly easy to install screw that does not require precision. Its installation requires the use of:
- drills;
- screwdriver.
These are the most common type of furniture screws
The confirmat cap is equipped with a connector for a hex key, which is used to tighten the screw. To install it, you need to make two holes in the furniture - the first in the end of the part, the second in the element that needs to be attached. This screw is quite easy to install, so you can drill holes for it immediately before assembling the structure.
Confirmation structure and standard sizes
For installation of the confirmat, a special drill is used. However, according to most craftsmen, such a device is not relevant - it is difficult to work with it, since it regularly:
- gets clogged;
- staggers.
Therefore, to obtain the necessary holes, you can use ordinary drills. The most common is the confirmat size of 7 * 50 millimeters.
Table 2. Advantages and disadvantages of confirmat.
| pros | Minuses |
| 1. Installation does not require special equipment, so assembling the furniture is quite simple. 2. Provides reliable fastening of parts. 3. Withstands heavy loads. 4. Installation is possible using a mallet. | 1. If you do not use plugs that match the color of the furniture, the confirmation hat will be visible. 2. Confirmat cuts threads inside the part, which can cause its deformation. 3. If furniture is assembled using confirmat, it cannot be disassembled more than three times. |
After studying the table, you can see that the confirmat does not cause any difficulties when working with it and provides a reliable screed. However, if possible, it is better to replace it with an eccentric coupler.
With frequent twisting/twisting, the confirmat damages furniture parts, which negatively affects the strength of the entire structure
Prices for popular models of screwdrivers
Screwdrivers
Dowels
Dowels are wooden cylindrical fasteners, their size is usually 8 * 35 millimeters (length and diameter). The main advantage of these fasteners is that they are invisible from the inside and outside.
Concealed fastening fittings for furniture
Also, dowel fastening has a couple of disadvantages.
- You can only do it once. It is quite difficult to dismantle and reassemble furniture without damaging it.
- Jeweler's precision is required when preparing holes. To comply with this condition, the use of special equipment may be required.
What does a box jig look like?
Instruction No. 1 - how to install a dowel
Installation of this fittings is extremely simple, you just need to follow certain rules.
Step No. 1 – holes for fasteners. Holes must be made in each part using a drill. It is important that they completely coincide with the position of the axis.
The holes for the dowels must be coaxial
Prices for the range of drills
Drill
Step No. 2 – installation. Dowels must be inserted into the prepared holes on one part. They should only go halfway deep. To increase strength and secure the fasteners, you can add PVA glue to the holes.
Example of how dowels should be inserted
Step No. 3 – furniture assembly. Now you need to secure the second piece of furniture. To do this, you just need to place it on the protruding edge of the dowels.
If everything is done correctly, the dowels will tightly secure the furniture parts
Instruction No. 2 - how to make a jig for dowels yourself
You don’t have to buy a conductor in a store, because it’s quite easy to make it yourself using available materials. It is necessary to take into account that separate templates are required for different diameters of dowels. To create a conductor you will need:
- wooden blank;
- plywood;
- metal tubes;
- drill/screwdriver.
Supplies for a DIY template
Prices for sheet plywood
Plywood sheets
Step No. 1 – holes. Through holes should be made in the wooden blocks, it is important that they are located strictly at an angle of 90 degrees. The diameter of the drill must correspond to the dimensions of the metal pipes.
What wooden blanks with holes should look like
Step No. 2 – processing of plywood. You need to cut three rectangular pieces from plywood and make holes in them. The edges of the plywood can be sanded with sandpaper to remove chips.
The width of the plywood sheets must correspond to the size of the bars
Step No. 3 – forming the conductor. It's time to put the whole structure together. To do this, you need to apply epoxy glue to the metal tubes and insert them into the prepared holes in the wooden blocks. When the glue has dried, you can begin fixing the plywood sheets. They can be attached to the beams using PVA.
When the glue on the homemade jig is completely dry, the template will be suitable for use.
Video – Conductor for DIY dowels
Ties
To fasten furniture parts, 2 types of ties are used. They differ from each other in certain features.
Table 3. Types of furniture ties.
| View | Description |
| Eccentric | Such fittings are used exclusively under factory assembly conditions. To install the screed, a special device is required to make an accurate hole. The main advantage of this screed is its invisibility, making the furniture look:
|
| Intersectional | It is presented in the form of a screw with a nut, which allows you to tighten two perpendicular pieces of furniture together. This type of tie is ideal for fixing:
|
Shelf supports
This type of fittings is very diverse. It is usually divided into fasteners for glass and chipboard. Shelves that harmoniously combine two different types of materials look interesting. To obtain a high-quality screed between them, it is necessary to use shelf holders. Such fittings happen:
- with fixation;
- without fixation.
It is better to choose shelf holders only from high-quality material
Table 4. Differences between shelf holders for chipboard and glass.
| Options | For glass | For chipboard |
| Design | Contains screw and rod. | It consists of a self-tapping screw and a holder. |
| Installation | They are fixed to the cabinet walls with screws, and a shelf is placed on the base. | The self-tapping screw needs to be screwed into the wall of the cabinet, and the holder will fix the plane of the shelf. |
| Advantages | It has an attractive appearance and provides reliable fixation of the shelf. | The reliability of the design is ensured by the threads in the cabinet material. |
| Flaws | To protect against loosening and damage, an elastic gasket is required. | Precise holes must be made. It is important that they match on the wall and shelf. |
Shelf holders must match the style of the furniture and be in harmony with other interior items
Bolt nut
For quite a long period of time, a system such as a bolt-nut has been used to connect furniture surfaces. Holes are made in each part for such fasteners. A bolt is inserted into it on one side, and a nut is screwed on the other. Today, such fastening hardware is not used so often, despite its advantages. The bolt head has a semicircular shape, which, after fixation, does not rotate, remaining in a static position.
The bolt nut has lost its relevance with the advent of modern fittings
Despite its ease of operation, the bolt-nut system has shifted to the background after the advent of more modern types of fastening hardware. However, it still remains relevant when assembling furniture, especially for novice craftsmen.
Table 5. Advantages and disadvantages of bolt-nut fasteners.
| pros | Minuses |
Among the advantages of the bolt nut are:
| There are only two disadvantages. 1. Visibility - after installation, such fasteners remain visible. Because of this shortcoming, the bolt-nut has lost its relevance today. 2. The ability to connect exclusively parallel surfaces. |
Video - Main types of furniture connections
Common mistakes
Each private furniture maker has his own secrets on how to quickly and accurately assemble furniture. Some professionals use a table to assemble furniture, while other craftsmen can mount a large tall cabinet on the floor and install the finished structure, measuring the diagonal of the room and the product.
Difficulties may arise with inserting sinks into kitchen countertops, making radius curves, for which you need to use special equipment, hanging mirrors with glue, tape, or adhesive.
To become a professional assembler, the future master must be able to draw up a project, calculate the consumption of materials, perform detailing and cutting of chipboard, MDF boards, use equipment, tools and have some design skills. Then the finished product will be distinguished by its impeccable quality, durability, and long service life. Frequent mistakes that novice craftsmen make when assembling furniture:
- start work without first checking the availability of the mounting kit, basic structural elements, and without studying the manufacturer’s instructions;
- Universal prefabricated furniture begins to be assembled by connecting large parts - you need to decompose all the elements into units (drawers, cabinets, tables), and try to assemble a small structure;
- they don’t pay attention to the specifications in the instructions - in vain, at first glance the parts are similar, but there are left and right elements, fronts of upper and lower cabinets, and other assembly nuances;
- ignore the need to assemble the product on a hard, clean surface. For work you need a sufficient amount of free space; you can use a device for assembling furniture;
- panels made of MDF material can be damaged by using an electric tool (drill, screwdriver) - use screwdrivers until you acquire the necessary assembly skills;
- do not change the diagonal of cabinets (compartments, bedside tables, chests of drawers) before installing the back wall made of fiberboard - this leads to distortion of the part and the entire structure;
- do not take into account the assembly order specified by the manufacturer in the instructions. The result is low quality assembly, dismantling and re-installation of the product;
- they do not check the holes for fixing the fasteners, do not measure the distance between them to ensure compliance with the drawing - as a result, they have to cover the defects with plugs.
There are craftsmen from whom you can hear that they violate assembly technology in order to quickly complete the work - for example, “I hang the top of the kitchen unit before installing the lower cabinets.” Technically, this is not true - the assembly of a complex kitchen structure begins with the installation of the lower corner cabinet (often a sink), then install the remaining floor units, connect them together with self-tapping screws or intersection ties, cut in the sink, install the countertop, and only then proceed to install the upper tier of the kitchen headset There are many such subtleties in the process, and to do the job accurately, watch the video on assembling furniture.
When the master has assembled a furniture structure using simple equipment, fasteners, tools and accessories, he must make adjustments, check that there are no visible technological gaps, and that the doors are diagonal. Distributing and assembling furniture is not an easy task, but after acquiring the appropriate skills, everyone will be able to gain valuable experience in assembling furniture units of various designs. To make furniture assembly easier, the video below will help you understand the process.
This activity can be used as a business option in several steps - ordering factory furniture, delivery to the consumer in your car, installation at the installation site. Presenting photos of assembled furniture will expand your customer base if the furniture assembler is interested.
Basic varieties
All mechanisms and accessories are divided into several varieties. Each of them performs its own function and, accordingly, must meet certain requirements.
Facial
These elements not only carry a functional load, but also remain visible, so the appearance of the furniture largely depends on the front fittings. This type includes the following auxiliary accessories:
- Legs - the stability of the structure and safety of operation depend on them. The supporting furniture element must support the weight of the product and protect the place of contact with the floor covering from it, so as not to scratch or push through the latter. Among the modifications of this fittings are adjustable legs, which allow you to install furniture at the desired height or level it on an uneven floor.
- Wheels or roller supports allow you to easily move furniture. Such fittings are usually used for models that are often moved from place to place (coffee tables, computer chairs), as well as for sliding sofas. This type of headset can be linear or rotary, bushing or bearing. As an additional element, manufacturers provide such products with a stopper.
- Edge - lining the surfaces of the ends of furniture. Edges are distinguished by surface type (with structure, glossy, smooth, others), as well as by the method of fastening (overhead, mortise, rigid).
Wheels
Legs
Edge
Industrial furniture is already equipped with front elements, which makes it possible not to think about purchasing additional materials. When choosing furniture fittings on your own, first of all, preference should be given to reliability and quality. But the styling of the components also plays an important role.
The group of front fittings for detachable furniture includes:
- Handles that open doors, drawers or furniture doors. There are many varieties of this fittings: in the form of a bracket, a button, a ring, a drop. These can also be profiles, roof rails, sinks. Handles are divided into overhead and mortise.
- Locks designed to provide more secure storage of securities and things. They can be mortise, which do not spoil the appearance of the furniture (they are considered more reliable), as well as overhead, attached to the top of doors or drawers. Based on the closing mechanism, push-button, retractable, rotary, and rack-and-pinion varieties can be distinguished.
- Snap hooks are the easiest way to secure a door in a closed position. The loop of the furniture fittings of the hook is fixed on the movable part of the furniture, while the element itself is fixed on the fixed facade.
- Latches, or magnets, are designed to hold doors tightly closed and prevent them from opening spontaneously. They are used as additional or independent door fastening mechanisms. Latches are divided into built-in locks with a magnetic key, models with a bolt that fits into a groove when closed, and magnetic varieties with a locking mechanism.
- Espagnols are also used to secure doors, windows, and gates. According to the principle of operation, they are divided into mechanical (opened and closed manually), as well as automatic, in which when the door slams, the bolt extends, and to open it you subsequently need to press a button.
Purpose of furniture corners, advice on selection, installation rules
You can place decorative elements into a separate type of front fittings. They complement the interior with originality and give the entire room a single style coloring, for example, antique. Used to mask joints or design features of furniture. The variety of decorative elements is great. As an example, we can cite an agraph that connects the tops of arches, openings, and niches. As a standard, the element is decorated with carved leaves, branches, and connected at one point in the middle of the top of the arch.
Lock
Magnet
Cap hook
Pens
Espagnolette
Fastening and tightening
The main elements of fastening and fastening fittings for furniture:
- hangers and rails for cabinets - metal plates attached to the wall using self-tapping screws;
- hardware - bolts, screws, screws, nuts, nails, dowels, self-tapping screws;
- body ties - specialized furniture fittings - eccentric or intersectional ties, connecting corners.
The function of fastening and tightening metal fittings for furniture is to facilitate assembly. Ultimately, it becomes invisible on the surface of the products.
Hardware
Screed
Tire
Connective
The function of such fittings is to connect and fix parts with each other. This type of product includes one-piece elements:
- Hinges - designed for closing drawers, cabinets or doors; in turn, they are divided into overhead and semi-overlay, internal and corner, inverse, piano and others.
- Canopy - also allows you to open or close doors; it can be four-hinged, piano, card, mezzanine, secretarial, card.
- Drawer slides provide ease of use with quiet, smooth operation. They are divided into the following types: roller, full extension, reverse action, hidden installation, metaboxes, tandemboxes.
- Mechanisms for flaps - allow the door to smoothly rise up to the fixation point, are divided into mechanical spring fittings and gas lifts.
- Models with closers - used to smoothly open or close cabinet doors; there are gas and oil types of these parts.
Connecting fittings are used in cabinets with doors and drawers.
Canopy
Guides
Loops
Closer
Sliding systems
Sliding systems are used in conventional and built-in wardrobes. This is a special door opening mechanism that ensures softness and quiet use of the headset. Varieties of such systems for furniture assembly: roller, consisting of hidden upper and lower profiles along which the door leaf moves on rollers, and hanging, where the door is suspended from the end of the cabinet.
Hanging
Roller
Shelf holders and fittings for mirrors
A separate type of furniture fittings are shelf holders designed for fixing shelves in cabinets, kitchens or dressing rooms. They are divided into open models, they are mounted to furniture (the shelf is placed directly on them), hidden, resembling an eccentric coupler. Glass fittings such as screws and plugs are used to attach mirrors. They involve drilling holes in the surface, so special rubber seals are additionally required.
Shelf supports
Accessories for mirrors
Cable channels and plugs
A cable channel is a box made of a profile that protects wires from external influences. Plugs mask mounting holes, bolts, nuts, and also prevent the accumulation of dust and dirt in legs and racks made from hollow pipes, and clothes hangers. The elements are supporting, protecting the floor covering from mechanical damage, and also hiding holes. This decorative fittings give the interior and furniture an aesthetic appearance.
Stubs
Cable channel
Hooks and hangers
Hooks, as an independent element of fittings, and components of hangers are designed for storing clothes in a hanging position. This type varies in size and design. Hooks can be mounted on the wall as a separate element or used in cabinet furniture. The most common are one, two and three-arm models.
Types of height-adjustable furniture legs, installation rules
Dampers
This type of furniture fittings is used in doors that rise up or open horizontally. The main function is to provide softness when closing. Dampers act as a shock absorber, allowing the door to slam silently. Depending on the operating mechanism, they are divided into hydraulic and pneumatic. Based on the method of fastening to furniture, we can distinguish such varieties as overhead, mortise, self-adhesive, and hinged.
Mechanisms of transformation
This type of fittings is used in the manufacture of convertible folding sofas. Such designs make it easy to change the position of the soft surface, increase the area of the sleeping area, and make the product more functional. Transformable furniture may involve the use of retractable, unfolding systems. In addition to sofas, fittings of this type are also used for folding tables.