Plasterboard ceiling structures make the ceiling level somewhat lower, and in some cases standard chandeliers look bulky and not very organic. Installing spotlights in plasterboard on the ceiling will be the best solution, which can be used either independently or in combination with a central lighting fixture. A group of spotlights will allow you to delimit space, highlight certain areas of the room, evenly illuminate the room, and create interesting effects on the ceiling.
Types of spotlights
Spotlights designed for plasterboard ceilings are classified according to several parameters. Based on the type of installation, the following types are distinguished:
- built-in - inserted into a hole in the ceiling, after installation only the decorative part is visible;
- overhead - mounted on a hard surface, a hole in the drywall is made only for wires.
Structurally, lamps are:
- fixed;
- rotary.
Different types of lamps are used in spot lighting devices:
- halogen;
- LED;
- luminescent;
- incandescent lamps with a mirror reflector.
What color temperature lamps do you prefer?
USEFUL INFORMATION: Installing a gypsum board ceiling: which plasterboard is best to use for the ceiling
Everyone chooses them at their own discretion, guided by efficiency, price and other factors. LED lamps are the most effective, but many are put off by the price. However, if you buy lamps from reputable suppliers and manufacturers, they pay for themselves because they last a long time and produce the least amount of heat. The most inefficient are incandescent lamps: they get very hot and “eat up” the most electricity, although they are cheaper than others.
Design features in different rooms
Making a simple single-level plasterboard ceiling with lighting with your own hands is not that difficult. This design is relatively simple, because only one frame is made for it. It is also not customary to use LED strips and neon tubes, which are usually used for hidden lighting.
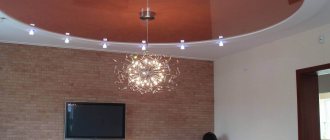
Plasterboard ceilings with lighting for the living room are usually multi-level. In these cases, hidden lighting is used. If a single-level design is used, then care must be taken to ensure that the lamps are at an equidistant distance from the center of the room. The light should not hit the eyes, so there should be no lamps above the TV.
With the living room, due to its large size, there are two options: with a chandelier in the center and without it. If there is a chandelier in the center, then it is better to make the lamps at the edges not very bright and place them zonally so that the light from them is directed to certain areas of the room. If there is no chandelier, then brighter lamps are needed to compensate for the lack of a central light source.
When planning a place for lamps on the ceiling, you need to consider the possibility of using sconces
A kitchen ceiling made of plasterboard with lighting is needed to illuminate specific areas. The greatest emphasis should be placed on the dining table and work surfaces (stove, cutting table, sink). That is, the light needs to be directed to those places where you spend the most time.
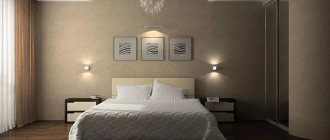
The plasterboard ceiling with lighting in the bedroom is made in such a way as to create an atmosphere of comfort. In other words, the light should be dim, but there should be a lot of it. A lot of spotlights located above the bed look beautiful. You may also want to consider additional lighting above your desk, bookshelves, and closet.
It is definitely worth providing several switches for such lighting. This will allow you to turn on the lighting for the currently needed areas of the room.
A properly made suspended ceiling made of plasterboard with lighting with your own hands will be able to adjust the proportions of the room. If the light is directed along the walls, it will visually expand the room.
Placing lighting fixtures on the ceiling
Spot lighting fixtures can be placed on the ceiling in several ways.
- In straight rows along a line perpendicular to the window, in increments of no more than 80–100 cm and at a distance of about 60 cm from the wall.
- In a checkerboard pattern. The method is well suited for living rooms and provides them with complete lighting.
- Peripheral lighting. Well suited as additional lighting in the presence of a central chandelier. The distance between the lamps is 80 cm, and the distance from the walls is 40 cm.
The above schemes can be combined with each other.
Installation of lighting fixtures
Let’s move directly to the topic of our article, namely installation, and we’ll start with something simpler.
Surface-mounted lamps
As you can see from our photo selection, the range of these lighting devices is very large - from those that are very small and are used as additional lighting (including decorative), to massive options that can flood large areas with light. Therefore, the first thing you should pay attention to is the weight of the purchased product.
Let us repeat, you should have this data along with the dimensions already at the stage of assembling the ceiling.
- We would like to warn our reader against the idea of twisting anything directly to the drywall. An exception may be the lightest products that can be mounted using butterfly dowels.
Dowel butterfly
- The design of this fastener is such that it opens like an umbrella from the back of the cardboard, providing a reliable connection without the risk of crumbling the material.
- But it’s still better to have a metal profile behind it, to which you can screw it using the most ordinary self-tapping screws. Such a connection will be more reliable, so think about the location of the profiles that will serve as mortgages.
- For heavier models weighing from 1 to several kilograms, no “butterflies” will help - you can’t do without embedded parts. Examine the luminaire mounting system by determining the distance between the mounting holes. According to the data obtained, supplement the frame with the necessary jumpers, which, for particularly heavy devices, are rigidly attached to the main floor using hangers.
However, the strength of thin metal may sometimes not be enough - we are talking about the most massive giants, whose weight can reach tens of kilograms.
In this case, you can do it in two ways:
- Reinforce the metal frame with a wooden beam, that is, everything remains as is, but in those profiles to which we plan to knit, we insert a thick beam on top, which we fix on the sides with self-tapping screws. Then, when installing the chandelier, we use long, galvanized wood screws. The structure is also further strengthened by several suspensions.
- The second method is more suitable for frames with large cells - we install a separate mounting platform from a piece of thick plywood or purchase a finished metal product in a store. It is rigidly attached independently of the rest of the frame, but must be level with it.
It is necessary to make a hole in the platform for passing wires
Chandelier installation
In fact, we have already described everything, but there are still some differences. Modern chandeliers are equipped with different mounting systems, most of which can be installed using the technology already described. These include models on slats, crosses and I-beams. The question arises when should our chandelier be attached to a hook?
So, how do we attach a chandelier to a plasterboard ceiling? There are two ways to solve this problem:
- First, after the ceiling is mounted, we calculate the mounting location for our massive lamp. We will be attached directly to the concrete floor, so we will not need any mortgages; moreover, they may interfere with installation, so make sure that they are absent in advance.
- For fastening, we will need the hook itself, which should be selected based on the distance from the main ceiling to the surface of the drywall. You can calculate this parameter before installing the entire structure (the hook with the platform is installed before the filing), or you can select it along the way, but be prepared that the necessary fasteners may not be in the store.
- So, we find the point of attachment of the lamp - if this is the center, then the easiest way is to pull the threads along the diagonals, if not, then we do the calculation using a tape measure, according to the project.
- Next, take a 32 mm wood drill bit or a small crown bit and drill a hole with a diameter into which the hook ring will fit freely, but which will easily be blocked by the decorative bowl of the chandelier. If necessary, the hole can be slightly expanded with a stationery knife.
- We take a hammer drill, install a drill of the appropriate length and diameter into it and drill a hole in the base. If you are afraid of damaging the drywall when drilling, you can make an improvised guide and limiter from a piece of polypropylene pipe.
8x460 drill with a pobedit tip - do not overdo it so as not to drill through the floor of your neighbors above
- Then everything is simple - insert a hook with a dowel, also selected in length, into the hole and screw it to the desired level.
Mounted chandelier on a hook
After we pull out the wires, we connect the lamp through the contact pad that is usually included in the kit. We push the excess wire back into the space above the ceiling, raise the bowl to the desired level and fix it on the side with a screw.
Installation is complete. As you can understand, this solution is very reliable, but it cannot always be used, and the main obstacle is the distance from the ceiling to the false ceiling. If it is very large, you can use the following method.
Assembled mounting platform
- We install a little above the level of the frame (4-6 cm) such a platform made of plywood, which we attach to the ceiling with hangers, profiles or cables.
- At the installation point of the lamp, we drill a hole for the spring dowel, which is shown in the next photo.
Spring mounting dowel - “umbrella”
- The dimensions of the dowel hole are shown in the following table.
We are interested in the drilling diameter, although a column with maximum loads will be useful
- Next, the ceiling is hemmed. Naturally, we must measure the location of the hole we need in advance. Again using a drill of the required diameter (for a hook), we make a hole in the drywall.
- Then we push the dowel with the spring part inside. The following picture shows in detail the principle of operation of such a fastening.
Installing a spring dowel
- Needless to say, the “umbrella” must be inserted into the plywood and not hung on drywall. As soon as the element opens, we give it a slight downward tension and adjust the height of our hook.
- Tighten the bottom nut for better fixation.
Further actions are no different from those already described.
Installation of recessed lamps
Perhaps the easiest to install is recessed spotlights. It does not require you to install additional mortgages or drill into the reinforced concrete floor. The weight of such lamps is small and is distributed over a larger area than overhead lamps.
Springs made of steel wire serve as clamps. This fastening allows you to install and remove devices in a matter of seconds.
Installation goes like this:
Cutting through plasterboard surface
- After making sure that you do not get on the frame profile, using all kinds of crowns, files, and cutter attachments, we make a hole of the required diameter in the drywall;
Advice! These values are contained in the installation instructions for the lamp itself, on its original box.
The lamp is completely ready for installation
- We assemble the lamp - place the lamp and fix it with a spring ring (depending on the type of device);
- We pull the wires out and through connectors or twisting (today this method is used less and less) we connect the base that comes with the device to it;
Advice! Be sure to de-energize the wires to avoid electric shock.
- We make sure that the insulation of the current-carrying conductors is of high quality, and connect the lamp;
- We bend the springs upward and insert the lamp into the hole, simultaneously pushing the wire back.
All! The lamp is ready for use. If you need to dismantle it, just pick it up carefully with a knife and pull it down, just hold the springs, as they can hurt your fingers.
Installed lamps are ready for use
Installation of LED strip
Finally, let's talk a little more about decorative lighting, namely, LED strips.
A room with such lighting will look different
To install such a solution, we do not need to drill the surface - usually the tape is hidden either in a specially prepared cornice or behind ceiling moldings.
The tape is hidden behind the protruding box
We will, of course, not discuss how such cornices (boxes) are constructed, since this does not relate to the topic of our article. We are interested in the installation method and connection.
Different wiring of LEDs on a strip meter
The main feature of LEDs is that they generate a lot of heat in the opposite direction to the propagation of light. In other words, the installation site, plinth, and tape become very hot (depending on what kind of design we are talking about).
Elevated temperature is the first thing that negatively affects the service life of the LEDs themselves, therefore, if you install a fairly powerful strip, for example, 120 or 240 per linear meter, it needs to have a high-quality heat sink.
Mounting aluminum profile
- For these purposes, aluminum profiles are used, which come in different configurations and sizes. For example, the one shown in the photo above is designed for installation in a plane and is additionally equipped with a light diffuser made of plastic.
- For hidden installation, you need a U-shaped version, which is attached to the walls or drywall with self-tapping screws or dowel screws.
- Covering the tape with a diffuser means getting a uniform glow throughout the entire line. This is especially important if you don't want to see the LEDs reflecting off your glossy ceiling.
- If you don’t want to spend money on profiles, then when assembling the ceiling box, you can install a 27x28 PNP profile into it as a base for the side, and glue the tape to it. Steel does not have the same thermal conductivity as aluminum, but it will be quite enough. For a scattering effect, you can direct the tape not towards the ceiling, but towards the inner wall. To understand this design, take a look at the picture below.
The LED strip is fixed to the profile and faces the inside of the structure, while the PNP profile serves as a heat sink
As you know, you won’t be able to pull off this trick when installing it to solid walls, so either buy a profile or limit yourself to a tape of lower power.
So, for installation we will need:
| The tape itself. There are two main varieties - monochrome and RGB (color). The first ones constantly shine in one color, while the second ones are able to change the shade, according to your preferences and the programmed program (their price is higher, but such an installation has many times more possibilities). |
| If you want multi-colored lighting, then you can’t do without a controller. It is he who sets operating modes and remembers color changing programs, in general, controls the lighting. With such a device, you can find a non-standard shade and store it in memory, recalling it later with one click of a button. The controller is additionally equipped with a remote control. |
| LEDs cannot operate on AC power, so they need a converter. In addition, they require a reduced voltage (12V, less often - 24V). The model of the power supply and its power are selected in proportion to the load that will be created by the entire network of tapes connected to it.
|
Well, and, of course, a heat sink profile, if required.
Preparation for installation
When arranging the ceiling, it is necessary to begin installing spotlights immediately after installing the frame under the drywall.
- First, a diagram of the location of lighting fixtures is drawn up.
- Wiring is being laid. It is convenient to do it on the ceiling, having previously secured special clips to it that hold the cable taut.
- The conductors from the cable descend down to the lamps. The connection is made through terminal contacts.
You can route wiring through the holes in the profiles if they are provided for in the design. It is not recommended to cut them out yourself, so as not to weaken the ceiling.
Some tips:
- For lighting, it is convenient to lay a flexible cable with three cores with a cross-section of 1.5 mm2.
- It is not recommended to install powerful light sources. Economical lamp models are selected that are equivalent in luminous intensity to incandescent lamps with a power of 35–40 W.
- The ability to quickly replace the lamp allows you to subsequently select the device that is most suitable in terms of power, color temperature and dispersion angle.
USEFUL INFORMATION: GKLV: decoding, technical characteristics, comparison of manufacturers and prices
Wiring
The wires are laid to the lamps in a corrugated pipe.
The junction box should be located in an accessible place so that you can later check the serviceability of the wiring through it. It also wouldn’t hurt to lay a backup cable from it in a separate corrugation in case the faulty wire is replaced in the future. Even though the ceiling will be covered with plasterboard, the cable will be accessible through holes in the ceiling and can be pulled to any lamp.
If fire-resistant cable is used, it is not necessary to use corrugation. But still, it is recommended to install it at least at the entrance to the inter-ceiling space. It is convenient to pull out worn-out wires and insert new ones through a corrugated pipe, so it should be placed in a straight line from the junction box.
The connection is made in parallel everywhere: this way it will be easy to find a burnt-out light bulb. When connected in series, the failure of one lamp leads to the shutdown of the others.
Lamps with low voltage are often used: 12 V and 24 V. This is safe, but requires the installation of an additional power supply. It is better to place it somewhere below or in a hidden ceiling niche for ease of maintenance.
Important! Even before installing the gypsum board, it is necessary to check the serviceability of the wiring, which may fail during installation.
Create a masterpiece with LED strip
Of course, spotlights, chandeliers and fiber optics are very interesting, but the best option for lighting a plasterboard ceiling is, of course, LED strips. Here we will dwell on them in more detail. True, for this, as a rule, it is necessary to construct a two-level structure from gypsum plasterboard.
First level installation
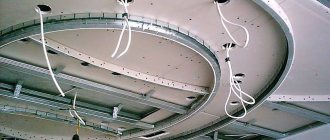
Installation of a plasterboard ceiling with lighting includes the construction of a frame; a metal profile is used. The procedure consists of 5 stages:
- stepping back about 10 cm from the ceiling, you draw a horizontal line around the perimeter of the room. A laser level or hydraulic level will help to make it level;
- the starting profile is attached to the wall along the line.
Scheme and names of required profile types
- you will need to insert the main profile into the starting profile and then attach it with hangers;
- you can make the structure more rigid. To do this, install jumpers between the profiles using crab connectors.
Creating a 1st level frame
after the jumpers have been connected, the frame is sheathed with sheets of plasterboard (gypsum plasterboard). To ensure reliable fastening, use self-tapping screws.
Covering the frame with gypsum plasterboard sheets
Installation of the 2nd level frame
You have built the first level using plasterboard on the ceiling. It's time to start the second one:
- at the 1st level the boundary of the second is drawn;
- Having allocated space for the cornice (usually 5-6 centimeters), the starting profile is fixed.
Marking the second level frame
sections of the main profile are cut with metal scissors. They are fixed in the starting guide and serve as suspensions. The starting profile is fixed with hangers.
Assembly of the 2nd level frame
- the main profiles are inserted into the ceiling and the wires are brought out. The frame is sheathed with material;
- Finally, putty is applied to the plasterboard ceiling and the seams are processed.
Sheathing the frame with gypsum plasterboard sheets (don’t forget to install lighting)
Organization of lighting and installation of tape
When installing LEDs, the following installation rules should be observed:
- the tape is cut only in designated areas;
- the elements are connected only using connectors;
- The power supply must have a minimum power reserve of 20% or it will quickly burn out.
You should also remember the location of the LED strip
To make a backlit plasterboard ceiling with your own hands, you need to accurately calculate the power of the power supply. Working with the tape, it will play the role of a transformer. Let's imagine that you are just installing a plasterboard ceiling with lighting in your bedroom. The tape is 6 meters long and has a power of 9.5 W. Multiplying the power by the length, we get 57 watts. Don't forget about additional power in reserve. Applying a coefficient of 1.25, we get a value of 71.25. Thus, you need to stock up on a 72-75 W power supply.
The circle of the tape is connected like this. Power the unit with a voltage of 220 V, connect the LEDs to it. If an RGB strip is used, it is connected through the controller. The red wire is positive, but the negative can be black or blue. Is everything working properly? Can be carefully glued to the ceiling.
A visual diagram of the correct connection of the LED strip
LED lighting kit
A place to put the power supply
Your home requires special attention and effort. When you know how to make a plasterboard ceiling with lighting, it is quite possible to create comfort and warmth in absolutely any room. In addition, this does not require any special skills or a rare, terribly expensive instrument. The ceiling is ready without any effort - you can relax!
How to cut holes in drywall for light fixtures?
Markings for lighting fixtures on plasterboard sheets (GKL) are done before attaching to the frame. After all the sheets are secured, you can adjust the locations of the lamps so that they are located evenly on the ceiling. This will not affect the quality of their connection to the wiring, since the wires are laid with a reserve.
Holes in the drywall are cut using a drill with a special bit. This can be done with a stationery knife, but the quality will be worse. The edges of the hole should be primed.
USEFUL INFO: How to hang kitchen cabinets on drywall
Installing a spotlight in the ceiling
Installation of spotlights in plasterboard is done when the finishing coating has already been applied to the ceiling. You should work carefully so that the decorative coating remains intact.
- The wiring is de-energized, after which its ends are pulled through holes in the drywall and connected to terminal blocks or spotlight clamps. To do this, the cartridge is untwisted and separated from the body. Two supply wires - phase and neutral - are connected to the cartridge terminal block.
- Most lamps have spring-loaded antennae attached to the body. They are brought together and the lamps are inserted into the drywall through the ceiling holes. The springs spread the antennae and press the body against the drywall from the reverse side.
- The socket is removed through the hole in the housing and connected to the lamp.
- It is then inserted into the housing and secured with a retaining ring.
- Before final fixation, you should turn on the power and check the operation of the lamp.
The installation method for luminaires may vary. Before installing them, you should read the instructions, where all operations should be described in detail.
Note! All lamps are connected in parallel with a cable. The main wire is not cut, but remains intact, with the exception of the removed insulation at the connection points. This leaves a supply of power cable for possible subsequent connections.
The wires are connected by soldering (twisting is not allowed) followed by insulation.
Lamp switching patterns may be different. To connect individual sections, two- and three-key switches are used.
Connection and installation of lamps
After wiring, plasterboard sheets are installed on the constructed frame. Then once again, now on the plasterboard ceiling, the locations of the lighting fixtures are indicated. It is necessary to make holes in them for the light source.
Please note that even at the stage of forming the distribution scheme of lamps on the ceiling surface, it is necessary to strictly take into account that the lighting device does not fall on an element of the metal frame. Because in this case there is no possibility of installation; the metal profile will simply interfere with the installation.
Problems when installing ceiling lights
There is one subtle point here - the diameter of the spotlights for drywall should match the diameter of the hole in the ceiling. The manufacturer must indicate the first parameter on the box (packaging), but it is better to check it.
Therefore, this size is applied to the plasterboard ceiling where the devices are installed. For this it is better to use a compass. Now you need to cut the holes according to the applied markings. There are several ways how this can be done:
- The simplest is to drill holes with a drill, onto which a crown with a diameter equal to the diameter of the circle drawn on the ceiling is installed.
- Through holes are drilled around the circumference with a small drill in increments of 1-1.5 cm. After which a piece of drywall is simply pressed inward. True, the edges of the hole will have to be modified with a sharp knife or jigsaw.
- You can use a ballerina. To do this, the cutter is adjusted to the radius of the hole.
All that remains is to pull the wires out of the cut holes and connect the lamps to them.
Installation of a ceiling lamp
There are many connection methods, or rather, devices with which the connection is made. The simplest, but also most reliable, are terminal blocks with clamping screws or modern WAGO terminals.
This terminal allows you to connect different types of wires
The wires from the lighting device must be inserted into it on one side, clamping them with screws, and the power wiring on the other side.
All that remains is to install the lamps in the plasterboard ceiling. The design of the devices has special clamping strips (antennae), which are spring-loaded on one side. That is, in a free state they are turned outward, and accordingly protrude beyond the technical part of the device. That is, the spread of the antennae is greater than the cut diameter of the hole on the plasterboard ceiling. Therefore, the mounting strips must be pressed to insert them into the hole.
Sometimes it’s not easy to do this by hand because the drywall itself gets in the way. Therefore, experienced craftsmen do this - they tie the tendrils together with wire, and after installing the spotlight in the drywall, they cut it with wire cutters or pliers. The antennae straighten under the action of springs and rest on the outer side of the ceiling, preventing the lamp from falling.
Using wire we hold the tendrils of the springs
Some designs of recessed plasterboard ceiling lamps are collapsible. That is, the decorative part is disconnected from the technical part. Therefore, the sequence of installation work here is slightly different:
- The device is being disassembled.
- The technical part is installed in a plasterboard ceiling, that is, in a hole, exactly the same as in the case described above.
- The device is connected to the power cable, which is pulled out through the cartridge. After which the wire is recessed.
- The decorative part is attached to the technical part.