0
80473
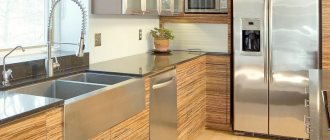
Gone are the days when our kitchens had regular sinks for washing dishes. Now everyone has comfortable sinks that are selected and fit into the design of their kitchen furniture. It is important to take into account the organization of space under the sink; a properly selected cabinet for the kitchen sink and its internal contents will help here. In addition, this important detail of the set must be of a reliable, reinforced design, capable of holding any sink (even a very heavy one, because they are made of different materials). When choosing, you need to pay close attention to detail, since a cabinet can become not only a necessary place for arranging and storing various household small things, but also an interesting, stylish piece of kitchen interior.
Is it possible to integrate household appliances under the sink?
Some owners of compact kitchens are interested in the ability to integrate small household appliances into the cabinet under the sink. Due to the small size of the room, it is not always possible to find space for all the household appliances that you would like to have available.
In general, it is better to build the equipment into the cabinets adjacent to the sink. This location is ideal for a dishwasher or washing machine. Due to the presence of a drain and a siphon, there will be very little space left in the cabinet under the sink, and it should be used rationally.
In addition, there is a possibility of water leakage, which means this can cause damage to the equipment located under the sink.
So, if desired, you can adapt the lower tier of the cabinet with a sink for small built-in household appliances or storage of items such as a blender, chopper, juicer, toaster, etc. But it’s more rational, practical and safer to use adjacent cabinets and cabinets for them.
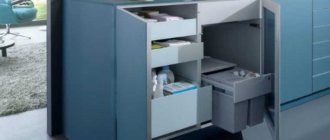
To get a truly ergonomic and comfortable workspace, you should spend a lot of time organizing space in your kitchen cabinets. For this purpose, there are various pull-out and roll-out elements, shelves, mesh containers, holders, etc. A drawer under the sink will allow you to rationally use the space inside the cabinet and conveniently store cleaning products and other kitchen utensils.
Varieties
Manufacturers of kitchen sets offer two cabinet options:
- straight;
- angular.
The straight kitchen sink cabinet is a classic. Square or rectangular shapes allow you to place it in any part of the room where communications for the sink are connected. The advantage of this model is easy access to the pipes, since the back wall is either absent or made in the form of a sheet of square hardboard. You cannot place such furniture in the corner of the kitchen - its place is only along one of the walls. Cabinets of this configuration are well suited for large rooms where the work area is designed as an island in the center of the room. Then the pipes are hidden in the floor, above which only part of the communications rises, intended for connection to the siphon. A classic straight cabinet is convenient because you can organize full contents inside - shelves, pull-out baskets, drawers for small items.
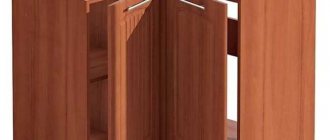
Placing a corner kitchen sink cabinet requires minimal space in the room. This is a good option for small kitchens where it is not possible to install a full-fledged set. Here, the internal content has some limitations - you won’t be able to use classic shelves and stationary drawers. A good option is to use a carousel type mechanism.
Criteria for choosing modular furniture for the kitchen, tips for arranging it
Straight
Angular
Where to put the cabinet correctly
Proper placement of the cabinet will help to conveniently zone the room to ensure comfortable cooking and free movement. There are several most common installation options:
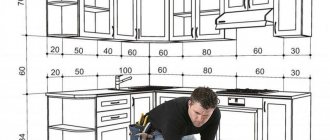
- A sink in the corner of the kitchen will save space, and the cabinets will be deep and convenient for storing kitchen utensils.
- Built-in option under one tabletop. It is better not to install the sink next to the refrigerator and hob. Ideally, between two work areas.
- Near the window. The sink should be located at a sufficient distance from the glass unit so as not to splash during operation.
In any case, when choosing a design, you should proceed from the area of the room and subsequent comfortable use. Experience shows that making a sink cabinet with your own hands is not a difficult process, and as a result, you can save a lot of money and get the interior of your dreams.
Internal filling
To better understand how a cabinet under a sink is designed, let’s consider the types of its contents. These include shelves, U-shaped drawers, baskets, containers and pull-out grids. Material of manufacture – metal or chipboard.
| Element | Description |
| Shelves | More often they equip one central shelf so that it is possible to place household chemicals on it. Since the bottles are large, a central division into 2 parts is suitable here. You can also install shelves in the corner cabinet under the sink: they will consist of several sections and have the shape of the letter L. |
| U-shaped boxes | An invention from furniture manufacturers - a drawer that goes around the sink siphon. The design is divided into several sections; it is convenient to store cutlery and small household items here. If you cannot find such an element, you can remake a standard box - separately find a device for bending around the siphon, cutting a hole in the middle. |
| Retractable nets | The grid is similar to a shelf, but has the ability to slide out. It is better to place it under the tabletop. All household items are stored here - sponges, rags, gloves. |
| Baskets | The element is ideal for storing household chemicals. The basket can be two-tiered, each of the tiers can be pulled out. The design is equipped with high sides, so the contents will not fall out when the basket is pulled out. |
| Containers | The kitchen cabinet under the sink is a great place to place containers. They are hung on self-tapping screws to the side walls or attached to the door wings. The devices are suitable for storing vegetables - onions, carrots and potatoes. |
It is not advisable to use a siphon located under the sink when arranging the interior space. If the drain hose from the washing machine runs under the sink, it is better to secure it to the side wall of the furniture.
Shelves
Boxes
Retractable nets
Baskets
Containers
Sinks
The bus washing installation is intended for external cleaning of buses during the passage of the EO or preparation for repairs in motor transport enterprises and repair shops with a large production volume.
The selected device relates to washing equipment; it can be used to perform work in preparing buses for maintenance and repair work, and EO of buses. They can also be used at auto repair shops and service stations where bus repairs and maintenance are carried out.
The wash consists of the main parts - rack 2, washed bus 3 and jay control unit 4 (see Fig. 1). There is a brush inside the stand. The brush is covered with a sheet of transparent flexible plastic, curved in a half ring and the ends attached to the pipes of the racks. For rigidity, the plastic is additionally secured with steel strips, four pieces for each rack. The left rack is additionally equipped with brush rotation drive I and an electric pump. Both units are in a closed housing. The washing unit control panel is located on the outer wall of the housing. The racks are installed on the prepared foundation 1, which has a lower height towards the center of the installation. Metal gratings 8 are installed in the center of the lowering; underneath them there is a drainage chute 7, through which the waste liquid is sent to the plant’s cleaning system. On the base, closer to the racks, fender corners 6 are fixed.
On the inner sides of the racks there are six strips 9, made of waterproof awning fabric of “heavy” density, and serving as splash protection when washing the bus. A washing system 5 is installed inside the racks, on the metal-plastic pipes of which nozzles for washing the bus are fixed. The system is connected to the water supply of the enterprise. Since there is no cyclic use of water in the installation, there is no heater in the installation - hot water is continuously supplied from the ATP.
Cables with electrical wiring and a hose with water supply are supplied to the sink. The gutter is made in the bus storage area, in places where it is possible to park washed buses.
Installation operation. When the bus approaches the wash, the operator turns on the electric motor for rotating the brushes and the electric pump. After unwinding the brushes, the bus driver drives through the wash. At the same time, the fender corners do not allow the driver to exceed the pressing force of the brushes, the water jets of the nozzle system first wash the surfaces of the bus, the brushes erase wetted dirt, and after the nozzles they wash the bus a second time. Before entering the car wash, the bus must first undergo cleaning of its front and rear walls, and, if necessary, wetting the remaining walls with a detergent solution from an autonomous sprayer.
Mobile brush washing for buses General view
Door Configurations
The external design and design of a cabinet with a sink depends on which doors are installed in the structure. The following configurations are available:
- Two-door - this option is used if the width of one section of the cabinet is more than 60 cm. Convenience lies in freer access - you can easily take items that are stored in the depths of the cabinet.
- Single-door – used if the section width is less than 50 cm. They are not always convenient, since the door opens in one direction, which can create discomfort when using adjacent cabinets. Sets with such doors are considered classic.
- Sliding – this configuration will be appreciated by owners of compact kitchens. No space is required to open the door, since the door rides on a special rail. Sliding doors open from the center to different sides of the closet.
- Double doors on hinges - this type is used in corner cabinets. To provide maximum access inside, 2 doors are made that are connected to each other. They are mounted on hinges and opened using a handle located on one of the doors.
- Drawers – you can use drawers rather than doors as a front. Then the upper elements will have a U-shaped bottom to go around the sink siphon. Bottom drawers are made according to a standard pattern depending on the size.
- Combined - this configuration provides for the presence of drawers and doors. This is convenient when you need to place items for quick use, such as cutlery, in the upper compartment.
Creating kitchen furniture with your own hands, work procedure, important nuances
Folding doors remain an unchangeable classic. This option is chosen by most owners of kitchen units for ease of use and speed of repair in case of mechanical failure.
Two-door
Single door
Sliding
Double doors on hinges
Drawers
Combined
Hinged doors
Manufacturing materials
Since the cabinet under the sink has special functions in the kitchen set, there are a number of requirements for the materials from which it is made. For example, they should not absorb extraneous odors and moisture, since they are placed near water. The materials must be durable, since the furniture is used every day, and also resistant to any mechanical damage.
All these requirements are met:
- laminated chipboard;
- MDF;
- tree.
The furniture made from chipboards is considered the most popular for kitchen sinks - it is accessible and inexpensive. Kitchen cabinet doors made of this material have good performance properties. MDF is another popular material. It is twice as strong as laminated chipboard, and therefore more expensive. A kitchen made from MDF will last longer. Products made from natural wood are always the most expensive, but they are very durable, smell nice and last a long time.
laminated chipboard
MDF
Tree
Drawings of trapezoidal corner sinks for the kitchen
Once upon a time, the corner trapezoidal module was very popular in kitchen layouts. However, practice has shown that it is too cumbersome and impractical in comparison with other options.
Drawings of trapezoidal corner sinks clearly demonstrate that, given the rather voluminous dimensions of the module, access inside is limited by a narrow door. However, in kitchens where there are no problems with free space, and the issue of maximum optimization of free space is not urgent, a corner sink cabinet can be placed in a trapezoid. With its design and construction, it “supports” the look of a corner wall kitchen cabinet, which is also usually made with a beveled door.
Product dimensions and shape
Cabinets come in different shapes, and their dimensions depend on this. The size of the cabinet is determined by the type of sink that is installed in it. To select the appropriate cabinet size, you must consider the following parameters:
- Room area. If the kitchen is small, then the appropriate width for such furniture will be 45 cm. In small kitchens, you should not make the cabinet too deep so as not to take up space, so 45-50 cm depth will be the most relevant. The height of the furniture is selected based on the height of the user, most often it is up to 90 cm.
- Built-in set of equipment. If you plan to fit equipment under the sink, then when taking into account the dimensions of the cabinet, they start from its parameters. Let's say dishwashers are 45-60 cm wide, the dimensions of the cabinet should be a little wider to leave room for installation.
- Sink size. The sink can be round, oval or square. Based on this, the width of the cabinet frame is selected.
Depending on the shape of the cabinet, its standard dimensions are determined. For example, rectangular structures have dimensions of 60 x 80 cm or 50 x 60 cm. Square cabinets are produced with dimensions of 50 x 50 cm. Radial cabinets are made with dimensions of 50 x 60 cm.
Tips for choosing
There are several nuances that you should pay special attention to when choosing a cabinet with a sink for the kitchen:
- Match the furniture design to the stylistic design of the room. If the kitchen is made in the Baroque style, then the cabinet should have appropriate decorative elements and be made of solid wood. It is better that this element of furniture does not stand out from the overall ensemble of the interior.
- Accessories. Handles, hinges, mechanisms, hinges - all this must be of high quality, made of stainless materials, as there is a risk of moisture getting on the parts.
- Design integrity. There should be no chips or damage on the surface; defects indicate that the cabinet will not last long.
Options for kitchens without upper cabinets, photos of possible designs
Cabinets for built-in appliances allow you to combine space for devices with useful area for organizing storage. In such designs, you can make a pull-out U-shaped drawer for cutlery in the upper part.
It is advisable that the edge of the cabinet at all visible ends be made of ABS plastic, which will prevent wear.
Furniture design
Accessories
Structural Integrity
Selecting hinges for installation on cabinet doors
Most consumers, when choosing certain interior items, pay attention to the quality of the fittings with which they are equipped. This approach is due to the fact that it is this element that can affect how long the products will last before the first repair. It is worth noting that this statement applies to all elements, including loops.
The hinges are made in the form of mechanical devices that are installed on the front part of the body of cabinets or other pieces of furniture, thanks to which the door can be opened at a certain angle. Today, these accessories are offered in a large number of options , which differ from each other in design, purpose, installation method and other characteristics. Due to such a wide variety of these elements, the average consumer is faced with difficulty when choosing fittings, and how difficult it is to understand which option is suitable for specific furniture.
Installation nuances
Assembling a cabinet under a sink is not difficult - instructions are usually included, which describe in detail how to assemble the structure. There are several installation methods:
- overhead;
- mortise;
- integrated.
With the overhead method, the cabinet is first assembled. To do this, the side walls are connected to the front part, where the door will be attached using corners and screws. Stiffening ribs are screwed to the back of the product, usually there are two of them. The resulting structure is connected to the bottom of the cabinet, the front edge of the bottom overlaps over the bottom of the cabinet, which hides the legs. Then the rear frame is installed - it is attached using corners to the side walls. At the final stage, an overhead sink is installed.
The mortise method involves embedding the sink into the countertop. First, a hole with a diameter the size of the sink is made on the countertop that will cover the cabinet. The cabinet is assembled in a similar way; at the final stage, a sink is installed. The integrated method involves installation under the countertop. In this case, the sink will be strongly lowered down, so it is worth foreseeing the availability of free space in the cabinet in advance.
Invoice
Mortise
Integrated
How to make a sink cabinet with your own hands
An important step in making a sink cabinet is planning. A detailed sketch development and drawing of the sink cabinet will help save time and avoid many annoying mistakes. It is advisable to pay attention to the following nuances:
- Decide on the model and installation location of the cabinet and sink, sketch a sketch taking into account the placement of the main communications and equipment.
- Take measurements of the free space where the cabinet will be installed.
- Develop drawings indicating the overall dimensions of the product and separately each of its constituent parts.
- After this, you should decide on the material, prepare the necessary tools, and you can begin to implement the idea.
It is necessary to measure the place where the cabinet will stand.
Drawing and diagram
The diagram will allow you to clearly demonstrate the design features, taking into account the location of the pipes and siphon so that it can function normally. You should consider the dimensions of all the necessary elements: frame, side walls, doors and pallet.
A correctly drawn diagram will allow you to complete the job without errors.
It is also important to take care of the detailing of additional elements: the number of shelves, carousel, fittings, etc. For each structural element, a detailed drawing should be developed, indicating dimensions.
Important! When calculating the dimensions, it is important to take into account the thickness of the side wall - therefore, the internal usable volume may decrease. For laminated chipboard it is 16-18 mm.
Selection of tools and material
The complexity of the project depends on the choice of material for the cabinet. The following are considered popular in the manufacture of kitchen furniture:
- Tree. An expensive material, difficult to process and subsequently maintain, since it absorbs moisture too much, which contributes to its deformation.
- Chipboard. The most popular and inexpensive option. Easy to process, but requires additional lining and edging tape to minimize harmful resin fumes.
- MDF. This is the safest material, also affordable, but more durable and practical than chipboard.
Products made from artificial stone require specialist skills and professional equipment. A novice craftsman should practice on accessible and easy-to-process materials. You will also need to stock up on the necessary fittings, facing tape and plywood for the back wall. The following tool will be useful in your work:
- electric drill;
- power saw or jigsaw;
- screwdriver and screwdriver.
For installation you will need the appropriate tools.
You should stock up on a pencil and tape measure, buy screws and self-tapping screws, door handles, corners and hinges. Additionally, putty, sealant and construction adhesive are purchased.
Preparatory stage
Having purchased the necessary materials and tools, as well as made drawings of the future product, you can begin preparatory work. They consist of the following stages:
- Transferring the elements of the cabinet onto paper, observing the dimensions.
- Cut sheets according to the drawings. The two side walls, the pallet, the top part, the bottom plinth and the top spacers are cut out.
- Appropriate holes are made at the connection points.
- The edges are cleaned with sandpaper, treated with putty and pasted over with an edge.
Important! The opening for a mortise sink is marked on the countertop. Then drill a hole and use a power saw to cut out the desired hole.
Please ensure that all dimensions correspond to the drawings. After this, you can begin assembling the parts.
Door calculation
Particular attention should be paid to calculating the size of doors, since this determines how well they will fit and open freely. To do this you should:
- Measure the width of the lower baseboard and table top.
- Subtract these dimensions from the total height.
- Subtract double edge thickness (4 mm).
The doors must be designed in such a way that they fit well to the cabinet.
With a height of 800 mm, a baseboard width of 80 mm and a tabletop of 25 mm, this value will be 691 mm (800-80-25-4).
The width of the door is calculated in this way: the total width of the cabinet is divided in half, then the width of the ends on both sides (4 mm), the gap between the doors and adjacent cabinets (2 mm each) are subtracted from the resulting value, and another 2 mm is added to be sure. That is, with a cabinet width of 800 mm, the width of each door will be 390 mm.
The width of the door is calculated using a certain formula.
Assembly
After manufacturing all the main elements, they begin to assemble the entire structure. This happens in the following sequence: Initially, the sidewalls and the pallet are connected, fastening them with corners and self-tapping screws.
- Install the bottom plinth.
- The transverse strips are attached: the first on the facade, the second on the back wall.
- Install shelves.
- Check the structure for distortions.
At the final stage, the doors should be attached to the bedside table and marks should be made for the recesses for the hinges. Cut openings for the mount and install it. Now you can install the handles and magnets.
Sink installation
The installation of the sink depends on its design. The invoice is mounted using fasteners or plastic corners. A mortise sink can be fixed in a pre-cut opening using sealant, after which it is advisable to install a heavy object for better fixation.
The sink is installed depending on its configuration.
It is recommended to fasten heavy sinks with self-tapping screws. With any option, it is important to apply sealant to the ends - this will help eliminate unwanted gaps.
Gaps can be closed with sealant.
