Home/Interior/
01 Mar 2020 No
Tiles are always used during renovations. Most often I can decorate an entire room with it, for example, a bathroom. But there is no desire to use the same tone of tiles for cladding walls, ceilings and floors. Therefore, most people come to use different tile options. After all, it is in this case that you can achieve the effect of individual repair.
An important parameter in choosing a tile is the texture and then, of course, the color. For a harmonious union, the texture should be the same on any of the selected tiles. Ceramic tiles serve as a durable guarantee of beautiful walls and interesting interior design of the room. And there are many options, how by using different calibers of tiles you can also achieve harmony. There are separate collections of tiles and they have their own size. All this is indicated on the packaging. There is a standard size for ceramic tiles, which is 30 cm by 30 cm, but in fact it is important to know that this is not a real size. In reality, the tile has a slightly smaller diameter, just one centimeter. But during construction this will play a role.
Such differences in small details will play a big role if someone wants to use different collections in the same room space. If you think about the idea of combining ceramic tiles from different collections on the floor and on the wall, then the relationship between the joints will create a disaster. It is also important to think about the thickness of the ceramic tiles. Due to differences in thickness, gaps may also form.
The most common options for laying ceramic floor tiles or porcelain tiles
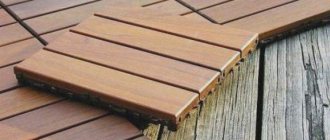
Natural stone tiles look impressive in themselves, but simple solutions can be enhanced with inserts like those in the photo.
The background tiles were cut so that "inserts" could be inserted into the corners, which is what they are called in the ceramics business. Ceramic tiles and floor tile inserts have excellent performance characteristics and are perfect for decorating a room. They are in many ways superior to other finishing materials, at least in practicality and aesthetics.
Various brands and companies offer their products to the buyer. When purchasing, be sure to pay attention to the quality of the tile and its characteristics indicated on the box. In addition, it is important to do the installation correctly, and for this you should pay attention to the following points:
- what adhesive composition will be used for installation;
- the amount of materials that are needed;
- what installation technology will be used.
Speaking in more detail about laying floor tiles, there are many different technologies that will help diversify the design, even when using plain canvases. So, let’s look at the most popular styling options.
Straight layout simple basic version
The most common option for laying tiles, a kind of classic of the genre, is straight layout. It involves installing tiles in rows parallel to the floor, ceiling and each other. The tiles are laid in even rows, and this is the key to high-quality installation. The most common size for such masonry is 420x420 mm. The best shape for this is square, but a straight layout is also suitable for rectangular materials. This technology is both the fastest and simplest. Installation does not require special skills and experience; it is enough to carry out the work according to the instructions and follow all requirements.
Only design tricks will add originality to this installation: using tiles with a pattern, combining materials of different colors and textures, etc. But it is important to consider the following nuances:
- If the installation is carried out on an uneven surface (poorly carried out preparation stage), or the purchased material turns out to be defective, all the installation flaws and shortcomings of the material itself will immediately be evident.
- If you don't resort to tricks like combining shades, the design may seem boring.
- For installing seamless ceramic tiles, this method is considered the most optimal.
Straight offset layout
Laying tiles on the floor using this method will slightly diversify the room, especially when compared with the previous option. The coating installation process itself is no different. The peculiarity of the pattern is that the seam of the first row should be in the middle of the tile of the second.
If you look at it visually, the pattern is very reminiscent of brickwork. It is preferable to use rectangular tiles for these purposes, but square ones are used just as often. The main advantage of this method: with this type of masonry you can hide small surface defects.
Diagonal layout simple
Although at first glance everything seems extremely simple, this installation method is one of the most difficult to install, but at the same time the most beautiful. Although diagonal laying is carried out based on the classical method, it has its own subtleties and difficulties.
The main difficulty of the diagonal layout lies in the designation of the axes. In order for the coating to be smooth and neat, the diagonal axes must be correctly positioned. Another difficulty is the need to cut tiles, which requires certain skills, and this technology definitely cannot be done without. And, of course, time and financial costs also increase (more building materials are needed for diagonal laying).
For this design, it is recommended to use square tiles. It is laid exactly at an angle of 45 degrees relative to the wall. Even if plain ceramic tiles are used, such a pattern will look original and interesting.
This technology allows you to visually make the room wider and mask all the errors of the uneven surface. The only disadvantage of the diagonal layout is the large amount of waste, which is explained by the need to trim the material.
Diagonal offset layout
Only offset laying can make a diagonal layout even more interesting! For this technology, the surface must be carefully prepared and made perfectly flat.
The flooring is laid, as in the previous version, at an angle of 45 degrees relative to the wall. It is important to ensure that all seams are even and of the same thickness. The tile shift is done in the same way as in the case of installation with a direct layout shift. This technology looks interesting and unusual. It will be appropriate in any room.
Parquet layout
This installation method is also called herringbone. It uses exclusively rectangular tiles, and it looks interesting and original.
“Herringbone”, in turn, is divided into two more options:
- Classic parquet method.
- "Herringbone" with inserts. For this, additional elements of mosaic tiles or elements of a different color are used.
On the floor, such a pattern looks even better if wood-like tiles or a plain material were chosen. It is not recommended to use stone-like tiles, otherwise the coating will look unnatural and rough.
The peculiarity of the installation is that the tiles are laid at an angle, alternately turning to the left and then to the right. This technology is practically waste-free and suitable for any type of premises.
Layout with inserts with offset tiles of two types
This option involves the use of square and rectangular tiles and inserts. Essentially, one type of tile (rectangular) creates a kind of frame for the offset layout. Its advantage is that this layout hides poor surface geometry well and makes any interior more harmonious.
Combined layout - two types of tiles: black and white
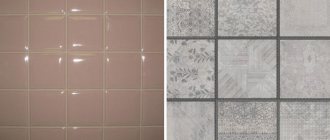
Combining black and white tiles is a classic. Experts recommend using white as the main color, and black for inserts and other small ornamental elements. Predominantly black tones will create a poor visual effect and make the room cold and gloomy.
You can mix any two colors, black and white, white and blue, red and yellow, and so on. If you add a third color, you will end up with a kaleidoscope that is not suitable for a classic home interior.
Clear the tile floor
In a small bathroom, it is better not to get carried away with the pretentious rococo boudoir style and give preference to laconicism. Correctly chosen graphic lines will eliminate the feeling of clutter. And if you add compact hanging furniture to this and remove all the objects that you rarely use (stool, scales, etc.), the optical effect will not take long to arrive: the bathroom floor will be cleared, and the tiled floor will play in full force.
A reminder to visually expand the space in the bathroom with tiles:
- Choose light shades
- Play with contrast with tiles
- Choose gloss
- Rectangular tiles are what you need
- Don't be afraid of large tiles in a small bathroom
- Full height tiles
- Combine tiles with paint
- Tiled frieze - for perspective effect
- Feel free to choose embossed or patterned tiles
- Bet on transparency
- Clear the tile floor
How to lay tiles with your own hands, expert advice
Correct placement of tiles on the surface is the key to a beautiful and neat ornament. Different types of layouts have their own installation features. The following useful tips from professionals will help you get the job done as correctly as possible:
- Preliminary preparation, including leveling the surface and cleaning it from dust and dirt, is the main stage of high-quality tile laying.
- The adhesive mixture is selected depending on the temperature and humidity in the room where the work is planned to be carried out.
- For all layout methods, it is recommended to make preliminary markings on the floor.
- Beforehand, if a complex pattern is being made, it is recommended to cut the tiles and lay them on the floor without adhesive. This way you can immediately see what the final result will look like and “try out” the layout itself.
Important! For this preliminary layout, the tiles are laid on a fabric, and not on a bare floor.
- All complex technologies for installing patterned tiles must begin from the center of the room. Simple installation can be started from a corner.
- Treating the surface with liquid waterproofing will improve adhesion.
- If the floor has been treated with impregnation, it must be given time to dry before starting work.
- Grouting of joints takes place after the adhesive has completely dried.
Linen carpet
This technology is recommended for use in large rooms. It is considered a very sophisticated and unusual way to cover the floor. The principle of laying a “carpet” is that some kind of pattern is laid out of tiles in the center of the room, it is framed by elements of a different color and/or shape around the perimeter, and the last few rows of decoration are made of a plain background. The advantage of this technique is that the design can be selected individually to suit your interior, and there are no restrictions in this regard.
Kaleidoscope
Kaleidoscope is a bright and unusual design option for any room. This styling method allows you to experiment with patterns and come up with it yourself. Experts recommend thinking through the pattern in advance, otherwise it will simply get confusing and confusing in such a pattern.
To install tiles using this technology, it is necessary to perfectly level the surface, otherwise defects will immediately be evident.
Laying tiles diagonally
Before laying the tiles diagonally, it is necessary to make an accurate calculation of the pattern. First of all, the surface is prepared: the remnants of the old coating are removed, the surface is leveled, and after that you need to vacuum it to remove all excess debris.
For this layout method, the main thing is to start correctly. The first 4 tiles will do all the work: we determine the center of the room, lay the tile so that its corner is in the center of the room, and the sides go directly along the marking lines. Using the same principle, we lay the other 3 tiles. Then, starting from the center, we lay out the tiles in rows so that they go diagonally.
The process of laying tiles with a diamond shape with your own hands
The process of laying a diamond is practically no different from a diagonal one. Let's look at the detailed instructions:
- As in the previous method, we determine the center of the room, and lay the first tile at an angle to the center so that its sides lie directly on the diagonal of the marking.
- The adhesive mixture is applied with a notched trowel to the floor and to the back surface of the tiles. We apply the material to the floor.
- To get rid of voids, after the tile is in the correct position, you need to tap it a little with a rubber mallet so that the glue comes out slightly beyond the tile.
- We check the evenness of the installation using a building level.
- Next, we lay out a diagonal line (one row) to one corner of the room, and then return to the center and lay out the tiles to the other corner. After the first row has dried, we begin to lay out the second according to the same principle.
Diagonal tile laying with offset and inserts
Laying floor tiles offset also has much in common with laying tiles diagonally:
- We make markings and find the center of the room.
- Lay out a pattern on the floor, inserting crosses between the tiles.
- We stretch the pendulums to determine the correct direction.
- We prime the surface.
- We prepare the adhesive and begin laying the solid tile elements. When all the solid elements are laid out, we begin to lay the missing pieces around the perimeter, having previously cut them out.
- We wait until the coating dries and rub the seams.
Methods for laying tiles by combining colors
The range of tiles presented in construction stores can surprise, and this is what allows home owners to achieve a unique and unusual design. This variety, first of all, lies in the sizes (20x20, 20x60, 20x30, etc.), but in addition, such coating may differ in texture and color.
The texture of the tile can be glossy or matte. They differ not only visually, but also in their operational characteristics:
- The glossy surface is very slippery, and laying such tiles in the bathroom, toilet or kitchen is not recommended. Once water gets on such a surface, it becomes potentially traumatic. This surface is very easily soiled. Any drop of water or other contaminants that gets on it immediately catches your eye. It requires constant care and regular cleaning. At the same time, the aesthetic component of glossy tiles remains at its best.
- The matte surface is slightly inferior to the glossy one in aesthetic terms, but if used correctly, this difference will not be noticeable. From a practical point of view, especially for flooring, matte tiles are more convenient. It does not slip, scratches are not noticeable on the surface, which means it can be cleaned using various means, including metal brushes.
The most interesting thing in terms of the variety of tiles is the color range. Here manufacturers give their customers complete carte blanche. Solid colors, striped tiles, wood effect, stone effect, mirror and much more. All this creates a huge field for imagination and allows you to bring any design idea to life.
In terms of practicality, designers recommend using a classic dark-light color combination. In general, dark shades are preferable for tiles, but you should be careful when using them. A completely dark room will turn into a black hole, and not the highlight of the apartment.
Depending on the characteristics of the room, you can play with the color palette. More creative owners can afford to combine the most provocative colors: yellow, red, green, orange, etc. The main thing is to do it with taste.
More calm and standard options are tiles in pastel colors with black inserts, or with inserts with a classic pattern. It looks interesting and helps create a cozy atmosphere in the room.
Complex installation options require additional work. First you need to lay out the tiles on the floor and make sure that all the tiles are suitable for this design. If the tone is different, then you need to remix so that the different tone of the material is not noticeable and looks natural.
Advice! Materials with a mirror surface are sometimes found on sale. Their use can bring some zest to the room if such tiles are correctly introduced into the interior. For example, one row of mirror tiles can separate the top and bottom of a wall, or this material can be used to lay out a pattern, such as a flower, on one of the walls, which will become an original addition to any room.
Choose light shades
Light colors will help expand the space. Pastel shades look very advantageous and are ideal for the bathroom. Contamination is not as noticeable on them as on white, and these tones seem to fill the entire room with light. Bathroom tiles in light shades (taupe, linen, beige or cream) will not bore you for a long time, which means they will be the right choice for many years to come. These “ universal ” colors are loved by almost everyone, which will make things easier if you decide to sell your home. Do you like rich colors? Add your favorite shades in the form of bathroom accessories: towels, soap dishes, bath mat, toothbrush cups...
> How to combine colors in the bathroom
Original offset tile laying
Tiles are often used to decorate walls not only in apartments and private houses, but also in public places. To diversify the design of a room, a simple but at the same time original method of laying tiles with offset is often used.
For these purposes, rectangular tiles are used (square ones are less common). This type of tile laying is very similar to brickwork and is performed according to the same principle: the center of the tiles of the previous row is at the level of the junction of two elements of the next row.
This technique is perfect for the following rooms:
- Bath;
- kitchen;
- toilet;
- corridor/hallway.
The advantage of this technology is its versatility. In addition, by laying tiles offset, you can hide some surface defects (irregularities and bumps). You can diversify this styling by using some inserts with ornaments, or by combining several colors.
Installation of offset tiles is no different from classic masonry. It also requires the use of an adhesive mixture, crosses to control the seams, a spatula and a building level (to check the evenness of the installation).
For high-quality installation, it is recommended to apply a diagram of the placement of coating elements on the wall in advance. In other words, draw the location of the tiles. This will help you accurately calculate the amount of materials needed and not disturb the drawing during the work.
Bet on transparency
In order not to overload the space and to “unload” a small bathroom as much as possible, you should try to eliminate visual obstacles . Want to know how? It’s very simple: focus on transparency. In the bath or shower area, it is definitely worth taking a closer look at transparent frameless railings. When laying tiles, it is better to avoid too flashy decorative slats: they limit the space that we, on the contrary, intend to free up. For an Italian shower, we choose large or mosaic tiles in light colors or even glass blocks .
Are curbs necessary?
In the catalog of floor tiles, elements such as borders are often found. Should I use it? In modern interiors, borders are quite rare. Its original purpose was to cover the remaining space in rooms with a fixed height.
Let's look at an example. The ceiling height is 263 cm. If you use tiles measuring 20 cm, then there will be 30 cm left from the last row to the ceiling, but if you use a small border somewhere in the center, the final row of masonry will be more neat. Today, in repairs, this element is not of value, due to the ubiquitous use of suspended ceilings, the height of which is easily adjusted if necessary.
Tiled frieze - for perspective effect
Ceramic and mosaic tiles provide endless possibilities for playing with space in the bathroom.
Elegant taps from the PURIST collection contrast with green mosaic tiles
Friezes allow you to simultaneously add a unique design touch, as well as create a vertical or horizontal perspective in the bathroom. This can change the perspective of the bathroom and enhance the feeling of depth or height in the room.
Universal color combinations for bathroom and restroom renovations
In terms of color design for baths and toilets, of course, the most popular colors are: blue, light blue, black and white. First of all, you need to decide on the surface texture: glossy flooring is not suitable for such rooms, especially the bathroom. It is more fragile, wears out quickly, and can also be dangerous and slippery. Matte tiles are more practical: they don’t get dirty as much and there are no traces of water left on them.
As for the color scheme, one of the most common options is a combination of light and dark tiles. For example, we use dark elements to decorate the space slightly above the bathroom (about 7-10 cm) and under the ceiling. At the same time, it is advisable to make the ceiling itself white so that the dark tiles in the upper part of the room frame and emphasize it. We decorate the bottom of the wall and the space in the middle with light tiles.
This contrast will create an interesting visual effect. On a dark background above the bathtub, dirt will not be so visible, which also serves a practical purpose. It is also recommended to finish the floors with dark tiles.
Choose gloss
In the bathroom, glossy surfaces reflect light more strongly, so light glossy tiles will allow you to fill a small bathroom with maximum light, especially if it does not have windows. Another way to add as much light as possible to the bathroom is with mirrors, from small to huge!
> Tile, ceramic, porcelain tile: Find out how to choose the right tile
Tiles diagonally on the floor, marking methods
Diagonal laying of tiles is considered the most difficult, so initially it is necessary to correctly mark the working surface. Diagonal installation of tiles can take place in 2 ways:
- From the center. To mark, it is enough to determine the center of the room. We stretch 2 straight lines from opposite corners of the room (you can use a special breaker). Or simply stretch the lace). The intersection of the lines is the center of the room, from which you need to start the layout.
- From the corner of the room. This option involves starting work from one of the corners of the room, as is clear from the name. Several squares of tiles are cut into triangles, and then they are first laid out on the floor without an adhesive mixture. After this “trying on” of the drawing, you can begin the main work.
Feel free to choose embossed or patterned tiles
Thanks to the relief pattern, 3D tiles create the effect of movement in the bathroom.
Embossed tiles highlight the flowing lines of faucets from the Kumin collection
3D tiles, emphasized by large shapes, enliven the bathroom , creating a dynamic, truly unique space, making it more spacious.
Calculation of flooring inserts
Purchasing a sufficient amount of building materials is one of the most important stages during renovation. To ensure that the tiles do not differ, you initially need to purchase enough products from one manufacturer and from the same batch, because it is not always possible to buy exactly the same material later.
To calculate the correct number of inserts, you only need to know the dimensions of the tiles and inserts, and the area of the room. The calculation is made as follows:
- Calculates surface area.
- Calculate the area of one tile.
- Divide the area of the room by the area of the tile. The result is the required number of tiles to cover the entire surface.
- We round the resulting number up and add another 5% (this is stock and material for fitting and trimming).
- The number of inserts is equal to the number of tiles + stock.
Important! For both material options (the tile itself and the inserts), a reserve must be made; this should not be neglected. Such a measure will help to avoid difficulties if elements are accidentally damaged or calculations are made incorrectly.