06/01/2015 Category: Do it yourself Author: Natalya Ivantsova
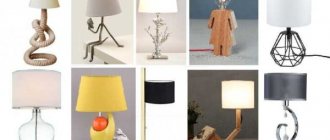
We all love beautiful lamps. They are an excellent option for visually transforming the interior of almost any apartment. The most interesting thing is that it’s not at all difficult to make a lamp from a bottle with your own hands. Let's look at several ways to implement such an unusual idea.
Original lamp from a wine bottle
- Step-by-step instruction
- Video. Light from a glass bottle in 3 minutes
- DIY lamp made from a plastic bottle
- Necessary materials to create a lamp
Step one: preparing the base for the lamp
- Step two: preparing plastic bottles for decoration
- Step three: assembling the lamp
DIY wine bottle lamp
Wine is one of the most popular alcoholic drinks in the world. There is no doubt that in almost every home at least one bottle is bought for every holiday.
This is interesting: After the wine is drunk, the container becomes unnecessary and is simply thrown away. Luckily, old bottles can be turned into interesting lamps that can add a magical touch to your living room or bedroom. They look especially beautiful in complete darkness. Let's find out how to make such a lamp!
Original lampshade made from a plastic bottle
Everything can be done much simpler, for example like this. A little paint, imagination and you're done. Below in the pictures you can see by hand, simply and clearly, how you can make such a lamp.
Photo source creativehozz.blogspot.com
If your lamp's lampshade is broken, you can replace it with this “bouquet” made from plastic bottles.
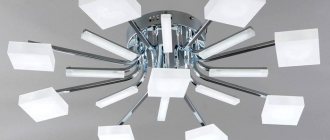
DIY decorative chandelier
How do you like this original chandelier using bottoms from plastic bottles ? Of course, only the decorative part was made with your own hands, but the idea is impressive. Not a cheap option, you will have to buy a chandelier with a round plastic lampshade and try not to spoil it, but art requires sacrifice. This is what it will look like.
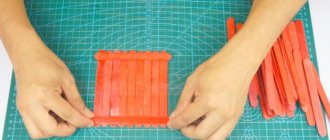
The main decorative detail is the bottoms of plastic bottles, you will need a lot of them. Cut along the lower stiffeners
Use a soldering iron to make holes and place them on wooden sticks. The plastic hardens quickly, so you can add superglue for reliability.
Apply markings on the plastic ball, also use a soldering iron to make holes and insert sticks with plastic “petals”. You need to be very careful with the soldering iron, overexpose it a little, the hole will be larger than necessary, in this case you can wrap the end of the pin with electrical tape and fix it with glue. In general, be patient.
Material from the site www.home-dzine.co.za
Step-by-step instruction
1. Select the appropriate material. Collect all the empty wine bottles and select a few of the same ones to use to make a lamp. You can take different bottles, but in this case the composition will not be complete. They can be any color. A lamp made from a frosted bottle and a brighter LED garland will look especially beautiful.
2.Remove the label. The label must be carefully removed from each bottle. For best results, use a sponge and warm water.
Washing wine bottles
3.Rinse the bottles. They need to be thoroughly treated both outside and inside. After this step, leave the bottles to dry completely.
4. We outline a place for the wires. It is necessary to mark the place from which the wires of our lamp will come out. It is better to make a hole in the side wall near the bottom. This way your lamp will look much neater and more aesthetically pleasing.
5. Prepare the water. We will need it to make a hole in the bottle.
6.Power tools. Prepare in advance the tool you will use to make our hole for the wires. A diamond crown is best suited for such painstaking work. This way you can do everything carefully, and the hole will be smooth.
Use clay to drill a hole
7.Use clay. We make a cake from clay and apply it to the intended hole. While drilling, you will need to occasionally slowly and carefully pour water into our hole. This is necessary to ensure that the bottle does not overheat and crack.
8.Drilling. Drilling must be done very carefully so as not to damage the bottle. After completing this process, remove the clay and rinse the bottle again.
The hole must be sanded
9.Use sandpaper. To make the hole smooth, you need to go over it with sandpaper. This way you will sharpen sharp edges and protect yourself from possible injury. This is also necessary in order not to damage the wires that will come out of this hole. Select a piece of sandpaper whose grit is 150 mm.
10.Re-cleaning the bottle. After the work is done, I wash it again.
11.LED lights or garlands. Take LED lights or garland. Single-color lights will look beautiful. But you can also use a multi-colored garland. It all depends on your preferences.
We insert the garland into the bottle through the hole
12.Place the lights in the bottle. Insert the garland into the bottle so that its plug comes out of the hole made.
13. Gasket in the bottle hole. You can use a special gasket to secure the wires. This is optional, but it will help prevent accidental damage to the wiring. In addition, with such a gasket the appearance of the lamp will look much better.
Insert the rubber gasket
14. Fasten the wires. After installing the gasket, you need to secure the wires well.
15.Connect. After the work has been done, you can see what you got. Plug in your new lamp. If you don’t like the way the garland looks, you can carefully straighten it. To avoid having to disassemble the lamp, take a thin stick and use it to eliminate any imperfections.
Wine bottle lamp is ready
16.Done. You can decorate the bottle with decorative ribbons or laces (optional). We hope you are satisfied with the result!
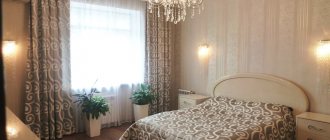
Wine bottle table lamp
Beautiful and unusual night lights can be made from wine bottles, which can have the most bizarre shapes. The lighting features will depend on the color of the glass. Lamps made from bottles with an original design fit perfectly into a modern interior.
To make a cozy night light you will need one bottle, simple short garlands, masking tape and a drill with a special drill bit for tiles and glass. It is better to match the color of the light bulbs on the garland to the color of the bottle glass. For example, light bulbs with yellow light (warm lighting) are suitable for containers made of dark brown glass, and a dark blue bottle will be combined with blue or white light bulbs (cold lighting).
When all materials are prepared, you can begin to work. We take a clean, dry bottle and wrap its lower part and bottom with masking tape in several layers. Next, mark the hole for the wire on the wall or bottom and drill with a wet drill at medium speed, holding the drill straight and firmly fixing it. If you follow all the described recommendations, the glass will not break. When the hole is ready, it should be sanded.
The next stage is the design of the bottle walls. The most affordable option is to paint patterns with translucent stained glass paints. For these purposes, you can use a homemade stencil. With sufficient skill and developed imagination, you can depict something abstract. It should be noted that even without additional decoration, such a table lamp will look great.
The bulbs of the garland are lowered into the bottle one at a time through the hole, leaving the necessary part of the wire with the plug. The lamp is supposed to be oriented vertically with its neck up.
Necessary materials to create a lamp
To make a lamp according to the scheme proposed below, you will need several plastic bottles of various sizes. So, for the base you can use a large bottle, for example, a five-liter one. And for additional decor - smaller bottles. It is important that they have the same color and size.
Base for lamp made from plastic bottles
In addition to the bottles themselves, you will also need to prepare an electric socket, a sufficiently long wire, a plug and the light bulb itself.
Important information: Traditional incandescent lamps are a bad option for our lamp. The fact is that in the process of heating the glass, the plastic can begin to melt, releasing an extremely unpleasant odor. In the worst case, this can even lead to a fire. To make a lamp from plastic bottles at home, you need to purchase exclusively halogen light bulbs (economical). Their advantage is that during operation there is no strong heating.
Marking a bottle lamp
Step one: preparing the base for the lamp
The basis of the lamp will be a large plastic bottle or a five-liter bottle. It is necessary to cut off the lower part (bottom) from it. Leave the top of the container intact; an electrical wire will be passed through the neck later.
Marked base for lamp
Then you need to measure the diameter of the necks of other plastic bottles that will be used for decoration. You can simply attach them to the main container and use a marker to draw circles of the appropriate size. It is advisable to increase the diameter by a few millimeters so that later you can screw the bottles into the side holes without any problems.
Holes in a bottle lamp
Helpful Hint: The easiest way to cut holes for the side bottles is to use a wallpaper knife. But if it is not there, you can use ordinary sharp scissors.
Step two: preparing plastic bottles for decoration
Plastic containers for decoration are prepared as follows. First, their bottom is cut off, then the workpiece is evenly cut into thin strips (you can see the approximate thickness in the photo). The strips are cut right down to the neck - the thickest part of the plastic bottle.
Cutting a bottle to decorate a lamp
Each piece is then heated over a gas burner until it melts, giving it a disordered and chaotic appearance. It's not difficult to do this. Firstly, narrow strips of plastic, in any case, under the influence of high temperatures begin to change their shape, bending in the most bizarre way. If you want to correct the shape, use special tweezers or pliers.
Cut bottle for lamp decoration
Glass overexposure: interesting ideas for pendant lamps for apartments and cottages
To make a lamp, you can use not only wine bottles, but also shaped bottles for cognac and liqueur or miniature beer bottles.
A composition of lampshades of different sizes and shapes will certainly impress your guests. You can use the frame from an old chandelier, or you can fix them as separate lampshades.
Glass goes perfectly with a metal or wooden frame.
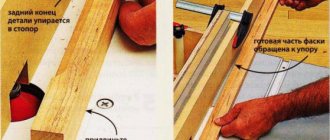
To carefully and safely remove the bottom of a bottle, you need to wrap the bottle along the “cut” line with woolen thread in several layers, then, after tying the ends, remove the wrapping to wet it in acetone or vinegar and put it back on the bottle. After this, the thread should be set on fire and, turning the bottle, wait until it burns out and then immediately lower the bottle into a pre-prepared basin or sink with cold water. The bottom will easily fall off, leaving a clean, smooth edge.
Another method requires rigid fixation and a glass cutter. First, use a glass cutter to make a closed cut line. In this case, the glass cutter is pressed tightly against the glass, and the bottle, sandwiched between the bars, is slowly rotated. When the line is ready, the container is immersed in cold water slightly above this line, and boiling water is poured inside through a funnel. As a result of such actions, the glass at the notch will burst and the bottom will fall off. All that remains is to sand the edges with sandpaper or a block. You may not get the desired result right away, so first you can practice on not the most beautiful bottles.
To implement the idea presented in the next photo, you will need three identical containers made of light brown glass. When the bottom is separated by the methods described above, you can begin assembly and decoration, which consists of randomly wrapping copper wire.
The next version of the pendant lamp is suitable for the kitchen and living room.
A convenient and practical lamp for illuminating a country porch or a gazebo for tea drinking can be made quite simply and quickly from beautiful bottles of noble alcohol lying around. To be more economical, it is better to use energy-saving lamps.
A street lamp from bottles can be made using solar-powered LED lamps or using wax candles. Such designs are indispensable in places where it is difficult to install an electrical wire. Glass perfectly withstands contact with open fire, so using candles is completely safe.
What else can be made from bottles
Do you want to add charm to your gazebo or balcony so that you can sit in an armchair at night and enjoy the stars, surrounded by intimate twilight? We will help you achieve what you want - to do this, you need to watch our master class and make a lamp or chandelier from a glass bottle with your own hands.
A chandelier made from glass bottles will fit perfectly into your home or apartment interior. And most importantly, they will be exclusive!
To make a chandelier from bottles with your own hands you will need:
- Large bottles - 3 pieces;
- Bottle cutter;
- Sandpaper;
- Screwdriver;
- Dark wire.
- Remove labels from bottles and dry them well.
- Secure the bottle in the cutter, place the glass cutter at the level you want to leave, put on protective clothing. Carefully rotate the bottle for a smoother cut line.
- Pour cold water over the bottle
, then hot. Alternate like this for a few minutes, and the bottom of the bottle will fall off along the cut.
- Place the bottom of the bottle on the sandpaper and scroll for a few minutes
until the edges are even and smooth.
- Using a screwdriver, carefully disassemble the lamp and carefully remove the wire. We thread the wire through the hole, assemble the lamp and check if it works.
- Now, in order to give the almost finished chandelier some originality, we take a dark wire and, starting from the neck, begin to twist it onto the bottle. You can give the wire any look you want.
The lampshade can also be painted and we will get these stylish pendant lamps. To find out how to paint a bottle, click the button!
Master class No. 1. Night light from a bottle
What could be simpler and more elegant than soft light flowing through the small petals of your night light?
Materials and tools:
- transparent plastic bottles (bottles of any size at your discretion will do);
- white paper (you can use thicker paper than usual - it will hold its shape better);
- flashlights or LED candles (for more brightness);
- template or stencil of a drawing (you can download any one you like on the Internet);
- adhesive tape (white);
- scissors;
- a scrapbooking machine, a paper knife or a special shaped hole punch for cutting out templates.
Manufacturing technology
Step 1.
Let's prepare the bottles. We will use 1- and 1.5-liter bottles - this is the frame of the flashlight. We remove all the labels from them and cut off the necks with scissors.
Step 2.
- Take a white sheet and wrap it around the bottle. If any edges of the bottle stick out, they need to be trimmed. The edges of the sheet should not overlap each other - then the light will be uneven.
If you have a scrapbooking machine, take a ready-made template and do everything according to the instructions.
- If you do not have a special stencil machine, then place a white sheet on a flat surface, cover it with a stencil on top and fasten them with paper clips so that the drawing does not “move” during the translation process.
- If you are confident in yourself, you can transfer the design from the stencil onto a white sheet directly with a paper knife.
If you are using hole punches, first make a stencil of the pattern for the night light, and then cut them out.
Step 3.
When you have cut out all the desired patterns from paper, make your flashlight three-dimensional - carefully bend the petals from the plane.
Step 4.
Now we glue the flashlight. We wrap the patterned sheet around the bottle, align the edges and secure it with white adhesive tape. A very thin strip so that the gluing area is not noticeable.
Step 5.
Add the main element - place a flashlight or LED candle at the bottom of the bottle.
This original, autonomous and safe night light is ready, now you can turn off the light and enjoy this soft romantic glow!
from bottles - disconnect the bottom
Such chandeliers will fit perfectly into the interior of a kitchen, living room, bar, country house or cafe.
To make them, you first need to cut off the bottom of the bottle:
- Take wool thread, solvent, bottle, lighter, sandpaper, bowl of ice water.
- Cut a long piece of thread and soak it in solvent.
- Around the bottle, in the place that needs to be cut, tie several circles of woolen thread.
- Hold the bottle so that it is parallel to the ground and light the thread.
- The bottle must be carefully rotated around its axis for several minutes.
- When the fire goes out, immediately plunge the bottle into ice water.
- Carefully remove the bottom.
- Grind down the edges of the bottle using sandpaper.
Sand decoration
When the mass finally dried, I began to decorate it with sand.
Sand, I didn’t buy it. She slightly “robbed” the children’s sandbox. May the children forgive me.))))))) I poured the sand into a deep cup and washed it thoroughly under running water. It was dirty, I tell you, it was!!! At this point it’s time to think about whether our children should be allowed to play in public sandboxes around the house.
After the sand was washed, I placed it on a baking sheet and put it in the oven to dry and fry. And after drying and frying, I sifted it through a sieve. I needed to separate small grains of sand from large ones.
Then I started decorating with sand. I diluted PVA glue with acrylic varnish, approximately in proportions of 1/1. I already used this composition when I did it, so I was confident in this composition.
Then, she generously lubricated the surface with this composition and sprinkled the surface with sand, pressing it with her fingers. Pressing the sand with my fingers, I buried it in the glue and at the same time leveled it to avoid lumps. Left it to dry. Here we had to wait about 8-10 hours.
Then I painted the sand with gold acrylic paint. I used a wide brush. I didn’t soak the brush in water, I just dipped it into the paint, shaded it on the paper and passed it over the surface of the sand. I let it dry again, it dried relatively quickly))).
So, I did two layers.
The first two layers are fine sand.
In the photo above, you can see that the bottle does not fit tightly to the base. And I wanted her to be drowned in the sand. Therefore, I sealed the cracks. To do this, I cut a simple napkin into thin strips and used glue + PVA to close the cracks (the principle is the same as insulating wooden window frames for the winter).
I close the resulting gaps
I didn’t wait for the strips to dry, I started decorating them with sand, just like the base. I glued the sand, after drying, painted it with gold paint. And so three layers.
Decorated with sand
Fine sand seemed a bit boring to me, so I added a layer of coarse sand. It worked the same way as with fine sand.
I decorate with coarse sand
During the forced periods of waiting, when the sand was drying, I made a lizard. The next master class will be about her.
To make a lamp, I, of course, needed a light bulb and a cord with a plug. I bought an LED light bulb (it barely heats up) and a ready-made cord, with a plug and an on/off button. I measured the length of the cord I needed, from the switch to the place where the light bulb would be. And she asked her husband to solder the light bulb to the wire.
Light bulb with cord
Using a hot glue gun, I glued the switch and ran the cord into the groove, under the neck. And she stuck the light bulb into the neck.
I glued the lizard. You can see how I made the lizard
Everything was almost ready. But I wanted to dilute this brown-golden color scheme with white pebbles and shells. She glued shells and large pebbles using a heat gun. And the small ones were glued with PVA + acrylic varnish.
Now, that's all, the work is ready. So, I managed to make a lamp out of a bottle. By the way, when I connected the light bulb, it became clear that not all places on the bottle were completely painted over. I wanted to fix it, but my husband stopped me in time and said that it was even more interesting. And I agreed with him.)))))
Lamp from a bottle
Lamp from a bottle
And also, a little about what you can do with bottles:
- You can, for example, take an unopened bottle of alcohol, decorate it with leather and give it to a man. For example, on February 23 or a corporate holiday. I have such a job, you can see the MK. By the way, this decor is removable. It can be used in the future for bottles of similar volumes.
- Or don’t throw away bottles of your favorite sauce, but decorate them using Decoupage and Paper Art techniques. And use these cute bottles for spices. MK of this decor, you can see
Friends, if you found my master class useful, share it with your friends!
Decorating a home is a complex and responsible task that you can handle on your own. The peculiarity is that some interior items can be created with your own hands. Thus, lamps are integral interior items that are used to illuminate the room as a whole or a separate area. The store offers a wide range of such products. But there are master classes on how to make a lamp with your own hands from a bottle. And now we will show them to you! 
Possible luminaire design
It is not necessary to make a lamp from an ordinary bottle. It can be used as a basis for implementing interesting ideas and ideas.
Design options:
- Paint the bottle with acrylic paint. You can draw a picture or make a stained glass window. A lot of lamps made from bottles, identical in shape, but painted in different colors, look very beautiful.
- You can wrap the bottle tightly with thread or yarn.
- Cover the bottle with gold leaf and engrave it.
- If you are making a table lamp, then inside the bottle you can pour coffee beans, multi-colored salt, seasonings, cereals, pasta, and so on. Such a lamp will not only serve its intended purpose, but will also serve as an excellent decor for the kitchen.
- You can decoupage bottles and much more.
- If you have large perfume jars, they will also serve as an excellent material for creating lamps.
- To make a pendant lamp, it is not necessary to fix the cartridge or stopper in the neck of the bottle. You can insert the cord completely into the container, and place all the other parts under the narrow top. This bottle will look more like a lampshade. Only then do you need to think carefully about fixing the electrical cord.