Wallpapering a room in itself is not a difficult job, but it requires care and careful preparation of the base. When working with wallpaper glued to a base (wall) made of brick or concrete, there are usually no problems. It is enough to plaster and putty the wall, treat it with fine-mesh sandpaper (mesh) fixed in a sanding block and impregnate it with an acrylic primer.
It is much more difficult to prepare a wall that is made of plywood or fiberboard (MDF panels). In this article, we will describe step by step all the stages of preparing a surface made of wood materials, answering the questions: how to glue wallpaper on chipboard or how to glue wallpaper on plywood and recommendations on various compositions of impregnations, primers and putties that can be used for this.
No. 1. What is self-adhesive wallpaper?
Wallpaper is the most popular type of wall decoration. It's hard to argue with that. What made them popular was their wide variety. The market offers paper and vinyl, cork and textured, washable and liquid wallpaper, and not to mention the assortment of colors and patterns. With the advent of photo wallpaper and self-adhesive wallpaper, the variety has become indecently wide. Large sellers offer several hundred and sometimes thousands of options to choose from.
The production of self-adhesive wallpaper has been launched by many manufacturers. Buying a suitable option will not be difficult. No matter how fancy the colors may be, the structure of the material remains unchanged: on one side there is a decorative part, on the other there is an adhesive side, which is covered with protective paper. After cutting and immediately before the installation process, the protection is removed. It turns out that there is no need to look for a specific adhesive composition and prepare it. There is also no need to buy brushes, plumb lines and other tools, and there is also no need to keep the windows closed so that a draft does not disrupt the gluing process.
Self-adhesive wallpaper is sold in rolls of approximately 14 m, 40-90 cm wide. They are used for wall decoration, furniture restoration and decoration of other interior items.
No. 2. Advantages and disadvantages
The main advantage of the material is its simple and quick installation process . Self-adhesive wallpaper has other advantages :
- moisture resistance , so the material is suitable for finishing walls in bathrooms and kitchens. However, experts do not recommend covering “cold” walls with it, since condensation may begin to accumulate under the film, which will gradually lead to the formation of mold and mildew;
- resistance to ultraviolet rays, long preservation of original colors;
- resistance to high (up to +800C) and low temperatures (-400C);
- strength and durability , wear resistance;
- harmless to health. There are no toxic fumes either during installation or during operation;
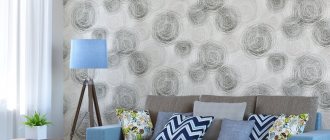
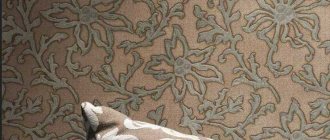
- a huge variety of patterns and textures . You can find wallpapers that look like wood and stone, with floral prints, intricate fantasy patterns, and with a matte or glossy surface. There are even wallpapers with photo printing, better known as self-adhesive photo wallpapers - in general, there is plenty to choose from;
- versatility , wide scope of application. Self-adhesive (as self-adhesive wallpaper is called) is used for wall decoration, quick change of decor, restoration or modernization of furniture, for pasting door panels and other purposes;
- the low cost of the material only encourages experimentation.
downsides as such. You just have to keep in mind that the material is quite thin and will reveal all the surface irregularities , so the walls must be smooth or with minimal defects - there will be no concessions. Self-adhesive wallpaper made on the basis of polyvinyl chloride , although they have the best performance qualities, have a significant disadvantage - they do not allow air to pass through . If part of the wall is lined with such material, then nothing bad will happen, but if all the walls are covered, then it will be necessary to take care of reliable ventilation.
No. 3. Main types of self-adhesive wallpaper
There is a lot of variety in this material, but we will try to classify the entire range presented.
So, according to the material of manufacture, all wallpapers can be divided into the following types:
- polyvinyl chloride (PVC). This is the most popular wallpaper, which is popularly called self-adhesive. It is based, as you might guess, on a layer of polyvinyl chloride, which is resistant to moisture, withstands temperatures up to +800C and is inexpensive. The variety of colors is huge: from imitation wood to an almost mirror-like surface;
- cork _ The cork layer is small, only about 1-2 mm, but this is enough to provide the material with high aesthetics and increased heat and sound insulation. Wax impregnation increases resistance to moisture and prevents the material from accumulating odors. This material is ideal for finishing the bedroom and living room, but can also be used in the kitchen, however, away from wet areas;
- satin wallpaper are made on the basis of dense fabric material, it has a matte surface. The density and lack of glare make it possible to successfully hide minor surface irregularities under such wallpaper. As a rule, photo wallpapers are made in this way.
Separately, it is worth highlighting chalk self-adhesive wallpaper . This is an analogue of slate paint. We think that by these names you have already guessed that we are talking about a material on which you can draw with chalk, leave notes to relatives, create real masterpieces yourself or in the company of children, each time giving the room a new mood. Everything drawn and written can be easily wiped off with a dry or slightly damp cloth.
Recently, wallpaper has appeared on sale in which the top layer is made not of PVC, fabric or cork, but of lace . It looks very unusual, gentle and elegant, but such wallpaper is not easy to fit into the interior correctly, so as not to slip into bad taste.
Based on surface type, wallpaper can be divided into glossy and matte, mirror and holographic. The latter are generally the peak of luxury.
Plane alignment
In order to worry less about subsequent leveling of the base, pay attention to the following points:
Acclimatization
Before you begin installing plywood boards on the wall, the material must undergo acclimatization. Sheets of plywood are stacked on a flat base, preferably in the same room where finishing will be carried out and kept in this condition for 1-7 days. Acclimatization is necessary in any case.
Alignment on frame
A simple method to level the thickness of plywood sheets is to use shims. As linings, you can use strips of veneer, linoleum, roofing felt, polyethylene, plastic - any material that has the required thickness and is not afraid of moisture. We place a sheet of thinner thickness under the edge.
End processing
It is necessary to remove all burrs, chips and process the ends of the plywood boards at an angle - remove the chamfer. When attaching sheets to the frame, leave a gap of 1-3 mm between them.
We will not dwell in detail on the structure of the frame and the installation of plywood sheets. I just want to draw your attention to the fact that moisture-resistant types of plywood FSF, FOF, suitable for wallpapering, are not recommended for use in residential premises. The adhesive component of these brands is a waterproof glue based on phenolic resins, which has a certain toxicity. For interior decoration, it is recommended to use FK plywood, since its production uses adhesive based on natural materials. You can select and buy FC plywood in St. Petersburg from our company NevaTorg.
No. 4. Application options for self-adhesive wallpaper
And again about versatility. The material is so convenient and easy to use, and has such a wide selection of colors that enterprising designers have come up with the idea of using it in various wholes, obvious and the most unpredictable:
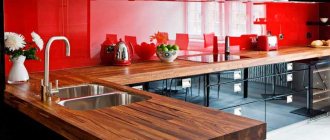
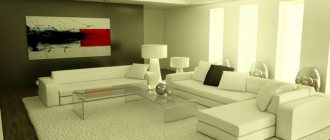
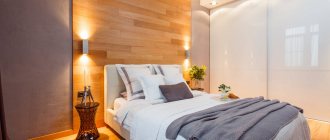
- wall decoration – the first and main area of use. Self-adhesive wallpaper is suitable as the main finishing material (remember that in the case of PVC it is necessary to provide ventilation), as well as for placing accents. You can use wallpaper in any room, even in the kitchen and bathroom. For these rooms they even produce wallpaper that imitates mosaics and tiles. Some people use easy-to-install self-adhesive when they just want to change the room a little, but don’t want to start a renovation with dust and debris. Chalk wallpaper is perfect for children's rooms;
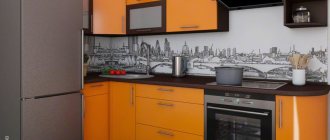
- furniture restoration. Old cabinets, bedside tables and tables can be changed beyond recognition in a few hours. Guests will think you just brought them from the store. The technique is also suitable in cases where the furniture has not yet lost its appearance, but for some reason (tastes have changed, it no longer fits the interior) it needs to be changed a little. Using self-adhesive wallpaper, you can modernize any furniture: from kitchen cabinets to a wall in the living room and a chest of drawers in the bedroom. There are any colors to choose from: stone finishes, precious wood species, or simply elegant patterns on a plain background. And if you are lucky enough to find wallpaper with an imitation of stained glass, velvet, lace, or with a mirror surface, you will be able to create a bright interior;
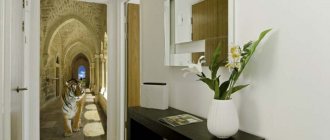
- decor of doors and window sills . These integral objects of each apartment lose their former luster over time, but if they remain strong, then all is not lost. A window sill that has been repainted dozens of times can be covered with wallpaper that imitates marble or oak. With the door leaf, everything is more complicated: every decorative element, panel and glass insert makes you more and more categorically abandon the idea of \u200b\u200bpasing. Strictly speaking, such a solution is suitable for a solid, smooth canvas.
It is very important to choose the right shade and pattern of self-adhesive wallpaper, especially when it comes to the PVC version. There are a lot of materials on the market that are too cheap (both in cost and in appearance) that will only spoil the interior. Actually, because of the simple, if not worse, looking yellow wood-look films, many have become disillusioned with self-adhesive wallpaper as a form of finishing and decor.
Material calculation
In order to calculate the required amount of film, you need to know the width and footage of the roll in advance. Room measurements are taken without taking into account windows, if any, doors and the space behind the bathroom. First, find out how many strips of material will be needed to cover all the walls. To do this, the perimeter of the room is divided by the width of the roll. Then they calculate how many strips can be obtained from one roll. To do this, its footage is divided by the height of the walls with an increase of 5-10 cm for trimming.
Before purchasing the film, carefully calculate the required footage. When using wallpaper for the bathroom with patterns or a geometric design, in addition to the stock, the height is added to the adjustment - 35-45 cm. The total number of strips that will be required to cover the entire room is divided by the number of strips in one roll and the required amount is obtained number of rolls for repair. If the bathroom has ledges or niches, add one more roll to the total. Methods of covering surfaces with decorative film. The temperature in the room being repaired must be at least 10 degrees. If the film was previously stored at lower temperatures, it is advisable to keep it warm for at least two days. After completing the preparatory work, they begin cutting the film and gluing it.
Features of material cutting
As a rule, the film is cut from the reverse side, on which square markings are applied for convenience. But in some cases, when, for example, the selected film is designed to imitate tiles, the markings are carried out taking into account the front design. Additional instructions for working with a certain type of material are always indicated on its reverse side.
It is more convenient to cut the material according to special markings
The panel is cut to length using a special construction knife. It is not recommended to cut the film by weight or with scissors.
No. 5. Gluing self-adhesive wallpaper
Actually, the gluing process itself is very simple and should not cause any special difficulties. It is better to devote most of your efforts to preparing the surface and the material itself.
Surface preparation
The main thing is that the surface should be as smooth as possible. It is better to remove the old finish; if there are small unevennesses, use putty; if everything is really bad, then it is better to level the walls with plaster. After this, you should go over the primer, and when everything dries, proceed to the next stage.
Some people are in such a hurry that they stick self-adhesive wallpaper over the old finish . “What is it if the base is quite even? This saves time and effort!” they will say, and they will be only partly right. Indeed, when repairs are urgent, self-adhesive can be glued over wallpaper, but remember that adhesion will be much worse than with a primed wall. It is also undesirable to glue film onto film. In both cases, the likelihood increases that the multi-layer finish will begin to move away from the wall. If all this happens in the kitchen, then the risk increases even more, because the material here will be constantly exposed to moisture and grease vapors.
If you are going to wallpaper only part of the wall, then at this stage it doesn’t hurt to mark the boundaries of the required area to make your task even easier. Experts recommend keeping vertical lines parallel to the walls, and horizontal lines parallel to the floor and ceiling.
mark the surface if all the walls are completely covered with wallpaper. This will allow you to achieve the most aesthetic result. From the corner at a distance equal to the width of the wallpaper, you need to draw a vertical line, step back the width of the wallpaper from it and again draw a vertical line using a level or plumb line. As a result, you will get a whole grid that will help you navigate the gluing process.
Preparing furniture is even easier. It is enough to thoroughly clean and degrease the surface. It's best not to use a cloth that leaves lint.
The preparation process also includes the process of cutting the roll . If the fabric is plain, then you just need to measure a piece of the required length and add a few centimeters for the allowance. If there is a pattern on the wallpaper, then it must be joined correctly. Sometimes, in order to join an ornament, it is necessary to sacrifice relatively large pieces of canvas. It is better to cut such wallpaper, focusing on the front part. It is better to cut the canvas with a construction knife and a ruler.
Wallpapering the walls
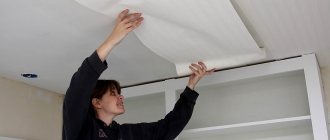
The process of gluing self-adhesive wallpaper to walls and furniture is extremely simple. You need to take the prepared canvas and start removing the protective paper from the top edge. Place the adhesive side of the fabric on the surface, constantly checking the evenness. The upper part of the wallpaper must be fixed very well using a sponge or squeegee. Now all that remains is to gradually remove the protective paper and carefully press the wallpaper to the surface, keeping an eye on the level all the time. Level the canvas with gentle movements using a plastic spatula, moving from top to bottom and from the center to the sides. If a bubble has formed that cannot be “squeezed out” from under the canvas, then it can be pierced with a needle and then smoothed out the area.
The glue dries in about 24 hours, so if any small defects are noticed, they can be corrected. Some manufacturers advise moistening the canvas with water for better fixation, but you will be warned about this in the instructions that accompany each roll of wallpaper.
How to cover the corners of furniture?
The process of installing self-adhesive wallpaper on furniture completely coincides with the procedure for pasting walls described above. The only caveat is the angles, which cause the most problems for inexperienced craftsmen. To make the corner neat and without wrinkles, some people use a hairdryer to heat the film. It does become more elastic, but at the same time its useful performance qualities may be lost, so it is better to do things differently.
The film must be glued to one of the planes forming an angle, a cut should be made along the end line, part of the film should be folded and glued to the surface. The second piece of film is glued on top of the first. As a result, an inconspicuous seam will form at the end, and there will be no folds or other misunderstandings. The process is well shown in the video.
How to peel off self-adhesive wallpaper?
Sooner or later the finishing will have to be removed, but you won’t have to suffer for long. Self-adhesive wallpaper is also superior to regular wallpaper - it can be removed very easily. In some cases, it will be enough to forcefully pull the canvas, and it will move away from the surface. If the wallpaper does not give in, you will have to heat it up a little using a hair dryer or fan heater. After this, the film will come off easily, and the glue can be removed with a solvent.
In conclusion, we note that self-adhesive wallpaper is an inexpensive, fast and practical way to transform your own home.
Tags:Wallpaper
Preparatory work
First of all, before gluing wallpaper on plywood, it is necessary to carry out preliminary preparation in order to avoid possible shortcomings and ensure a long period of operation of both materials.
The main disadvantage of the base made from it is the slightly but varying thickness of the sheets. For this reason, when fixed to the walls at the joints, small ledges appear, which, after wallpapering without preliminary preparatory work, stand out noticeably against the general background.
As a result, before gluing wallpaper from plywood, it is necessary to remove it using a grinding machine. For this task, it is enough to even use a low-power eccentric or belt model with a set of P60-P120 sandpaper.
Before sanding the plywood base, you should make sure that the fasteners are fully screwed or driven in so that they end up slightly recessed into the sheets, since without this there is a possibility that the wallpaper will tear during gluing or damage to the power tool used will occur. If there are protruding nails or those with caps torn off, then you need to pull them out and re-hammer the intact ones. It is also important to open the caps with drying oil or paint, and after drying with moisture-resistant putty, which will prevent rust from bleeding through the wallpaper several years after pasting the plywood with it.
When starting to process plywood, the first thing you should do is install sandpaper with a higher grit (P60-P80) on the sanding machine to remove deep irregularities from the surfaces. After finishing the wall, you need to go over the entire wall again with finer sandpaper (P100-P120).
Note! If liquid wallpaper is to be applied to the plywood in the future, it should only be sanded with coarse sandpaper (P60) to ensure greater adhesion.
At the end of this stage, you should begin moisture-proof treatment of the base, which must be carried out regardless of the material (plasterboard, wood, plaster and many others) acting as it. During the process, it is only important to ensure that the wood is fully protected from the negative effects of moisture. The ends of the sheets are most susceptible to its influence, which is why they must be opened with natural drying oil, which is best done before fixing the plywood to the walls, bringing the mixture to a temperature of 50-60°C during heating before use.
The very outer side of the material can also be opened with it, after which it should be treated with a continuous layer of a special acrylic primer for wood, which is available in a huge variety of hardware stores from various manufacturers. To apply the mixture, you can use a wide brush or paint roller.
Important! It is best to use a special primer that does not contain substances harmful to health, has no odor, and dries within a few hours after application.
The next step is to seal the joints between the plywood sheets. For this purpose, it is optimal to use acrylic finishing putty, which is also commercially available in ready-made form, supplied in plastic buckets. If there are large gaps between the slabs or significant differences in height, then in addition to it, serpyanka should be glued. After gluing, it must be re-treated with a layer of putty.
If there are chips, irregularities or deep depressions on the outside, they must also be opened with putty. After the mixture has dried, sand it with fine-grained sandpaper.
Finally, it is necessary to completely prime the plywood surfaces at least once, and preferably even twice. Before applying the second layer, be sure to wait until the previous one has completely dried.