Hello readers of my blog! Today we will talk about how to make a drawing on the wall with your own hands. It would seem that the matter is not tricky, but when you are faced with this problem, you have to think about how to do it correctly, what preparation to do, what materials to choose. Thus, I decided that this article would be useful to someone, and I am devoting my efforts to this subject. In it I will answer a number of questions that will arise immediately before How to make a drawing on a wall with your own hands, and some even after that. This topic is quite broad, because before work, thorough preparation is necessary, but how to do this? And this is a separate topic. You can learn about all this in great detail in the article below.
DIY drawing on the wall
Many people have at least once thought about radically changing their home. Create an unusual interior, add a touch of exclusivity. Transform your home in such a way as to be completely confident that none of your friends and acquaintances have this design.
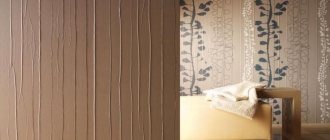
What can be presented as an individual style? Wallpaper, panels, any painting compositions - all this has long been familiar to everyone and, in fact, has already become boring. A drawing on the wall will help to freshen up the atmosphere!
Who didn't draw on the walls as a child?
All without exception. So maybe it’s worth remembering this golden time? Just do everything correctly and, most importantly, beautifully.
What will serve as the main tool?
Ordinary brushes can be used as a tool. Attention should be paid to the fact that they must be different.
You need to stock up on at least three types of brushes with bristles of different thicknesses. If there are concerns that instead of transforming the walls, they will be damaged due to a lack of talent in the field of drawing, you can use a stencil. In this case, a foam roller or sponge will be required to apply the paint.
For some craftsmen, spray cans of paint will be enough. Graffiti art continues to be an original, fashionable way of drawing and why not bring it from the street to the apartment. This will undoubtedly add brightness and individuality to the interior.
Choosing paints
When selecting paints, there are certain rules that can rather be classified as recommendations:
Any colors can be chosen. Ordinary gouache or acrylic will do.
You can use tempera paints. It is best that the paint composition is moisture resistant. Then the drawings will acquire the quality of durability. The thickness of the colors should be of average quality. If you make them too thin, they will run off the wall.
Too much thickness will make it difficult to move the brush.
Beginners are not recommended to start “creating” by choosing a large number of shades for their drawings.
In particular, the initial number of colors should not exceed three shades. This will greatly facilitate the task of decorating the background of the picture.
Proper use of selected colors will add elegance to the drawing. Often, one color is enough for the “artist”. And black. Despite its gloominess, this paint is very popular because it creates beautiful abstract paintings.
Choosing a color palette
When choosing a print on curtains, you need to remember the rules of harmonious colors. When selecting a palette, use a color wheel.
The most favorable groups of color combinations are:
- Monochrome. One spectrum of the circle is used, for example green, and when compiling the palette, emerald, light green, and dark green colors are used. Is the most harmonious group.
- Similar. Neighboring shades are taken, for example yellow and orange: the palette is created from their variations.
- Complimentary. Here they use opposite tones: red - blue, red - green. To create a more harmonious palette, an intermediate color is most often used. For example, purple, green, yellow. This is a dynamic palette; it adds originality to the interior.
Don’t forget about the psychology of color and select shades depending on their effect on a person: warm beige shades will create comfort, green colors will add peace, and blue varieties will provide tranquility.
How to make drawings on the wall in an apartment
I always want to draw on something clean and smooth. Therefore, when deciding how to make drawings on the wall in an apartment, first of all they think about the condition of the base itself.
The preparatory period is divided into several stages:
Preparation will take time and effort, but in the end you will create a smooth surface that will be pleasant to work with.
If the walls are too uneven, it is recommended to cover them with plasterboard sheets. The cladding is made on a metal frame.
The main vertical profile guides and racks are fastened with self-tapping screws to the floor and ceiling. The pitch of the racks is 0.6 m. To enhance the rigidity of the frame, transverse profile strips are used, installed inside the racks at a distance of 1 meter from each other in height.
GKL sheets can be fixed either in one layer or in two. Depending on the quality of the material. The joints are leveled with serpyanka putty.
The surface is primed and completely puttyed. The layer should not be thick. It is enough that subsequent painting of the wall surface simply does not create gaps.
Finding a place to work
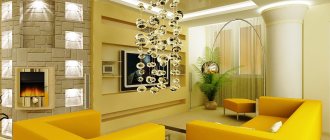
As for choosing a place to show your talent, this choice can fall on any room. This can be done in the kitchen or decorate a wall in the hallway. And of course, the first place is to carry out such work in the living room.
At the same time, young parents often use this type of design in the children's room. Less common, but still quite common, is this type of interior design in the bedroom. If we remember this type of layout as a studio apartment, then the drawing will undoubtedly show off in the hall.
Each of them is interesting in its own way. In general, they present a variety of techniques for creating drawings on walls with your own hands. The following methods are known:
1. Drawing with a pencil. The technique is considered difficult and can only be done by people with the appropriate skills.
The sketch must be perfect, without distortion. It is necessary to maintain the proportions of the elements present in the picture and correctly reflect the direction of the lines. In addition to the main tool - a pencil, you need to use an eraser and a soft cloth to remove the remains of the lead.
2. Drawing with paints.
There should be no amateurs here. Especially if you plan to create something beautiful and amazing. More often, experienced artists take on such work.
First, they determine the base tone. It can consist of several colors, which will be used to mark the contours of the central and largest details of the picture. Then the central element of the composition is selected.
All other elements in the picture will be interconnected with it in one way or another. Any three-dimensional image is chosen as the basis. It could be a tree with a spreading crown or a ship sailing on the waves.
3. Use of stencils. This method can be called the simplest. It is mainly chosen by those who like symmetry and clarity of the image.
Here the pattern is formed as an ornament. The main thing is to place it on the wall in such a way that an overall beautiful composition is created. To do this, you need to accurately select the points for applying the paint, and, if necessary, apply the lines along which the ornament will run.
A ready-made stencil can be bought at the market or store. Sometimes they take several types at once.
This creates a multidimensional image. To create an individual look, stencils are prepared independently. The manufacturing technology is simple.
A pattern or patterns are selected and printed on the printer. Then it is glued onto cardboard. Use a sharp painting knife to cut out any excess elements.
Everything is quite easy and accessible to everyone. The stencil is certainly one of the most successful inventions. It will not only help those who do not have drawing skills, but mainly create a clear composition.
The paint is applied with a roller with a foam coat or sponge. Be sure to make sure it doesn't drip. To do this, first roll the roller over the mesh.
4. Transfer the pattern across squares. It is somewhat more complicated than using a stencil, although in a sense the fact of working with a pre-prepared sample is also evident here.
Create a drawing on a sheet of paper or, using a ready-made picture, divide it into squares. This is the source material. Next, the image is transferred to the wall.
It, like a leaf, is drawn into squares, but on an enlarged, individually accepted scale. Carefully, calmly, following the source code, lines are drawn in large wall cells, which, when connected to each other, ultimately form the same picture depicted on the sheet. To some extent, this method can be called a type of pencil drawing due to the similarity of some technological details.
5.Drawing a picture using shadow. This technique takes a little practice. Not many are in a hurry to use it in such creativity as painting walls with their own hands.
Despite the fact that this method is quite easy. The main thing is to install the right lighting. Then the shadow of the object is projected onto the wall on an enlarged scale.
All that remains is to outline the shadow contours with a pencil. As a blank for a wall painting, you can use a pattern cut out of cardboard or some beautiful detail (branch, silhouette, human profile, and so on). The scale is selected by moving closer or further from the wall.
Creating a shadow can be done using a projector or a powerful lamp. Next, use the usual pencil and eraser.
6. Three-dimensional drawing on the wall. This technique of decorating wall surfaces and reproducing relief patterns is original and very interesting.
There is also work with a stencil, but in this case it must be very dense and have a certain thickness. Plywood or a piece of rolled insulation will do.
The stages of work are as follows:
the drawing is cut out; the stencil is applied to the wall and secured with masking tape; a special gypsum-based plaster mixture with good adhesion is prepared; The prepared mixture fills the cutouts in the stencil.
The remains of the mixture are carefully cleaned off with a spatula; after 10-15 minutes, after the gypsum has hardened, the mold is removed and a wet relief blank of a three-dimensional pattern remains; a stack and a small amount of solution are used to bring the element to the required state.
Small sagging is removed, the depressions are leveled; sharp edges are smoothed with a brush dipped in water; then the entire wall is primed and waited until it dries; the resulting surface is coated with paint.
This process is usually carried out up to three times; after the paint has dried, the relief elements are covered with a darker color. To make everything look beautiful, you need to decide on the color contrast in advance.
The colors can be very different from each other, but at the same time they look very harmonious.
To all of the above, we can add that this technique is best used in rooms with low traffic and not filled with a lot of furniture. It is completely unsuitable in the corridor, where there is increased traffic flow and the design can become deformed.
Basic techniques
Today there are a large number of techniques for painting on walls in an apartment. Familiarization with the most popular methods will allow you to choose the most suitable one.
Drawing with paint
The technique is often used when drawing images without clear lines and contours. To perform such work, spatial imagination and preliminary visualization of the result are required. The base color is used when applying key details.
On the wall you can depict a landscape with a tree in the center and individual details on the periphery. When applying an image, it is recommended to use greenish or brownish shades; they are present in landscapes. This stage is considered marking and becomes the basis for work. When applying a picture, a translucent base composition is used, on top of which a thicker layer is applied. The technique is considered the most difficult and requires experience and talent. 3D drawings on the walls in the apartment are painted using paints.
Pencil
Drawing on a wall with a pencil is also not considered easy. The image is transferred from the sketch to a scale drawing, the possibility of distortion is eliminated. The difficulty of transferring lies in the need to maintain proportions, shapes, and direction of movement, which is quite difficult.
At the initial stage, an area for the painting should be designated on the wall; it is marked with crosses or dots. It is necessary to reproduce the picture in the center of the selected plane. In addition to the pencil, you should prepare an eraser and a soft cloth.
By squares
In this case, the image is transferred from an image, photo or painting to the wall using the method of dividing into separate squares. This method is considered the most accessible for those who lack artistic skills and talent. The method requires perseverance, precision, and a meticulous attitude to work. There is no need for drawing experience in this case.
Stages:
- Draw the sketch into squares 30x30, 40x40, 50x50, etc.
- Mark the area for the future drawing using a ratio of 1:10 or 1:5 (you should choose the ratio yourself) and mark the selected area into squares.
- Transfer the image from the sketch to the wall step by step. The line of each sector must have continuations in the adjacent one, which guarantees accuracy.
The method does not require the use of a large number of tools. You should first prepare a pencil, an eraser, several rulers, and a plumb line.
Shadow
Transferring a picture to a wall using a shadow is used quite rarely, despite its relative simplicity. The main point is to create the right lighting. The shadow of the object should fall on the wall being painted.
This technique is suitable for applying geometric patterns, branches, human figure, profile, etc. The main advantage of shadow painting is that the shadow increases the size of objects.
Shadow can be used when composing individual elements of a landscape. It is possible to rearrange objects, find the best position for them until their maximum harmonious arrangement is achieved.
After clearly fixing the shadow, its contours should be outlined with a pencil; at the next stage, small details are drawn in. The technique of transferring a picture over the shadow allows you to create exclusive panels. The drawing is applied with a pencil; it is recommended to use a projector or lamp to create shadows.
Stencil drawing
The stencil painting technique is considered the simplest. The main disadvantage is the difficulty in creating blanks for large elements and the monotony of the picture. The stencil does not allow you to recreate full-fledged images with a lot of detail.
The advantages of stencil designs outweigh their disadvantages. The stencil allows you to recreate clear lines of the picture. At a minimum, you need to use 1-2 templates, which will allow you to properly design the entire site.
Paint printing
For stuffing you only need a couple of shades. The main work is carried out using a paint brush or a regular brush. Adjusting the contour requires the use of watercolor brushes. Spraying a can of paint will help speed up the process.
Following two rules will help you avoid adjustments. Masking tape will help ensure a tight fixation, the use of which will not disturb the wall coating. The use of thin putty, applied with a spatula, will help achieve relief. The drawing turns out to be voluminous, protruding beyond the wall by 1-1.5 mm.
Shade and shape
After applying the base, it is recommended to proceed to the next step. Life should be breathed into the contours, as a result the image takes on the desired appearance.
Roller
The main advantage of the technique is speed; there is no need for adjustments. The disadvantage is the monotony and limitations in the choice of pictures.
Painting a pencil drawing
When painting, water-based paints and a palette are used to combine shades. First of all, a transparent layer is applied, due to which the color distribution is ensured. The entire picture is gradually filled with color spots. It is not recommended to use bright colors at this stage. It is recommended to draw objects located in the foreground as clearly as possible. Small details should be painted after applying the main drawing; thin brushes are used when carrying out the work.
DIY wall painting
Only a few master the technique of real artistic painting. Based on this, when a similar issue is resolved within a private house or apartment, a professional is invited.
He will do everything masterfully, like an expert in his field. True, the price of such an order is always high. On the other hand, everyone is interested in participating in such creativity.
To do this, you can learn some techniques that allow artists to reproduce objects so that they seem “alive.” You need to know that an ordinary brush in the hands of a professional can work wonders. For example, reproduce a real dandelion, and not turn it into an ordinary yellow ball.
If you have an obsession with doing artistic painting on the wall, it is best to study this type of painting. Get acquainted with the combination of paints, drawing lines of different visibility, learn how to select brushes.
Drawings on the walls
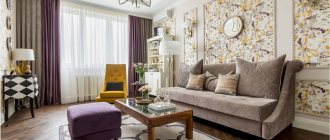
Flowers on the kitchen wall in a classic style
In a modern interior, geometric prints, chevron, horizontal stripes, and abstract pictures would be more appropriate.
The most universal prints for wall painting are: Vichy or tartan, stripes, diamonds, floral motifs, Moroccan patterns.
Can't find wallpaper with a trendy Moroccan print? Order a ready-made pattern stencil online or make it yourself following our master class
Images of trees (for example, cherry blossoms), flowers and plants are also quite universal.
It is advisable that the wall pattern echoes some elements of the interior, for example, with pillows on the sofa, a picture on one of the walls, a carpet, curtains or tablecloth.
A wall drawing with perspective will help to visually enlarge a small room, for example, an image of a city street going into the distance as in the photo below, a forest path, a road, etc.
Which wall or wall fragment should I choose for painting?
Any empty or most noticeable wall in the room, a niche or ledge, a wall in any functional area (or opposite it), as well as the area above any table, chest of drawers, console, fireplace, headboard, etc. will do. So, for example , in the kitchen you can paint the apron or the area above the sink, the wall near the dining table or opposite it.
By the way, with the help of a drawing on the wall you can divide the space and mark the boundaries of any zone.
Tips for application and color selection
When using wallpaper with a geometric print, it is very important to maintain the right balance and not overload the interior, both in color and decorative terms.
Follow these tips:
- Geometric wallpaper in a small room, first of all, should visually expand the space and not hide it. It is recommended to give preference to horizontal stripes of medium thickness with unclear contours. To prevent the design from rippling and being too contrasting, choose the following shades - light tones of yellow, blue, green, pink, sand. In small rooms where there is little natural light, you should not use cold shades. Small diamonds or zigzags can be used to decorate one wall. Then the rest should be plain;
- IN spacious well lit rooms You can use wallpaper with any pattern. It is also permissible to cover all walls with geometric wallpaper. But in this case, the drawing should be small and not too contrasting. Many people note that within large areas it is permissible to combine different types of geometric wallpaper - the main thing is that the design matches the theme. For example, large circles + small peas, etc. But it’s worth noting right away that without proper experience, it will be difficult to achieve a good result. Therefore, as an addition, it is better to choose plain canvases or plain wallpaper, but with a clearly defined texture to match the pattern;
- It is not recommended to use more than three different shades when creating the overall color scheme of a room. Many different shades are acceptable for finishing a contrasting wall, but provided that the remaining surfaces are monochromatic;
- If the entire room is covered with wallpaper with a geometric pattern, it is necessary to minimize the number of decorative items, otherwise the interior will be overloaded;
- Accent geometric trim needs to be supported with appropriate decor. For example, a similar pattern should be present on sofa cushions, a small bedside rug, the lampshade of a table lamp or floor lamp. There shouldn’t be a lot of such items, otherwise it will be too messy.
Idea 1. Painting walls using a stencil
Stencils come in handy when you need to outline the contours of a complex image, draw letters, numbers or any repeating patterns.
To paint the walls, you can use a ready-made template or one made to order in a printing house. Such stencils can be flexible or rigid, one- or two-layer (to create a multi-color pattern), self-adhesive or glueless. They are generally durable, fit tightly to the wall, and are designed to be reusable.
However, you can make a simple single-layer stencil for painting walls with your own hands, following our step-by-step instructions.
What you will need to make a stencil: office paper, plastic film or thick paper (for example, whatman paper or wallpaper), a pencil, scissors, a stationery knife or a special knife for cutting out stencils, masking and transparent tape, as well as a printer and some kind of graphic editor (vector or raster).
What you will need for stencil painting of walls: paints (preferably water-based acrylic), a synthetic round brush (7 cm in diameter for painting large designs and smaller ones for finer work), a sponge (can be used instead of brushes) and paper napkins to remove excess paints.
Instructions:
Step 1. Find a suitable vector(!) stencil on the Internet, for example, on the website https://www.getpattern.ru/. Please note that it is advisable to choose a contour image (or make it as such, following these instructions), because colored areas will only waste ink when printed.
Step 2. The selected picture must be scaled to the desired size and printed.
This is very easy to do if the stencil size does not exceed A4 format. However, if you need to print a large template, then you need to break it into several parts, following these instructions. Next, all you have to do is assemble the picture as a mosaic.
Step 3. At this stage, the A4 paper stencil must be covered with transparent tape on both sides and overlapped (!) to protect the paper from getting wet. Finally, use a craft knife to cut out all the segments intended for painting.
If you have printed several A4 sheets for a large stencil, then at this stage you can immediately start cutting, but keep in mind that you will have to paint the stencil with an almost dry brush so that the paper does not get wet. But in order not to take risks, it is advisable to laminate the design or copy it onto a denser base (for example, vinyl wallpaper). To do this you can:
When cutting out the stencil, be sure to protect the table from scratches by placing some kind of backing on it, such as glass.
Step 4: Now it's time to stick the stencil to the wall. To do this, try on your template to the selected location, align it with the building level and glue it with tape. If necessary, for example, if you need to draw repeating elements at equal intervals, you must first make markings using a building level.
Step 5. Hurray, the most labor-intensive work is left behind, it's time to start painting.
Step 6. When the drawing on the wall is completely dry, coat it with matte varnish to protect it from moisture.
Idea 2. Painting checkered walls (+ master class)
As you know, check is the most versatile print that never goes out of style. It fits perfectly into both classic and modern interiors, both into the interior of the kitchen and children's bedroom. You can decorate one or more walls with a cage using wallpaper or painting.
The easiest way is to paint walls in a large Vichy checkered pattern, as in this collection of photos.
Painting walls in Scottish tartan requires a little more effort, but still, it is accessible even to beginners - after all, the accuracy of the markings, rather than painting skills, is what is important here.
And now we suggest you familiarize yourself with the step-by-step instructions for painting walls with your own hands in tartan, as in the photo below.
What you will need: 4 paints of the same color, but in different tones (in this project we used light olive for the background, a slightly more saturated marsh shade for vertical and horizontal stripes, an even darker one for the intersections of stripes, as well as two paints of contrasting colors), brushes , roller, masking tape and laser level, stepladder and other basic painting supplies.
Instructions:
Step 1: Prepare the wall for painting, then paint it with the background color using a roller. In this master class, the background is a light olive tone of paint. Allow the background layer to dry before moving on to the next step.
Step 2: Mark vertical stripes of equal width on the wall using a laser level and masking tape. Then paint them with a paint darker than the background and let dry.
To ensure that the lines are smooth and clear, and the paint does not flow under the masking tape, use a small brush to paint along the tape and a larger brush to paint the main body of the strip. It is important to ensure that there is no excess paint on the brush. The movement of the brush should not be up and down along the tape, but left and right (across the tape).
Step 3. Now mark the horizontal stripes in the same way, paint over them and leave to dry.
Step 4. Paint the intersections of the stripes in an even more saturated shade to create the effect of layering threads of the same color in the checkered fabric (as if the cells turned out darker than the stripes).
Step 5. Now it's time to draw the contrasting thin stripes that are required for the tartan check.
To do this, again use the laser level and masking tape, mark a line along and in the center of the vertical stripes. Next, paint over them and let dry. Then use the same paint to draw lines along the horizontal thick stripes.
Step 6. Finally, draw the cells of a different contrasting color (in this master class it is blue). The technology is still the same, but the cell becomes larger, since the stripes are drawn along the lines of the first background layer.
Step 7. All that remains is to coat the painted wall(s) with matte varnish to enhance its moisture resistance and strength.
Geometric patterns
With the help of such drawings, a special creative and creative mood is created in the room.
Strip
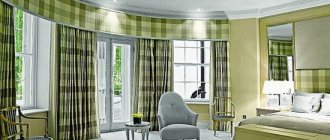
Creates a simple, but at the same time very rich design. Striped curtains are ideal for almost any setting.
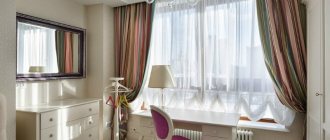
The photo shows the living room interior and windows decorated with striped curtains.
Cell
A traditional print that always looks relevant and interesting in the interior of the room.
The photo shows short curtains with a checkered print in a children's room.
Diamonds
Not too large rhombuses on the curtains will not catch the eye and create an overly flashy interior. This pattern always looks colorful.
The photo shows a living room and windows decorated with burgundy curtains with a diamond print.
Polka dots
The varied polka dot print comes in many colors and sizes. Such a stylish pattern adds cheerfulness and dynamism to the room.
Zigzag
Provides the ability to change the geometry of the room. The energetic zigzag pattern looks very harmonious and relaxed in the room.
Abstraction
Vague and whimsical compositions on curtains look very unconventional. They are an integral part of stylish interior design.
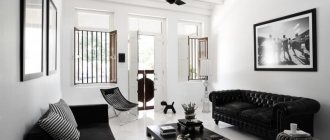
The photo shows a living room in light colors and curtains with an abstract print on the window.
Idea 3. Hand painted walls
Hand-painted walls allow you to create unique and personalized interiors, embodying your wildest fantasies and design ideas.
With the help of hand painting you can correct, disguise or play up some of the shortcomings of the room. For example, draw a missing window, pieces of furniture or accessories, paint over a spot on the wall, etc.
Drawn headboard and vase
Hand-painting walls is best left to professionals, but simple drawings can be done by beginners if they have at least a little drawing skill. Here are some examples of simple images.
The stages of painting walls with your own hands are as follows:
Drawing dimensions
Main dimensions of the drawn print:
- Large. Curtains with large patterns are more suitable for spacious rooms, but even there they can overload the room, so this print must be used carefully.
- Small. Small patterns can visually adjust a room and change its proportions. They do not burden the interior and practically merge with the general background of the curtains.
Idea 4. Stamping
You can quickly and easily paint walls with your own hands using the stamping technique, when drawings or patterns are applied with a stamp. As a stamp, you can use both ready-made painting stamps and roller stamps, as well as improvised means - sponges cut in the shape of a circle or other shape, brushes and even your own fingers.
You can also make a stamp for painting a wall yourself from microporous rubber (foam, foamed polymer or simply “foam”) and a piece of cardboard.
What you will need: foam microporous rubber (often sold in children's art departments in the form of colored sheets), cardboard, pencil, sharp utility knife, scissors and glue, as well as acrylic paints.
Instructions:
Step 1. Cut out any shape or figure from a sheet of porous rubber. For example, it could be a circle as in our master class, a letter, an asterisk, an autumn leaf, a butterfly, a flower, etc.
Step 2. Glue the resulting blank onto a piece of cardboard. Voila, the stamp is ready!
Step 3. To start painting the wall, dip the stamp in the paint quite generously, but so that the paint does not drip from it, then apply it to the wall. If you want the print to be as clear as possible, you need to press evenly on the stamp.
Next, place the prints all over the wall in the same way, maintaining the same spacing. To avoid mistakes, it is advisable to first apply markings to the wall. In addition, before starting work, you should practice putting stamps on a draft.
Step 4. When the stamped designs are dry, coat the decorated wall with matte varnish.
What is important to know about wall painting methods?
A person who cannot draw like a real artist is capable of much, even if he does not suspect it. Enough to confidently hold in your hands:
- brushes of different widths;
- spray paint;
- roller with nozzle;
- marker;
- pencil for marking.
Each device leaves its own recognizable mark. From these strokes, lines and painted blocks of color, you can create any image on a vertical surface with your own hands.
The desired design can be transferred to the wall in any way. For example, at school, many were introduced to the method of enlarging images by squares. A 2-5 cm grid is marked on a small drawing, and then each square is drawn on a large wall marking. This way the proportions of a recognizable portrait are preserved.
With this technique, even teenagers can make decorative drawings on the walls with their own hands. You can transfer a brand name, the logo of a famous rock band or your idol to the wall.
The easiest way to do it yourself, without involving an artist, is to redraw black and white images of portraits of John Lennon or Viktor Tsoi, which have long been familiar to everyone. Girls draw Marilyn Monroe and Coco Chanel against the backdrop of the Eiffel Tower. It’s easier to draw a conventional drawing of a lady in a hat in your bedroom. It’s a little more difficult to transfer your silhouette profile from a good photo into squares and fill the necessary areas with paint. After practicing with drafts on a piece of plywood, they make clean drawings on the walls in the interior, as in the photo.
This pattern will create the feeling of wind walking around the room.
Japanese style drawing will arouse interest
There are different ideas and ways of making decorative designs, but not all are accessible to beginners. You can practice on the wall before renovation. If it works out, leave it as a decorative panel; it won’t look like a masterpiece; you can always paint it over or cover it with wallpaper. Any interior paints are suitable, for example, acrylic-based ones.
The exception is volumetric decor; it will have to be completely removed from the wall for repairs. Therefore, it is performed on a prepared surface, for example, after the next update of wallpaper for painting. This method is used to decorate the walls in the nursery seasonally. A summer collection of fluttering butterflies made from folded paper will be replaced by a blooming spring twig, and then autumn leaves or flying birds will appear, then snowflakes.
A stencil for drawing on the wall can be made from a cardboard box
A tree with birds will look harmonious in the hallway
This landscape will refresh the bedroom even in extreme heat.
But the easiest way is to make abstract drawings or intersecting geometric shapes with your own hands, from which a solid composition is made. Wall drawings in the interior are best done in a single color palette, but if after renovation it “doesn’t look right,” then a colored block on an empty wall can fix everything or distract attention from some defects.
To decorate your walls with your own hands using a new technique, you should watch a master class on wall painting.
Branches of grapes on the wall will look harmonious in the interior
A large decorative pattern in the bedroom will help you fall asleep quickly
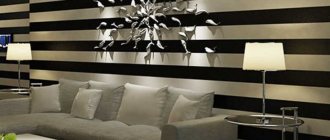
Idea 6. Striped wall
Striped walls not only look cool, but also visually correct the shortcomings of the room. For example, vertical stripes “raise” low ceilings, while horizontal stripes increase space and push walls apart.
It’s very easy to paint walls with stripes with your own hands; the main thing here is to carefully stick the masking tape and correctly calculate the optimal width and number of stripes.
To find out the required number of stripes of the same width, but alternating in color, you need to divide the height or width of the wall by the desired width of the stripes.
But there is one nuance - if the number of stripes is even, then along the edges of the wall the stripes will be of different colors. To make the number of stripes odd and the wall design symmetrical, you can “play” a little with the width of the stripes or simply divide the height or width of the wall by an odd number. For example, a wall 270 cm high can be decorated with 17 stripes 16 cm wide.
In order for the stripes under the ceiling and above the floor to be the same color, there must be an odd number of them
It is desirable that the stripes have a width of 10-30 cm.
A width of less than 10 cm will be too narrow, and more than 30 cm will be too wide and heavy. It is best to use blue masking tape for drawing stripes, which can be removed without leaving a trace, without damaging the wall covering and marked “for clear lines”.
To ensure that the lines are smooth and clear, and the paint does not flow under the masking tape, use a small brush to paint along the tape and a larger brush to paint the main body of the strip. It is important to ensure that there is no excess paint on the brush. The movement of the brush should not be up and down along the tape, but left and right (across the tape).
We create a drawing on the wall in the apartment with our own hands
A person’s lack of artistic talent does not at all put an end to the idea of decorating the wall of his apartment with an interesting image. Enterprising people have developed several simple technologies that will allow you to do without such colossal costs. The main thing is inspiration and the desire to create.
Some creative people use technology to make their lives easier.
You can simply display the image you like on the wall using a projector. Outline all the elements in the form of a sketch and then decorate with paints. A very convenient technique that you can use.
How to draw with fingers
Children love to draw on the walls.
And often this is painting with paint using your hands. Some artists have taken this childhood fun to a whole new level. Using finger painting, you can draw a real masterpiece on the wall of your apartment.
Of course, this requires a certain skill, but you can also train on an ordinary Whatman paper. In addition, there are a huge number of video tutorials on the Internet, which explain in simple and understandable language all the intricacies of this work, as well as various technologies. Drawings created in this way are never repeated.
They always have their own individual look. The paint can be absolutely anything, the main thing is that it is not toxic or has a pungent odor. When drawing, you should not put a lot of paint on your finger at once to avoid drips.
Let's draw
Stencil
There are 2 significant tricks to painting walls using a stencil. The first is that the downloaded templates will probably have to be scaled. If you do this in the original compressed .jpg, .png formats, then compression artifacts can greatly blur or lead to contours, and the stencil outline is everything for it. A small deviation from the contour can literally kill the drawing. Therefore, the downloaded stencils need to be scaled like this:
- We pass the original drawing in Photoshop through the AutoLevels option; If you know what this means, it is advisable to manually remove the upper peak using Levels.
- Next we convert it to gray, and then to black and white with a 50% threshold.
- We clean up the remaining dirt and change it back to gray.
- We increase it to the desired size, you can add sharpness using the mask (unsharp mask).
- We save for printing in uncompressed .bmp or .tif formats; as a last resort – .gif.
The second is to fill the stencil not necessarily with one color. On the contrary, as you move along the stencil, it is advisable to change the paint. In this way you can revive a rather monotonous stencil, see fig.
Multi-colored stencil printing
As an example, below we give fairly simple drawings for a stencil, which can be quite scaled up in raster format. The feather and goldfish will have to be filled in with shading; It’s time for us to move on to the techniques that require it.
Stencil drawing templates
Let's give it a try
Shading areas filled with paint is possible in 3 ways: washing, erasing and rubbing. All of them are carried out from the center to the edges, and always in several stages: in no case should you rub everything at once. He rubbed, walked away, looked, rubbed again, again from the center to the edges, etc. Blend the paint with a brush, swab or finger. General rules for coloring for shading - the warmer the tone, the deeper it should lie. If the color scheme is monochromatic, light and faded tones go underneath. However, these rules are very relative.
Washing is done only with a tampon. The bottom layer of paint should be completely dry, and the top layer should just set. It is partially removed with the lightest, without pressure, tangential movements. The color of the shaded area will be the color sum of the layers' colors.
To shade by erasing, the top layer of paint is applied to the still slightly damp bottom layer and the tinder is pressed down. Now the color of the shaded area will be the color product of the colors of the layers, because The top paint is rubbed into the bottom. By rubbing, small shaded fragments are created over large areas, over dry or not completely dry underlying paint.
Note: airbrushing allows you to obtain only the color sum of paints.
How a leaf that has begun to turn yellow is outlined by shading is shown in Fig. below:
Shaded drawing on the wall
- Fill the outline with the background color;
- Once it dries, apply a dirty greenish color;
- The 2nd layer has dried, wash off the excess;
- Fill it with a greener color;
- Once it’s dry, we erase what’s unnecessary and immediately apply strokes of even more saturated green;
- The 3rd layer has dried, rub the greens over it.
On the trail. rice. Flowers are given that can be made on the wall by combining contour filling with a stencil and shading. To scale them, you need to save them immediately in .gif format (the necessary preparation has already been done), but it is better to transfer their outlines to the wall using a grid, see below.
Sketches of flowers for wall art
Outline on the wall
Transferring the drawing to the wall along a grid and painting the contours is already a completely professional type of wall painting. Currently, this very painstaking and responsible task can be significantly simplified with the help of modern technology.
Without mesh
Photoshop has a special edge selection tool. The resulting contour drawing is enlarged to the required size: Photoshop allows you to work with pictures up to 10,000x10,000 px, which with a resolution of 72 dpi, which is more than sufficient for a wall, gives an image of 3.5x3.5 m, and with a quite sufficient 24 dpi - 10.5x10.5 m. Next, the outline picture is printed in pieces onto an A4 sheet (almost every printer has this option), or in the same Photoshop, a large picture is divided into pieces and printed separately. Then the sheets of paper are glued into one sheet, placed on the wall and the contours are drawn with a hard pencil; The last stage, but not amenable to automation, is coloring.
Painting with a decorative roller
In Romania, the use of special rollers with a convex pattern is no longer something out of the ordinary. But in the CIS countries this innovation is just beginning to take root.
Some designers even came up with their own ideas for the embossed rubber surface of this wonderful invention.
All you need to do is prepare the surface and choose paint. The pattern is applied with a simple movement, as when painting a wall.
Surface preparation
The first step is to decide which image on which wall will best fit into the design of the room itself.
Then you need to clean the surface of the old coating, be it wallpaper or paint.
Although, some types of paints can be safely applied with plaster. This won't work with just oil paints.
Most often, paintings or frescoes on the wall are made using plaster that has been carefully applied and dried. The stencil technique is possible without this preparation: it can be done directly on the wallpaper. You can also do without cleaning the wall if the room has paintable wallpaper (special types of non-woven, paper or glass wallpaper).
Required materials and tools
You can apply a design to the walls with your own hands using the most ordinary brushes. But you will need at least 3 with different pile thicknesses. For application using a stencil, a regular sponge or roller may be suitable.
Almost any paint will do.
You can buy regular gouache, acrylic or tempera paints are also suitable. It is advisable to take moisture-resistant paints so that the drawings are more durable. Their consistency should be medium.
Beginners should not take on designs that contain more than three shades. When used correctly, even several colors will create an elegant design. You need to remember that even if you choose only black, you can get a beautiful abstract painting.
You can also use spray paint for painting if you have experience working with them. By the way, graffiti is not such a bad way to make your apartment bright and individual. But not everyone can cope with this.
You can use tempera paints for painting.
To make your work easier, you can purchase a palette. You can mix colors and create new shades on it. You can also make several test strokes on the palette or practice them.
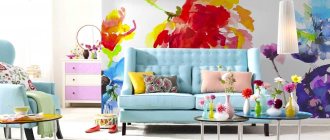
The drawing should suit the character of the room. In living rooms, you can paint abstract images in the form of geometric shapes. A children's room should convey the spirit of childhood: cartoon characters, funny animals or toys.
In the bedroom you can place pictures of the forest or the sea, something soothing and not stressful. Don’t rush to redraw the first picture you come across on the Internet. To liven up a room, a simple floral pattern or the application of butterflies, cats, stars, and so on may be enough.
The first step is to draw the background, if there is one in the selected image. It is applied, as on paper, to a damp surface.
The wall should be lightly moistened with water. After the background has been applied, you can begin drawing the sketch. This can be done even with a simple pencil.
Tracing paper or carbon paper will also work. Professional artists can try transferring a large design onto the wall using a grid-based enlargement of the design. The drawing and the wall are drawn into cells and then painstakingly redrawn.
Another way to transfer an image to a wall is with gunpowder. All lines in the drawing are pierced with a needle. Then it is applied to the wall and all holes are filled with coloring powder.
You can use coal. A drawing in the form of dots remains on the wall, with which you can already work. To apply large paintings, you need to mark the wall using a level so that the drawing does not warp.
After which the artist sets off on a free voyage. The main thing is to let the already drawn elements dry before moving on to the next ones. Drying can be done with a regular hairdryer or even a fan.
But just don’t bring them too close, otherwise the paint will spread. If the work is not urgent, it is better to let the paint dry on its own. It won't take that long.
For those who are not so confident in their abilities, an excellent option would be to apply a design to the wall with your own hands using a stencil.
Features of geometric wallpaper
Geometry wallpaper has won the loyalty of consumers for a reason: in rooms with different designs, shapes and layouts, they can create the most unusual effects .
Let's look at their capabilities:
- Wallpaper depicting straight lines or stripes are most often used to change the parameters of a room. Vertical lines allow you to raise the ceiling level, creating the effect of additional free space. The horizontal direction of such elements contributes to the visual expansion of the walls: this effect is especially relevant in narrow kitchens or corridors;
- wall coverings with circles, squares, diamonds and other large geometric patterns create accents on the walls. That is why they are most often used in the design of residential premises, where it is necessary to highlight the main area. In addition to this effect, large figures contribute to the visual approximation of the walls and reduce the space;
- Wallpaper with a small geometric pattern has the exact opposite effect: it makes the room wider and more spacious. Often, prints of these sizes are used to reflect country-style design features;
- coverings with scenes in the form of bright circles help emphasize the dynamism of the interior. Polka dot wallpaper symbolizes cheerfulness and optimism, and large circles around the entire perimeter of the room help create a mysterious atmosphere and promote concentration;
- squares and rectangles represent restraint and simplicity; they will not emphasize dynamism in the interior, but will help you concentrate, relax and unwind. Thanks to the orderliness of such motifs, the effect of a calm interior is created, which is not disturbed even when using bright accessories. Such motifs look best in modern designs;
- Wallpaper in the form of waves and zigzags can provide effects similar to straight lines, but are most often used exclusively to create a bright and creative environment;
- the cage is an excellent option for antique interiors and rooms in the English style. Thanks to the embodiment of checkered motifs in a variety of shades, you can emphasize the calmness, brightness, and unusualness of the design;
- diamonds in spacious rooms. The key role of such motifs in space is to create an energetic, cheerful and bright environment.
The use of wallpaper with geometry in the interior allows you to correctly beat any zone , therefore it is often typical for spacious rooms that perform several functions at once. For example, the combination of such coverings with another type of wallpaper allows you to divide the space of the kitchen and living room in studio apartments.
Remember! Since the geometric pattern on the walls must be consistent, carefully align the canvases before gluing the wallpaper to the surface around the entire perimeter of the room.
Despite the versatility and multifunctionality of such materials, gluing geometric wallpaper for walls requires compliance with several rules. Firstly, try not to use many bright accents in an interior decorated with wallpaper with a geometric pattern. Secondly, curtains and other textile design elements should be plain and have light or neutral shades. Thirdly, furniture in this design should be as simple as possible and not include bright inserts or cutouts.
Making a stencil
Stencils can be found on the Internet, printed and cut out on hard cardboard. Not any cardboard will do; you need to take something that won’t get wet from the slightest drop of water. You can also use a plastic paper folder to make a stencil.
For advanced users, the option of using a plotter may be suitable.
First you need to find a picture in eps format, and then simply send it to be cut on a plotter. Thin plastic or oracal film is suitable for this. The stencil will be completely ready as soon as you remove the cut out elements that are not included in your drawing.
If you don’t have time for this, you can purchase ready-made stencils in specialized stores. Some printing studios can make a stencil based on your design. You just need to stick it on the wall in the chosen location.
Applying wall art
The main rule for applying a pattern to a wall using this method is that after applying each element, you need to thoroughly wipe the stencil itself. Otherwise, multi-colored spots will spoil your masterpiece.
Use a spateria to spread the paint.
Your cardboard or plastic assistant needs to be firmly attached to the wall using special glue, or better yet, regular tape. But make sure that you do not remove a piece of primer or wallpaper along with the fastening.
Using a brush to make a design
Geometric pattern
Curtain fabric with a geometric pattern is clear, concise and finished in appearance. Such curtains will fill the interior, while at the same time preserving its uniqueness and will not disturb the harmony of shapes and colors.
To choose curtains, use the designer’s advice, then the room will look complete, and the curtains will attract attention and delight you and your guests.
What are the features of fabric with a geometric pattern?
The ornament has been used since ancient times; it is the most characteristic color for textiles since its first production. This option for decorating fabric is pleasant in its simplicity and orderliness; it allows you to achieve the effect of tidying up any room. With the help of geometric patterns, the room becomes more alive and dynamic.
For a geometric pattern, as a rule, rapport is used - repeated repetition of the same pattern along the entire length of the fabric. The geometric pattern fits many interiors and emphasizes its style. However, this pattern may not be chosen for all styles and trends of home furnishings.
As with other curtain fabric patterns, there are several criteria to consider when choosing a geometric fabric pattern.