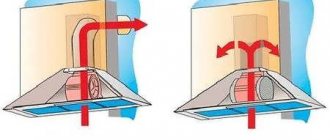
Kitchens have a common characteristic feature - functionality. In this relatively small room there are all types of household communications and a lot of equipment. The center of the kitchen has always been the oven or its prototype, the stove, and only then the hob appeared. Nowadays, the oven and stove are increasingly becoming separate devices, and the importance of the second has grown. But at the same time, technology is developing, and new oven cooking functions are becoming available to customers. Thus, the quality and variety of the modern human diet is increasing. Buying an oven for your kitchen is not a matter of one hour. The dimensions of the equipment are directly dependent on the kitchen set, and if it is not there or has not yet been assembled, then the overall picture will have to be “assembled” in the process. Installing the oven is simple in terms of the structure of actions, but you will have to carefully read the instructions and carefully carry out the connection.
Types of oven
Ovens are distinguished according to several classifications:
- type of accommodation;
- management method;
- source of energy.
Depending on the type of placement, there are free-standing and built-in ovens. Some options are placed anywhere, but next to the power source. For those being installed, special furniture sections are provided. Based on the control method, a distinction is made between autonomous and dependent ovens. The second subtype only works in conjunction with the hob, and adjustments are made through one interface. Autonomous ones have become increasingly common in recent years. The third classification option is by energy source. The devices are divided into gas and electric models. The former remain in demand due to the prevalence of the energy carrier, but cannot heat the chamber evenly. Electric ovens are the most popular at the moment. Users select a certain temperature, and the device, in turn, maintains it with high accuracy and at a stable level.
Tabletop installation instructions
- Place the bottom of the hob on the top surface of the countertop and trace its perimeter with a pencil.
- Drill several holes along the edge of the marking so that they do not extend outside the contour. They are needed for the starting movement of the jigsaw blade.
- Use a jigsaw to cut out the opening for the hob console.
- Place the tabletop on top of the dowels at the ends of the sidewalls. Don't forget to pre-lubricate the wooden dowels with PVA glue.
Choosing an installation location
Whatever the design, all options are installed in the central part of the wall, closer to the edge, and also away from the corners of the room. The stove is placed where the hood is planned. In addition, take into account the rule of the working triangle with vertices in the form of a stove, refrigerator and sink. Autonomous ovens are usually installed under the same autonomous cooking zone, so the triangular shape criterion is relevant for all oven models. In this case, the rule can be modified by replacing the sink or refrigerator with a work surface or dining table. These are not all the nuances. Maintain a safe distance between the oven and other objects. For example, the distance from flammable materials: oil, towels, curtains. The distance from water sources is ideally 1.5 meters or more, and the permissible minimum is 60 cm. Leave 60-70 cm of free space above the hob surface of the stove. Electric ovens are mounted next to a grounded power outlet.
Preparatory work
To make furniture, it is advisable to have a workshop. You can use a large table in a free room. Make sure there is an outlet within walking distance to connect power tools and stock up on an extension cord. Organize your workplace lighting correctly.
If you are going to make a closet in a non-residential area, then take care of heating in winter and forced ventilation in hot summer. Large window openings will save energy consumption during the daytime. A workbench equipped with stops, sockets, vices and clamps will be a good help for assembling the cabinet.
Rules for installing and preparing a furniture niche
Installation is carried out between sections of the kitchen working surface, under its countertop or in a niche designed for this purpose in a set or a separate module. The wall is designed to match the parameters of the oven, and is ordered or purchased taking into account all dimensions and installation method. The segment suitable for installing the oven is disconnected from the rest, if such a fastening is present. After meeting all the criteria and taking into account aspects of the compatibility of furniture and ovens, all that remains is to prepare the furniture niche. In this sense, you should start with protection against surges in the power network. Then grounding is done. They also leave gaps between the oven and the walls of the furniture. To maintain an acceptable level of ventilation, at least 40-50 mm are left between the back wall of the niche and the oven, and a margin on the sides is 50 mm or more. In addition to ventilation, the lower part of the furniture should be protected from heating: a rise of 90-100 mm is needed.
Important points:
- The connection to the electrical panel must be made through a separate circuit breaker.
- Do not directly connect copper and aluminum wires.
- It is forbidden to connect electrical wires by twisting.
Installation of a gas cabinet is only permissible in the presence of a specialist.
What should a cabinet be like for a built-in oven?
All electric ovens are produced to the same standard and have similar dimensions. Regardless of the manufacturer, they are designed for installation in a cabinet or pencil case with a width of 600 mm.
The height of the opening under the oven should also be 600 millimeters (taking into account the cabinet strip, which is shifted down relative to the upper edge of the side by 10 millimeters).
The depth of the box is designed in accordance with the dimensions of the countertop for which it is designed. A standard tabletop has a width (in our case, depth) of 600 millimeters. This means, taking into account the gaps, the depth of the box will be in the range of 450-550 millimeters.
A detailed drawing of the box for the oven with the internal dimensions of the niche for installation is usually contained in the instructions for the cabinet itself.
Using the values given above, the total height of the box is selected. The selection of this height contains “the whole point” of calculating this box.
The fact is that if the total height of the kitchen is less than a certain size, then it will be impossible to install a drawer in the opening located between the two lower horizons of the box. It will be too narrow and therefore non-functional. And this is not a rational use of the free space of the box.
Well, it won’t be possible to design a very high box either, since increasing the height of the lower modules of the kitchen unit above the norm is the cause of the inconvenience associated with its use (when the countertop is too high from the floor, it is inconvenient to work on it).
DIY installation
Self-installation is possible if you have knowledge and experience working with electrical circuits. They are almost always mounted in the lower tier, but autonomous products without a hob are installed in different places, provided that the gaps are maintained. Manufacturers take into account the complexity of this moment and provide cameras at a distance of 5 cm from the back and sides, and 10 cm from the bottom. Special furniture sections, in turn, have 10-centimeter legs. During the installation process, they first check the capabilities of the installation site, the serviceability of parts, connections, and communication points. Set up a system of electrical wires and make grounding. Sometimes you have to look for sockets with special parameters. Installation of the device proceeds after preparing the working tools and the installation site. The device is fixed only with factory fastenings.
Checking electrical wiring and connection
Without checking the quality of the wiring, further actions are prohibited. The first step is to find out the resistance level. Next, check the cross-section of the electrical wires, because it must correspond to the power of the oven. Next, the quality of the cores is determined. Typical system needs result in the presence of a grounding structure. Then they look at the circuit breaker, which reacts to failures and overloads. The current level for operation of this element is selected, depending on the declared power of the device. The built-in device is connected using a thick copper wire. In general, it is recommended to make an additional branch. New sockets of a non-standard configuration may be needed. The relevant information is indicated in the technical passport. The more powerful the oven model, the more likely it is that a special connector will be required. Screw terminal blocks should be used to connect the wires.
Installing and fixing the oven
For installation into the set you will need a painting knife, a fork, insulation, a drill and a Phillips screwdriver. As for the installation location, for stand-alone devices without a hob, an option with a second tier is possible, but it is better to place the device in the bottom row. Install equipment only in a level space that has been verified by the building level. The connection has a clear algorithm. They start by replacing the aluminum cable with a copper cable with three wires. Replacement is carried out from the device to the shield itself. For a device consuming 3-3.5 kW, you need a wire with a cross-section of 2.5 mm² and a 25 ampere circuit breaker. If the energy consumption is higher, then a core with a cut area of 4 mm² and a 40 ampere circuit breaker. The wires are connected to a 3-phase outlet. For houses with double cable, the shield is grounded. If the oven has a two-pin connector on the back, then the grounding on it is a separate screw - you can work with a simple wrench.
Oven cabinet depth
The common depth of the working area in the kitchen is 60 cm. This value is convenient for performing any operations related to cooking. Manufacturers of built-in appliances usually focus on this standard and make the maximum external depth no more than 56 cm. If you need to place a model with large dimensions in a set with a regular countertop, it is placed in a corner module.
There are non-standard models for placement in wall cabinets. Their depth does not exceed 450 mm. A relatively common technique of this type is microwave ovens. Finding a full-fledged oven with a depth of less than 50 cm is quite difficult.
How to properly prepare a new oven for use
After installation, the device should be discarded of anything left after unpacking. Even before turning on for the first time, the oven must warm up to +25 °C, so if the appliance was cold, then leave the doors open. Subsequently, the stove requires calcination. It should be heated together with all grates, baking sheets and everything that is included and intended for indoor use. Then the oven is turned off, opened and left to cool completely. After a few hours, the inside of the oven, including all its elements, is washed with non-abrasive products. First they work with a sponge, and then wipe everything dry with a rag or thick cloth. For normal calcination, 2-3 hours at maximum temperature are enough - as a result, technical materials and liquids will be eliminated. Simultaneously with calcination, it does not hurt to use the convection or top heating mode.
Warming up is also used:
- After washing.
- After glass replacement.
Narrow and wide
Models for domestic use with a standard height (60 cm) can vary significantly in width. The narrowest of them are 45 cm. Such stoves usually have only basic functions, but they can be placed in a compact vertical module, such as a side cabinet, at tabletop level. A convenient option, especially relevant for families with small baking needs.
Despite its small size, the Maunfeld MEOXN.376RCC.TA oven costs about 50 thousand rubles
Wide ovens (up to 90 cm) are powerful, expensive devices capable of operating in a wide range of modes (12 or more). To install such a stove at the level of the working area, you will need a fairly large frame. Therefore, they are most often located in floor cabinets, below the countertop, under the hob.
Features and rules for installing a gas oven with a hob
To connect a gas oven, you do not need permission from the gas service, but at the same time, there is a fine for incorrect installation. The optimal installation option looks like this: first, the shut-off valve is released, and a triple fitting is screwed onto its outer pipe. Screw on using lubricated tow. Next, taps are installed on two free branches of the fitting, just like a fitting on a pipe. All joints are then checked for tightness and tightness. They are coated with soapy water and then the central tap is opened. If bubbles appear, then all manipulations begin again. Even barely noticeable bubbles are enough. When everything is done perfectly, proceed to connecting the cabinet. It is connected by a line to the tap. A gasket with grease is placed in the union nut. The nut is tightened tightly, but so much so that it does not put pressure on the connection.
The best material for flexible hose is a corrugated metal hose.
Tips and tricks for choosing an oven
The leader in consumer preference is electric models. The latter provide more options regarding temperature conditions and cooking methods. When choosing, you can use standard criteria: ease of use, efficiency, safety, appearance, compatibility with the environment and environmental friendliness. Gas ovens have a significant drawback: you often have to check the condition of the dishes from below, as they dry out from one-sided exposure. As for the dependent/autonomous division, the size of the room is important in this regard. Dependent ones are in a sense more universal, but autonomous ones are suitable if there is a separate hob, and an additional one will be superfluous due to the lack of another hood. In terms of the built-in/free-standing parameter, none of the options has a clear advantage. The first type is better for design, and the second can be represented by compact options.
Regardless of the type of device, you need to pay attention to the presence of a smart interface, a built-in microwave, and automatic cleaning capabilities. The buyer should be interested in the presence of Let's Taste and StreamFunction. Operating savings depend on energy efficiency.
Non-standard models
Non-standard ones also include some of the already mentioned models, which have a different length, height or depth from the standard. But let's take a closer look at models that differ in two or more indicators or that have a non-standard appearance:
Ilve 748-SSTC IX is distinguished by its low height (48 cm) and increased width (70 cm). This model is well suited in a situation where, due to the size of the kitchen, a wide cabinet for built-in appliances has already been purchased.
A double oven looks very unusual, in which the compartments are located not under each other, but next to each other - Ilve D 900-NVG GF (H60 x W90 x D55).
Among the small non-standard models, it is worth noting the electric TEKA HSC 644 C with microwave function:
It has not only a reduced height (45.5 cm), but also a small depth (36 cm), which allows it to be built even into a hanging pencil case that is suitable in depth.