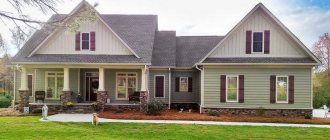
Brick finishing will always be relevant. This method of cladding facades allows you to give them a solid and respectable appearance. A brick building is a reliable and solid structure, most desirable for any homeowner. In addition, “brick-like” finishing materials make it possible to disguise the unsightliness of the façade walls and protect it from the adverse effects of the environment.
Brick finish
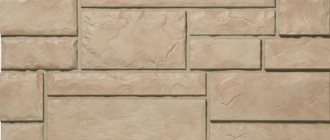
Imitation of brickwork
What can you use to make a brick finish?
In order to imitate brickwork, several types of materials are used. Some of them you can buy in the store, others you can make yourself. Among those purchased:
- facade panels;
- siding;
- clinker tiles.
Aged clinker tiles
Brick-like facade panels
Facade panels are often called facade siding. These are actually the same material, differing only in size. The shape of the panels is closer to square, the siding – to rectangular and oblong. The appearance may be absolutely the same. The same materials are used to make panels and siding. The production method is also the same.
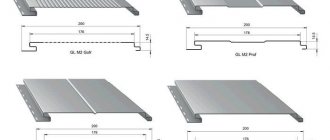
Facade panels - imitation brickwork
You can also make an imitation of brickwork yourself. Different materials are used for this:
- decorative plaster;
- cement;
- tile adhesive.
The use of materials of the first group (purchased) eliminates a lot of hassle and “wet” processes, which cannot be avoided when finishing with cement and plaster. Each owner chooses the method of façade cladding that is most beneficial and convenient for him.
An example of façade finishing with panels
Brick cladding panels
Brick-like facade panels
The most popular material for exterior finishing is facade panels. They can imitate both perfectly smooth brickwork and an antique effect. The color range of these materials is as close as possible to the natural palette. There are panels with different effects: old brick, new, burnt. Masonry joints can also have their own design features. The outer surface of the “bricks” can be smooth or textured.
Fiber cement cladding facade panels
Today, several types of brick-like facade panels are produced.
- Fiber cement.
- Vinyl.
- Polyurethane foam.
- Polymer sand.
- Metal with or without insulation.
House lined with brick vinyl siding
Any of these materials is suitable for finishing a facade in the style of “classic”, “high-tech” or “eclectic”. The panels will last at least 20 years without requiring any additional processing. Caring for them is easy and simple. It is enough to periodically clean the walls with water as they become dirty. The easiest way to do this is with a hose.
Do not use abrasives to clean panels
Harsh chemical liquids can also ruin siding.
Manufacturers recommend using water-based cleaners as siding care products.
When ordinary water turns out to be powerless against stubborn dirt, experts advise washing the siding with a solution that consists of 30% vinegar and 70% water
Types of siding by material
Finishing the facade with siding of a private house or country cottage requires careful attention to the choice of material. The abundance of offers on the construction market complicates the task, so it is necessary to study all the varieties and features of facade slabs.
All types of siding are presented in various color variations and can have different sizes. The most popular are cement, metal and polymer varieties.
Vinyl
Vinyl
Plastic siding made from PVC is characterized by color fastness and reasonable price. It is very easy for them to cover the outside of a house. It looks as natural as possible and such brick siding is almost impossible to distinguish from natural material. At the same time, it is fragile, especially in the cold season, so you should be careful when using it and avoid mechanical stress.
Manufacturers also produce thicker and more durable polypropylene brick siding. It is mainly used for finishing the basement, but complete exterior finishing of the house is also possible using this option.
Also very popular are innovative sandwich panels, which are a multi-layer insulated structure, which eliminates the need for additional thermal insulation and significantly reduces the time for cladding.
Metal
Metal
Brick panels made of metal have increased strength. The variety of metal facade materials is very large, which allows you to choose a color that perfectly harmonizes with other elements of the building: white, gray, shades of burnt or clinker brick.
A special feature of iron siding is its high weight, so a special frame is required that can withstand the current loads.
In addition, the metal material is susceptible to corrosion, so you should find out in advance about the availability of a special protective coating.
Despite the higher price, metal brick panels are an excellent option for exterior decoration, since they are durable, reliable, strong and retain their original appearance for a long time even when influenced by negative factors.
Cement
Fiber cement
Fiber cement brick siding belongs to the premium category and has the highest strength, frost and moisture resistance.
In addition, it belongs to a low flammability class, which makes it possible to use it for cladding houses where high fire safety requirements are imposed.
This material perfectly tolerates any type of external influences and does not lose its characteristics.
The use of fiber cement siding allows you to give any building a presentable appearance.
Fiber cement facade panels
Fiber cement panels
The most reliable materials for cladding facades are cement and stone. They are traditionally used for external work, as they have maximum resistance to environmental influences. The use of cement involves a number of labor-intensive and “wet” processes. Therefore, people have always looked for ways to minimize the hassle of plastering the facade.
The Japanese were the first to find a way out. They have developed a way to produce cement-based panels that are not only strong and durable, but also aesthetically pleasing. These are fiber cement products. They contain components that provide relative flexibility of the material. Therefore, fiber cement facade panels have sufficient bending and compressive strength.
Japanese facade panels
The production technology is based on a conveyor process. Products sequentially go through several stages:
- preparing the mixture;
- molding;
- drying;
- applying finishing and protective coatings.
The special characteristics of fiber cement panels are provided by the cellulose they contain. This component gives the material moisture resistance and strength. In production, they are guided by two types of standards: the domestic GOST 8747-88 and the European one accepted in the international classification: DIN EN 12467.
Fiber cement panels
Prices for popular finishing fiber cement panels
Fiber cement panels
Characteristics of fiber cement products
| Linear deformation | Density | Frost resistance | Flexural strength | Flammability class | Water absorption |
| Within 2% | 1.5 kg/m3 | At least 10 freeze-thaw cycles | 21.5 MPa | NG (non-flammable material) | Within 7-20% |
Schematic diagram of the structure of a fiber cement facade panel
Scheme of the structure of a fiber cement panel
Features of installation of fiber cement facade panels
There are two possible installation methods.
- Directly on the walls.
- On the frame (sheathing).
Panels can be mounted without lathing
The choice of installation technology depends on how smooth and strong the facade walls are. For finishing houses made of foam and gas blocks, only the second method can be used, despite the fact that the walls of such buildings are even and relatively smooth. The fact is that these porous materials actively absorb moisture. Therefore, the outer layer of the blocks may be loose. For this reason, reinforcement is necessary: lathing.
Wall made of aerated concrete blocks
However, the frame acts not only as a foundation that provides strength. It is necessary for the installation of a ventilated façade required for foam and aerated concrete. With the help of a ventilation gap between the wall and the facing layer, moisture coming from both inside the house and from the external environment is removed.
Lathing for installation of ventilation façade
For frame houses, including those built from sandwich panels, it is possible to mount directly to the walls. As a rule, the façade cladding of the frames is 9-12 mm OSB, a board that is sufficiently protected from moisture. When choosing this installation method, you should also take into account the fact that the panels will not completely adhere to the wall. In any case, there will be a minimum gap sufficient for steam to escape. Therefore, you should not be afraid of the occurrence of a thermal effect.
OSB boards, facade
Prices for OSB (oriented strand boards)
OSB (oriented strand board)
Rules for installing fiber cement panels
Fiber cement siding - installation diagram
To construct the frame, you can choose the most convenient material in this case: metal profiles or wooden blocks. Brick panels are used not only for cladding walls, but also for plinths. Therefore, installation of the sheathing can be carried out both from the beginning of the wall and from the blind area.
Metal profiles
The design of a ventilated facade requires the presence of upper and lower openings for moisture removal. Therefore, there is no need to install additional finishing profiles under the cornice and at the base of the facade. When performing work, the architectural features of the building and the presence (absence) of a ventilation utility network are taken into account.
Before you begin installing the panels, it is recommended that you familiarize yourself with the list of rules that must be followed. This will make it possible to complete the façade cladding in full accordance with the technology for installing fiber cement panels.
- It is not permissible to install the panel close to the base or starting strip. Otherwise, moisture will accumulate in these areas, which can lead to the formation of mold or mildew.
- It is necessary to exclude the possibility of gaps appearing when joining two panels. Moisture can penetrate into the cracks, which will lead to the gradual destruction of adjacent materials.
- The panels are secured only through special fasteners.
- There should be at least 10-15 mm between the bottom edge of the first panel and the starting strip. This gap will act as a lower ventilation gap.
- It is extremely important to install the panels in a strictly vertical position. If you allow the finishing material to slope, this can cause distortion of the facing structure with its subsequent destruction.
- Experts recommend installing fiber cement panels starting from the central vertical axis of the wall, and symmetrically in both directions from it (from the axis).
- Installation of panels on roof slopes is prohibited. For this purpose, special roofing materials are used.
Features of panel installation
Components and tools, calculation of quantities of materials
To install fiber cement panels under brick, you will need the following components:
- starting bar;
- strike plate (aluminum);
- finishing strip;
- docking strip;
- corner element.
An example of fiber cement panels and additional elements for them
To correctly calculate the required amount of materials, it is recommended to pre-lay out the panels on a piece of paper. The following parameters must be indicated on the drawing:
- dimensions of the wall and openings (windows and doors);
- distances from wall corners to openings;
- distances between openings;
- distances from the base to the bottom edge of the openings;
- distances from the top edge of the openings to the cornice.
Calculation of façade area
Panel Layout
Next, you need to determine and indicate the location of each sheathing post. To install the panels, you need a frame that tightly surrounds all window and door openings. Vertical profiles (or wooden blocks) are installed in increments of 100-120 cm. The first and last posts should be located along the line of the wall corners.
Frame diagram
Having a ready-made drawing of the sheathing in hand, it is easy to calculate the required length of the material that will be used to construct the frame. The calculation is made in linear meters. The length of one unit is taken as the base (for a metal profile this is 280 cm, 300 cm, 305 cm, 600 cm).
Next, the “layout” of the panels is performed. First of all, find out the length and width of one unit. Then they calculate how much finishing material will be needed to cover a given wall.
The most convenient metal profile for constructing the frame is PP 60/27. In addition, you will need hangers for working with drywall and galvanized screws.
Profile and suspension diagram
Required tools:
- screwdriver;
- hammer drill (or drill with hammer drill mode);
- jigsaw;
- construction bubble level at least 80 cm long;
- metal scissors;
- hammer;
- screwdrivers.
Sample set of tools for panel installation
The panels are cut using a jigsaw or grinder with a stone disc. When using the second tool, you need to take into account that before starting work you must turn on the low speed mode. In this case, there will be no formation of sparks that could damage the facing layer of the panel.
Prices for angle grinders (grinders)
Angle grinders (grinders)
Cutting and processing of fiber cement panels
To attach the panels to the frame, you will need special metal brackets, which are called “clasps”. These connecting elements are equipped with several holes; it is recommended to fasten through the central one. For this, screws or self-tapping screws are used.
Stainless steel clip and screw
Additional elements
Accessories
Stages of installation of fiber cement panels under brick using insulation
If the wall requires insulation, the first step is to install a heat insulator. It is recommended to choose dense materials of the correct geometric shape. These include sheet foam and mineral wool slabs. Any of them is attached to the wall using plastic dowel-nails with a wide round cap, which is otherwise called an “umbrella”. If the load-bearing surface is flat and strong, you can stick polystyrene foam. But even in this case, you will need a duplicate fastening using dowel-nails.
Stages of installation of thermal insulation materials
Step 1. Perform a visual inspection of the load-bearing surface. If places that require strengthening are found, cement-sand mortar is mixed (for walls made of brick and concrete) and work is done to seal the cracks. If the walls are wooden, replace the lumber that has become unusable with new one.
Step 2. Mount the brackets.
Bracket installation
Glue is applied to the foam sheet at 5 points: in the middle and in the corners.
Application of the solution
Step 3. Glue the canvas to the wall. Allow the glue to set for the time specified in the manufacturer's instructions.
Step 4. Install a drill with a pobedit tip into the drill. Drill holes where the glue is applied.
Step 5. Install a hollow rod and dowel nail into each drilled hole. If necessary, use a hammer.
Styrofoam fastening
Step 6. Drive the second part of the nail dowel into the rod: a fastening element with a wide round head.
Attaching the insulation
Step 7. Cover the insulation with a vapor barrier film using a construction stapler and galvanized staples.
Step 8 . They continue to work using the technology described below: install the frame and attach the fiber cement panels.
First of all, the base drip is installed
Horizontal profile
Vertical profiles are attached to the horizontal profile with self-tapping screws
Installation of fiber cement panels
If the walls are insulated not with foam plastic, but with mineral wool, the installation process is similar, with the exception of the stage of gluing the heat insulator.
Prices for thermal insulation materials
Thermal insulation materials
Stages of installation of fiber cement panels under brick without the use of insulation
Ventilated façade diagram
Precautionary measures
Installation recommendations
Precautions to prevent cracking
If the wall does not require insulation, the markings made in the drawing are transferred to it. Use chalk or marker, tape measure and level. Prepare all the necessary tools and get to work.
Step 1. Along the marking lines, holes are drilled in the wall in increments of 60-80 cm. The top and bottom ones should be at a distance of 10-15 cm from the top and bottom of the wall.
Step 2 . The hangers are attached along the lines of the vertical posts of the frame and along the perimeter of window and door openings.
Step 3. Install a metal profile (or wooden blocks) between the side plates of the suspensions and secure them with galvanized self-tapping screws.
Step 4. Install the vapor barrier film on top of the insulation. To fix it, use double-sided tape or a construction stapler with galvanized staples. If the insulation has been fixed, re-installation of the vapor barrier is not required.
Step 5. Begin installation of ebb tides. Depending on the brand, the configuration of these products may be different. But they all have one thing in common: purpose. It consists of draining water from the base of the building. The ebb tides are attached strictly along a horizontal line.
At the top of each element there is either a perforated or flat and solid strip. In the first case, fastening to the frame posts is carried out through holes in the perforations. In the second case, screws are screwed through a solid sheet.
Installation of the base part
Step 5. Install the starting strip along the lower horizontal line of the wall. In order to perform this work correctly, use a level or level. At the junctions of the planks, an overlap of at least 50 mm is required.
Step 6. Attach the external corners.
Installation of external corner panels
In order to correctly install these components, use clamps or prepare a fastening element made from a starting strip. Cut a piece of the required length from it, cut the narrow part and bend the bar at a right angle. Further:
- using self-tapping screws and a screwdriver, fasten clamps or an auxiliary element in the lower part of the outer corner of the building;
- insert the lower edge of the facing corner element into the slot of the starting strip;
- attach the upper end of the corner element;
- increase the cladding vertically.
Precautions to prevent lateral movement
Step 7. Install the first sheet of finishing material. Each fiber cement panel is equipped with a narrow longitudinal slot at the bottom end and a special cone-shaped strip at the top end. All connections to the frame are made through this bar.
Installation of facade panels
Claimer attachment
There are types of panels that are equipped not with a cone-shaped strip, but with a rectangular protrusion. In this case, clamps are used to fasten the slabs.
Clamp installation diagram
Step 8 . At the points of contact between the panel and the sheathing, clamps are installed on the rectangular protrusion. They are attached to the frame post using self-tapping screws or self-tapping screws. In this way, the facing structure is installed vertically to the under-eaves space.
Step 9. A T-shaped aluminum profile is installed along the vertical edges of the panels: a dividing strip. It is designed to prevent lateral movement of the panels. Depending on the brand of panels, the dividing profile may have a U-shape.
Installation of vertical joints
Next, you can choose one of the following installation methods: install the finishing strip along the entire length of the wall, or postpone the installation of the top panels until the final stage of the facing work. The configuration of this additional element may be different. Depends on the panel brand and manufacturer.
In any case, installing the finishing strip will not cause difficulties. The purpose of this element is to cover the upper ends of the panels. Therefore, it (the strip) is either mounted on them, and after that it is attached to the sheathing profiles. Or vice versa. In the second case, the finishing strip is installed before installing the top panel. Which, having previously been cut to the desired height, is inserted from the side. Then they are attached to the profile with self-tapping screws.
Step 10 . Drainage corners are attached to the inner corners of the building.
Finishing internal corners
Step 11. Continue adding panels. Having reached the inner corner, each slab is attached to the drainage corner.
Installation of the second and subsequent rows of panels
Step 12. Install the one-sided dividing strip and continue installing the panels.
Step 13. If a U-shaped dividing profile was used, close the vertical gaps between the rows of panels using special cladding elements that match the color and texture of the type of brick-like fiber cement panels being installed.
Step 14. If this has not been done previously, attach the finishing strip, trim the slabs to the desired height and install them.
Step 15. Install window and door trim elements.
Finishing the bottom and top of openings, doors and windows
Right and left sides of the window opening
Sealing joints with silicone
Precautions to Prevent Corrosion and Paint Damage
Errors in installing fiber cement panels (part 1)
Errors in installing fiber cement panels (part 2)
Ventilated facade made of fiber cement panels
Siding installation instructions
To ensure that the cladding of the walls of a house with brick siding is reliable and durable, you should select good quality materials and ensure the availability of appropriate components and accessories for installation.
Tools
Some manufacturers offer the necessary tools for attaching siding with the panels, but they can also be found at home. To work you will need equipment for:
- markings: level, cord, tape measure, marker;
- cutting: hacksaw, grinder;
- hole preparation: drill;
- fixing the sheathing and panels: screwdriver, screwdriver, hammer.
It is also necessary to correctly calculate the required number of fasteners to avoid excessive waste.
Calculation of materials and components
Calculation of the amount of materials and components takes into account the surface area, as well as the type of finish.
Calculation of materials and components
For frame
For the lathing you will need wooden beams or a metal profile. The area of the surface to be coated should be calculated. Next, it is important to decide what cell size is needed.
For a wall profile, the optimal size is 50x50 cm, and for a plinth this figure is reduced to 40x40 cm.
Based on the selected size, the quantity of the required profile is determined.
For insulation
Calculations of thermal insulation material also directly depend on the surface area, as well as on the type of insulation and the number of layers.
So, in order to insulate the house, it is necessary to add another 10% to the working area - this will ensure a supply of material.
This is important, since the heat insulator will be adjusted, which will lead to overspending. Also, for insulation, a second row of sheathing will be required to provide ventilation. This also needs to be taken into account when calculating materials.
For siding
To determine the required amount of siding, you need to subtract door and window openings from the total surface area of the walls.
Next, you will need to divide this figure by the area of one panel to find out the required amount of material. Here you will also need to add 10%, since trimming is an integral process when facing.
Marking and installation of the frame
Installation of any brick siding begins with the arrangement of the frame. To do this, you will need to mark using a tape measure and a level.
Frame installation
It is important to note the attachment points of all elements and measure the evenness of their placement in order to prevent further deformation of the profile and the panels themselves.
Insulation
Thermal insulation materials begin to be mounted from below and move upward. It is important to ensure that the insulation fits tightly to the frame, and it should also be additionally secured with dowels or screws.
Thermal insulation of the building from the outside
To increase the water-repellent properties of the material, it is necessary to place a waterproofing membrane on top of it. Next, you will need to install a second layer of sheathing, providing a gap for ventilation.
Setting the corners and starting bar
Manufacturers offer special corner parts. It is with their installation, as well as the starting strip, that the process of laying siding under brick begins. The starting strip is attached 4 cm above the bottom edge of the future first panel. When fixing this element, you should check its evenness, since it is on this that further cladding will be oriented.
Installation of corners
Corner parts, on the contrary, are installed 8 mm below the edge of the first plank. In the upper part they should not reach the eaves by about 6 mm.
An important requirement is strictly vertical fixation.
How to finish slopes and junctions with window and door openings
To cover window and door openings you will need to use a special profile. It must be fastened around the perimeter of the window or door, while ensuring a tight fit of the elements. This profile will become the basis for attaching the siding.
Installation of brick siding
Installation of the panels is very simple, since each panel has a locking connection. The siding must be attached to the profile using self-tapping screws or dowel nails.
Panel installation
The fastening begins from the starting bar, and is fixed at the top with the finishing element. It is important not to completely tighten the fasteners, which will prevent deformation from thermal expansion.
Brick-look vinyl façade panels
Brick siding made from vinyl is also called “brick siding.”
Samples of basement siding panels
Basement siding
This material is as convenient and easy to install as fiber cement panels. The methods of cutting, fastening, and preparing walls are identical. As with fiber cement, installation of vinyl also requires a frame. It is built according to the same principles mentioned above.
Frame for siding
Vinyl siding with brick look
The only difference in the installation of vinyl siding is the method of joining the slats. They do not fit on top of each other, as is the case with fiber cement panels, but are connected using a special locking element. The lower edge of each lamella is equipped with a small hook-shaped protrusion. It is inserted into the recess at the upper end of the lower lamella. After which a characteristic click should be heard. It means that the slats are connected correctly.
Installation of finishing material
Do-it-yourself basement siding installation
Attaching basement siding
In addition, there are several more nuances in installing vinyl siding under brick.
- The slats are never pulled up all the way. When joining any elements of this facing material, the gap required by technology is 2-3 mm wide.
- Lamels located next to each other along a horizontal line can be connected overlapping each other by 5-7 cm. Another joining method is through a special H-shaped bar.
- Fastening to the sheathing is carried out through special holes, which are located in the upper part of each lamella.
The appearance of brick-look vinyl siding is varied. Each manufacturer offers a fairly wide range of designs. Not only the sizes of the “bricks” can be different, but also their color and texture. You can always find a version of this finishing material that suits you in all respects.
Prices for brick-like vinyl siding
Vinyl siding with brick look
Video – FineBer facade panels
What is siding
In fact, what everyone is used to calling siding or basement siding is ordinary two-layer wall panels made of weather-resistant plastic. The basic principles of the technology for building houses using the now fashionable brick or natural stone can be summarized in several sentences:
- The walls of the house are sheathed with a special load-bearing sheathing, onto which decorative panels are attached. Thanks to the precision of laying siding under the brick photo, a very accurate imitation of brick or rubble masonry is created;
- There is a small ventilation gap between the outer wall of the building and the decorative siding slab. As a result, plastic cladding in the form of imitation brickwork perfectly protects the walls from rain and sun, but does not create problems with vapor permeability;
- If necessary, thermal insulation of any thickness can be laid under the siding; this will not affect the appearance of the building in any way. If the siding assembly is done correctly, then it is possible to understand that the house is lined with plastic and not lined with brick only from a very close distance.
You can lay siding on almost any wall, no matter what it is made of, brick, timber or wood paneling. The main thing is that at the time of installation, the shrinkage of the walls is completely completed, cracks and chips are cleaned and repaired.
For your information! Most organizations and companies that sell siding claim that a high-quality plastic panel with imitation brickwork has a service life of up to 50 years. That is, almost the same as natural red brick costs without finishing.
It is quite difficult to verify such statements in practice, since siding in our country has existed for no more than 30 years, and abroad the external cladding of plastic buildings is planned for a period of more than 20 years.
If you delve into the catalogs of selling companies, you will find that there are two types of plastic siding panels offered for sale - vinyl and plinth. The former are made from cheaper polyvinyl chloride by casting a metal mold, the latter are stamped from polypropylene.
In both cases, the quality of imitation brickwork is obtained at the highest level. You can see cracks and pores on the surface of the brick. The difference between brick siding and vinyl siding is the strength and rigidity of the panel.
Basement siding is thicker than vinyl and can withstand scratches and icing, as well as harsh water washing. Vinyl siding is a thinner, lighter brick, but at the same time brighter and resistant to fading in the sun.
Simply put, basement siding will last quite a long time if it is not exposed to direct sunlight, but the color and texture of polypropylene bricks are poor; this material is planned for the lower layers of finishing. Vinyl brick siding always looks very bright and rich, even after 10 years of use.
Brick-like polyurethane foam facade panels
Polyurethane foam facade panels
Facade thermal panels
Aesthetic and practical facade panels made of polyurethane foam
Facade panels made of polyurethane foam (PPU) are a material. which simultaneously combines two important properties: it decorates the walls and insulates them. Such products are also called “thermal panels”. They have many advantages over any other types of brick finishing.
- Polyurethane foam facade panels are light in weight, so their installation is quick and easy.
- When using this finishing option, installation time is reduced, since there is no need to lay insulation.
- Thermal panels made of polyurethane foam are not hygroscopic, therefore they are more durable.
- This facing material can be glued to the wall if it is flat. Or attach it to a wooden or metal frame.
- PPU panels are characterized by unsurpassed frost resistance.
- Each tile has brick-shaped protrusions, so when installing the panels simply slide into each other. Thus, there is no need to purchase any additional elements that mask and seal the joints of the finishing material.
The top facing layer of polyurethane foam panels can consist of clinker tiles, which are attached to polyurethane foam in the factory. This facing material has high aesthetic characteristics.
Scheme of finishing the facade with thermal panels
Installation of clinker thermal panels
File for download. Installation instructions for decorative insulating cladding slabs
Instructions
Video - Facade thermal panels with clinker tiles
Artificial stone panels
Due to their structure and properties, artificial stone panels are ideal for cladding the basement of private houses in regions with harsh climatic conditions. During the production process they are given a certain color and relief. Using the material, you can design hewn, smooth or antique masonry.
Advantages of stone panels
- Panels made of artificial stone are lighter than their natural counterparts and at the same time are highly wear-resistant and resistant to mechanical damage.
- Light weight simplifies delivery and installation.
- Artificial stone is heat-resistant and fireproof.
- Stone panels are resistant to moisture and dirt and are easy to maintain.
You call us or leave a request on the website
Our manager will contact you and clarify the details
We measure the object and provide an estimate
We conclude an agreement
We deliver the material to you
We carry out installation
Catalog of lightweight stone panels for finishing a stone base ()
Polymer-sand brick-like facade panels
All types of façade cladding panels are installed on a frame pre-mounted on the wall. Polymer sand is no exception. But, like all previous panels, these also have their own characteristics. First of all, this is the price. Polymer sand panels are almost two times cheaper than vinyl ones. That is, they have the lowest cost of this group of facing materials.
Polymer sand slabs
The installation of polymer sand products does not require any components in the form of starting, finishing, or connecting strips. The high strength of the material allows it to be used in cladding not only facades, but also plinths. Polymer sand panels are classified as self-extinguishing. This is another advantage of them.
Polymer sand siding
Manufacturers of this finishing material offer the widest range of color solutions for the facing layer. Bricks can have any of the shades of the red spectrum and have different textures. The surface of the panels is often decorated with fine-grained stone or marble chips. Shimmering under the rays of the sun, it gives the building a special, spectacular look.
Polymer sand siding for brick
Brick-like metal facade panels
Brick-like metal facade panels are nothing more than ordinary metal siding, but with a brick finish. The imitation is so believable that from afar the building can be mistaken for a natural brick one.
Installation of metal siding requires the presence of a mass of additional elements: connecting, finishing and starting strips, wind boards, etc. This finishing material has its advantages: it is non-flammable, can withstand sudden temperature changes perfectly, and neither moisture nor frost will harm it.
Basement metal siding
But it also has its drawbacks. First of all, it is heavier than any other brick-like façade panels. Installation of metal siding is more time-consuming and labor-intensive. It will not be easy for a beginner in this type of work to cope with façade cladding. To install metal siding, you need to know how to properly connect all the elements of this structure.
When performing work, you must be as careful as possible and try not to damage the top facing layer of panels and components. In places where chips and scratches occur, rust will form over time, which will not only spoil the appearance of the finish, but will also shorten its service life.
Video - Sheathing a house with basement siding
Panel colors and sizes
The design and dimensions of the material may vary, depending on the specific manufacturer.
The most popular manufacturers are:
- "Alta-Profile". Releases several main series. Clinker brick (length – 121.7 cm, width – 46.5 cm) is presented in gray, red, yellow shades, and also has a burnt variation. Antique brick panels (116.2*44.6 cm) are sandy, beige, red with a gray tint and blue-gray.
“Alta-Profile” panels for clinker bricks are especially good - Dock. It has its own brick collection, which includes parts measuring 112.7 * 46.1 cm. The panels come in golden, cherry, gray and brown colors.
Products from the Russian-German brand “Docke” are distinguished by the most vibrant color palette - FineBer. This manufacturer produces a wide range of siding with an imitation brick surface. Product parameters: length a little more than a meter - 112.5, 113 and 113.7 cm; width - 48.8, 47 and 46.3 cm. The color palette is yellow, brown, brown-black, red, burgundy and white.
FineBer products are valued for their very high quality and reliable fittings - Holzplast. The size of the panels is 79.5*59.8 cm. Available in sand, white and terracotta colors.
- "U-Plast". It produces a separate series of Stone House in brown, sand, graphite, red and beige shades. Dimensions – 304.5*23 cm.
Naturally, there are many more companies on the building and finishing materials market that produce siding with a specific imitation, but the color range and dimensions of the parts are almost identical.