Where to begin?
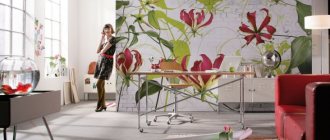
Recently, the demand for all hand-made goods has increased significantly. This also applies to furniture. Any author's item is exclusive and is quite expensive. If you have free time and a desire to create a work of art with your own hands, then you should master the technique of painting furniture. By choosing a single style or a specific plot, you can make a whole set. And if you complement it with the same elements in the decor of the walls and ceiling, you will get an amazingly beautiful man-made living space that will be the envy of all your relatives and friends.
Decorating old furniture
Many people paint furniture professionally or as a hobby. They decorate and restore old furniture, decorating it with paintings, making it new and very beautiful. It makes sense, because the old, although used, furniture is made of such high quality that it has stood and served for many years, changed owners, and is still as strong as after its creation. Modern ones sometimes cannot stand even one move - they fall apart.
Below is an example of a very simple design - almost the same color, decorated with burgundy borders.
Decorating old furniture with painting
Materials used
If you have no idea about painting furniture and have never held a brush in your hands, you should first master the decoupage technique, which uses ready-made images to be applied to a prepared surface. Only some elements can be completed manually, and stencils are often used to greatly facilitate the work.
The second option is to paint furniture with acrylic paints. It requires a lot of time, effort and patience, but the result is worth it. As a first experiment, it is better to take a small object: a stool, a chair. You can turn an ordinary wooden box into a gorgeous chest for shoes or other things. It is worth noting that the furniture you will paint must be made of natural wood; do not use substitutes. You create something exclusive that should look luxurious.
You will need acrylic paints. They create a waterproof surface and are great for wood. They are sold in sets or individual tubes. You can purchase only those shades that are useful to you, in packaging of the required volume. It is better to buy brushes synthetic or with mixed bristles. Nowadays even special types designed for acrylic are produced. It is better not to use natural ones, as they can stick together and deteriorate, especially for novice artists. Brushes should be both wide, designed to fill large areas of the background, and thin, used to work out small details.
You may also need a special primer to treat the surface before painting, but this layer is not always done. If you decide to create a cracked effect or age the surface, you will have to buy additional compounds specifically designed for these purposes. There are also improvised means that allow you to obtain similar effects: PVA glue, varnish, gelatin, egg white. To create iridescent, pearlescent parts or a textured surface effect, special mixtures will also be required. To begin with, you can try to do regular painting without additional decorations.
LiveInternetLiveInternet
Tulip chair (article published in Masteritsa, 2012, Belarus)
This time we will try to draw the flowers in more detail. I chose a simpler one - tulips in buds. And we will try to paint with acrylic on a chair. Yes, yes, let's create our own unique, very feminine chair.
You can repeat this plot or create a similar one on a cabinet panel, wall, canvas, or box. You can also do it in oil. The technique of applying strokes is the same.
To work with acrylic we need
1 object of painting decoration itself. This is my old chair.
2 sandpaper
3 primer for wood
4 white acrylic paint (paint for radiators has good coverage, or paint for windows)
5 brushes - wider for covering a chair and smaller for painting (column number 4 or bristles number 2 are suitable), a piece of sponge, tracing paper or paper (for a sketch), carbon paper, palette, tape.
6 acrylic artist paints (can be bought at stationery stores or specialized stores for artists) - green, brown, red, yellow, white (you can use the one that was used to cover the chair), gold. Advice - if it is difficult to paint with quick-drying acrylic, then you can purchase an acrylic paint drying retardant, then the painting technique will be closer to oil paints.
7 furniture varnish
Let's get started
1 Here is our object
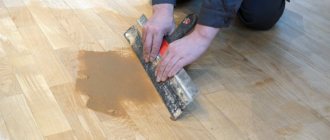
Let's prepare it for painting. Sand the surface with sandpaper and wipe off the dust. Prime in 2 layers. Let's wait until it dries. And cover it with white or cream (white + pigment) paint in 2 layers (we dry each layer). We try to paint in daylight, distributing the paint evenly and avoiding smudges. After drying, all unevenness and roughness can be easily sanded again (especially the seat).
2 Lightly dip a sponge in gold paint, first practice the strokes on paper, and using “smacking” movements apply the paint to the backrest crossbar, the side surfaces of the seat and the connecting arches. You can distribute the “gold” at your discretion.
3 Then, on tracing paper, placing it on the seat and marking the edges, draw a bouquet of tulips.
Using carbon paper, transfer the sketch to the seat of the chair. Let's draw flowers on the crossbar of the back.
How to draw a tulip? I will show this very schematically in drawings; everything basic is done in color.
4 We take paints - green, yellow, brown. To neutralize the “toxicity” of green, add brown to it.
Let's move on to the leaves. The leaves located “bottom” will be darker than the “top”. Also inside the fold, the sheet is darker than the covering half.
We draw the stems and leaves, adding pure brown (shadow) somewhere, and yellow somewhere (light). Mix the colors with each other.
At the end we add the brightest tones-highlights with white and yellow. Move away from the chair to evaluate the drawing from a distance.
5 The sheet on the crossbar is drawn in exactly the same way. First, the sheet is tinted - dark inside, light outside,
then we work out the details and make a smooth transition of light and shade.
6 Flowers. After working on the first flower, you will understand the principle of writing, and the rest will be easier to complete.
Let's tint the petals with red paint
and, while they have not yet had time to dry, apply brown paint to the places where shadow is expected (bottom, under the petal, under another flower, near the stem), and white-pink to the protruding ones (the roundness of the petal and edges). We make a smooth transition by shading the paint.
Next, we highlight the shadow more strongly in the darkest places and apply white (highlights).
We write other flowers in the same way.
Draw flowers on the crossbar, back and front
I wanted to make the bottom two flowers more distant, so I tinted the top with white paint (just a little on the brush and smear it a little until transparent).
Here's what we got
Move a little away from the drawing and look at it a little from a distance, correct the places that you don’t like.
7 I decided to decorate the chair with an organza bow. I had a suitable piece (the rest of the curtain), I decided to tint it to match the petals. I diluted the paint with water and soaked the fabric in it. . Squeeze it a little and dry it in a ball-shaped position, securing it with an elastic band.
8 The painting is done schematically on the seat, on the crossbar, and on the rear legs below. But do not overload the chair with paintings and details. After everything, we coat the chair with furniture varnish in 2 layers (we dry each layer). Ironed bow, tie on a chair.
Now our “bride” chair is ready!
The master class was prepared for you by Tatyana Sonets.
Exclusive for a baby's room
Very often, young mothers try to do something special for their baby, including in the interior of his bedroom or playroom. Painting children's furniture was popular back in Soviet times. One could often see in preschool institutions neat tables and chairs made to look like Khokhloma. They are still on sale and in demand.
So it’s quite possible for you to make a hand-made kit. If the child has already grown up to paint with paints, you can turn this into a process of joint creativity.
The plots of children's fairy tales are perfect here. Handmade furniture in the style of a princess castle will look very cute in a girl’s room.
What furniture will you need?
Old or new unpainted furniture is ideal for painting:
- cabinets;
- cabinets;
- buffets;
- chests of drawers;
- benches;
- benches;
- chairs;
- stools;
- massive tables;
- coffee tables;
- countertops;
- children's furniture (chairs, cabinets, etc.).
Important! The furniture chosen for processing should be made from real wood, and not from chipboard, etc.
Provincial style
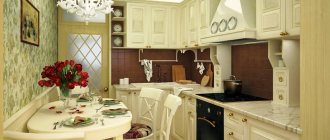
If you decide to make an exclusive decorative element for the kitchen, bedroom or living room, choose the French version of the country style. It combines the splendor of southern nature and the sea. Furniture painting in the Provence style involves the use of certain tones and patterns. The color may be as follows:
- white;
- cream;
- light green;
- lavender;
- brown;
- light wood shade.
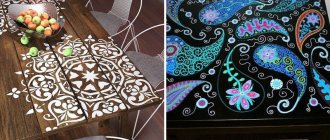
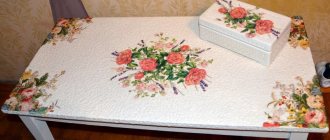
Furniture elements such as sideboards, chests of drawers, bookcases, cabinets with mezzanines and drawers, benches, benches, tables and cabinets, and massive dining tables are painted in this style. The choice is quite large. The facades are usually decorated with floral patterns. A characteristic feature of painting furniture in the Provence style is artificial aging, creating the effect of cracks and broken pieces of the paint layer. This can all be done independently, combining several different techniques.
So, you have learned about the wonderful possibilities of hand painting furniture with acrylic paints. Choose the right style and turn an ordinary wooden table, chair or stool into a work of art.
A little about the history of furniture painting.
This art has a long history. It takes its roots from the archaic times of pagan peoples, when people worshiped nature and the elements, which were clearly depicted on walls, ceilings and interior items. Almost all paintings at that time were dedicated to natural scenes, and also became a symbol of protection, prosperity and health.
In addition to furniture, in the old days the external interior of the room and the facade of the building were decorated in this way. Even today, some historical monuments still remain, which are decorated with decorative paintings on wood.
But since those times, furniture painting has undergone significant evolution and today is presented in more modern versions. The world does not stand still, experience has accumulated and many modern technologies have appeared. Previously, they used oil paints. Nowadays, mainly acrylic or tempera paints are used, which dry quickly, have almost no smell, are safe and allow you to achieve the highest quality indicators. All this makes this type of art more accessible. To begin with, we advise you to decide on a painting style and then turn to professionals. Our artists carry out painting according to individual sketches, taking into account all the wishes and preferences of the customer, which will fully fit into the overall picture of the interior. This is a must.
Design options
The way you decorate furniture depends on your professional skills and the time you are willing to spend on creating a masterpiece. For beginners who do not know the art of artistic drawing, it is better to start by using simple stencils. More complex and interesting painting is obtained by mastering the decoupage technique. The main composition can later be supplemented with small details made independently.
For craftsmen who are skilled with a brush, it is better to try painting furniture using acrylic paints. It will take more time to work, but the freedom of creativity here is not limited to a specific composition. For the first experiments, small pieces of furniture are suitable - a stool, chair or shoe shelf. After honing your painting skills, you can move on to larger objects - chests of drawers, cabinets.
Comment! Furniture made of natural wood is suitable for painting; products based on chipboard or MDF will have to be set aside. The exception is the design of surfaces using decoupage.