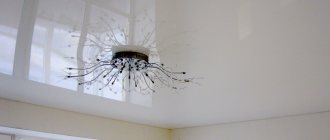
City residents sooner or later face the question of how and where to dry their clothes. For most, installing a ceiling-mounted clothes dryer is a worthy solution.
And if the solution to the issue seems simple and obvious, then the process of choosing a dryer mechanism and installation technology have some nuances. So, what you should think about before buying and installing a ceiling dryer.
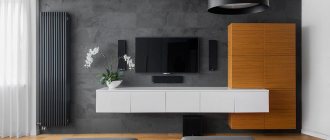
Wall dryer with telescopic mechanism
Clothes lines strung throughout the apartment are a thing of the past. Modern hardware stores offer a variety of clothes drying devices to choose from. Among them:
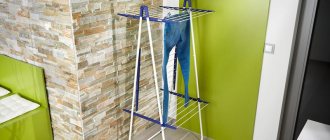
- floor folding dryers;
- ceiling systems for drying vines.
In the table below we consider the main advantages and disadvantages of each type of dryer.
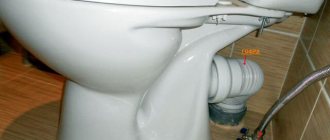
Before you begin installing a liana dryer, you need to carefully select a place for its installation, and based on it, purchase a liana mechanism of the required size.
Precisely because the ratio of advantages and disadvantages of Liana dryers is the most optimal, the installation of this ceiling dryer in city apartments is a hot topic today.
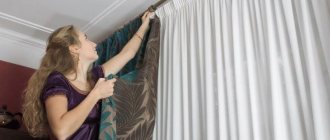
How to choose the right installation location
The balcony is ideal for installing a dryer
It is necessary to decide on the room in which you plan to dry clothes in the future before purchasing a vine. In essence, ceiling dryers are simple structures of brackets through which several ropes pass. The main brackets are mounted on the ceiling, the height adjustment system is mounted on the wall on the side.
When choosing a mounting location, consider the following points:
- the room should be well ventilated;
- when lowered, the ropes should not interfere with the opening of windows and doors;
- You should avoid installing a clothes dryer on a suspended ceiling or gypsum plasterboard surface.
Practice shows that the most convenient place for drying clothes, suitable in all respects, is a loggia or balcony.
After the location is chosen, decide on the length of the mechanism, taking into account the specifics of opening all windows and doors. Creepers are sold in various lengths from 50 cm to 2 m. The dryer kit usually includes:
- cords;
- 5 tubes of the specified length (plastic, galvanized or painted metal);
- 2 brackets installed on the ceiling;
- a bracket attached to the wall to fix the height of the ropes.
The vine on the balcony is installed for a long time, so be careful about the quality of the product you purchase. It is worth choosing a dryer made in Russia or Europe.
Types of ceiling dryers
It is much more convenient to attach accessories to the wall than to the floor slab. However, wall-mounted dryers in bathrooms often cannot be used for a number of objective reasons:
- drywall, PVC panels will not withstand the load from the weight of the laundry;
- at a height convenient for the user’s height, one wall is already occupied by mounting the shower head;
- If you install the drying system higher, it is impossible to get it from the floor, you will have to use a ladder.
The advantages of ceiling dryers are as follows:
- choice of spatial position relative to the walls of the room by the user;
The home master attaches the structure where it is convenient for him without being tied to the walls. - presence of lowering and raising functions;
The dryer can be lowered to hang laundry. - the laundry is in a zone of concentration of warm air, which always rises to the ceiling;
- the dryer is practically invisible when not in use, as it is located above the zone of involuntary gaze fixation;
The design does not spoil the interior of the bathroom. - linen can be hidden behind the bath curtain, for example, during a visit from guests;
- The load capacity of ceiling models is initially higher than that of wall-mounted options.
Before installing the structure on the ceiling, the home craftsman will have to assemble the clothes dryer on his own. Therefore, it is better to first study all the design options offered in retail stores of household goods.
Products of this type are classified within their category according to several criteria:
- degrees of freedom – fixed, completely lowered, with individual elements moving vertically;
Fixed type dryer. - drive – manual or electric;
Design with manual movement of hanging elements. - suspension design – frame, made of separate elements;
The tubes are connected into a rigid frame structure. - design of the moving mechanism – traveling system (cord + blocks), scissor lift;
Scissor lift type dryer. - material of hanging elements - wood, plastic, metal, synthetic cord;
- fastening - strips, ceiling brackets, anchor hooks.
Fixation of the suspension system on hooks.
For bathrooms, dryers of short length (less than 1 m) or medium length (1.2 - 1.5 m) are usually used. On balconies and loggias, long-type models (2.5 - 3.2 m) are often installed. In the latter case, it is recommended to choose dryers with wooden or steel tubular elements, since plastic here has an extremely limited service life.
Sliding accordion
The design of this type of dryer is a classic scissor lift, inverted with the base facing the ceiling:
- two plates are fixed to the ceiling in parallel at a distance of 1.5 - 1.8 m;
- the other two are located strictly below them and have through holes;
- Several laundry tubes with decorative plugs at the ends are placed in the holes of the lower plates;
- The plates are connected vertically to each other by four X-shaped elements with one degree of mobility.
Sliding-type accordion dryer
When the dryer is folded, the laundry is located 30 cm from the level of the floor slab. To hang wet laundry and remove dry laundry, the rods are lowered 40 cm down (70 cm from the ceiling, respectively). Installation requires 4 dowel nails or anchor bolts.
Electric
Most often on sale is a dryer for installation on a floor slab with electronic control Acona (China) or Senspa (South Korea). The moving parts are made of aluminum, the laundry tubes are plastic. Main design characteristics:
- remote control control;
- protection against collision with an obstacle;
- UV lamp for disinfection of linen;
- telescopic crossbars;
- two built-in fans.
The dryer costs 15–17 thousand rubles and is purchased for luxury bathroom interiors.
Mechanical
Mechanical versions of “accordions” for hanging clothes to dry are also produced by Korean and Chinese manufacturers. The principle of operation is the same, but for lifting, a cord is used that is fixed to the wall. The structure is lowered by its own weight and is held against a sharp fall by the same cord.
The instructions indicate how to hang the structure on the floor slab. The cord here is short and does not get tangled during transportation. Costs about 3,000 rubles. There are three design options - with lowering the slats to 0.7 m, 1 m or 1.3 m from the ceiling level.
Frame design
You can make the frame for the dryer yourself, for example, from propylene tubes, and hang the laundry on a cord stretched in several rows, as in the photo below.
The structure can be secured with dowels using nails or anchor hooks, depending on which version of traveling blocks was purchased in the store.
From the same structural material, propylene fittings, you can assemble an analogue of a bus handrail for passengers. Additional spatial rigidity is provided by lateral support to the wall.
Clothes dryers are either made to order or made with your own hands from a wooden plank with rounded ribs and forged openwork elements.
For a classic loggia interior, an entirely wooden structure is suitable.
The simplest option for a country house would be a frame made of a block with rows of linen cord stretched inside it.
Frame-type drying systems can be fixed to the ceiling or have free movement vertically.
Liana
Due to its budget cost and convenient design, the most popular option for a balcony or bathroom is the Liana clothes dryer with plastic or metal tubes.
By simply adjusting the length of the cord, the user can make the process of hanging, drying, and removing laundry more comfortable:
- the distance between the tubes and the ceiling is 10 – 30 cm in the raised position;
- placement of supporting elements in steps at different vertical levels;
- installation of a cord clamp on the left/right on the side or end wall of the room.
Each row of tubular hangers is controlled by its own cord through an individual pair of rollers. This allows the tubes to be lowered one at a time. Different manufacturers have different names for the five-row laundry drying system:
- Luminarc Liana (France) - line length 0.9 - 2.1 m in increments of 10 cm at a price of 450 - 600 rubles, mounting to a wall or ceiling of your choice;
- Floris (Ukraine) - wall-ceiling, rod length 1.5 - 2 m, 6 lines, load capacity of each of them 3.5 kg;
- Zalger Lift Comfort (Russia) – ceiling installation, 5 lines, each of which can withstand a maximum load of 2.5 kg;
- Gimi Lift (Italy) – only metal tubes, the load capacity of each of them is 2.5 kg
- Dogrular (Turkey) – ceiling mount only, load on each line 2 kg;
- Comfort Alumin (Belarus) – the length of each of the five lines is 1.5 m or 2.5 m, the distance between them is 10 cm, the load capacity is 10 kg.
The designs differ in length, thickness, quality of cord, size range of the manufacturer, diameter of the rollers and width of the strand on them for the rope, shape, design of the ceiling strips, wall comb for fixing the lines in a vertical position at the desired height.
The brands Jimi Lift, Comfort Aluminum, Zalger Lift, Luminar Liana include brackets for wall mounting. Tubes can be plastic, aluminum, or powder-coated steel.
In any case, for the operation option under consideration, the planks will be attached to the floor slab, taking into account its cladding.
Transformable telescopic dryer
Electronic models of laundry drying systems have two additional functions:
- telescopic lines - the tubes consist of three parts and can be extended to increase the length in either direction or in both directions;
- transformer - tubes are assembled in pairs into blocks; if necessary, each block can be rotated from a horizontal to a vertical position; the axes of rotation are the outermost bars.
When purchasing electronic systems for drying washed clothes, there is not much to choose from, since these products are produced by no more than five manufacturers in the world.
With hangers on guides
Designs for hanging laundry on hangers are included in a separate category. They are used only for suits, jackets, outerwear, trousers, shorts, shirts, T-shirts, shirts. For this category of clothing, folds from ropes and tubes of standard designs are not desirable. Therefore, immediately after spinning, they must be hung on hangers.
A dryer with hangers is usually installed in addition to the main structure with several rows of cords, tubes, and slats. There is physically not enough space in the bathroom for a second drying system. Therefore, drying outerwear, jackets, and evening dresses usually takes place on the balcony, where a similar structure is installed.
There are several options for drying with hangers:
- tubular - an analogue of Liana with a backup cable;
Tubular type design with hangers. - profile – an analogue of a ceiling curtain with the function of lowering suspensions;
Profile design of dryer for loggia. - racks - a tubular rod is fixed vertically between the balcony floor slabs; at different levels there are rotating consoles with holes for hangers.
Rack with rotating consoles for drying clothes on hangers.
For small items (handkerchiefs, neckerchiefs, ties, socks), designs with “chandelier” clothespins have been created.
For these options, mounting is provided to an anchor hook screwed into the ceiling or to the rods of main clothes dryers. Sold in a set of two pieces (20 clothespins each), cost from 450 rubles.
Bed linen, capes, and tulle made from delicate fabrics are dried on two or three tiered mesh trays. Manufacturers position these structures as ceiling-type dryers. A set of two tiers Niklen (Canada) measuring 0.6x0.7 m costs 650 rubles.
Dryer assembly and installation diagram
After purchasing a dryer, you must read the installation instructions included in the product. It will describe how to assemble and install the ceiling dryer correctly. To do this you will need several special tools:
- Stepladder for ease of work in the ceiling area. In standard apartments, sometimes you can get by with a stable stool.
- To attach the brackets to the ceiling, you need to drill holes for screws or anchors.
- To mark, prepare a marker or pencil with a tape measure more than 2 meters long.
- Dowels and fasteners of the required size.
- A screwdriver or screwdriver for fixing screws.
Check out the typical step-by-step instructions on how to hang. Before you start assembling, check the contents and prepare the necessary tools.
- We attach the brackets to the ceiling and mark the drilling locations with a marker. The distance between the brackets should be equal to the length of the tubes with an error of up to 70 mm;
- We drill holes in the designated places and insert dowels. We attach the bracket to the ceiling with hammered dowels and secure it with self-tapping screws. (If decorative trims are included, cover the screws with them);
- In the direction of pulling the ropes on the wall, we attach a bracket to fix the height of the suspension. It is better to attach the bracket at the level of the housewife’s arm bent at the elbow;
- secure the roller clamps to the brackets. We pass the cords through the rollers of the far bracket. We put a rod on the long end of the cord (bottom). And we pass both ends through the roller of the near bracket;
- We fix the ends together in caps to adjust the height of the rod. Watch the intricacies of dryer installation in this video:
- When choosing self-tapping screws to attach brackets to the ceiling, give preference to products of greater length, so that the fastenings do not tear out under heavy load.
- The installed and assembled ceiling clothes dryer takes up absolutely no space. But when using it, in order to increase the “drying” coefficient, the tubes should be arranged in cascade. Therefore, before hanging the vine on the balcony, make sure that the laundry on the lines can be easily placed without touching the interior items. For more information on assembling and installing the dryer, watch this video:
In the central and northern regions of the country, when deciding how to choose the right dryers, it is important to remember that due to low winter temperatures, you should not install Liana-type products on unglazed balconies.
Every day the vine for drying clothes on a balcony or loggia penetrates deeper into the life of people who cannot afford clotheslines in the yard.
The old option with iron fastenings on the outside of the balcony is a constant risk of dropping or falling while hanging things; eternal ropes with clothespins cause constant inconvenience.
Such dryers are no longer relevant.
Every housewife has long wanted to achieve comfort and simplicity even in such an ordinary task as drying washed clothes. Therefore, the compactness, easy installation and attractive appearance of the vine speak only in its favor.
Advantages
The reliability of ceiling dryers has been tested by time, since many have been using them for more than 20 years. What do housewives like about vines? First of all, compactness. Even the largest dryer in the folded position takes up virtually no space on the balcony or loggia, does not clutter it up and does not spoil the interior. The metal parts are painted white, the products have a modern design and do not stand out against the background of the ceiling. The only detail visible is the ropes assembled in the holder.
The dryer is convenient to use: to hang things, you don’t need to climb onto a chair and reach the ropes with your hands. They easily fall down, after which, together with the laundry, they rise again to the ceiling and are fixed at the desired height. Removing dried items from the crossbars is also easy.
Another advantage is that round rods are used for hanging laundry. Because they are made from metal or plastic hollow tubes, their diameter is much larger than the thickest ropes. Thanks to this, there are no traces of ropes left on things, and in some cases you can do without ironing.
More about this device
The problem of drying clothes in apartments has always been solved differently, but now it has acquired not just functionality and simplicity, but also aesthetics. If we consider a dryer such as a liana, then it is this one that today meets all these requirements and receives only positive reviews.
Advantages of such dryers:
- can withstand heavy loads - the design and durable cord can withstand a lot of weight;
- easy to use - even a child can use it;
- neat appearance - modern and quite aesthetic;
- easy to assemble and install - does not require special skills or tools.
Ceiling and wall-ceiling vines
The clothes dryer for the balcony Liana is a structure in the form of ropes with tubes attached to the ceiling frame. In this case, the tubes serve as a device on which wet things are hung. The ropes that hold them are passed through the ceiling frame and brought to a special holder on the wall. It is thanks to this holder that in this type of dryer the height of the tubes can be easily adjusted, which greatly simplifies the hanging process.
There is no longer any need to reach high clotheslines or carry a stool with you. You just need to lower the device to a comfortable level, and then raise it back so that hanging things are not in the way.
The positive aspect of this invention is that each tube can be installed at a different height, which allows the laundry to dry faster, ensuring unhindered air flow.
You can adjust the suspension to different heights.
It is worth noting that such a ceiling-mounted clothes dryer for a balcony has a very attractive appearance; the tubes are mostly painted white and coated with anti-corrosion agents to protect them from rapid wear due to exposure to moisture. Unlike a regular floor dryer, you don’t need to find a place in your apartment for storage for the liana. Simply raise the tubes to the ceiling and you're done.
To all this it should be added that the installation instructions for this invention are quite simple and unpretentious. Although questions may arise from girls and young people who are far from using a hammer and pliers.
When choosing a vine, you need to consider many factors. First of all, you should take measurements of the balcony or loggia, carefully read the instructions for installing the dryer, and only then decide which size is suitable in a particular case.
Today in stores you can buy vines, the sizes of which range from fifty centimeters to two meters.
It is also important whether it will not interfere with the opening of windows and doors, so that the installation does not unexpectedly turn into dismantling.
If the ceiling is foam plastic or suspended, then it is better to choose a wall mount.
After everything has been calculated, a model of suitable size has been found in the store, the next step in choosing a dryer is what material the vine is made from. Tubes and frames are most often made of plastic, aluminum and steel.
The most popular is the aluminum structure, due to its lightness and strength.
However, it is worth considering that steel, although heavier, is always coated with special polymers or paints that prevent corrosion and staining of linen. Plastic tubes, as a rule, are distinguished by their cheapness, but also their fragility.
Another important criterion in choosing a vine is the weight that each commercially available model can withstand.
This may depend on the material of the tubes and ropes, the installation system, and the country of manufacture. It is also necessary to take into account the purpose of purchasing a dryer - small vines practically do not need such a characteristic as supporting weight, since a priori you cannot hang much on it. In this case, it will be more important to purchase a plastic model. But if a two-meter dryer cannot withstand a lot of weight, then it is not worth taking it.
Before you choose and buy, you should familiarize yourself with the different types of balcony dryers. Video below.
VAR600 Kitchen dryer 600
In Moscow:
Delivery time: 2-3 business days. Payment on delivery. Delivery to the entrance: Over 3000 rub. - FOR FREE. Less than 3000 rub. — 285 rub. Outside the Moscow Ring Road - 20 rubles/km (one way). Delivery hours are negotiated individually. If the weight of the product exceeds 30 kg, the delivery cost may increase. In case of refusal, the client must pay transport costs.
In Russia::
Prepayment 100%. Dispatch by transport company (TC). Over 3000 rub. — delivery to shopping center is FREE. Payment to your city TC upon receipt. Less than 3000 rub. — delivery to shopping center 285 rub. Payment to your city TC upon receipt.
Payment for goods can be made by bank transfer or using electronic money. The delivery time and cost depend on the remoteness of the region and the volume of cargo.
Delivery scheme for Russian regions:
You place an order on the online store website. Delivery of products by transport company. You pay the delivery cost to the transport company upon receipt of the goods. We send goods by parcel in rare cases, if the volume allows, for example, the post office does not accept the parcel when the size of one side exceeds 80 centimeters. Dispatch within a day after payment.
Note.
To cities nearby the Moscow Ring Road: To the near Moscow region up to 5 km are delivered according to Moscow conditions, including Mytishchi, Reutov, Lyubertsy, Khimki, Vidnoye and Dolgoprudny (from 3000 rubles free of charge).
And the cities of the Moscow region, located a little further: Korolev, Odintsovo, Shchelkovo, Pushkino, Krasnoznamensk, Ivanteevka, Zelenograd, Dubna, Dmitrov, Dedovsk, Lobnya, there will be a small surcharge, with such a small price for kitchen accessories and furniture fittings.
By region, orders were delivered to the following cities: Almetyevsk, Astrakhan, Bryansk, Bratsk, Volgograd, Vladimir, Grozny, Far East, Yeisk, Kaliningrad. Leningrad region, Lipetsk, Minsk, Murmansk, Novgorod the Great and Nizhny Novgorod, Omsk, Petrozavodsk, Sakhalin and many others.
Important: If you buy furniture system components in different stores. Where the combination of details causes us doubt. In this case, we do not fulfill such orders or ask for advance payment. In addition, any company has the right to refuse execution for various reasons. These may be some impossible conditions regarding the availability of goods, the time and distance of delivery, REFUSAL TO PAYMENT OR USUAL rudeness. WE RESERVE THE RIGHT TO REFUSE SERVICE WITHOUT EXPLANATION OF REASON!
Also furniture handles, hinges and guides - 50% prepayment is possible. If you are not sure and it is too far for you to go to the warehouse, then order one pen, if you are satisfied, we will deliver the rest the next day.
Install without errors
Installation of the vine can be done even by an ordinary person without a higher engineering education. Each box contains detailed installation instructions, following which the result is sure to be satisfactory.
Tools and accessories:
- A hammer drill or a good drill.
- Tape measure, marker, pencil.
- Fasteners - it is advisable to use the one that comes with the kit.
- A screwdriver, or just a screwdriver.
- "Shoe" or pocket knife
An example of assembly and installation is in the video below.
When carrying out installation, it is advisable to use exactly those fasteners that come with the kit, if they match your finish, while carefully checking the quality of their fastening in the wall and ceiling, so as not to get a surprise in the form of a torn dryer after you hang things on it .
You should also take into account the material from which the ceiling and walls are made, on which the vine components will be attached. After all, there is a big difference between mounting on a wooden surface and a concrete wall. If the person doing the installation cannot cope with this issue himself, you can ask the sales consultant, he will always tell you which option is better.
Typical errors:
- making incorrect calculations - you can make a mistake with the length and tension of the vine;
- incorrect choice of mounting location - windows or furnishings may interfere;
- incorrect choice of fastening elements - length and diameter of screws;
- using dowel-nails - they become loose too quickly;
- incorrect use of the tool - inaccurate selection of the diameter of the drill or drill.
Some difficulties may arise when installing the dryer on plastic lining, suspended ceiling or foam. Video below.
If you strictly follow the instructions and treat the process with all responsibility and care, then installation will not bring any difficulties, and further use of the new thing will delight you for many years.
Where do residents of apartment buildings dry their clothes? In most cases - on your own balcony or loggia. To do this, you have to pull ropes, which spoil the appearance of the balcony and are not always convenient to use, and hanging laundry takes up a lot of space and often gets dirty. Today this problem can be solved much easier, with the help of compact and easy-to-use dryers.
Types and models of dryers
The range of designs designed for drying clothes in modern stores is very large: these can be external, internal, sliding, wall and ceiling dryers, and each of them has its own advantages and disadvantages.
If the balcony is small, apartment owners often choose folding, wall or ceiling structures to save usable space. Folding models are quite compact and are installed immediately before drying clothes, and after use they can be quickly folded and put away. The disadvantage of such dryers is that when unfolded they take up a lot of space. In addition, some of them are unstable and can simply tip over under the weight of the laundry.
Wall-mounted dryers are available in several versions, but for small rooms, inertial and telescopic (cantilever) models are most suitable. Inertial dryers consist of a drum with wound ropes and a bar with hooks on which the ropes are fixed. That is, if the dryer is not needed, the ropes can be wound on a drum, so they will not take up space and interfere with the passage. The main disadvantage: over time, the ropes stretch and sag.
Cantilever or telescopic dryers resemble metal accordions that are attached to the wall and pulled out when necessary. True, such designs are only suitable for small families, since they won’t be able to hang a lot of laundry on them.
According to housewives, the most convenient and easiest to use are designs called “Liana”. They got their name due to their original appearance - they really look like climbing tropical plants.
What is a Liana dryer?
The “Liana” ceiling or wall dryer is a structure consisting of plastic or metal cylinders with anti-corrosion coating, ranging from 50 cm to 2 m in length. They are attached with cords to a special block equipped with rollers, thanks to which the height of the elements can be adjusted. Such a device provides a number of advantages that conventional ropes or other structures do not have.
Clothes dryer "Liana": design features and advantages
“Liana” is a technologically simple, easy-to-use dryer that can be installed in any room. The dryer received this name due to its appearance - the ceiling structure, which is connected to several cords for adjustment, attached to the wall surface, allows you to lower the cords with laundry to different levels .
How does a ceiling dryer work?
Ceiling clothes dryer for the balcony “Liana”
General view of the design: several plastic or metal tubes with a special coating that protects against corrosion. Tubes can be of different sizes - from 50 cm to 2 meters. If necessary, these tubes can be lowered to different heights, which are adjusted on a special block that is mounted on the adjacent wall . This makes hanging laundry much easier - no need to stand on stools or reach to the ceiling. If necessary, you can lower the tubes to waist level.
The multi-level design not only ensures ease of use, but also allows clothes to dry quickly. The cascading arrangement of several levels ensures faster drying.
Advantages
The main advantages of “Liana” for drying clothes on the balcony are:
This is what the Liana ceiling dryer looks like in the balcony interior
- Ability to withstand heavy weight . The design allows you to hang even a large amount of laundry - tension cords allow you to withstand a lot of weight;
- Appearance . “Liana” looks much neater than ordinary ropes on a balcony or loggia and fits neatly into any interior design;
- Simplicity of design and ease of installation. To install the vine, you need a minimum of tools and a small instruction manual, which is included with each device.
A natural question arises: are there any disadvantages to this ceiling dryer? Based on numerous reviews from people, we can draw the following conclusion: no significant shortcomings were found. Some users noted the complexity of the installation process. To be fair, we note that such comments came mainly from women. For our visitor, who is probably interested in all the nuances of arranging balconies and loggias, the installation process is unlikely to seem complicated.
Important: Despite the fact that the Liana clothes dryer can withstand a lot of weight, you should not “abuse” it - it is recommended to hang no more than 2.5 kg of laundry on each rod.
Complete set of clothes dryer "Liana"
This dryer is technologically simple, which is confirmed by the small number of components:
- Bearing brackets - 2 pieces;
- Control side bracket;
- Linen rods (set);
- Cords for each rod (2 pieces).
Are you building a balcony or loggia? Read our article about the design of a loggia combined with a room. In it you will find various design ideas and many photographs on this topic.
Read about boxes for balcony flowers here. Review of materials and recommendations for selection.
Not all owners choose ceiling dryers. Some people prefer floor-mounted and wall-mounted clothes dryers; their characteristics are presented in a separate article.
How to choose a dryer?
In order for the design to serve its owner faithfully, you need to pay attention to some important points when choosing. The first is the material from which the tubes are made (plastic is much cheaper, but metal is more reliable). If the dryer is purchased for a large family, it is recommended to choose stainless steel - it is stronger than aluminum, and in addition, it will not stain the laundry even if the top anti-corrosion layer is worn off.
The cords must be thick enough, otherwise they may break under the weight of the laundry. In addition, you need to pay attention to the length of the structure indicated in the instructions and make sure that it will fit in the chosen location.
As for the country of origin, it is better to refuse products made in China - such dryers are of low quality and can quickly break down.
Finally, before purchasing, you need to check the integrity of the product packaging - if it is damaged, you should purchase another design.
How does a liana dryer work and what is good about it?
The main disadvantage of stationary classic drying devices is that their ropes or crossbars occupy most of the space on balconies and loggias, creating inconvenience for the owners. Previously, this situation was solved by placing ropes on long consoles extending beyond the balconies.
Some apartment residents, out of necessity, still dry clothes and laundry this way
With this method of drying, clothes are not protected from dust and dirt, which can fly from the upper floors. In rainy or cold weather, outdoor structures are completely ineffective because laundry cannot dry.
The liana dryer is free from all of the above disadvantages. The entire structure is located under the ceiling . Dimensions can be selected for both a spacious loggia and a small balcony.
Liana type drayer installed on the balcony ceiling
In order to place clothes on tubes (hereinafter also referred to as rods) made of metal or thick-walled plastic pipes of small diameter, they can be lowered using ropes attached to the wall. After the laundry is hung, each rod is raised up. To speed up the drying process, it is better to place the tubes at different heights; in this case, the air exchange is more intense.
Drying with rods at different heights
The advantages of this driver include the following:
- There are no sharp creases left on dried items, which are usually formed from thin cords or ropes and are difficult to smooth out.
- The structure is easy to care for; just wipe the tubes and other parts. Regular care ensures that clothes are free of dirt and dust after drying.
- The design is so compact that the raised rods are almost invisible if there is no laundry on them.
- Each tube can hold at least 2–2.5 kg of items. By multiplying these numbers by the number of tubes (from 3 to 6, depending on the model), you can easily determine the maximum number of clothes that can be dried at the same time.
When folded, the design is almost invisible
When purchasing, special attention should be paid to the manufacturer, as well as to the materials from which the dryer is made. If many parts in the structure are made of plastic, there is a possibility that it will quickly fail if a lot of laundry is hung on the rods. This is especially true for tubes - it is better to purchase a device with metal rods.
Metal rods in the structure are more reliable than plastic ones
Stainless steel tubes are good. They are durable and not subject to corrosion. Some manufacturers use aluminum rods with anti-corrosion coating, which are also quite reliable.
The plastic bar for fixing cords cannot always withstand the weight of tubes with clothes
It is desirable that the rollers through which the adjusting ropes are pulled be secured in supports made of metal. It is necessary to pay attention to the reliability and quality of the adjusting rope, as well as to the design of the bar for fixing the cords.
Rollers rotating on a metal rod mounted in a metal mount
Installation instructions for the Liana dryer
Despite the fact that installing the structure is a simple process, the owner will have to choose a suitable location, acquire some tools, and follow step-by-step instructions.
Stage one. Choosing a place
It is best to install “Liana” on glazed balconies or loggias. Otherwise, drying clothes will cause serious inconvenience, since in winter it will constantly freeze, so it is recommended to find a suitable place in the apartment. The structure and the things hung on it should not disturb household members and guests, or be too conspicuous, that is, the best option is a bathroom or dressing room (in extreme cases, a living room or bedroom), with the exception of rooms with suspended ceilings or suspended structures. If attaching the structure to the ceiling is impossible or too difficult, it is recommended to choose a wall-mounted option.
Choose the right location for your dryer
The dryer should be installed so that it does not interfere with the opening of doors or windows. In addition, you need to take into account that water may drip from wet laundry, so it is better to place a film or disposable diaper under it.
Stage two. We prepare everything you need
The Liana dryer kit includes the following elements:
- two load-bearing blocks;
- side fixing bracket;
- slats (cylinders) for hanging laundry, there are 5 of them in a standard set;
- 2 cords for each of the cylinders (one long, for the roller brackets and one short, which needs to be fixed to the bracket).
- meter tape, long ruler or tape measure;
- hammer drill (for wooden floors) or drill (for concrete and brick);
- screwdriver;
- fastening elements (anchors, dowels or screws) according to the size of the drill;
- pencil.
To get a reliable design, and not a lot of holes in the ceiling, you should not install the dryer “by eye”, but take simple preliminary measurements.
Stage three. Dryer installation
After preparing the necessary tools, you can proceed directly to the installation process, which looks like this.
| Step, no. | Description | Illustration |
| Step 1 | Place the load-bearing blocks on the ceiling surface and make appropriate marks where they will be attached. The distance between the blocks must correspond to the length of the cylinders. | |
| Step 2 | Make holes in the designated places and secure the blocks with self-tapping screws, placing plugs on top. The number of holes should be maximum, since wet laundry has considerable weight. | |
| Step 3 | A fixing bracket is attached to a nearby wall in a similar way. Its height and location can be any - the main thing is that the dryer is convenient to use. | |
| Step 4 | Pull the cords into the cylinders and then pass them through the blocks. You need to pass a long cord through the left one, and both a long and a short one through the right one. | |
| Step 5 | Thread the ends of the ropes through the fixing caps on the bracket so that the laundry can be fixed at a certain height. | How to properly attach a vine to a suspended ceiling After installing the structure, you need to check its reliability by hanging wet laundry. If the structure holds well and does not fall, then everything was done correctly. |
How to Install a Ceiling Clothes Dryer
We mentioned that installation requires few tools. And here is a small list of them:
- Hammer . It is better not to use a drill - it is not as reliable as a hammer drill, with which you can make holes not only in the finishing material, but also in the concrete base. The kit should include a 6 mm drill (for the standard size of self-tapping screws for securing the structure).
- Roulette and marker . Although there is no need to take long and complex measurements to install the vine, simple measurements (markings on the base, marks of attachment points, attachment points) must be carried out.
- Fastening elements - self-tapping screws and nylon dowels. The standard size of the dowel is 5 mm, the self-tapping screw is 3.5-4 mm.
- Screwdriver . Necessary for fixing fasteners.
Now let’s proceed to the actual process of installing the Liana dryer:
Installation diagram of a ceiling-mounted clothes dryer
- The purchased “Liana” must be unpacked and the brackets removed from the packaging.
- The entire structure will be supported on the ceiling brackets. We take them, apply them to the ceiling in the right places and make corresponding marks on the surface with a marker.
- Holes are drilled at pre-marked points.
- The brackets are fixed using self-tapping screws, after which plugs are installed on top.
- The fixing bracket is attached to the wall using the same screws. You can choose the height and location arbitrarily - the main thing is that you can reach it.
The picture shows how to hang the dryer correctly - The cords that come with the rods are passed through the rollers of the right bracket. A long cord is passed through the left bracket.
- After this, both a long and a short cord are passed through the right bracket.
- The ends of the two cords are passed through the locking caps on the locking bracket so that the upper or lower position can be set.
- Other rods are attached to the Liana in the same way.
Important: Despite the installation instructions provided, we recommend that you read the instructions included in the kit. It is possible that the dryer you purchased may have installation features that are slightly different from those described.
Dryer care
How to use "liana"
Special care for the dryer is only necessary if its cylinders are made of plastic - to extend their service life, after each drying of the laundry they need to be wiped dry with a rag (metal structures do not require such measures). Repairing the structure is also quite simple: most of the breakdowns are associated with deformation of the cylinders or wear of the ropes, and these elements can be easily replaced. Finally, it should be noted that with proper selection, installation and operation, the Liana dryer can uninterruptedly serve its owners for 5 to 10 years.
Video - Installing a ceiling dryer for drying clothes. Instructions
Ceiling design is a very convenient option for small spaces like a balcony
A ceiling-mounted clothes dryer saves space on the balcony, because it does not take up useful space. I installed this design for myself three years ago and am very pleased with the result. In the article I will share my installation experience and tell you what you should pay attention to during the work process.
Description of work
Let's find out how to hang a ceiling-mounted option and how to install wall-mounted drying racks. Let me immediately explain that both structures are installed according to a similar principle, only the bracket configuration differs.
If you don’t want to carry out installation, you can consider floor dryers; they are placed wherever there is space and folded up after use. But this option is not very good, since the design takes up a lot of space. I recommend spending an hour and installing a convenient and practical ceiling dryer.
Materials and tools
The following is used for operation:
| Illustration | Description |
| Dryer included . The vine for drying clothes on the balcony is supplied unassembled. The kit includes:
The price of a hanging dryer ranges from 500 to 3000 rubles, depending on the size and number of rods. | |
| Long self-tapping screws . With their help we will attach the brackets. The length should be 30-40 mm greater than the void under the lining. In our case, 4.8x152 mm fasteners were used. Need 6 pieces. | |
| Nylon dowels . They are much better quality than those that come with the kit. Size 6x30-6x40 mm. You need 6 pieces for the ceiling and 2 pieces for the wall. |
Tool:
- Hammer
. Equip it with a 6mm diameter drill bit long enough to fit through the void and drill a 40mm deep hole in the concrete. A universal option is a 6x210 mm drill, which is usually enough for any type of structure;
- Screwdriver.
It must be equipped with an attachment for the screws that will be used. You will also need a drill for wood or metal; it will be used to make holes in plastic. The diameter of the drill must match the diameter of the aluminum tube;
- Tape measure and pencil
; - Hammer
; - Lighter or matches
; - Hacksaw for metal
. Needed for cutting aluminum tube into pieces of the required size.
Step-by-step installation description
Installing a ceiling dryer on a balcony is done as follows:
| Illustration | Description of the stage |
| The location of the structure is determined . The ceiling drying rack for clothes on the balcony should be installed so as not to interfere with opening doors and windows. In our case, there is one on the balcony, so we opened the door to mark the point beyond which the structure cannot be placed.
| |
| The position of the first bracket is marked . The fastenings should be located with a distance from the wall of at least 100 mm, and preferably 150-200 mm. A mark is made using a tape measure, then the holder is positioned perpendicular to the wall. Use a pencil to mark the drilling points for fastenings.
| |
| Plastic panels are drilled . A wood or metal drill is inserted into the screwdriver, the tool is placed along the mark and a hole is made in the plastic. Everything is quick and simple, the main thing is to keep the tool perpendicular to the ceiling. | |
| Drilling holes in concrete . The hammer drill is placed in a hole in the plastic and drilled to a depth of 40 mm. To make it easy for you to navigate during the work process, stick a piece of adhesive tape or electrical tape in a certain place on the drill. | |
| Aluminum tube sawing line is marked . To do this, it is inserted into the hole and rests against the ceiling slab. A mark is made flush with the plane of the ceiling along which cutting will be done. For each element, measure the tube separately; the height may be different. | |
| The tube is cut according to the mark . It is necessary to securely fix the element and cut it strictly perpendicularly so that the end is smooth and not skewed. | |
| Assembling the fastening unit . The photo shows how the assembly is done, I will describe it step by step:
| |
| The bracket is put in place . Carefully insert the elements into the holes in the lining. The main thing is to get the dowels into the holes in the slabs. Move the elements to the sides until you accurately insert the fasteners into place. | |
| The dowels are driven in until they stop . You should not immediately tighten the fasteners; you need to carefully tap the element with a hammer so that the dowel fits completely into the prepared hole. Do not hit too hard as this may damage the plastic. | |
| The fasteners are completely screwed in . Take a screwdriver and tighten the screws until they stop. The result is a design in which the self-tapping screw is tightened into the dowel, and the rigidity of the fastening is ensured by a tube resting on the bracket. | |
| The reliability of the fastening is checked . Just try moving the bracket to the sides, if it stands rigidly, then everything is done correctly. | |
| Take one coil of rope and straighten it out . Carefully cut the fastening tape and untangle the string. The main thing is not to damage the cord or tangle it. | |
| The ends of the cord are burned . This will make it easier to pull them through the holes and the cord will not begin to fall apart at the ends over time. Everything is simple here: carefully burn the tip and squeeze it with your fingers, forming a sharp end. | The end of the cord is inserted into the bracket from the inside . Pull the rope through and secure the cord so you don't have to hold it. |
| The location of the second bracket is determined . It is installed as shown in the photo. The hole on the rod should be located opposite the outer edge of the roller on the holder. Mark the distance from the wall in advance, and the exact location is set on the rod. | |
| Mounting points are marked . Place dots with a pencil, and then carry out the work in the same order as in the case above. It is important to ensure the reliability of the design. | |
| The cord is inserted from the outside of the right bracket . Stand on the side of the window facing the fasteners. A rope is inserted into the right element on the outside of the roller, threaded through a hole in the rod. The suspended structure will work precisely due to the ropes, so they need to be positioned correctly. | |
| The threaded end of the cord is inserted into the second hole of the rod . A knot is tied to secure the connection. After this, the rope is folded at both ends, that is, a double cord is obtained, you can bend it anywhere, then everything will be adjusted during the installation process with your own hands. | The bar is leveled . To do this, you first need to pull one end of the cord to the required position, and then do the same with the second. |
| A cap is placed on the double cord . The work looks like this:
. | |
| The bar is set in the upper position . A second cap is put on the cord and secured so that the rod stands at a distance of 100-200 mm from the ceiling. The remaining elements are placed in the same way. Installing the dryer is simple - just deal with the first rope and then repeat the action. | |
| The dryer is fixed in the upper position . After this, check the operation of each row again. |
When choosing between ceiling and wall options, I prefer the first. They are simpler, more reliable and can withstand higher loads.
How are cross-bar dryers attached?
In this type of structure, all bars are lowered simultaneously using a folding mechanism or elevator. And you don’t need to worry about how to change the ropes in such a ceiling dryer. Overall the product is stronger and easier to install. But you won’t be able to adjust the height separately, which is not always convenient.
To assemble a clothes dryer, first drill 4 holes in the ceiling into which plastic dowels are inserted. The distances are selected according to the dimensions of the structure - in accordance with the gaps between the attachment points on the traverses and along the length of the crossbars (indicated in the documentation, usually 150-175 cm). The folding parts are then screwed to the ceiling. As a rule, elements are divided into external (movable) and internal.
Attention! As in the previous case, for a fragile finish you will need a mortgage made of wooden beams or long self-tapping screws with tubes; they cannot be attached directly to the sheathing.
After this, the crossbars are assembled by screwing one part into the other. The finished rods are threaded into the upper grooves of the traverses. Having disconnected the lifting mechanism clamp, the dryer is straightened. The slats are moved to the lower edges of the holes.
The cord is passed through the roller on top of the side part, tensioned and secured. Then they pass it through the hole at the bottom and fix it again.
Conclusion
Ceiling dryers have replaced conventional clotheslines due to their convenience and ease of installation, since the work can be carried out by anyone. The video in this article will clearly show the process, and if you have any questions, ask in the comments.
Dear visitors!
We have selected the 3 best options, you can return up to 30-40%
from the cost of an item purchased via the Internet (clothes, bags, shoes, whatever)!
So, read our article "" and save your money, because money saved is money earned.