Porcelain tiles are one of the most durable materials. And if their size is chosen incorrectly, then cutting will be required during the work. This is not an easy task. In addition, the surface of the tile may be damaged due to the resulting chips. It is better to decide on the sizes in advance. Then it will be easier to work, and the cut tiles will not be noticeable.
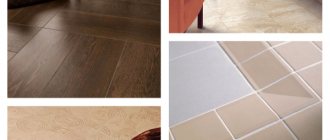
Forms of porcelain stoneware cladding
Two types of floor coverings are used - ceramic tiles and porcelain stoneware. In the manufacture of the latter, pressing and subsequent very strong heating are used, or, to be more precise, baking. This allows you to create elements that can withstand significant loads.
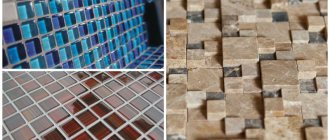
The standard for the production of porcelain stoneware slabs is provided not only for the process itself, but also for their shape and size. They can have a square shape, be produced in the form of a pentahedron, hexagon, or octahedron. In addition, modules may differ in parameters (side length).
Distinctive qualities of floor tiles
The main distinguishing feature of floor tiles from wall tiles is their thickness. This is because floor tiles experience heavy loads, and therefore the requirements for them are more stringent.
However, the thickness of the floor tiles only plays a role if the base on which they are laid is not strong enough. If the tiles are laid on a concrete base or on top of old tiles, then it is possible to lay thin porcelain tiles, with a thickness of 3 mm or more.
In places where ultra-high wear resistance is needed, a type of tile is laid - clinker, which is fired at 1200-1300 °C, while simple tiles are fired at 800-1000 °C.
Through stronger sintering of clay particles, clinker acquires special strength, and at the same time its water-repellent properties are enhanced. Thanks to this, it copes better with severe frosts, because water cannot penetrate into the pores, and, therefore, the clinker is not destroyed due to the expansion of water in them.
There is no difference between floor and wall tiles and they can be used with equal success on any surface.
Porcelain tile sizes
The standard is square tiles with a side of 400 millimeters. It is believed that such porcelain tiles are very convenient for installation. The square size with a side of 600 millimeters is also popular.
This type of cladding, like the one mentioned earlier, is used for flooring. In this case, large-sized elements are placed where a large area needs to be covered.
In retail trade, floor tiles are offered not only square, but also rectangular in shape. But the choice of square ones is always greater. Their side dimensions:
- 250 millimeters,
- 300,
- 330,
- 400,
- 450,
- 600.
There are also very small ones, also square, with a side of 150 millimeters.
Porcelain tiles, which are shaped like a rectangle or a polygon, also come in different sizes. The most common sizes of porcelain stoneware rectangles have sides:
- 100 by 1200 mm,
- 150 to 300,
- 200 to 300.
Pentagon-shaped ones are available in sizes:
- 86.5 by 150 mm,
- 98 by 170,
- 115 to 200.
Hexagons – 150 by 173 millimeters and 200 by 230.
Triangular modules are also produced. Their dimensions are 58 by 83 mm, 83 by 118 and 98 by 138.
Basic questions when choosing
The cost of porcelain tile depends on its thickness. Therefore, reinforced materials are chosen for warehouse and industrial premises when arranging the floor. Thin varieties are great for wall decoration. For example, porcelain tiles 20 mm thick should not be mounted on the wall, since the weight of such finishing is very large. Not every partition is able to withstand such a load.
For flooring exposed to high pressure and vibration, reduce the size of the tiles. Most often, 30 x 30 cm porcelain stoneware is used for such purposes. Wall elements can have the largest dimensions. At the same time, their thickness remains minimal.
Porcelain tiles are heavy. Therefore, when choosing a finishing material, be sure to take this feature into account. The thicker the tiles, the greater the load the base is subjected to.
Thickness of porcelain tiles for flooring
Porcelain stoneware also varies in thickness. Its minimum value is 3 millimeters, the maximum is 30. Material with a minimum thickness is rare. The most common parameter is 5 mm.
The best option for flooring is tiles with a thickness of 8 mm. It can withstand the loads that can occur in most rooms.
There is no direct connection between thickness and strength. If tiles 3 mm thick are installed correctly, their strength will be the same as that of 30 mm.
Methods for determining the optimal adhesive layer for a wall
To determine the height of the adhesive layer for installation and the total mass needed, you need to:
- Determine and evaluate the factors that affect the thickness of the adhesive: the evenness of the walls, the size and weight of the elements, the type of fixing component. Based on these data, calculate the average thickness for reliable adhesion.
- For packages with dry or ready-made composition, the manufacturer indicates consumption per 1 m², with a thickness of 1 mm.
- Multiply the first figure by the consumption indicated by the manufacturer. You will find out the amount of tile mass for 1 m of cladding.
- Determine the area of the room where you will install the decoration.
- Multiply the tile mortar indicator (for 1 m²) by the total area of cladding work - you will get the minimum amount of connecting component that you will need.
- To be on the safe side, add another 10% to this number to avoid unintended shortages of the mixture. This happens due to the fact that the reverse side of the finishing elements contains notches or corrugations. The tile adhesive penetrates into them and consumption increases.
Principles of tiling a kitchen, bathroom, corridor
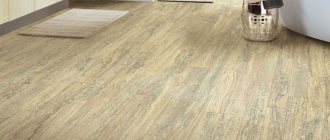
Typically, floors in kitchens are covered with porcelain tiles. With the right choice of parameters, you can visually increase or decrease the space.
Most often, square slabs with a side of 200 or 350 mm are used. With such dimensions it is easier to carry out work. In addition, they give the visual effect of increasing the area.
When tiling bathrooms, the rule is: if it is small, large tile elements are used. In spacious rooms it is preferable to use small modules.
The best effect is provided by square or rectangular tiles. Depending on the size of the bathroom, choose cladding sizes with sides ranging from 150 to 500 millimeters.
When laying tiles in the corridor, it is preferable to choose a rectangular shape. Visual effect – the corridor lengthens. It is optimal to cover the corridor floor with porcelain tiles, rather than ceramic, due to increased loads on the surface.
Minimum and maximum values
With the correct layer thickness, good adhesion of the adhesive mixture to the base occurs. Insufficient and excessive volume of the mixture leads to a number of problems when facing: the layer may not dry well, crack or delaminate. It happens that after some time the facing material completely moves away from the base.
The maximum thickness of the adhesive when finishing the floor is 1.5 cm. It is recommended to apply no more than 1 cm to the walls. A thicker application can lead to an unpredictable result and defects over the entire area of the cladding.
The maximum cannot be exceeded due to a decrease in the degree of adhesion of the solution. This is due to the increase in his weight. With a large layer thickness, severe shrinkage occurs. Because of this, the tile may burst.
The minimum adhesive layer for small tiles is about 1.5-2 mm, and for large-format tiles - 4-5 mm. It is not recommended to apply a smaller volume of solution, because there will be no adhesion of the tiles to the base.
The calculation of the required amount of composition should be made based on its layer. To do this, the consumption per 1 mm is multiplied by the thickness of the solution. And all the necessary information on applying the glue can be found on its packaging.
The step is porcelain stoneware thickness. How to choose porcelain stoneware steps
When choosing steps to create a staircase, it is very important to correctly determine the material according to several criteria: safety in use, strength, resistance to external irritants, durability, price. One of the best options is to use porcelain stoneware. Let's look at the main positive aspects of porcelain stoneware for creating steps, especially the choice of color, size, and type of material.
Why porcelain stoneware
Porcelain stoneware steps have become in demand due to the following advantages.
- Resistance to moisture. This material has no pores, due to which moisture does not penetrate into the structure and does not damage the integrity of the porcelain stoneware. This quality is especially important for outdoor use on stairs.
- Resistance to fire, mechanical stress, and direct sunlight makes the tile durable.
- Rust does not form, constant maintenance is not required, and the use of impregnations as a protective coating is not required.
But there are several disadvantages, these include the coldness of the material, which can interfere with the creation of comfort inside the house; the smooth, glossy surface will become slippery and unsafe. At the same time, the price of the product is quite high compared to wood.
How to choose
The first thing you need to decide on is the type of porcelain stoneware steps. They can be divided into two groups: suture and seamless. The suture option is a structure that includes a plinth, riser, riser, and ceramic corner. Using a prefabricated structure allows you to combine different shades, colors, textures, this allows you to create an unusual design for your staircase.
Solid steps are usually made to order at a hardware store, since choosing the right size is quite difficult. The main advantage: beauty, the absence of seams on the surface makes the staircase more attractive. The front part of the blocks can be round or straight.
Selecting the size
The traditional, standard size of porcelain stoneware tiles for steps is 1200*300 mm. But the thickness and height may vary. The thickness primarily depends on the purpose of the staircase.
- Up to 14 mm (small thickness) is suitable for arranging the stairs of a country house or country house.
- 15-16 mm (average thickness) is used in private homes with low traffic levels.
- From 18 mm, porcelain stoneware is used in public places.
Application rules
When working with cement, in order for the glue to obtain all its necessary characteristics, it is mixed with water. The liquid should be added gradually. After mixing, the solution should be left for a couple of minutes, then mixed again until a thick mass is formed.
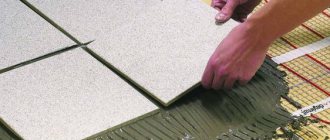
Reference! To distribute the adhesive mixture of the required thickness, use a spatula with teeth of the required size. The solution is applied directly to the floor, and if there are uneven areas, to the tiles.
To distribute the adhesive composition on the floor, you need to start work from the far corner, moving to the exit, so as not to step on the composition. Floor tiles are usually large in size, so a trowel with large teeth is used.
When laying tiles on the floor, you need to make a thick layer. This is due to the fact that afterwards you will need to drive out the voids by tapping with a mallet. The glue will be partially distributed and its volume will decrease. Excess solution can then be removed with a rubber spatula.
Laying porcelain stoneware requires preparation:
- Checking the quality of the base. Porcelain tiles can only be laid on load-bearing concrete foundations. Use a level to check horizontality. If there are significant differences, you will need to use more glue.
- Base primer. Can be done up to two times if the base quickly absorbs liquid. It is best to prime with a roller; the floor must first be cleaned.
Priming the surface before facing is of great importance. This increases the strength of the cement-sand base, preventing the coating from crumbling. This is also important for better adhesion. Adhesion after priming increases by approximately 20%.
The priming procedure also reduces the level of moisture absorption. Cement adhesive must remain wet for a certain time to gain strength. Before laying tiles, you need to wait until the floor is dry.
When laying porcelain tiles, you need to make sure that the glue does not protrude along its edges. This problem can be avoided if, before laying the next tile, remove a little mortar from the edge of the previous one with a spatula. The strip removed should not exceed a centimeter. If glue gets on porcelain tiles, you can remove it with a damp cloth. It is especially important to clean structured tiles before the adhesive hardens, which will simplify finishing work.
If you have little experience in laying tiles, you should lay no more than 2 layers at a time. Do not allow the glue to thicken. If this happens, you need to prepare a new portion. Do not dilute the finished thickened composition with liquid; the glue will lose its properties.
Considering all these factors, determining the thickness of the substance will not be as difficult as choosing the appropriate glue. To work with porcelain stoneware, it is better to use cement mixtures that are prepared immediately before the start of cladding.
Reference! You should pay attention to well-known companies that have already earned the trust of professional craftsmen. These are adhesive compositions from Ceresit, Knauf, Rusean, Yunis.
Manufacturers always indicate on the packaging information about the composition, consumption and nuances of use. You can also always call consultants to get answers to your questions. It is necessary to distinguish the original from the fake. Signs of the latter will be uneven, small letters on the packaging, and a careless appearance.
Correctly determining the thickness of the adhesive will allow you to calculate the required amount of glue, as well as securely fix the tiles for long-term use. You should always be prepared for the fact that some areas will require more glue and others less. You should buy adhesive with a small supply.
Calculation of adhesive thickness for porcelain tiles (2 videos)
Laying porcelain tiles on the floor (15 photos)
Equipment for laying tiles
Porcelain tiles for walls thickness. Thickness of tiles with adhesive
Let's go further. And so, let’s say the tile itself will be 10mm. thickness, and what thickness will it be with glue? Most glue manufacturers have already taken care of this and indicate the recommended thickness of the adhesive layer directly on the packaging (see table below). If such calculations are not given, you can easily do it yourself!
Thickness of tiles with adhesive
The maximum thickness of ceramic floor tiles, already with an applied adhesive layer, is 30mm. It is worth considering that if your floor is not very level, it is better to first level it or fill it with a new rough screed.
We have determined how much glue is needed, but how exactly to apply the required amount evenly over the entire base? Everything is simple here too!
Not always, even an experienced master optimally determines and applies the adhesive solution. If you don't succeed the first time, don't despair. Use a notched trowel; it will accurately select the thickness of the glue and distribute it as evenly as possible over the entire surface, and the excess will be squeezed out from different sides.
Important!
When excess glue is squeezed out from under the spatula, it will stain the adjacent already laid tiles. Try to immediately wipe them off the solution, then it will be much harder to do.
To make the example clearer, I will give you an example of a sign that is located on the packaging of one of the well-known branded tile adhesives.
Glue consumption per 1m? (table)
| Side size of square tiles (using rectangular tiles) calculation based on area | Recommendations for using a notched trowel (size of trowel teeth) | Layer of adhesive application after pressing the tile (trowel angle 45°) mm | Layer of adhesive application after pressing the tile (trowel angle 60°) mm |
| Up to 5-7 cm. | 3mm | 1,1 | 1,3 |
| Up to 10 cm. | 4mm | 1,4 | 1,7 |
| From 10 to 20 cm. | 6mm | 2,1 | 2,6 |
| From 20 to 30 cm. | 8mm | 2,8 | 3,5 |
| From 30 to 50 cm. | 10mm | 3,5 | 4,3 |
| Over 60 cm. | 12mm | 4,2 | 5,2 |