Many housewives cannot imagine their life without this convenient and functional device. This is a device that allows you to quickly heat up food and cook some products. Nowadays you can find many types of microwave ovens on the household appliances market, varying in functionality and size. Microwave ovens can range in size from small portable appliances to industrial giants.
The dimensions of the microwave affect not only how much food can be cooked, but also its functionality. A large number of additional parts, such as a grill or convector, also require space. To have an idea of selecting a microwave oven by size, you need to fully determine your requirements. It may be useful to buy an appliance with advanced functionality, which will cost more, but not to buy an oven separately.
Types of microwave ovens
Now it is difficult to imagine that the first equipment with a magnetic emitter was as tall as a person; the weight of the microwave was 300 kg. Its power was 2 times greater than that of the most modern modern models, and amounted to 3 kW. The first notes about this device appeared in the USSR in 1941. But this invention belongs to the American scientist Percy Spencer.
Installations with microwave emitters were used only on an industrial scale. They played a huge role in wartime, when the time of heating food was of great importance. Thanks to the microwave, it was significantly reduced, and thanks to the large size of the chamber, many portions could be heated.
Nowadays, the microwave oven has been significantly modernized. On the household appliances market you can find both compact models and industrial giants used in food production. They are varied in functionality and size, some are even suitable for preparing complex dishes, steaming and baking.
What types of microwave ovens are there?
| Microwave | Functional | Available cooking modes | Power |
| Solo | Only the microwave energy of the magnetron is used (usually it is located on the side) | Heating food Defrosting food Cooking simple recipes | 700–800 W |
| + Grill | Exposure to thermal energy generated by a heating element or quartz lamp | Baking Grill Defrosting Heating | 900–1500 W |
| + Convection | Uniform heat distribution thanks to fan operation | Can be used as a full oven | 900–1500 W |
| With uniform wave propagation | The location of the magnetron in the center of the bottom panel allows microwave waves to act evenly on food | Warm up Defrost | 700–1100 W |
Thanks to the compact size of the microwave, this device can fit perfectly into the kitchen interior without taking up much space. It is very easy to position, optimizing the space for cooking and placing new appliances.
Classification of microwave ovens by size:
- mini – up to 15 liters, suitable for an office or small family;
- standard - from 16 to 30 liters, a good option for quickly heating food;
- large - from 30 to 40 liters, for preparing complex dishes;
- 40 liters or more - models for the food industry.
Mini microwave
Standard
Large size microwave
The volume of a microwave oven is not the only characteristic that you need to pay attention to when choosing household appliances. Sometimes the choice of equipment when purchasing may be influenced not by its dimensions, but by its functionality. It is necessary to determine the type of control that is suitable for the user. It can be mechanical, push-button or touch remote control.
The lever system will be convenient, but such a microwave oven will not have a variety of functionality. The main advantages of these gadgets are ease of use and reliability. The buttons and touch screen allow you to expand the number of cooking modes, but this control unit breaks down a little more often. Of course, this factor is also influenced by the quality of the device; you should not expect long-term operation from a very cheap option.
The inner coating of the camera may also vary. The most common models have a stainless steel chamber. This is an inexpensive coating that can withstand high temperatures well. But caring for it is a little difficult. At high temperatures, fat can burn strongly to the walls on which it settles, which requires intensive cleaning. In addition, this coating is highly scratched due to mechanical damage.
Heat-resistant enamel is also a budget coating for a microwave oven, but it is less durable. Painting it under enamel is probably the worst option for a camera, because under the influence of high temperatures it can crumble within six months.
Bioceramic coating is the newest and most reliable option. It is easily cleaned of grease and is durable, but its price will be significantly higher than its budget counterparts. The only drawback is that the coating can crack upon impact, for example, if the device is accidentally dropped.
To diversify the choice on the home appliance market, manufacturers add many functions to the design. For example, a musical notification about the end of work, choosing your own cooking algorithm, automatic heating, delayed start. One of the most interesting developments is the steamer. The food is placed under a stainless lid, which prevents exposure to microwave rays. Only water is heated in the chamber.
Height of built-in microwave ovens
- The standard height of products is from 30 to 40 cm, but stoves with a height of less than 35 cm are rare. One of the lowest Neff C17WR00N0 is 38 cm.
- Tall models - from 40 cm or more. Stoves higher than 50 cm are also very rare. For example, Kaiser EH 6319 at 49 cm is one of the tallest in our store.
Why do you need to know the sizes?
Today there is no single standard for microwave oven sizes; everyone can find an option that suits their requirements directly. The dimensions of a microwave oven are one of the main factors that play a role when purchasing a device, so this issue must be approached responsibly.
Having determined the required dimensions, you can immediately allocate space for the device on the kitchen countertop, conveniently arranging all the available equipment. When planning a kitchen renovation, you can immediately highlight a niche for a built-in microwave. The performance of this device, its operating power and the availability of cooking modes will depend on the size of the chamber. This technique boasts wide functionality.
Convection and grill ovens will be much larger, not only because of the size of the chamber, but also because of the need to fit all the necessary parts into one unit. Even a minimum size microwave with additional functions will be larger than a standard solo one.
How to properly install a microwave oven in the kitchen
Modern manufacturers produce microwave ovens that fit perfectly into kitchen furniture. At the same time, they work just as well as household appliances placed separately.
However, their cost is much higher, and this is due to some design features of these models: their cases are reliably protected by thermal insulation, and the front part is well decorated. Such devices are purchased taking into account their size - they must match the niche or cabinet chosen for installation.
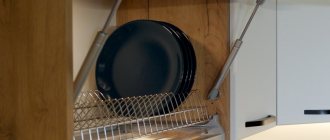
Place under the table top - to build a niche there, just pull out one of the bottom drawers. This way you can save space on your work surface. The kitchen does not look cluttered, while the microwave oven occupies its permanent place.
This option for placing an electrical appliance also has its drawbacks: it may not be very convenient to constantly bend down to get the finished dish. Such a place should not be considered if there are small children in the house who can easily reach the microwave.
A microwave built into the set is an ideal placement option in which the built-in device looks very aesthetically pleasing and attractive. The advantages of this placement: you can easily choose the most convenient height for the microwave oven. Cons: the microwave may be located a little far from the countertop, and this is not entirely convenient.
To place the electrical appliance as conveniently as possible, it is recommended to buy or order a kitchen set with a special niche provided for it, ideally sized.
Placement in a corner cabinet - this option is suitable for spacious kitchens with a convenient layout, in which deep corners are not used much. It is very convenient to use an appliance installed in this way, since it faces the kitchen, filling the entire corner of the cabinet.
However, this option cannot be called particularly ergonomic, since some places behind the stove may not be used. However, if the kitchen is really large, then this is not a problem.
Niche - as a rule, the housewife herself chooses the most suitable niche in the closet to install a microwave in. This option is suitable if the device is not used often enough. Its advantages are that the stove can be placed at the most convenient height if the cabinet is not very loaded.
There are also disadvantages - you will have to constantly open and close the cabinet door to use the device, and this is not entirely convenient.
Another difficulty may arise - you will have to drill the necessary holes for the wires in the back wall of the cabinet. You will also need to place an outlet nearby so that you can turn on the microwave.
A place above the stove - this location of the microwave can hardly be called attractive, but this option can be used if there are no others. The advantage of this location is that there is a significant saving of space in the kitchen.
However, if the device is placed too high, it will be inconvenient to constantly reach it. In addition, it will interfere with effective ventilation. To make this option look more attractive, it is recommended to buy both a stove and a microwave from the same manufacturer; they should be designed in the same style.
“Garage” for household appliances - this method is often used to hide and not keep in sight various kitchen appliances. The microwave should be placed in such a “garage” in such a way that it is quite easy to operate. Not only a shelf in a closet, but also a narrow work surface that is not used in any way can be turned into a “garage”.
However, it is best to choose a deep countertop for this so that there is enough free space in front of the microwave oven.
Place on the kitchen island - with this location, the microwave is practically invisible. There is a significant saving of space in the kitchen. Since the device itself is quite distant from the main working area, household members who are not engaged in cooking can freely use it without disturbing the housewife.
The downside is that the stove will be placed quite low, and this is not entirely convenient. In addition, electrical wiring will have to be connected to the island.
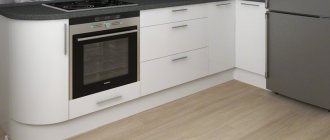
Place above the oven - this placement option looks best when the entire kitchen interior is designed in a minimalist or hi-tech style. Both devices should have a modern look and should be purchased from the same manufacturer.
This method of installing a microwave stove will also look good when arranging a classic interior, when the set is made of solid wood. The technique in this case looks very harmonious and balanced. The main thing is not to let the microwave be too high - it will be inconvenient.
What parameters characterize the device
When choosing kitchen appliances directly in a store or on its website, customers always pay attention to the characteristics of the product. When purchasing, you need to monitor all indicators. For example, the weight of a Samsung microwave may be greater than that of a cheaper one with the same parameters.
The main features of a microwave oven that you need to know when buying:
- dimensions of microwave ovens;
- power;
- set of modes;
- type of coating of the inner walls of the chamber;
- chamber volume;
- equipment;
- additional functions.
Sometimes the weight of the microwave, the dimensions of the microwave magnetron, and its location are very important. Now models have appeared on the market with an emitter in the center of the bottom, which allows food to cook much faster.
Manufacturers claim that such installations damage the structure of food much less, so it turns out tastier, and less time is spent on its preparation.
It is also necessary to resolve the issue of location - a freestanding microwave or a built-in one will be more beneficial for the kitchen. This factor has virtually no effect on the size of the device, but if there is a ready-made niche, it will be decisive when purchasing.
The process of installing a microwave oven
If the location for the device is chosen taking into account the above recommendations, you can safely proceed to the installation process itself.
Let's look at the most common installation instructions. It involves performing the following steps:
- Carefully inspect the equipment for damage and various defects.
- In the operating instructions, find the installation section and read it.
- If a mount is included, install it.
- Make a hole in the cabinet wall to provide easy access to the electrical outlet when using the device.
- Place the device in the cabinet, remove the cord, and insert the power plug into the outlet.
- Install the frame if it is included with the built-in oven. How to secure it can be found in the instruction manual. In the case of a regular microwave, there are no decorative frames. Remember its need for proper heat dissipation.
Read also: Stretch bars with lanyards for deflectors
As you can see, if you look at all the points, installing the equipment yourself is quite simple. But if you doubt your abilities, consult a specialist.
However, installation of a microwave oven should be carried out taking into account all recommendations and rules. Then the electrical appliance will work correctly and will serve you for many years.
What parameters are included in the size of microwave ovens?
As a rule, the size of the kitchen greatly influences the choice of household appliances. When there is not much space left for a large number of appliances, some tricks can save you from a mess in the kitchen. The dimensions of a built-in microwave or a free-standing one are an important detail, because you can even make a separate shelf or niche in the wall for the device. In this regard, the main indicators for the buyer will be: microwave width, length, height and volume.
What determine the dimensions of microwave ovens?
The volume of a microwave oven is influenced by many factors. A microwave up to 30 cm deep can be placed in a cabinet or on a shelf to hide it from view. You can also select sizes based on functionality. All additional parts that are built into the equipment to expand its functions require additional space. Therefore, a chamber using the solo and convection techniques can be the same, but the dimensions are different. Typically, standard kitchen sizes allow you to install a microwave oven with the following parameters:
- length – 30 cm;
- height – 30 cm;
- width – 45 cm;
- depth – 25–40 cm;
- dish diameter – 20–25 cm.
Such models are available in both solo and extended configurations, so everyone can choose an offer that is perfect for the kitchen.
The size of the stove does not always affect its price; you can always find the best option that will suit all the buyer’s requirements.
Dimensions and volume of the internal working chamber
The overall dimensions of built-in microwave ovens include the width, depth and height of the device. These indicators are extremely important if the oven is located in a kitchen column along with other household appliances. In this case, the width of the microwave should completely coincide with the width of other appliances.
The dimensional grid for built-in microwaves is quite large. So the width of the device can vary in aisles from 45 cm to 60 cm, depth from 30 cm to 60 cm, and height from 30 cm to 45 cm. The standard model has dimensions 60 x 50 x 45 cm, the mini version – 46 x 32 x 30 cm.
The volume of the internal chamber directly depends on the dimensions of the microwave. It can have a capacity from 17 to 45 liters. For an average family of 3-4 people, a 20-25 liter stove will be sufficient. Models with a capacity of more than 30 liters are relevant only if there is a need to frequently cook large quantities of food or reheat several dishes at the same time.
40 liter model
Microwave oven dimensions
To properly organize the space in the kitchen, placing all the appliances in the right places, you definitely need to know their dimensions. The dimensions of a microwave oven vary greatly depending on the functionality and purpose of the device. When selecting dimensions according to the volume of the camera, you need to remember that the length and width of the equipment can be different, regardless of the selected volume.
For a full-sized kitchen, you can also buy a large built-in microwave oven, because it can even replace the oven, thanks to its huge functionality. If there is a lack of space, small equipment will become an excellent assistant; it can be hidden in any closet if there is no need to use it. A large microwave oven will only become a burden here.
Standard
Despite the fact that there are now a lot of offers for every taste, there are certain standard sizes of microwave ovens that can fit in any kitchen. This is a practical and functional technique that will allow you not only to quickly heat up lunches, but also to prepare simple dishes.
A microwave oven with a volume of 20 liters and a power of up to 1 kW with defrosting, heating and autonomous cook modes is an excellent option for a small family. The width of such equipment rarely exceeds 35 cm, and the depth and height of the microwave varies between 30–40 cm. It is these devices that can most often be found on the market, and their price is optimal for every user who wants to acquire this device.
Limit dimensions
The standard size of the smallest microwave in centimeters is 30x20x45, respectively, these are depth, height and width. This does not apply to portable models with a volume of less than 10 liters, where the characteristics are slightly different, and in the foreground is not their capacity, but mobility.
If you want to choose the largest device for a household consumer, you need to pay attention to equipment with dimensions in cm - 52x45x60.
The external dimensions of the device will depend not only on the volume of the chamber, but also on the filling and the number of operating modes.
Built-in ovens
With a built-in microwave, things are a little more complicated. If the solo can be placed on any surface, and after cooking it can be put away in a convenient place, then in this case you need to clearly determine the size. This will help to arrange all the kitchen utensils correctly so that all the items are placed conveniently for the user. The approximate size range of the device is 38x35x48.9 cm. Built-in appliances require a certain approach, because they should not only fit into a niche, but also fit well into the interior, so when choosing, its appearance will play a huge role.
Solo ovens
Unlike a built-in microwave oven, a solo can be placed in any convenient place. Here, when choosing, the size of the niche will not play a role; you can take both a large and medium size model. The main advantage of this technology is its availability; their cost is much lower than analogues with advanced functionality. But basically they are only suitable for defrosting, heating food and preparing semi-finished products.
Models of built-in microwave ovens
Depending on the functionality and the presence of additional modes, all microwaves can be divided into several types. Namely:
- solo microwave with a minimum set of functions,
- grill ovens,
- models equipped with both grill and convection,
- multifunctional models.
The first type of microwave oven is equipped with the simplest set of programs. These include functions for heating and quickly defrosting food. In addition, you can cook simple dishes in such stoves. These models are especially relevant in families with children. With their help, even a child can warm up his own lunch in a matter of minutes by pressing just one button.
Simple microwave
There are also models with extended equipment that include a grill. It is a metal heating element located in the upper part of the inner chamber. In this case, the dishes are heated from bottom to top. Also, there are microwave ovens equipped with a so-called movable grill, which, depending on needs, can be placed either vertically or at an angle. This function is very important when preparing some dishes. Some models of microwave ovens can be equipped with an additional lower grill.
Microwaves with a grill may also differ depending on the type of heating element inserted into them. It can be metal, quartz or ceramic.
Microwave oven with grill
In addition to grilling, ovens with extended configurations can have a convection mode. This function implies uniform distribution of warm air in the inside of the microwave. Thus, dishes cook much faster, do not burn or dry out. This distribution is achieved through the operation of a special fan.
Such ovens are suitable for preparing absolutely any dishes and can easily replace a gas stove or oven.
Built-in oven with grill and convection
The most expensive models include multifunctional ovens. The list of their modes, along with grill and convection, also includes a steam cooking function. This model is definitely worth choosing for those who cook very often and are a supporter of proper nutrition.
Microwave with steam function
Built-in microwave ovens may differ in their control method. It can be mechanical or electronic.
The first implies the presence of two regulators, which are responsible for the power and cooking time. Such models are equipped with a minimum set of functions. They are not intended for cooking complex dishes, since it is almost impossible to accurately determine the cooking time.
Electronically controlled ovens have a more expanded range of modes. Thanks to precise timing (down to the second), such microwave ovens are perfect for preparing baby food and various baked goods.
Built-in microwave ovens are also distinguished by the type of interior decoration of the chamber. It can be made of enamel, stainless steel and bioceramics.
How useful is sizing information?
Knowing the size, it will be much more convenient to choose a microwave in the store. This information will help narrow your search to a minimum. This will also help you choose functionality. If we are talking about mini-appliances, then you should not rely on convection and grilling in them. The parts simply won't fit into the device.
What affects the size of a microwave: dimensions and functionality
The first thing the size of the microwave affects is, of course, power. There is no need to install a high-voltage magnetic emitter in a small device. This will result in overheating of the device and distortion of the cooking mode. Large models allow the installation of a high-power magnetron and additional grill and convection installations.
Dimensions also play a subjective role, which depends on the preferences of the buyer himself. Industrial food production plants choose huge microwaves that hold several hundred liters to speed up the work process. Some prefer more compact models, others pay attention only to the design. You can always find the best option for yourself, which will suit all your requirements and become a good helper in the kitchen. The manufacturer should be chosen last; the lg microwave oven may not have sufficient functionality, which was previously approved by the buyer.
How to disassemble a door
Reading the comments on the article, Microwave oven door, it becomes clear that many site visitors have difficulty disassembling the door. This is not surprising, because in the article, as an example, only one design option for this part of the microwave is presented, when in fact there are a great many of them. To fill this gap, I decided to write several articles in which special attention is paid specifically to disassembling the door and removing from its structure the parts that most often fail, such as safety glass or deadbolt.
Despite the wide variety of designs, all microwave oven doors have the same layered structure, and can differ from each other only in the number of layers, as well as in the way they are attached to each other. The load-bearing element of any door is the metal base - this is the main layer. All other layers are attached to the base, and it is on the base that the hinge joints are located, through which the door is attached to the furnace body.
Figures 1 and 2 show the door of the microwave oven that we will disassemble. In Figure 1 you can see the outer layer of the door in the form of a decorative finish made of white plastic, as well as the outer protective glass. Figure 2 shows the door from the other side - the inside. Here you can see the metal base of the door with a protective mesh in the form of many holes, and a frame of plastic seal that frames the entire perimeter of the door. In order to gain access to the fasteners between the layers, you first need to separate the seal frame from the door base. These layers are secured to each other using latches.
Figure 3 shows the seal frame already removed. Pay attention to the nature of the latches; all latches face inside the frame. So, to remove the seal, you will have to deform the plastic so that the latches bend outward. As a tool for this operation, oddly enough, an ordinary kitchen knife with a narrow and durable blade was best suited. The whole difficulty lies in the fact that at first we do not see in what places the latches are located and how many there are in general. Therefore, you should start prying off the seal frame from the side of the crossbar. In this place, it is most often attached not to the base of the door, but to the decorative layer and is separated more easily.
And so, we insert the knife blade into the gap between the seal frame and the outer layer on the side of the crossbar, tilt the knife in the direction away from the door, prying the frame. This must be done very carefully, without much effort. If the frame does not budge, try moving the blade to one side or the other along the gap and try again. But, as a rule, the seal comes off quite easily in this place. Then we move on to the corners. It doesn't matter which angle you start from. We move the knife to the long side of the door, at the same time, using our fingers, lift the frame from the side of the crossbar and pry it with the knife along the long side. The corner of the frame should come free. We continue like this around the entire perimeter. With one hand we lift the frame, with the other, using a knife, we pry it off. Sometimes you have to use a knife on the inside of the seal frame. I repeat, this all needs to be done very carefully. The doors of old ovens, in which the plastic has lost its elasticity, deserve special attention. In such cases, if we lose caution, we risk not only breaking the latches, but also the frame itself. That's it, we'll assume that we've removed the seal.
Next, you should separate the decorative trim from the base of the door. After removing the seal, we have good access to the fastenings between these layers and can now visually examine the presence of mounting screws, determine the number of latches and their location. First, let's check for the presence of screws. In our case there are no screws, only latches. Detaching the layers, again, should start from the corner. To do this we need two screwdrivers with a wide, flat blade. We insert screwdrivers between the base and the decorative layer on both sides, not far from the latches, as shown in Figure 5., and use them to bend the plastic outward.
Read also: What types of gears are there?
Here you don’t have to be shy with effort, within reasonable limits, of course. After releasing the two corner latches (the latches in the figure are indicated by red arrows), one of the screwdrivers should be left in place, otherwise the latches will return to their original position. We move the second screwdriver further along the side on which the first one remained and repeat the action until the next latch is released, and so on around the entire perimeter. Well, the metal base is separated from the decorative trim. At this moment, we have full access to the crossbar, which is fixed to the base, and access to the glass, fixed to the decorative layer (Figure 6). In other words, if you disassembled the door in order to wash the glass from the inside or replace the deadbolt, you can do this now and then proceed with assembly. And we will move on.
The glass is secured to the plastic trim using latches. The recipe for separating one from the other is the same as before - we start from any corner. It’s just not advisable to use any tool here. Glass is a very fragile material and when prying, say with a screwdriver, it can simply crack. We will separate with our bare hands. To do this, we take the plastic in our hands, with our thumbs we bend the sides of the trough outward on both sides and at the same time, with our index and middle fingers, we press on the glass from below. In Figure 7, green arrows indicate the expected places of application of force to bend the plastic, and red arrows indicate the locations of the latches. As before, after releasing the two corner latches, we move to one of the sides and repeat the action along the entire perimeter. And now, plastic and glass are in our hands separately (Figure 8). After that, if, say, there was a crack in the glass, and you disassembled the door in order to replace it, you can take the dimensions, cut out a new one and put it in place. By the way, the installation method is the same - bending the plastic with your hands, only you need to press on the glass from the other side.
The last thing left before completely disassembling the door is to remove the protective film from the inside of the metal base. In order to do this, it is not at all necessary to disassemble the door; it is enough to remove it and place it horizontally for convenience. This layer is designed to protect the door window mesh from the adhesion of food fragments during cooking and is a thin, transparent, heat-resistant film with a sticky layer on one side. As you probably already guessed, we will begin separating the film from the base from a corner, from any corner. Everything here is very simple, you need to take a blade or thin knife and pry the film from one corner so that you can grasp the raised corner of the film with your fingertips. Then slowly and smoothly pull the film by the corner towards the center of the door window. The film is removed very easily, the main thing is not to make sudden movements.
That's all, the door has been dismantled, as they say, “to the ground” (Figure 9). Agree, there is nothing complicated about this. “To break is not to build.”
Installation Rules
There are no big problems with installing this device in the kitchen, which makes choosing a microwave very much easier. It requires a power source, there is no need to install a separate power line (unless these are models with large dimensions), or make a gas supply. The location of the device itself raises more questions.
Not every device can be built into a niche. It depends on the ventilation device. If you place it on the wrong side of the wall, the air will not flow correctly and the unit will overheat and fail. For the same reason, you cannot cover the device.
It is strictly forbidden to place flowers on it, because the microwave creates a magnetic field that can harm them. The proximity to the equipment must be correct. You should not place a laptop on top - there is a risk of overheating of both objects.
The most advantageous placement, selected according to size, would be a hanging shelf or a separate place on the countertop. You can put it on the windowsill, but will it be convenient to open the window? During ventilation mode, when it rains, water may flow inside and cause a short circuit.
When selecting a microwave, you need to know exactly the height, width and depth of the device so that you can correctly position it on the work surface.
What and how to put
In modern realities, the size of the kitchen does not always meet the technical rules of household appliances. But in order for the HORIZON microwave oven to serve as long as possible, it is important to install it correctly.
The main safety parameter is stable and reliable support. The device must be installed exclusively on a flat surface, without wobbly or unreliable stands. The oven should stand on adjustable legs; direct contact of its bottom with the surface should be avoided.
The most suitable height for placing the device is from 0.5 to 1.5 meters. If you raise the microwave higher, you can get burned when taking out dishes with heated food; if you raise the microwave lower, you can spill it while standing up. But in any case, the height should be comfortable for all family members.
Ideally, the countertop from the microwave is no more than an arm's length away. It is considered most convenient to place the stove next to the refrigerator, but the devices should not touch. The door should open and close easily.
It is not allowed to install a microwave oven close to a wall, heating appliances, household appliances or kitchen cabinets. It is necessary to maintain a gap of at least 10 cm on the sides and 15 cm at the back. Unimpeded circulation of warm air ensures efficient operation of the device.
Often there is a TV in the kitchen. The operation of the microwave does not affect the functioning of the TV in any way, but you should still not place the devices nearby. If the oven is used for a long time, the heating of the panel may melt the plastic stand of the TV, and the release of hot air will affect the screen. In this case, it is better to use a bracket or hanging shelf.