By patina we mean signs of aging on various interior items and materials. An artificial type of aging - patination - is often used by designers because it will give products a noble vintage-type appearance, a high degree of decorativeness and antiqueness.
There are ways to make patina with your own hands without spending a lot of money - for this you need to buy good material and learn about application technology.
From the very beginning, “patina” characterized only a darkened coating on copper products - after time, a film of oxides gave the metal an aged appearance.
What is patination
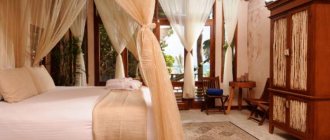
Not only furniture is patinated, but wooden doors, windows, picture frames and even floors. Kitchen facades, dining areas and bedroom sets are also restored in this way. The most common option is white furniture, decorated with patina, in the classic, Provence or Mediterranean style.
Patina can be white, colored, dark and metallic, imitating gold, silver, bronze or copper. Milk paint with gilding is often used on white furniture - this option is the most popular for furniture in a classic style.
In the photo, another popular option is a noble champagne patina on a white background. This solution will also look great in a classic-style room.
Patination as a process is the application of different compounds to the surface of furniture or ordinary wood. The greatest difficulty is presented by corners, recesses and edges - it is difficult to apply the composition to them in an even layer. This is how furniture made from solid hard and even soft wood is processed: oak, birch, pine, beech and others.
If in the natural environment patina appears only on furniture made of natural wood, then modern technologies make it possible to age even MDF or chipboard panels.
It is worth understanding that artificial patination is rather a conventional coloring with the aim of giving furniture an antique look. At home, no chemical compounds are used that could change the structure of the wood, so if the result is unsuccessful, the paint can be removed without problems - this, of course, is a plus for beginners. Removing the patina is done with a grinder or sandpaper, as in the following video.
Removing the patina
Features of patination technology
The definition of “patina” originally characterized the appearance on products made of copper and its alloys of a thin film of oxides, which gave the item an “aged” appearance. Modern patination technology makes it possible to age wooden surfaces, furniture elements and products in general, which significantly increases their decorative value.
Industrial patination technology is quite complex, but there are simplified aging methods that, with available reagents and certain skills of an amateur chemist and restorer, will give objects an antique look.
In order not to spoil the furniture product, before patination it is necessary to test the chosen method on a piece of wood.
The simplest and safest way to age furniture is to rub dark wax into its surface. This gives it a natural appearance, associated not with careless care, but with time, contamination.
To increase the decorativeness and naturalness of aging, many restorers use ordinary paints that match the color, “diluting” them with bronze or aluminum powder (powder). All these materials can be found in construction and finishing accessories stores. In addition, special patination kits have recently appeared on sale, which include not only coloring and decorating compositions, but also the tools necessary to perform the operation.
On a note!
In addition to metal powder, you will need sandpaper of varying abrasiveness, cotton or foam swabs, and for aging large wooden surfaces - a paint roller.
It should be borne in mind that home patination is essentially a conventional coloring, in which, instead of standard paints, special compounds are used that do not change the structure of the wood, actually aging it, but only give the product an antique look. This coating, in case of an unsuccessful experiment or if you don’t like the appearance, can be easily removed from the surface of the object without causing significant harm.
Most often, experiments on artificial aging are carried out in relation to furniture. To do this, you can use chairs, tables, chests of drawers, cabinets that have lost their visual appeal, and their design does not meet the requirements of the time.
From quite strong, functionally suitable furniture products, you can create the interior of a living space or kitchen in one of the retro styles. In addition to the applied tasks of increasing decorativeness, the restoration technology under consideration also pursues practical goals. The applied new paint layer will not only change the appearance of furniture items, but will also additionally protect the surface from adverse external influences.
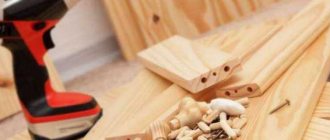
Necessary materials
Since the patination process is quite simple, it can be safely done at home. You just need some materials and tools.
There will be several compositions - each requires its own brush. For preliminary surface preparation, sandpaper or a grinding machine is used, depending on the size of the object. A dry rag will be needed to rub the decorative layer in order to age it.
Before patinaing, furniture must be covered with a base decorative layer. This can be stain or acrylic paint. When using acrylic compounds at home, it is better to choose water-based ones: they are easier to work with, and they are just as durable. To improve the quality of work, it is worth purchasing a primer - it will ensure better adhesion of all applied layers to the surface.
Next, the patina itself is applied. The top is varnished for additional protection. It is better to pay attention to matte varnish - it will create the effect of antique furniture.
General information
Features of patination
Later, the word was used to reflect the vintage type of other materials - bronze, iron, wood and plaster. In recent years, they have been trying to decorate houses, cottages and even urban apartments in an antique style. Artificially aged wood furniture with antique fittings will look especially stylish.
Modern technologies will help to age (that is, patina) various materials. Industrial methods are difficult for home use, which make it possible to increase the age of the material in the simplest way. They will help to imitate the natural color changes of products by applying a special coating. When patination, conventional paints can be replaced with special compositions without affecting the structure of the internal type of wood or other material.
The easiest way to age is to rub wax into the corners, edges of the product and relief protrusions. The result will be the effect of an “age-related” change in the surface, ideal for decorating a room in a retro style. Such a coating also provides a utilitarian function - it will protect the base from external influences, and will also provide water-repellent properties. If the result is poor, the patina can always be removed without much harm to the product.
Materials and tools
Before starting work, you should prepare all the necessary consumables - with an aging effect (with elements of silver, bronze and gold), regular paint and varnish material if you plan to repaint the products. Instead of paint and varnish material, you can use stain, wax, mastic or shellac, depending on the selected patination option.
Other components of the process that may be required:
- Brushes of different sizes.
- Roller (for large surfaces).
- Primer.
- Sandpaper.
- Furniture varnish for metal.
- An old rag to remove excess paint.
- Foam rubber and cotton swabs.
Not all craftsmen additionally buy metal powder if the effect of the paint and varnish material seems insufficient - it is usually used to artificially age metal fittings. There are even ready-made kits for sale for antique restoration and patination. Most of the compositions that are in the set are suitable for different materials - wood, plaster and metal.
Types of compositions
Previously, artificial aging was a complex process: furniture was placed in rooms with very high humidity, rubbed, scratched and mechanically affected in other ways. Now the process has been made much easier; there are even compositions of different consistencies and types:
- thick - paste for base and top coat. Used to achieve a gilded or light rust effect;
- liquid - varnish for finishing coating. Gives a yellowish tint;
- dyes - necessary to change the shade of furniture. For solid wood, stain is used; for MDF, chipboard, relief or carved furniture, acrylic paint is used.
Next, let's take a closer look at some types of patina compositions.
stain
The simplest and most popular way of processing wood to create an aging effect. The stain penetrates deep into the wood, providing protection from ultraviolet radiation, moisture and pests. The color of the composition may differ and ultimately imitate a different patina of antiques - from gray to green. According to its formula, stain is divided into the following types:
- water-based - used when you want to emphasize the structure of the wood, as it lifts the wood fibers, making it more noticeable. Gives the surface a shade of valuable wood, does not require a solvent;
- alcohol - useful for its antiseptic properties, which extend the life of the tree, preventing fungus from developing in it. This stain is based on a dye in ethanol, so to achieve a decorative effect you need to work quickly - the mixture dries quickly. Most often used in the form of a spray or cans, and on small surfaces;
- oil - has an easy application and an even coating, does not lift the wood fibers, and therefore only emphasizes its pattern. Beginners often have a question about how to dilute oil stain - regular white spirit will help.
Wood stain is a self-sufficient decor. It is rarely combined with the application of gold, silver patina or craquelure. Also, this composition is not suitable for processing MDF or chipboard.
An example of work can be seen in the video.
How to make a dressing room mirror? We cover it with stain and silver to create a patina. Old wood effect
Wax
Wax is a convenient material. It is most often used as a finishing coat in the form of a water-based paste wax or a vintage finishing wax. Paints based on it dry for a long time and are easy to rub, so they are used when working with embossed and textured surfaces. They can be used even on unpainted, unprimed wood - this will highlight its structure and provide protection from moisture.
A paste is formed by mixing natural wax and metallic pigment. This mixture gives good adhesion even to the plastic of the MDF panel, so it can be used on wood without a primer. With the help of paste, furniture acquires the effect of gilding, bronze or silver coating.
There are also colorless wax compositions. They are necessary to give the surface a pearlescent tint and repair furniture. It is easy to work with this composition: you need to apply it to the surface and rub in well, then polish the area and remove the excess. After a day, the coating will dry and the furniture can be used for its intended purpose.
Acrylic
Acrylic is suitable for patination of almost any surface: from solid wood to plastic on MDF.
The advantage of acrylic paints is their versatility: they can come in different colors or with different effects, such as rust, fading or darkening. Acrylic works both on the entire surface and only on protruding relief elements of furniture decor. For this purpose, a card with gilding or a darkening effect is often used.
In addition to the usual application of paint, there is another method of patination with acrylic. After applying and drying the composition, the surface is rubbed with sandpaper, creating abrasions that supposedly arise from time. Afterwards the furniture is varnished.
Popular options for acrylic paint patina:
- white;
- golden;
- silver;
- blue;
- black.
Usually, when choosing a patina color for painting, they are guided by the surrounding environment and fittings, for example, the handles of kitchen facades.
Bitumen
The basis of bitumen is concrete polymer. The solvent in its formula can be turpentine, white spirit or water. The resulting mixture has a special consistency, which greatly simplifies application.
Bitumen is necessary to give effects when patination, painting or aging. The technology requires careful application to the wood with a brush or cotton swab. Afterwards - accelerated drying with a hairdryer or long-term drying (about 6 hours) at room temperature.
Often bitumen patina is used for decoupage.
There is also a wax-based bitumen patina. It is necessary to remove excess shine when gilding furniture. Apply it with a cotton swab, the resulting layer dries within 20 hours.
Types of patina
The following types of patina are distinguished:
- Shellac varnish. When working with varnish, a sponge or brush is used. Depending on the number of layers applied, the color varies from golden to transparent red.
- Acrylic patina for wood. It's acrylic paint. The least complicated in practice and ideally suited for apartment conditions. Acrylic patina is applied with a brush. The advantage is the large number of colors that can be used to tint the product. If necessary, repainting is done to achieve the desired shade.
- Bituminous patina. A bitumen-based varnish is applied to the furniture, the excess of which can be easily removed with white alcohol. The varnish is absorbed into the pores, creating an antique effect. This patina is dark in color. Shellac varnish will help preserve the result.
- Waxy patina. It finds its application, in addition to patination of wood, in order to emphasize the structure of the wood and tint it. It hardens for a long time, which ensures comfortable DIY work. Wax patina should be applied when the structure of the material needs to be revealed. Most often used for small parts made of oak and ash.
- Oil patina is similar to wax patina, but more versatile.
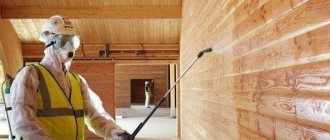
Applying patina yourself
It is advisable to carry out patination work in the fresh air, using protective equipment. First, the necessary furniture or ordinary wood is prepared, and only then the coloring compounds are applied.
Preparation
If you have to work with solid wood furniture, first clean it with sandpaper or a wire brush to remove old varnish and paint. After this, if there is severe damage, they should be repaired with wood putty, dried and sanded again. Then the primer is applied to the wood and left to dry for about 10 hours - the exact time is indicated on the primer package.
The process of preparing laminated furniture for patination is slightly different. First, the surface is also brushed with sandpaper. Then an adhesive insulator is applied, and after it dries, a colorless polyurethane primer is applied.
Patination with stain
Patination with stain is one of the easiest ways to “age” furniture. To do this, a wire brush is passed over the surface of the furniture to remove soft fibers and highlight the texture of the wood.
Afterwards the painting process itself occurs - it can be carried out in different ways:
- sponge;
- brush;
- roller;
- spray.
There are several secrets for working with stain for more uniform coloring:
- simple - you need to wet the furniture with warm water, wipe with a dry cloth to remove excess. Then you can apply the composition;
- difficult - saturate the wood with a special conditioner. It is applied every 20 minutes until it stops being absorbed. After this point, you need to wait half an hour and only then apply paint.
The stain must be applied in two layers. Next, you can apply a metallic patina to the raised relief surfaces. The resulting result is secured with wax or shellac.
Classic way
This method is suitable not only for solid wood, but also for MDF or LSDP furniture.
Article on the topic: Patination of MDF facades in 7 steps >>>
In short, the sequence of actions is as follows:
- Apply the first layer of acrylic paint. There are no specific requirements for how to apply it correctly - you can make neat or, conversely, rough strokes. Leave for a day until dry.
- Rub off a thin layer of paint with sandpaper to create an antique effect. Polish with a rag.
- Apply a second layer of acrylic paint. It may be the same as the first one, different or have a metallic sheen. This layer should be thin, so it should be blended well. If desired, you can sand it with sandpaper. Leave for a day until dry.
- Cover with matte acrylic varnish and leave for half a day until dry.
Such simple steps will give your furniture a sophisticated and elegant look.
Craquelure
Craquelure is an unusual patination technique that results in furniture covered with a web of small cracks. There are several ways to create this effect.
Faceted varnish is the simplest of them. This is a special water-based mixture that cracks when dried. The more layers of this composition you apply, the more cracks you will get. Faceted varnish can be either transparent or colored: it can be applied to painted or untreated furniture - working with this type of patina is very convenient, which is reflected in its cost.
There is another way to achieve cracks on the surface of furniture - alternately layering paint and varnish. First, the furniture is painted with acrylic paint and allowed to dry, then craquelure varnish and matte water-based paint are applied. Then follows the finishing coat, which must be very thin so as not to hide the structure of the cracks that have appeared.
There is also a so-called two-phase craquelure patination technology. For this you need to apply shellac varnish in 2-3 layers, drying each one well. Then the surface is covered with craquelure varnish, after it dries, the resulting cracks are rubbed with bitumen wax and the entire furniture is covered with shellac. This technology makes cracks more noticeable, but less noticeable in structure.
Patination of wooden products
The master class offers quite a lot of techniques that are completely do-it-yourself and do not require deep knowledge of technology. With their help, not just patinated facades are obtained, but precisely the aging effect that is required for each specific interior.
Classic patina
On solid wood, and only wood, patina looks like a dark coating obtained due to the gradual chipping of soft wood fibers and filling the resulting pores with wax or oil. The purpose of artificial imitation is to reproduce this microrelief and shade of plaque in accordance with the wood - oak, cherry, walnut. Moreover, at home, it is quite possible to “transform” a tree in this way not just into an old one, but also into an expensive one.
The technology of the method is as follows (almost every master class is based on it):
- The wood is brushed with a wire brush to remove soft fibers. You cannot do the same with a facade made of MDF or chipboard: in this case, apply a basic priming composition to the surface with your own hands, and after drying, treat it with a brush or, better yet, sandpaper. This MDF surface will imitate aged wood.
- It is recommended to apply a second primer, usually polyurethane, to the MDF board to secure the texture. Solid wood doesn't need this. After drying, the layer on the MDF surface is also treated with sandpaper.
- The application of patina is carried out in the following way: to highlight the relief or carving, the composition is applied with a brush, and if it is necessary to treat a flat surface, with a sponge. Remove excess with an appropriate mixture until the patina is completely dry: here it is important to achieve uneven filling of the pores, as the master class indicates.
- If required, the patina or paint is applied again. Most often this is done when creating a golden or silver-colored patina on MDF board or wood. Composition - oil, bitumen, wax, selected at your discretion.
- After drying, you need to apply a layer of colorless varnish to the facade with your own hands.
This patina can be easily combined with decoupage, tinting and even painting.
The following video covers how to properly apply patina to oak facades in more detail.
Gold and silver patina
It must be applied in the same way as usual. Wood, MDF, and chipboard are used as a base. But there are several nuances here that the master class teaches you to take into account.
- The paint itself, the color of silver, gold or bronze, looks unnatural on wood, so the wood here requires preparation. If the wood is dark, then you need to deepen the shade by covering the material with a dark patina. If it is very light or was painted with white paint, you need to carefully select the shade of silver or gold.
- If there is an abundance of carvings, it is preferable to use a wax or bitumen patina, since it does not have a bright shine. Silver-colored acrylic also looks good against a dark background.
- Each specialist in the master class recommends patination only matte facades: glossy facades glare, and instead of the impression of a patina of antiquity, you get the effect of a Christmas tree.
- It is correct if the patination with gold or silver is combined with the appropriate fittings.
With decoupage, silver and gold plating is not used.
Craquelure
This method is somewhat more complicated than usual, so you have to do it yourself. MDF boards, chipboards, and wood are also suitable for it. Craquelure is often classified as decoupage, since the latter combines decoration with images and aging.
- The surface - wood, MD, chipboard - is treated only with a primer; you cannot use a brush or sandpaper.
- The first layer is to apply craquelure varnish or decoupage varnish. It represents the background and is selected by color. If necessary, apply a 2nd layer to make the shade brighter.
- After the varnish has hardened but is still sticky, apply a layer of decoupage varnish. The latter cracks when dried, forming numerous cracks characteristic of the old coating.
- The finished surface is rubbed down. For this they use oil paint, gold powder, dry silver-colored pastel, and so on.
- To fix the resulting texture, the product is coated with varnish - preferably shellac.
If the original color of the facade made of wood or MDF does not need to be changed, but only to create a decoupage effect, then transparent varnishes are used at all stages.
The video offers a master class on patination and craquelure of oak and other surfaces.
Aging of metal
If you decide to visually age the furniture, you need to pay attention to the fittings. It doesn't matter if the wood looks antique and the handle is shiny brass or nickel. The easiest way is to purchase metal fittings of the appropriate type. However, you can do this work yourself.
- For patination on metal, chemical patina, acrylic, wax and even bitumen are used - depending on the size of the handles, overlays, inserts and, of course, on the capabilities of the home craftsman. A master class on using chemical patina is much more difficult, since it uses substances that are aggressive and have a strong odor.
But chemical patina also has advantages: you can dip the entire brass or copper part into the solution and get an excellent result.
The color depends on the composition of the solution. Thus, brass fittings can be given an olive or black tint using a mixture of copper chloride and ammonia. Potassium sulfite of the same brass will give a red-orange tint, and a solution of “liver of sulfur” will make the metal gray.
- If this DIY method is not possible, you can use a wax patina. The composition can also be applied to the entire handle or insert and shaded. The relief on brass or iron - any metal - will look brighter, and the recesses will be filled with a dark color.
- It's even easier to use acrylic paint or water-based patina. It is easy to prepare and is applied only to protrusions and relief elements, as recommended in the master class. In this way you can get handles made of “brass”, “silver” or “bronze” - almost any metal, with an antique effect.
Patination of wooden furniture or imitation of it on wood materials is an excellent design technique. Such a kitchen can safely be called unique, since the patination process provides truly unique results.
Sets
If you don’t want to understand different methods yourself and look for the necessary materials, you can purchase a ready-made set. They are sold in hardware stores and are intended for do-it-yourself antique restoration.
They are sold under the names “Patina” or “Patinating Set”. Thanks to them, you can achieve different effects:
- antique gilding;
- abrasions;
- cracks;
- natural green patina on wood or copper.
Most often, the sets are universal and suitable for any surface: wood, metal and even plaster. More detailed information can be found on the packaging.
Different patination methods allow you to give furniture a variety of decorative effects: from aristocratic classics to cozy Provence. It’s worth trying several decorating methods to choose the best one for yourself.
Did you like the article? Tell your friends about it:
- 8
- 3
- 1
Self-patination
To do a complete patination of wood with your own hands, diligence and accuracy are very important. All actions must be performed as carefully as possible, adhering to the rules. You need to prepare for the fact that the work will take a lot of time.
The point is that patination is carried out in stages. That is, each operation must be completely completed before the next one begins.
Before processing large-sized interior items, they need to be partially disassembled. Metal elements must be dismantled, leaving only wood fittings. The procedure will be as follows:
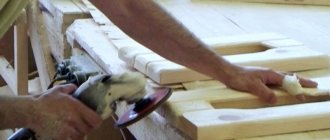
- Imperfections are removed from wood by sanding with sandpaper. After this, the workpiece must be thoroughly cleaned of accumulated dust.
- The surface is primed with a special mixture, which is designed specifically for the restoration of antique objects. Then the surface needs to be dried for one to two days.
- Apply one layer of patina and dry it for 24 hours.
- The next layer of dye is applied with small strokes in different directions. Before the substance has time to harden, its excess is carefully rubbed with a foam swab.
- Before the second layer sets completely, it must be rubbed with a dry cloth.
- After the element has dried, you can get rid of defects using local staining. Then the wood is also wiped with a dry cloth.
- When the surface is completely dry, a final coat of varnish should be applied to it.
Patina on metals – natural and artificial
Metal products in the interior of a living room or bedroom are not very common and are usually small and decorative items: chandeliers, sconces, stands, candlesticks, etc. Despite the fact that the new product has a bright shine and beautiful color, there are many who want to give them a less modern look. And since it takes a long time to wait until such an effect is achieved naturally, they resort to the use of chemicals.
Types of patina
The colors and appearance of the film on different metals under different conditions differ and are quite noticeable.
- The aging effect on silver looks the most attractive. This metal is quite inert, and the film usually occurs when it reacts with sulfur, creating iridescent shades from light yellow to crimson and turquoise. Black patina occurs when exposed to amino acids and chlorides. A wild variety of this kind is unattractive: the film is rough and protrudes above the surface. But the blackening of silver gives the product a rare elegance.
- Gold is a noble metal and practically does not react. However, if the alloy contains copper or nickel, light brown or orange stains may appear over time. Much more designers are attracted to the imitation of a patinated surface based on gold color. The effect is purely decorative and is created with gold-colored paint, and a patina can be achieved on metal and wood - for example, on oak wood.
- Most often in the living room one encounters copper and bronze products, sometimes iron ones if we are talking about a loft-style living room. On copper, the green and blue films are due to the deposition of chlorides and copper acetate, while the black films are due to the formation of oxide or sulfite.
Red patina is also formed by chlorine salts, but, as a rule, it is formed artificially. Brown patina appears when exposed to ammonium salts. For copper, almost all types of deposits are relatively safe, which makes copper forged products an excellent decor for the living room.
- But for bronze, green and blue coatings pose a danger. The noble patina for the alloy is only a black film. They are achieved artificially through bluing - oil treatment and calcination in copper filings.
Patination methods
There are many ways to give a metal product an antique look. However, they all involve the use of chemically aggressive substances, so they are implemented with caution.
The most famous and universal is patination using sulfur liver. The composition is made by mixing 1 part of sulfur in powder form and 2 parts of potash and calcining them over a fire. The result is sulfur liver - a brown mass that can be stored in a glass jar.
- An aqueous solution is prepared from the substance (the concentration depends on the purpose) and it is used to treat raised and protruding parts, as well as those that are subject to the greatest wear over time. The color can range from light gold on bronze to blue and black on copper and silver.
- An aqueous solution of 1 part copper sulfate and 1 part zinc chloride allows you to get a red or brown aging effect.
- A black film is formed when exposed to ammonium sulphide. However, there are some difficulties here: the solution has a very strong odor, so patination must be carried out in a fume hood.
- Ready-made bitumen patina can help out those who do not want to make their own mixtures. The solution is prepared on the basis of an organic solvent, and after patination, oil treatment is carried out. The color of the plaque is light brown. The mixture can be used on gold items if you want to give them an antique look.
Advantages and disadvantages of patinated kitchen
Patina refers to a coating that forms on wood and metal due to prolonged contact with oxygen. In the presence of patina, the main color looks brighter, and light darkening and small cracks appear on the surface, making the furniture look like antique. You can create such a coating yourself; it is only important to use methods and coatings that do not harm wood or metal.
Advantages of patina on kitchen furniture:
- Additional protection. The use of patination technology allows you to cover the elements of the set with a durable film, as well as varnish, which is usually applied as a finish. As a result, facades become stronger, last longer, and are less susceptible to damage.
- Practicality. Thanks to the protective coating, kitchen maintenance will become much easier; the facades can be washed without harming their condition. Stains on patinated surfaces are less noticeable than on regular ones.
- Aesthetics. Patination makes furniture look interesting and expensive. Even a simple kitchen set made of MDF will look luxurious and stylish.
- Possibility to restore products. Old furniture that has already lost its external luster can be restored using patination. This will allow you to seriously save money on the purchase of new furniture, especially if all the work is done yourself.
It should be remembered that applying the film does not increase the fire resistance of facades, so when cooking you will need to strictly observe safety precautions. The stove must be placed at some distance from elements coated with flammable paints. It is also not recommended to patina work surfaces: with frequent and strong mechanical impact they will deteriorate.
Silver and other metallic patina finishes
Metallic finishes are extremely popular right now, and the ability to mix and match different metallic colors to suit specific needs is essential. They are also great for commercial applications where applying a natural patina or rusty metal would be expensive. Finishing walls with a patina with a metallic effect will also be an excellent solution not only for classic, but also for modern decor.
VIDEO: How does patina change the interior?
Patina in the interior
Noble antiquity
Machining large parts
Patination of massive structures has its own characteristics. These include wall panels, furniture facades or door leaves. The preparatory stage will be the same, but for priming you need to use a special mixture based on acrylic or polyurethane.
After the primer has dried, you need to apply another thin layer of dye. The dried part is polished with a metal sponge. After this, nitro varnish, acrylic or polyurethane is applied to the surface. The color of the composition must be selected depending on the natural color of the wood being treated. Thus, for furniture made of linden, hazel and birch, yellowish and light varnish mixtures are used. For alder and oak, darker varnishes are used .
Kitchen color options with patina
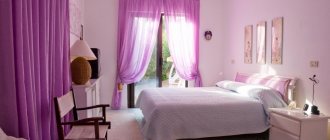
Any decor should be combined with the style of the kitchen and its color scheme. Antiquity will not be effective on every surface: for example, in a kitchen with purple facades or in a Scandinavian style, it will look out of place. If the housewife wants to achieve the effect of antique furniture, then she should first decide on the color of the set itself, and only then select the appropriate composition.
White
The lighter the color of the patinated surface, the better, since the effect is more noticeable, and the furniture itself becomes respectable and elegant. Silver and gold paints are considered the most popular because of their versatility, but many shades of patina will look good on a white neutral facade:
- blue;
- violet;
- turquoise;
- green and others.
In this case, the choice depends only on the wishes of the owners and the presence of the listed shades in the interior. It is better to decorate the walls and apron in beige or cream tones - this is how the kitchen will look most attractive.
An example of a classic corner kitchen in light colors
Black
Black is not an easy color for a kitchen as it requires really spacious and bright spaces. If you think through all the details, the result will please you for a very long time, and just being in a kitchen with black facades will be like meditation. Choose a light paint for patination:
- silver;
- golden;
- white.
This is how the depth of color and luxury of black facades are emphasized. The ideal option would be to choose door handles and other accessories to match the patina - this will enhance the attractiveness of the decor. If you are in doubt about which color of the mixture to choose, you should focus on the surrounding environment.
The photo shows an example of a black kitchen with a silver patina
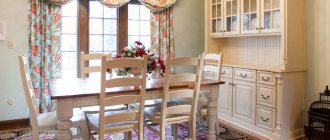
Beige
Beige is a universal color. Neutral facades can be used to decorate kitchens in different styles: country and its subtypes - Provence, classic and many others. All these areas only welcome the presence of furniture patina.
If the classic style requires only silver decor, then the rustic style and Provence are more loyal and allow a choice of several colors:
- universal golden;
- green;
- grey;
- blue.
When choosing, you should focus on the color scheme of the selected kitchen accessories - textiles, paintings, vases or even an apron.
Grey
Gray is a strict and versatile color with which you can create almost any interior design. It is completely undemanding and will feel great in both small and large kitchens. It can be combined with almost any color, but the most advantageous ones for patination will be:
- black;
- white;
- green;
- blue.
These shades in combination with the matte surface of the facades will create an elegant look in the kitchen. But if there is a large amount of some other color in the interior, you can use it as a patina - the room will become more harmonious.
Green
Green shades are most often associated with nature, which is why they are used in rustic kitchens.
If you want to achieve the effect of antique furniture, you should give preference to pastel shades: olive; pistachio and other light green. The golden patina looks gorgeous on this façade.
If you want a simpler kitchen, then choose beige, blue, brown, gray or even white paint.
Red
The color that attracts attention more than others. If you want to age the set, you should carefully choose a shade of red so that it is not too bright and does not distract attention from the decor - otherwise the designer may feel like the designer lacks a sense of taste and proportion.
A good option would be discreet shades turning into burgundy. The paint is selected in the following colors:
- golden;
- white;
- black;
- brown;
- gray
It is very important not to overdo it with decor.
Types of patina
Patina varies in shades and decorative effect. The choice of its specific type depends on the style of the kitchen, the color design of the walls, floors, textiles and other components, and on the basic tone of the set itself.
Golden and silver patina
Patination in the colors of gold and silver is considered a classic option, and the most common. The metallic finish goes well with white and black kitchens, as well as furniture made in light wood tones. It is recommended to cover the top of the gold and silver patina with matte varnish, then it will look even more advantageous.
Contrasting patina
Contrast will help to gracefully highlight the carved patterns on the wooden facades of furniture. Usually the set is made in a lighter shade, and the antiquity on the facades is saturated in color. Most often, frames, corners, and joints of parts are darkened.
Craquelure (crackle)
This patination option is perfect for country, Provence, and shabby chic styles. To implement the technique, a special craquelure varnish is used, which, after drying, creates a network of small cracks, and the surface resembles antique paint.