RECOMMENDATIONS FOR WORKING WITH CURTAIN TAPES
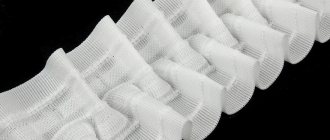
In our work, we use curtain tapes only of the highest quality and made in Europe (Austria, Germany and Italy). A good tape is worth the money. Curtain tape? These are just loops to hang the curtain on the cornice, you say. No! This is the functionality, decor and appearance of your curtains. Even the most beautiful, high-quality and expensive fabric on a bad curtain tape will look sloppy, like a cheap curtain. The photo on the left is an example of a low quality narrow curtain tape. In the photo in the center and on the right are high quality curtain tapes. You can read below which curtain braid is needed: narrow or wide.
USEFUL INFORMATION AND TIPS ON SELECTING AND DRAPING BANDEX Ribbons
Selection of fabric: The correct choice of tape gathering factor depends both on the functionality and style of window design, and on the latest fashion trends in interior decor.
For thick, heavy curtains, it is recommended to use curtain tapes with a low gather factor. And in turn, curtain tapes with a high gather factor are ideal for curtains made of light fabrics. The required width of the curtain in its finished assembled form (usually this is the length of the curtain rod) is multiplied by the desired assembly factor and we also add the fabric consumption for folding the side seams. Gather factor: Gather factor is a parameter that determines the required width of drapes or curtains. By adding hems to the side seams, you will determine the amount of fabric needed. If you are faced with choosing curtains for the first time and it seems to you that in order for the fabric in the curtain to lie in beautiful folds, you need to add 20-30 centimeters, I dare to disappoint you)))) this is not so.
The assembly factor of BANDEX curtain tapes is indicated by different colored marking threads. Assembly factor color code:
- orange 1:1.5
- black 1:1.7
- purple 1:1.85
- blue 1:2.0
- yellow 1:2.2
- yellow 1:2.5
- brown 1:2.7
- pink 1:3.0
- gray 1:4.0
For example, a gathering ratio of 1:2.5 means that you need 2.5 meters of tape to produce 1 meter of finished curtain on the tape.
Rapport: Rapport is the repeating part of the tape pattern, when the tape is not folded, measured in millimeters. Rapport is measured from the starting point of one fold to the starting point of the next fold.
Distance between pleats: Distance between pleats (in our catalogue) is the distance between two pleats when the tape is fully folded, measured in millimeters. The distance between folds is measured from the end point of one fold to the beginning point of the next fold.
Height of the curtain tape: The height of the curtain tape must be selected based on the height of the curtain and the density of the fabric. The width of the tape is selected according to the rule of proportion 1/6. Let's say the height of the curtain is 300 cm, then the recommended width of the tape will be approximately 300cm/6/6=8 cm 250/6/6=7cm Recommendation for selecting curtain tape based on the height of the tulle of the medium-density curtain:
| height of finished curtain, cm | recommended tape width, cm |
| up to 120 cm | 2 -3 cm |
| 120-180 | 3-5 |
| 180-220 | 5-6 |
| 220-280 | 7-8 |
| 280-310 | 8-9 |
| 310-350 | 9-10 |
| 350-380 | 10-12 |
| 420 and above | 12 or wider |
How to sew curtain tape: Curtain tape is placed on the wrong side of the curtain, usually with the pockets facing up, the material is cut exactly in the middle between two folds. Most sheer curtain tapes have a marker line between the folds. In curtain tapes with a uniform pencil or waffle gather, the cut point is the place where the tightening cords come to the surface. In addition, you need to leave an allowance of 2-3 cm at both ends of the curtain tape to sew the tape to the curtain.
The tape is sewn approximately 2mm below the top edge of the fabric, which allows the curtain to move smoothly under the curtain rod. The ribbon can also be sewn below the edge of the curtain, if the design of the curtain involves covering the cornice. It is necessary to take into account that not every cornice can be closed; this possibility must be discussed with the designer. Please note that when sewing the tape, it is important to sew the stitching in one direction and not sew the tension cords. One stitch along each edge of the tape is sufficient for all types of tapes up to 70mm wide and wafer gathered tapes up to 50mm. For wide ribbons, in addition to stitching along the edges, it is necessary to lay an additional third line in the middle of the ribbon. Some types of ribbons also require more than two lines for stitching, usually these are figured ribbons. Where necessary, you will find our recommendations in the information about this article.
Assembling the curtain tape: For ease of assembly, it is necessary to tie the tightening cords into knots at both ends of the curtain. The folds turn out beautiful and uniform when you pull the cords as tight as a string, gathering the fabric on it. To ensure even assembly, one side of the curtain needs to be fixed, for example, you can fix it to a door handle. Or let your assistant hold it. Hold the curtain tape with two fingers, your thumb close to you, your index finger behind the curtain tape. Perpendicular to the direction of movement and gather folds, moving forward from fold to fold. Move the assembled groups of folds along the tape until the product is completely assembled. Gather the folds carefully and carefully so that the distance between the folds is even and without creases in the folds. The tape we use is of the highest quality and allows you to beautifully tighten the curtain tape with minimal effort. Secure the assembly by tying the cord into an untied knot in the place of the last fold, secure the excess cord on a CORDTIDY cord reel, which can be purchased from us, or roll it into a cord and tuck it into the folds of the curtain tape. This will make it easy and quick to unravel the curtain before washing. After assembling the curtain tape, NEVER cut off any excess tie cords!
Hanging curtains: In order to hang a curtain, you need to thread the hooks into the pockets on the back of the tape. DO NOT PUT HOOKS INTO THE THREAD TO TIE THE RIBBON!!! - this is a fairly common mistake that leads to deformation of the tape and curtains and a change in the height of the product. Curtain tapes with one, two or several rows of pockets allow you to vary the height of the curtain and adapt to any type of curtain rod. There are a large number of different types of curtain rods and hooks. This fact must be taken into account when choosing curtain tape and sewing curtains. Tell the designer what type of cornice you have and from where on the cornice you measured the height. For ribbons with group (bundles), V-shaped, bow and folded glasses, it is recommended to use a double hook. The double hook threads through both pockets located on each side of the pleat to balance and secure the pleat. If it is not possible to purchase a double hook, then if you have a cornice with rings, you can put 2 hooks on each ring. If the cornice is profiled, then it is necessary to increase the number of runners/hooks.
For curtain tapes with a continuous uniform fold (pencil, waffle folds), the recommended distance between hooks is 8-10cm. By default, on all curtain rods the hooks are located in 10cm increments.
Ribbon sewing process
The finished curtain must be ironed and the tape tightened to the planned width.
Before sewing on the ribbon, be sure to trim the edges of the fabric. Fold the edges of the curtains and stitch the edges. The upper edge of the fabric is folded to the wrong side along the width of the braid or a little more. If the hem is wider than the tape, you need to overlog it to prevent the fabric from fraying.
- We cut off the edge of the curtain, bend it and iron it. It is necessary to do this smoothly, so there is no need to rush.
- The ends of the tape must be bent inward by 2-3 cm in advance, and the cords must be released. We sew it to the back of the curtain at a distance of up to 10 millimeters from the fold.
- You need to sew the top edge of the braid parallel to the cords and the bottom. Of course, you need to sew along the entire length of the tape. If you have chosen a braid with 3-4 cords, the stitches must be made along each of the cords.
- Fold the side edge over twice and stitch it. The threads under the seam must be pulled out in order to then collect the folds.
- Now the product needs to be processed along the braid using an iron.
When the braid is sewn, you can begin to directly drape.
ADDITIONAL TIPS FOR CURTAIN TAPES 15 CENTIMETERS WIDTH
Sewing: Despite the width, for ribbons with straight pleats, such as GABRIEL and INDIGO, two seams along the edges of the ribbon are sufficient.
With more capricious fabrics, like organza or taffeta, it is recommended to add a third seam in the center of the ribbon. Since the waffle fold is more complex, for the GIULIO and BOCCACCIO ribbons, as well as the AVENUE glass ribbons, three seams are required. Assembling: Start by knotting the top three and then the bottom tie cords to create two independent sets of cords. To assemble the ribbon, hold both sets of cords (2 x 3) and alternately begin to form pleats along the top and bottom edges of the ribbon. To align the folds more precisely, hold each group of cords separately, bringing the folds to the ideal position. Once the last fold is aligned, tie both sets of tie cords in a knot at the last fold to ensure the tape is secured in the gathered position. Secure the excess cord to the CORDTIDY cord winder, this will allow you to unravel the curtain quickly and easily
before washing.
Ready-made curtains and their advantages
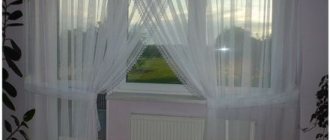
If you don’t want to sew the ribbon yourself, you can purchase ready-made curtains that already have a ribbon. You don't have to make a choice about which type of ribbon to buy and fool yourself with sewing. The main thing to remember when buying a ready-made curtain is that wide and narrow ribbons have a different number of rows. Using several rows of loops, you can adjust the height at which the curtain is placed. To do this, you just need to move the hooks to the bottom or top row, depending on the desired result. Ready-made curtains with beautiful folds will fit perfectly into any design, and if you want to add some flair, just choose additional accessories for the curtains. In the photo below you can see a wonderful example of ready-made curtains.
Thanks to the tiebacks, the decor of the room looks even more complete.
Decision is on you. Regardless of whether you want to sew curtains yourself or buy ready-made ones, remember the above tips and your choice will be ideal.
ELIZE AND SUNSET – CURTAIN TAPE FOR PERFECT WAVES. Hit of 2018.
Patented development of BANDEX. This unique tape creates beautiful folds and is suitable for both round curtain rods with rings and open profile curtain rods such as Quad or Simple. Perfect folds both when the curtains are closed and when the curtains are open. Large folds like those on eyelets, but always uniform and do not require a special cornice. When choosing a cornice, it is necessary to take into account that the tape requires a larger than usual distance between the rows in the cornice than usual. Not suitable for plastic tires and baguette cornices.
HELPFUL INFORMATION
ELIZA calculation:
To calculate the width of the fabric, take into account the gather factor 1:1.5 and fold repeat equal to 19 cm. For example, for a finished curtain width of 240 cm: 240 cm x gather factor 1.50 = 360 cm 360 cm: repeat 19 cm = 18, 95 = rounded to 19 19 waves x repeat 19 cm = 361 cm (+ 1-2 cm extra) Width of the fabric including hems = 362 cm Depth of the fold: 80 mm (50 mm in front of the cornice, 30 mm behind the cornice) To calculate the width of the fabric take into account the gather factor 1:1.8 and fold repeat equal to 23 cm. For example, for a finished curtain width of 240 cm: 240 cm x gather factor 1.80 = 432 cm 432 cm: repeat 23 cm = 18.78 = rounded to 19 19 waves x repeat 23 cm = 437 cm (+ 1-2 cm extra) Width of the fabric including hems = 438 cm Depth of the fold: 100 mm (55 mm in front of the cornice, 45 mm behind the cornice) To calculate the width of the fabric, take into account the gathering factor 1: 2.2 and fold repeat equal to 33.5 cm. For example, for a finished curtain width of 240 cm: 240 cm x gather factor 2.20 = 528 cm 528 cm: repeat 33.5 cm = 15.76 = rounded to 16 16 waves x repeat 33.5 cm = 536 cm (+ 1-2 cm extra) Fabric width including folds = 537 cm Fold depth: 150 mm (80 mm in front of the cornice, 70 mm behind the cornice)
SUNSET calculation:
To calculate the width of the canvas, take into account the gathering ratio of 1:1.5 and fold repeat equal to 15cm. For example, for a finished curtain width of 240 cm: 240 cm x gather factor 1.50 = 360 cm 360 cm: repeat 15 cm = 24 24 waves x repeat 15 cm = 360 cm (+ 1-2 cm extra) Width of the fabric, including hems = 361 cm Fold depth: 40 mm (25 mm in front of the cornice, 15 mm behind the cornice) To calculate the width of the curtain, take into account the gathering factor of 1:2.0 and the fold repeat equal to 17.5 cm. For example, for a curtain width of 240 cm in finished form: 240 cm x gathering factor 2.0 = 480 cm 480 cm: repeat 17.5 cm = 27.42 = rounded to 28 28 waves x repeat 17.5 cm = 490 cm (+ 1-2 cm additionally) Fabric width, including hems = 491 cm Fold depth: 70 mm (40 mm in front of the cornice, 30 mm behind the cornice) To calculate the width of the curtain, take into account the gather factor 1: 2.5 and fold repeat equal to 22 cm. For example, for a finished curtain width of 240 cm: 240 cm x gather factor 2.50 = 600 cm 600 cm: repeat 22 cm = 27.27 = rounded to 28 28 waves x repeat 22 cm = 616 cm (+ 1-2 cm extra) Width of the fabric, including hems = 617 cm Fold depth: 95 mm (55 mm in front of the cornice, 40 mm behind the cornice)
How to sew curtain tape Eliza and Sunset Curtain tape Eliza and Sunset are sewn to the curtain in pocket rows upward. The tape is distributed in such a way that along the edges of the curtain there are places where both tapes are woven together. This distribution guarantees symmetrical wave formation in the finished product.
Assembling Eliza and Sunset Before assembling the curtain tape, tie the tie cords tightly around the edges. Start by pulling the narrow ribbon from one end to get precise and consistent waves, building up wave after wave. Once the last wave is formed, double knot the tie cords at the last pleat to ensure the waves are held in place. Do not cut the tension cords, as the tape will need to be unraveled when washed.
Hanging Eliza and Sunset
To hang the curtain, insert the hooks into the two pockets located on each wave. Each wave is fixed with two hooks. Eliza and Sunset have two rows of pockets. Make sure you have enough rings and hooks on the cornice in advance! Each wave requires 2 hooks.
Depending on the type of hook, use the top or bottom row of pockets. Make sure the curtain does not touch the curtain rod. To ensure a beautiful drapery, secure a weighting agent along the edges of the curtain or use a weighting tape along the bottom of the curtain.
Grommet tape and its types
Eyelet tapes are nylon strips with a layer of hot-melt adhesive. They are divided into two types depending on the number of layers:
- Single-layer tapes have adhesive on only one side of the fabric. They can be used for various fabrics. You just need to go over the iron, and under the influence of heat the glue begins to melt and sticks the strip to the curtain. The fabric becomes stiffer, but still looks great.
- Double-layer tapes have glue on both sides of the strip, which makes the fixation even tighter. It sticks easily, like a magnet. As in the previous case, the fabric does not lose its face, and the folds are very beautiful.
Both of them can be either transparent or opaque.
MONSOON 100 mm width. clear looped tape for round curtain rod covering the cornice.
MONSOON - tape with cross loops is ideal for curtains on cornices with a diameter of up to 30 mm.
The cornice rod is threaded through the hinges. To create wide, shallow folds, wide loops are used. Narrow loops are used to create deeper folds - waves, with a smaller distance between the folds. RECOMMENDATIONS FOR WORK Bandex Textil & Handels-GmbH
In the photo: red curtains with ruching 1:1:5 (left) 1:2 (center) 1:2.5 (right) white curtains with ruching 1:2 but with different numbers of hooks 1 hook for every 10 cm of fabric ( left) 1 hook for every 14 cm of fabric (center) 1 hook for every 20 cm of fabric (right)
We hope this information was useful to you. Leading designer of the curtain salon Decorator Marina S.
Curtains with ties
Curtains with ties are made from lightweight materials in light shades with a simple printed pattern in the form of flowers or peas. Ties are sewn along the upper edge of the curtain, and they must be so strong that they can easily support the weight of the curtain.
You can use braid, multi-colored ribbons, or parts of rope as ties. You can sew the ties yourself from any suitable type of fabric.
Most often, decorating curtains with ties can be found in a teenage girl’s room, bedroom or kitchen. Everywhere they create a light romantic atmosphere.