Advantages of tile end sharpening technology
The technology of sharpening the ends at 45 degrees eliminates the need to use decorative corners when finishing external corners. Thanks to this, it will be possible to create an aesthetic appearance of the wall. Such corners have a neater and more stylish appearance than those with corners. Agree, this is much more interesting than tiles laid on tiles or inserted plastic.
Tile cutter
Here we are talking about professionals who are engaged in similar work on an ongoing basis. The most popular are two models from Feida:
- Feida TC 200;
- Feida TC 250.
Despite the fact that these are produced by Chinese companies, they have high quality and cutting accuracy.
With their help, absolutely any corner of the tile that will be needed for installation can be created. Most often it is 45 degrees that is popular.
Also among the companies, Einhell and Proton are distinguished by their reliability.
Many problems arise here when working with wavy tiles when the tile cutter touches the glaze part. It becomes chipped and “torn,” which noticeably spoils the appearance. Tile work will usually be done by professionals. After all, no one will purchase expensive equipment for personal use. Such work is carried out extremely rarely:
- when arranging external corners;
- upon entering a specific room.
When ordering a service from a construction company, it is best to first clarify its status and experience in this area. It is not uncommon for a large number of tiles to be “destroyed”. Each nuance should be written down in advance in the concluded contract, so that there are no problems in the future during the proceedings.
The quality of cutting at 45 degrees using a professional tile cutter will be immediately noticeable to everyone. In addition, the work is carried out in a short time, which allows you to start laying tiles almost immediately. This design of the corners of the tiles will be to the liking of every owner of the room in which the tiles will be glued.
Disadvantages of trimming tiles to form outside corners
When using the technology of sharpening the edge of tiles or porcelain stoneware at an angle of 45 degrees, the edge of the finishing material becomes thinner . As a result, its edge becomes very fragile and susceptible to destruction under external physical influences. Therefore, the use of this technology is not allowed when finishing steps and external walls in areas with high traffic. In such cases, it is recommended to use special decorative plastic or metal corners.
What tools are used to sharpen the ends of tiles at 45 degrees?
Cutting porcelain stoneware at 45 degrees can often be called sawing, sharpening, trimming, or bevelling. In this case, the meaning is the same in each case. The end of the tile is ground so that it changes its right angle to an angle of 45 degrees.
Such an operation can be carried out using various instruments. But the best result and the highest quality of sharpening the ends is achieved using an electric tile cutter , which is a special device for cutting and sharpening the ends of tiles. As a last resort, it is allowed to use a grinder with a special circle for cutting tiles. True, in this case the master must have sufficient experience and skills in order to do the job efficiently.
In any case, it’s worth taking a closer look at each of the methods for cutting porcelain stoneware and tiles at 45 degrees.
Cutting tiles with a grinder
Cutting tiles at 45 mm using a grinder is a rather labor-intensive and technically complex process. Not every experienced craftsman will be able to carefully trim the end of the finishing material. True, with the proper skill and experience, you can still cope with this. In fact, using a grinder is the most affordable way to trim tiles at home, as many people have a similar tool at home, which cannot be said about electric devices for sharpening or cutting ceramic finishing materials.
Also on the topic: How to drill porcelain stoneware?
Before you start using the grinder, you should make sure that you have a good diamond blade suitable for cutting ceramic tiles and porcelain tiles.
The presence of diamond coating on the edge is required
The ceramic tile is placed on an edge, after which the other edge, which is in a perpendicular position, is carefully sharpened with a diamond disc to an angle of 45 degrees. At the same time, it is worth remembering that the reverse, non-glossy side of the tile should be undermined.
If the surface is not perfectly smooth the first time, you can trim it by again with a diamond wheel. belt sander may also be suitable for these purposes . True, not everyone has such a tool in their home. Therefore, as an alternative, we can suggest using a wooden block wrapped in sandpaper.
You can also use Velcro sanding pads. Such attachments are simply screwed onto an angle grinder, after which sandpaper is glued to them. You can use diamond bits, which have a longer service life and higher performance. True, they cost significantly more than regular sandpaper with Velcro.
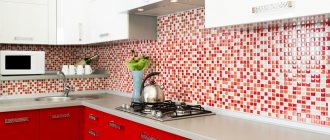
When finishing large areas, it makes sense to spend money on buying diamond nozzles. If we are talking about finishing a small section of the wall, for example, an apron in the kitchen, then you can limit yourself to using sanding wheels.
Important: when using diamond bits to cut porcelain stoneware at 45 degrees, you will need to use a grinder with a speed control function, and the speed should be set to a minimum.
Electric tile cutter
Can be installed without legs
The tile cutter is a machine for cutting tiles at 45 degrees, as well as for cutting them longitudinally and transversely. This device has a water cooling system. In addition, water helps to remove almost all dust that occurs during the cutting of porcelain stoneware or ceramic tiles. The main advantage of a tile cutter is its accuracy. It cuts along one predetermined trajectory. This eliminates the influence of factors such as trembling of the master’s hands. As a result, the cut is as smooth and neat as possible.
Tile cutters can cut at virtually any angle. True, craftsmen often cut tiles at an angle of 90 degrees or 45 degrees.
How to properly cut a ceiling plinth at an angle of 45
Corner elements for ceiling plinths can be easily trimmed using a miter box or by hand. In the first case, you will need a miter box and a hacksaw, and in the second, a pencil and a hacksaw/cardboard knife. The hacksaw blade should be well sharpened so that you don’t have to think about how to cover up chips and roughness on the cut.
Cutting a corner using a miter box
We take a polyurethane ceiling plinth. designed for the left or right side of a corner. We lean it against the future installation location so that the end of the segment opposite from the corner is against the edge of the already glued molding. In the place where the bottom edge of the ceiling plinth touches the top of the wall corner, make a dot with a pencil or stick a piece of insulating tape. We repeat these steps with the second segment.
How to cut an external corner of a ceiling plinth:
- We place the left blank in the miter box from left to right, pressing it to the edge closest to us. The corner vertex mark should coincide with the leftmost slot in the same edge
- We place the right blank from right to left, pressing it to the near edge. The mark for the top of the corner is to the far right slot.
How to saw down a ceiling plinth at an internal corner? Everything is very simple, the actions will be exactly the same, only the location of the corner vertex mark changes. Here it’s the other way around: for the left segment – the far right slot, and for the right – the far left. The finished ceiling fillets must be aligned, and then the joints should be held up to the light - there should be no gaps. If they are very small, then editing is not necessary; you can get by with sealing with putty material after installation.
How to make a corner of a ceiling plinth: positioning the workpiece in a miter box
Important: sometimes the angles deviate too much from the standard 45 degrees, and a simple miter box for the ceiling plinth becomes useless - you can cut off the excess. The solution would be to purchase a rotary tool, but it is not cheap and this “one-time” purchase will be irrational
In this case, you can use the intersecting point method.
How to cut the corners of a ceiling plinth without a miter box
If you are wondering how to properly cut down a ceiling plinth without a miter box, then the following information will be useful to you. We take the right section of the ceiling plinth made of foam plastic, apply it to the installation site and draw a line on the ceiling along its upper edge. It should extend beyond the vertices of the corners by about 5 cm. We do the same with the left segment and put points at the intersections of the lines. We put the ceiling plinths in place one by one and transfer the resulting marks to them.
We've dealt with the upper part of the ceiling moldings, now let's move on to the lower part. Everything is simple here, the marks we need are the vertices of the corners. We mark their location with dots on the lower edges of the left and right ceiling plinth. Next, you need to connect the dots on the moldings - this will be the cutting line. This method will help you cope with even the crooked corners. Adjustment will most likely not be needed, and if it is, it will be minimal.
How to cut a ceiling plinth without a special tool: the photo shows marks for the intersecting point method
Important: the work described here requires marking the surfaces. Therefore, first you need to start cutting and fitting the ceiling plinth, and only then think about how to glue the wallpaper
Or, if you want to mount the plinth on top of the wallpaper, we do the marking and trimming before the final finishing, and the gluing after it.
Recommendations for correct cutting of tiles at an angle of 45 degrees
Cutting tiles at an angle of 45 degrees should be carried out in such a way that the disc of the grinder or tile cutter does not reach the glossy coating of the tile by about one millimeter. This means that only itself . That is, only the clay, which acts as the basis of this finishing material, is cut off. This is due to the fact that this technology helps make the cut more accurate. When cutting tiles to the full depth at once, the likelihood of damage to the glossy coating and the appearance of chips on it increases. Such a defect will no longer be correctable, so you will have to throw the tile away or put up with its less than aesthetic appearance.
In some cases, cutting tiles at 45 degrees forces the craftsman to cut directly along the glaze. At the same time, experienced craftsmen know several ways to eliminate the possibility of damage to the glossy tile coating.
First of all, it is recommended to simply cut the tiles exactly to the specified dimensions. After this, you can begin sharpening the resulting edge to the desired angle. As a result, the resulting cut will be smooth, neat and beautiful. True, to do everything right you will need to get better at it. Therefore, it is recommended to practice a little on broken or damaged tiles so as not to subsequently spoil a lot of finishing material.
Additionally, the edges of the tiles can be processed using sandpaper to give them maximum smoothness and evenness.
Craftsmen also use the method of cutting corners from the factory edge. At the same time, they hide all the cuts made with a grinder or tile cutter under another tile.
Also on the topic: Cutting tiles with a grinder: how to make a cut without chipping?
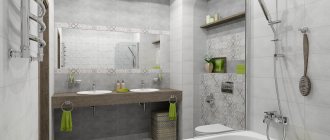
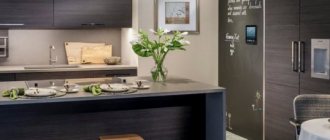
In any case, taking into account the latest trends in bathroom design and kitchen decoration, craftsmen and designers prefer the technology of cutting tiles at 45 degrees rather than corners. Therefore, if you want to create a truly cozy and modern interior, then you will have to work a little to master the technology of cutting tiles at a certain angle.
Cutting tiles 45 degrees (training video lesson)
Gripping involves sawing and grinding, cutting the tiles at 45 degrees.
Joining the sawing at 45 degrees is a beautiful visual effect and is useful for decorating niches and other external corners.
Without grooves or other decorative corners, tiles are often laid with one side abutting the edge of another tile.
In this case, one of the ends of the tile is exposed. Such connections are very often seen in hospitals, schools and other public places.
Cutting tiles 45 degrees
Cutting tiles 45 degrees
When two tiles are joined at 45 degree angles, the outer corner looks much nicer. Ideally, instead of joining the tiles, it can be achieved without seam convergence.
There is also a simpler option for joining the tiles, leaving a small gap for sealing with a fugue.
You can see in more detail in the video tutorial “Cutting 45 degree tiles”.
Having finished laying the second row of tiles, we approach the niche where the heating radiator is located. First, we will need to mark and cut the tiles, and then make the bevel.
To do this, we apply tiles and install spacer crosses and first mark the place where the edge will pass. We tightly stick tape to the place where the future edge will be cut.
It helps protect our tiles from chipping. It is possible to use another option for cutting tiles using a tile cutter.
In this version, we will trim and cut the tiles using a regular grinder.
Cutting tiles with a grinder
For circumcision followed by bevelling we need a small grinder. It is worth paying attention to the disk that will need to be installed. This disc will work on stone and concrete and it has notches on the cutting part.
There is also a disk with a solid cutting part and there are no notches on it. It is designed for cutting stone and tiles when cooled with water.
This disc is not suitable for cutting tiles with a grinder, but you can try to do a bevel with it. It will largely depend on the quality of manufacturing of these discs.
Take the time to look at the options at a hardware store. It is also worth noting that you need to use safety glasses and gloves when working with an angle grinder.
First, we should cut the tiles along the drawn line.
This operation should be carried out slowly, and care should be taken not to go beyond the line.
This cut is made at a right angle to the tile and, after removing the excess part, lightly sand the edge.
Now along this edge you can make a bevel, that is, saw at an angle of 45 degrees. Of course, doing this job requires a certain skill, but it is easy to train and here are the main features.
The grinder disk should always be at an angle of 45 degrees to the tile. Moving the disk along the tile, remove a small part of the edge.
The up and down movement should be done smoothly. Try not to touch the glazed edge of the tile and leave about 1 millimeter to it.
This way you can avoid unnecessary chips.
When the rough grinding with a grinder is completed, you can remove the tape. We look at the edge of the tile and see that it is filed at an angle of 45 degrees.
Now let's bring this cut to an ideal state with the help of sandpaper. We place the skin on a small block that fits on your hand.
Sanding tiles
Now the final sanding is done along the sawn edge.
The block allows you to monitor the grinding angle; it should also be at an angle of 45 degrees.
The movement should be light, we visually control the reverse glazed edge all the time and try not to touch it.
Having completed the grinding, we check the quality of the burring work performed. If necessary, we sand again.
You can check how well the joint is made when we join two tiles. Errors will be immediately visible at the resulting joints.
They should be eliminated, especially if you plan to join the tiles without joints.
Facing and forming right angles with ceramic tiles and porcelain stoneware
It is important to understand that the installation of porcelain tiles at 45 degrees, as well as ceramic tiles, is carried out when there is a need for facing external right angles.
First, the first tile with the previously cut end is glued and leveled. In this case, the pre-cut end will protrude beyond the edge of the wall.
After this, on the other hand, a second tile is glued, acting as a counter part of the formed corner made of porcelain stoneware or ceramic tiles. Until the glue has completely dried, the tiles need to be leveled and compared with each other so as to create a perfectly even and aesthetically pleasing corner.
So, the tiles are laid gradually row by row in an upward direction.
Important: before you start tiling the wall, you need to make sure that vertical . This is due to the fact that with an uneven wall it will be extremely difficult to ensure the possibility of matching the sharpened ends of the tiles. At the same time, it will be extremely difficult to correct the resulting defects and only with the use of overhead plastic corners attached to the sealant.
How to veneer and form a right angle?
First you need to glue the first tile and level it. The trimmed edge will “fly” beyond the plane of the wall.
Then you immediately need to glue the second (counter) tile on the other side of the corner. While the glue is fresh and adjustable, you need to form a beautiful right angle.
And so we gradually move up, row by row.
Important point!
Before tiling the corner, make sure that your walls are vertical.
Because if the walls are even slightly heaped outwards, then without steps the corner will no longer meet. And this is not very beautiful, believe me! And you won’t cover it up or make up anything.
In what cases should you not use tiles with ends sharpened at 45 degrees?
When cutting tiles at 45 degrees, it is important to remember that the sharpened ends, due to their thinning, become quite fragile. For this reason, this technology should not be used when finishing steps. In places with high traffic, the treated ends will certainly begin to collapse.
Steps should be finished by laying the ends of the tiles on top of each other or using metal corners.
In any case, before finishing the outer corners of the walls using this technology, you should think carefully about everything. If the outer corner of the wall is often touched, then the use of this technology is not allowed, as the corner may collapse due to constant external physical impact. In this case, it is recommended to give preference to the use of metal or plastic decorative corners.
Methods for joining block house corners
There are several methods for joining corners when finishing a room or external facade with a block house. Each of them is attractive in its own way and has the right to be chosen:
- Decoration using additional external or internal corners;
- Mounting on a vertical block pre-installed in the corner;
- Joining block house bars using several types of sawing.
The first two methods of decorating corners are quite simple, have a number of advantages, but look clumsy and rustic. Real professionalism that takes the whole overall look of the cladding to a new level - washed down. How to properly saw down a block house and take the joining of corners to a new quality level?