0
8050
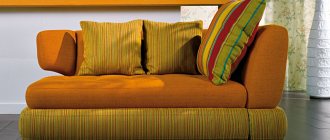
A home is not only a “fortress”, but also a place where you can gain strength and inspiration, relax, and spend time with your family. Each housewife has her own ways of making her home warm and welcoming. One of them is things knitted with your own hands. A crocheted blanket, bedspread or chair cover are simple products that even a novice craftswoman can create. They will give the furniture a special look and help a woman feel the joy of creativity.
Color selection
In order for your bedspread to harmoniously match the color of the room, you should take into account the following details:
- First of all, pay attention to the combination of shades of curtains and carpets; the color of the bedspread should match them
- For large rooms, a red or other bright blanket is perfect
- For a cozy and comfortable environment, choose shades of warm tones.
- If the living room is sunny, give preference to green and blue colors.
When knitting yourself, it is recommended to make products of two different colors from different sides. This will allow you to change the exterior of the room to suit your mood.
Models and size
In order to make a product yourself, you must first determine what size and shape your blanket will be.
When choosing a size, you should take into account the shape and dimensions of the upholstered furniture; the bedspread should be knitted a little larger than the sofa itself. The blanket can be knitted in the following shape:
- Round
- Square
- Rectangular
- For a corner sofa
You can also knit a blanket from squares. When making a product, you need to take into account several nuances:
- All elements of the future bedspread must be knitted in one size
- Consider the composition and density of the yarn
- Choose threads that match in color
- Knitting a baby blanket should only be done from natural yarn.
What shape and material the blanket will be knitted from depends on your individual preferences.
Step-by-step master class
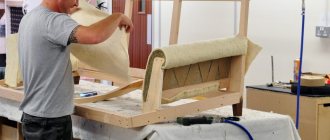
To sew a cover for a chair or sofa from thick, practical fabric, you first need to take measurements of the furniture.
Only knowing each size of upholstered or frame furniture can you design the correct pattern. And since we are talking about sewing a full-fledged cover, it is necessary to cut out each detail separately and only then sew all the elements into a common fabric.
Classic model
The easiest way is to cut out and sew a cover for classic sofas and armchairs that have strict rectangular shapes. If the armrests and back of the furniture are streamlined, the sewn cover will need to be supplemented with fixing ribbons, which can be tied with a bow or fastened with large decorative buttons made of natural wood.
If we return to the issue of cutting and sewing, then step by step this process will be carried out according to the following scheme:
Making a Quilt from Old Jeans
- The height, front width and length of the soft seats are measured without taking into account the lower part of the sofa (relevant when the design includes a frill), or together with it if the cover has a straight silhouette all the way to the floor.
- The dimensions of the armrests are measured (heights of the inner and outer side parts, width and thickness). The pattern for this part will have a rectangular shape, while the cover can be either straight or streamlined (depending on the configuration of the armrests).
- Measurements are taken from the back of the sofa. In this case, it is necessary to measure not only its outer and inner height, but also its width, minus the areas where the armrests adjoin.
- Based on the measurements taken, a paper pattern is constructed separately for each part, except for the armrests, since in this case one pattern and its mirror use for opposite sides will be enough.
- The resulting patterns are applied to the sofa to check the coincidence of the seams of the furniture and the paper edge (as well as the accuracy of the patterns).
- The finished patterns are pinned to the back of the fabric and outlined with soap or chalk, after which tolerances are made (the larger, the more reliable the seam will be).
- The products are cut, after which they are basted and stitched together on the wrong side in the same joints as for upholstered furniture.
- A frill is made separately and sewn to the already sewn cover around the entire perimeter.
At the final stage, a sketch of contrasting shades is pulled out from the finished covers, after which the first fitting or adjustment can be carried out, if necessary. The cape can be decorated with all kinds of decor, using twisted braid, heavy velvet tassels and other spectacular elements. It is worth noting that the described algorithm of actions is also useful for sewing a cover with your own hands for a corner sofa , which will have to be supplemented with a rotating element along the back.
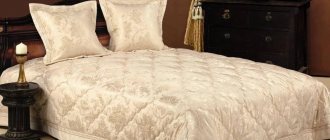
Warehouse of fabrics and sewing accessories
Round bed
Modern fashion requires the use of unusual furniture models in the interior. One of them is a round bed, which looks very bright and romantic. In order for a round-shaped bed to look impressive not only at night, but also during the day, it must be covered with a beautiful cover.
There are several interesting ideas that will help you cope with the task perfectly . These include:
- A classic case made of silk, velvet or tapestry fabric. To sew such a cover, two main patterns are used: with a frill and with a straight silhouette. In both cases, it is necessary to measure the diameter of the bed, its height and calculate the circumference. After this, using a needle and a pencil connected by a thread (not everyone has a giant teacher’s compass), a pattern of a round bed is constructed. The lower part of the cover is made separately according to the height and circumference dimensions.
- Fur cape. This option is rightfully considered the most luxurious, especially if real fur is used for tailoring. For example, fox skins make great round blankets if you sew them together, placing the faces in the center of the circle and the tails on the outer part. Lightweight, very warm and wear-resistant - you won't find a better bedspread. If the owners do not have such valuable raw materials available, you can opt for the recently popular faux fur in light shades. And it’s enough just to cut out a circle of the required diameter from a cut to get an impressive bedspread for a round bed or chair seat.
Ready-made covers will look as harmonious as possible if the hostess sews many small pillows with pillowcases made of the same fabric along with them. In addition to the aesthetic side of the issue, this spectacular addition will help solve ergonomic issues, making upholstered furniture even more comfortable for relaxation.
We sew the simplest blanket
For those who prefer sewing to knitting, there are also many ways and tips on how to sew an interesting and original cape.
Take any fabric you like and, having decided on the size of the future blanket, simply trim the edges. Fringe or ruffles will be a wonderful decoration. And from many multi-colored scraps you will get a luxurious patchwork-style bedspread. Sew them together to create a unique pattern, or create a whole picture - in any case, such work will bring a lot of pleasure.
Crochet
The crochet technique is more complex. Using this tool you can create many ornaments and product models. The work process is long, so the hook is chosen for knitting small blankets.
The crochet pattern for a bedspread will depend on the skills and practice of the craftsman. When creating a cover for upholstered furniture, the required number of elements are knitted and sewn together.
Chair cover with square motifs
This is a great way to use up leftover thread. There are motives:
- round;
- square;
- triangular;
- hexagonal and octagonal.
The square shape is considered the most favorite among knitters. Such motifs are simple to make, easy to stitch and help create a dense, continuous fabric without large holes. They are made in any color, often combined. An undoubted advantage of knitting with motifs is that the craftswoman does not have to hold the entire fabric in her hands (which becomes heavier over time). To knit a chair cover from squares, it is better to choose yarn of two or more colors. You can use leftovers, but the threads for tying fragments should be of the same type and shade.
Knitting is done according to a simple pattern:
- Close the chain of 12 VPs into a ring.
- Knit 1 ch for lifting, then 23 sc in the ring. Close the row SSt.
- Make 3 ch for lifting, 2 dc from the same loop, 1 ch, then 3 dc in the third sc in the second row, 5 ch, 3 dc in the third sc in the second row. Knit this sequence until the row is completed. Finish with an arch of 5 VPs and close the row of SS.
- Perform 3 VP for lifting, 2 Dc, 1 VP, 3 Dc in 3 Dc of the third row, 4 VP, 1 Dc in the middle of the arch from 5 VP of the third row, 4 VP, 3 Dc in 3 Dc of the third row. Knit this sequence until the row is completed. Finish with an arch of 4 VPs, close the row of SS.
- Make 3 VP for lifting, 2 Dc, 5 VP, 3 Dc in 3 Dc of the fourth row, 4 Ch, 3 RLS so that the middle one matches the RLS of the 4th row, 4 VP, 3 Dc in 3 Dc of the 4th row. Knit the sequence until the row is completed. Finish with an arch of 4 VPs, close the row of SS.
- Knit 3 VP for lifting, 2 DC, 1 VP, 3 DC in the arch, 3 VP, 3 DC in the same arch, 1 VP, 3 DC in 3 DC in the fifth row, 5 VP, 1 DC in the middle SC in the 5th row, 5 VP, 3 dc in 3 dc in row 5. Knit the sequence until the row is completed. Finish with an arch of 5 VPs, close the row of SS.
To calculate how many such squares need to be knitted, the length and width of the intended product are divided by the length of the side of the resulting motif. After a sufficient number of elements have been made, they are steamed and covered with a damp cloth, through which they are treated with steam using an iron. All squares must be the same so that the product does not bubble.
Related motifs are sewn together with a needle or hook, which should be smaller in diameter than the main one. You can connect the squares while creating the last row. The edges are tied around the perimeter to visually combine the motifs into one composition. A beautiful crocheted chair cover is ready. It can decorate an armchair, a chair, or a stool.
Scheme
We collect a chain of air loops and close it into a ring
We knit single crochets and close the row with connecting stitches
For the second row, tie a thread of a different color and knit according to the pattern
Add a thread of a different color to the next row and knit with double crochets
Add air loops to the last row and close with a connecting loop
Ready-made square motif
Using the same pattern, we make many square motifs.
Sew the squares together
The chair cover with square motifs is ready
Scope of application
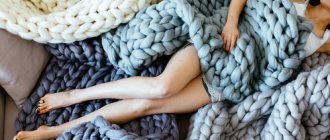
Knitted products create a unique comfort and warm atmosphere in the home. Blankets are used not only to protect your furniture from external factors, they can be used for any purpose.
NOTE!
- Knit a tunic - simple patterns and recommendations for choosing models for children and adults (130 photos)
- Knitted overalls for newborns - knitting pattern and description of sewing the best modern models (105 photos)
Jacquard knitting patterns: knitting patterns and tips for choosing the best patterns for beginners and professionals (115 photos)
If you decide to do handicrafts, you can create products not only for the sofa, but also for the bed, armchair, knit a tablecloth or even curtains for the room.
Knitted interior items are currently gaining particular popularity. After all, with their help you can decorate not only any room, but also just read a book, covered with a warm blanket.
DIY sofa armrest stand
An overhead stand for the armrest of a sofa is an excellent solution if you are going to sit on the sofa and want to have a laptop, tablet, phone, TV remote control, book, glasses and a glass of water next to you.
We offer a master class on how to make a comfortable wooden stand that is attached to the armrest of the sofa. Its stylish design will complement the interior, and its functionality will make sitting on the sofa even more enjoyable.
Necessary materials:
The amount of materials and the final size of the stand depends on the width of the armrests on your sofa. Take measurements of the armrests and make the stand in the manner described below, but adjusting the dimensions to suit your specific case.
- Wooden board measuring 80 cm x 50 cm with a thickness of 1.8 cm
- Screws measuring 4 mm x 35 mm (you can use others you have at home)
- Sandpaper (we used 240 grit here)
- Corner brackets (here measuring 40mm x 40mm x 17mm)
- Wood putty
- Wood glue
- Brushes (here there is one 50mm wide and one 25mm wide for finer areas)
- Wood paint (white here)
- Cork fabric size 45 cm x 30 cm
- Aerosol glue
- Decorative nails for furniture
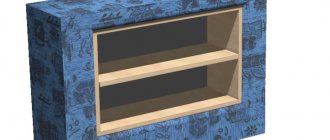
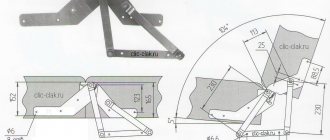
Before implementing the project, make a small sketch to find out how many individual pieces of boards will be needed for production. THE DIAGRAM shows how the stand should look when finished. After this, you can go to a hardware store for materials and immediately cut the boards to the desired size.
Scheme of the design of the armrest stand
The dimensions may vary for each sofa, but in any case you will need the following boards:
- a) a board corresponding to the width of the sofa armrest;
- b) a board corresponding to the height of the armrest (inward);
- c) a board defining the size (height) of the additional compartment; For example, in this case the size was calculated for a laptop: the width of the laptop plus 5 cm.
- d) a board that determines the width of the compartment and is its lower part;
- e) a board that limits the separation on the second side.
Step 1: Connecting parts a + b
Using wood glue, we connect parts a and b together, following the diagram below. After the glue has dried, additionally secure the boards together with screws for a more durable fastening.
Note: Alternatively, if you want to leave the outside of the stand intact, secure the boards together from the inside with corner brackets and screws.
Step 2: Connecting parts c + d + e
Similar to the previous step, we connect parts c, d and e with glue, and then with screws, following the diagram given.
Step 3: Connecting all the parts together
Now you need to connect the parts assembled in the previous two steps. For this we also use glue and screws from the outside or corner brackets from the inside.
Note: You can also optionally add a board to cover the compartment at the front, that is, attach it to boards c, d and e.
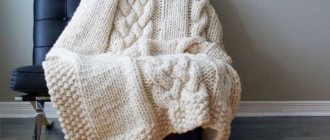
Photo tips on how to knit a blanket
NOTE!
How to knit a rug - detailed instructions and diagrams on how to properly knit a neat, beautiful rug- Knit a men's sweater: step-by-step instructions on how to quickly and easily knit a sweater with your own hands (80 photos)
How to knit socks - step-by-step description and recommendations on how to knit warm socks correctly and quickly (85 photos)