Neatness in Swedish
The living space in our country does not allow having dressing rooms for storing things and clothes. Individual closets in the house are sometimes so filled that it is difficult to get around and immediately find what you need.
IKEA designers have been improving storage systems for personal items over the years.
In the store you can choose the most suitable option for your home, as well as get full consultation from department specialists about the purpose of a particular product and even make an instant design decision.
Using the Scheduler
Since there are a large number of different options for organizing wardrobe systems from Ikea, specialists created a special planner. Using this program, you can create your own layout project and arrange the modules according to your personal wishes.
Using such software is not difficult. You just have to do the following:
- Go to the company website and open the scheduler.
- Choose a design and indicate the dimensions of your room and the dimensions of the modules.
- Supplement your wardrobe with auxiliary elements.
Any version of the system can then be printed and used when arranging a room.
A planner makes it much easier to arrange a room
Storage chests
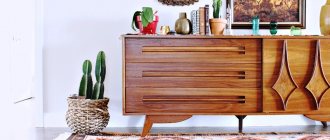
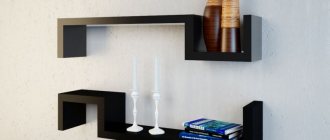
An interesting solution in any interior would be a chest of drawers. A functional product, convenient for relaxing and storing a large volume of various things. In the drawers located below you can store bed linen, blankets, rugs or large items that are not often used in everyday life.
If you place the chest of drawers in the nursery, you can use drawers to store toys, because children always have so many of them. Models of chests of drawers called BRIMNES and HEMNES are on sale.
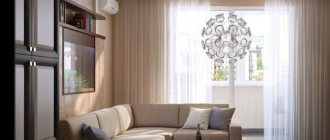
Another interesting solution is to use a chest of drawers with storage drawers near the window. Of course, we will have to dismantle the window sill, but the resulting result will bring a lot of pleasure and create all the conditions for productive relaxation. All we have to do is choose a comfortable mattress, a couple of pillows, a warm blanket (all can be purchased in the same store) and an interesting book.
- IKEA chests of drawers: 195 photos and videos of the main models and rules for their use in interior design
- IKEA tables: 155 photos and videos describing the use of the table in interior design
IKEA mattresses: 170 photos of current models from the manufacturer and tips for choosing a mattress
The free space under the bed or other furniture in the room can also be used by using storage boxes from the IKEA catalog. You can store seasonal shoes or some important but rarely used household items there.
You can choose a storage box of any color or size that will fit discreetly into the space of the room and will not damage the existing interior.
An original solution for storing things would be a wicker basket, which comes in different sizes and is suitable for home or office.
What difficulties can you encounter during the assembly process?
Let's consider the main problems that arise when assembling a wardrobe - structures that are available in various wardrobe systems from Ikea and not only.
Table 1. Problems when assembling the cabinet
| Problem | Causes |
| Doors are difficult to move along the guide | 1. The doors may have been mixed up. Therefore, you need to remove them and check the markings. 2. When installing the rollers, the screws were not tightened properly. 3. The roller has moved from the guide. It is necessary to check its position and correct it. 4. An object has fallen between the doors. |
| The closet door is knocking | 1. The roller has chipped. It may need to be replaced. 2. The guide is clogged with dust. You'll have to take it apart and clean it. |
| Drawers hit doors when opening | 1. First of all, you need to install the base of the cabinet level. 2. Then you should adjust the position of the doors. |
| The back wall is falling off | In most wardrobe systems from Ikea, the back wall must be fixed to the wall - this will make the structure more durable. In addition, this will ensure smooth door movement. If you are not going to fix it to the wall, then instead of nails when assembling the cabinet, it is better to use self-tapping screws. |
Wardrobe Ikea
IKEA for kitchen and bathroom
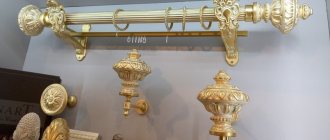
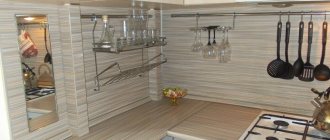
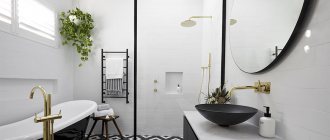
Order in the kitchen and bathroom is an indicator of a good housewife and a caring wife. It's always nice to look at everyday items in their place. A laconic model of a kitchen rack will allow you to correctly place dishes that are often used in everyday life.
The use of decorative glasses and hooks in the interior is varied. Cutlery, stationery, decorative cosmetics are stored in glasses or used as flower pots.
Hooks are conveniently placed in the right place and used to store jewelry, as well as towels or home textiles.
To store bulk products or spices, the company has created a variety of plastic containers of the height, width or length you need. They can be purchased separately or as a set with a lid.
The products are available in different prices, quality and colors. With careful handling, the container will last a long time.
A more expensive, but no less practical solution for storing bulk products is glass jars with a metal lid, or magnetic jars.
Both of them can be easily mounted on a magnetic board, which will save space and create original solutions in the interior.
The variety and brightness of colors will enhance your mood and level of creativity. In such containers you can always see what products need to be purchased.
Magnetic strips are an excellent solution for storing knives and other metal kitchen utensils.
If you decide to tackle the issue of optimizing space in your home or office, then be sure to check out IKEA stores. Everything that is planned or is in the process of being solved can be implemented in an original interior.
Proper organization of space with ready-made models or small additions to products attracts more and more grateful customers. Photos of storage boxes, boxes, baskets, various small items or ready-made IKEA designer cabinets can always be viewed on the website or any store of the company.
The main thing is that you don’t need to look for anything additional; everything you need to furnish your home is in one place. The quality of the products has been consistently high over the years, and the price is generally acceptable to the buyer. It is very easy to transform your home and put it in good order with the products of the world famous company IKEA.
Assembling a wardrobe system: step-by-step instructions
Today we will look at a detailed version of assembling the Pax wardrobe. In addition to cabinet parts, this kit includes additional elements for installation.
Step one: you need to open the packaging and conveniently place all the elements on the floor. The width of the finished frames will be 100 centimeters and 70 centimeters. In the assembly process itself, we will not need anything other than one screwdriver and a hammer and a hammer drill.
In this case, we will place two parts of the modules side by side - here you can see the presence of all the necessary holes for fasteners
Step two: First you need to install the wall brackets on both sides.
Installed corners for the wall
Step three : next, according to the instructions, we need to secure the holders for the upper crossbars. In total, these screws are screwed in three places. The same steps should be repeated in the second half.
Screw in the crossbar screws
Step four: Next, you need to hammer wooden pins into the upper and lower crossbars on all sides. Here we need a hammer.
Hammering the pins
Step five: Now you need to attach threaded washers to the bottom of the wardrobe (as shown in the image). They are needed in order to then screw the legs with stops into them.
Screw in the washers
Leg
From the inside of the wardrobe, you can adjust the optimal height of the legs using a Phillips screwdriver.
This is what the assembled leg with a plastic stop looks like
Step six: at the bottom of the cabinet we tighten the metal pins on which we will have to put the crossbar. They should not be secured from the extreme part, but by retreating some distance in order to place other perpendicular crossbars.
It is necessary to insert the lower crossbar into the metal pins
The sides with the cutouts should be aligned. The longitudinal part will be fixed to the wall
Step seven: when we put the bottom shelf on the metal pins, here you will notice a hole for a special nut that needs to be tightened. Using the same principle, it is necessary to secure the second shelf. It is also pre-attached to metal fasteners.
The nuts will need to be tightened using a screwdriver in three places
Step eight: when the top shelf is secured, it will be necessary to install stiffening ribs at the bottom.
They are a type of planks into which wooden pins are also installed - they should be securely fixed to the bottom.
Stiffening rib
At this stage, most of our cabinet is ready, you just need to secure the part on top.
In order to connect the remaining parts into the grooves, it is better to involve another person to help. After all, this is quite a responsible process.
This is what the finished cabinet base will look like
Step Nine: Now we need to attach the back wall to the cabinet. It is attached with nails.
It should be placed in this groove and then nailed evenly
This is what the fixed wall will look like
Now you need to put the cabinet straight.
Using the same principle, we assemble another meter-long cabinet with a height of 70 centimeters
Step ten: the next step is to connect all these cabinets into a single system using prepared holes.
You will need to attach the cabinets to each other using the fasteners that come with the kit.
To do this, you will need to first align them exactly to the level, and only then secure all the screws and nuts. It is advisable to double-check the correct location of the cabinets several times.
Then, through the holes in the furniture corners, each module of the system must be secured to the wall. You should also make holes in the wall itself using a hammer drill into which dowels will be inserted. As a result, two dowels were used for each such cabinet.
Fastening furniture corners
Step Eleven: Before installing the cabinet doors, you will need to secure the runners at the top and bottom. These doors will move on them.
This is what the top bar looks like
Bottom bar
This is done quite simply. So, first, using two self-tapping screws, screw the top bar according to the instructions, install plugs so that it does not move back and forth. Then we screw the plastic holders on top.
Plastic holder
The lower bar is even easier to install. It will have to be secured with 8 screws.
Step twelve: the next step is to assemble the doors.
First you need to screw the corner and crossbar
Prices for cordless screwdrivers
Cordless screwdriver
After the main crossbar is installed, we need to secure the middle crossbars with screws.
The crossbars will connect the mirror and the wooden panel
Step Thirteen: Once these plates are installed, we will move on to the step of joining the mirror to the wood panel. This is the most difficult process of all stages of structural assembly. The canvases must be alternated with each other.
On top we install a wooden panel in special grooves. In this case, all seats must be sealed with a rubber seal.
Rubber compressor
Then a jumper is installed and only then can glass be installed up to the next jumper.
Step fourteen: all that remains is to put on the other side of the fastener, and our door will be ready.
Door assembled
Once assembly is complete, you can tighten all the screws again for greater reliability. Otherwise, they may unwind during operation.
It should be remembered that the door marked “A” is installed on the right side. The only difference is that it is a little thinner because it slides behind the other. Therefore, during assembly this feature will also have to be taken into account.
The door marked “A” is installed on the right side
Then you have to hang the wheels on the door and install them in the wardrobe system. The mechanism should open and close smoothly.
Photos of IKEA storage boxes
Please repost